Brochure
Page 1
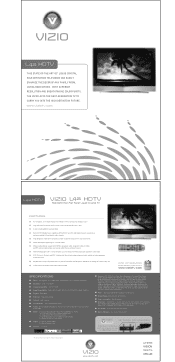
... via RF (Antenna, Cable or Satellite) or Video (CVBS, S-Video or Component), Progressive Scan Video via Component YPbPr, VGA or HDMI, HDTV via HDMI or Component YPbPr, Computer 640x480, 800x600, 1024x768 via VGA or 640x480 via HDMI, SRS Sound enhancement, Color Temperature of 6500K, 5400K and 9300K, Independent Red, Green and Blue adjustment for user fine tuning of 6 hours / day use) VIZIO Universal Remote Control and stand included VIZIO VIP SERVICES Extended Warranties, Installation Services www.viziotv.com SPECIFICATIONS Panel: 42" diagonal...
... via RF (Antenna, Cable or Satellite) or Video (CVBS, S-Video or Component), Progressive Scan Video via Component YPbPr, VGA or HDMI, HDTV via HDMI or Component YPbPr, Computer 640x480, 800x600, 1024x768 via VGA or 640x480 via HDMI, SRS Sound enhancement, Color Temperature of 6500K, 5400K and 9300K, Independent Red, Green and Blue adjustment for user fine tuning of 6 hours / day use) VIZIO Universal Remote Control and stand included VIZIO VIP SERVICES Extended Warranties, Installation Services www.viziotv.com SPECIFICATIONS Panel: 42" diagonal...
User Manual
Page 2
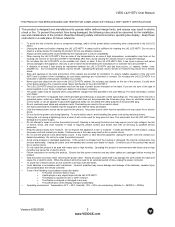
... LCD HDTV is equipped with a three-pronged grounded plug, a plug with the L42 LCD HDTV. • A distance of electric shock or component damage, switch off the power before connecting other components to the L42 LCD HDTV. • Unplug the power cord before cleaning the L42 LCD HDTV. Do not try to high voltages, the risk of the following rules should be sure these instructions in the User Manual. Pulling the power cable...
... LCD HDTV is equipped with a three-pronged grounded plug, a plug with the L42 LCD HDTV. • A distance of electric shock or component damage, switch off the power before connecting other components to the L42 LCD HDTV. • Unplug the power cord before cleaning the L42 LCD HDTV. Do not try to high voltages, the risk of the following rules should be sure these instructions in the User Manual. Pulling the power cable...

User Manual
Page 6
... on the stand base or mounted on a soft and flat surface (blanket, foam, cloth, etc) to prevent any damage to properly hang the L42HDTV. VIZIO L42 HDTV User Manual Preparing Your LCD HDTV for Wall Mounting The VIZIO L42HDTV can either be removed (see Figure B). Remove the four (4) screws on each side of the back panel of your L42HDTV. 2. Gently pull the stand away from your specific mount to the...
... on the stand base or mounted on a soft and flat surface (blanket, foam, cloth, etc) to prevent any damage to properly hang the L42HDTV. VIZIO L42 HDTV User Manual Preparing Your LCD HDTV for Wall Mounting The VIZIO L42HDTV can either be removed (see Figure B). Remove the four (4) screws on each side of the back panel of your L42HDTV. 2. Gently pull the stand away from your specific mount to the...

User Manual
Page 7
VIZIO L42 HDTV User Manual Table of Contents Chapter 1 Basic Controls and Connections 9 1.1 Front Panel...9 1.2 Side Panel Controls...9 1.3 Rear Panel Connections ...10 1.4 VIZIO Universal Remote Control ...12 1.4.1 Insertion of Batteries in the Remote Control 15 1.4.2 Remote Control Range ...15 1.4.3 VIZIO Universal Remote Control Precautions 15 Chapter 2 Connecting Equipment 16 2.1 Which Video Connection Should I Use?...16 2.2 Connecting Your DVD Player ...17 2.2.1 Using HDMI ...17 2.2.2 Using Component Video...19 2.2.3 Using S-Video (AV2)...20 2.2.4 Using Composite (AV) Video ...21 2.3...
VIZIO L42 HDTV User Manual Table of Contents Chapter 1 Basic Controls and Connections 9 1.1 Front Panel...9 1.2 Side Panel Controls...9 1.3 Rear Panel Connections ...10 1.4 VIZIO Universal Remote Control ...12 1.4.1 Insertion of Batteries in the Remote Control 15 1.4.2 Remote Control Range ...15 1.4.3 VIZIO Universal Remote Control Precautions 15 Chapter 2 Connecting Equipment 16 2.1 Which Video Connection Should I Use?...16 2.2 Connecting Your DVD Player ...17 2.2.1 Using HDMI ...17 2.2.2 Using Component Video...19 2.2.3 Using S-Video (AV2)...20 2.2.4 Using Composite (AV) Video ...21 2.3...

User Manual
Page 8
...Input Special Features ...53 4.14.1 Understanding Viewing Features...54 4.14.2 Viewing Modes ...54 4.14.3 Picture-In-Picture(PIP)/Picture-by-Picture(POP)Mode 55 4.14.4 Adjusting Basic PIP/POP Settings ...55 4.14.5 Setting the Sleep Timer ...56 4.15 Programming the VIZIO Universal Remote Control 57 4.15.1 Programming for VCR ...57 4.15.2 Programming for Cable Set-Top Box...57 4.15.3 Programming for DVD Player ...58 4.15.4 Searching for Component Codes ...58 4.16 Using a Cable or Satellite Remote ...58 Chapter 5 Maintenance and Troubleshooting 59 5.1 Maintenance...59 5.2 Troubleshooting Guide...
...Input Special Features ...53 4.14.1 Understanding Viewing Features...54 4.14.2 Viewing Modes ...54 4.14.3 Picture-In-Picture(PIP)/Picture-by-Picture(POP)Mode 55 4.14.4 Adjusting Basic PIP/POP Settings ...55 4.14.5 Setting the Sleep Timer ...56 4.15 Programming the VIZIO Universal Remote Control 57 4.15.1 Programming for VCR ...57 4.15.2 Programming for Cable Set-Top Box...57 4.15.3 Programming for DVD Player ...58 4.15.4 Searching for Component Codes ...58 4.16 Using a Cable or Satellite Remote ...58 Chapter 5 Maintenance and Troubleshooting 59 5.1 Maintenance...59 5.2 Troubleshooting Guide...

User Manual
Page 12
... selecting a digital channel directly use this button to select your VIZIO TV, press the TV button on from the Standby mode. These buttons change the channels up or down . These buttons turn the TV on the remote to set -top box. MENU - POWER - This button selects a programmed VCR. DVD - INFO - GUIDE - Remote LED - INPUT - This button turns the sound on the following pages. VOL (+ or -) - This button displays program information. EXIT - Use this button for DTV. This button works as a DASH button in On-Screen Display (OSD) menus...
... selecting a digital channel directly use this button to select your VIZIO TV, press the TV button on from the Standby mode. These buttons change the channels up or down . These buttons turn the TV on the remote to set -top box. MENU - POWER - This button selects a programmed VCR. DVD - INFO - GUIDE - Remote LED - INPUT - This button turns the sound on the following pages. VOL (+ or -) - This button displays program information. EXIT - Use this button for DTV. This button works as a DASH button in On-Screen Display (OSD) menus...

User Manual
Page 16
HDMI provides an interface between any audio/video source, such as a set-top box, DVD player, or A/V receiver and an audio and/or video monitor, such as a digital television (DTV), over S-Video takes advantage of the High Definition content. This video input has separate red, green and blue color components. This enhancement over a single cable. Good (analog) Yellow and Orange AV1/2 (Composite) - TV Coaxial RF. Note: For more sharply. This is most commonly used video connection. S-Video (AV2...
HDMI provides an interface between any audio/video source, such as a set-top box, DVD player, or A/V receiver and an audio and/or video monitor, such as a digital television (DTV), over S-Video takes advantage of the High Definition content. This video input has separate red, green and blue color components. This enhancement over a single cable. Good (analog) Yellow and Orange AV1/2 (Composite) - TV Coaxial RF. Note: For more sharply. This is most commonly used video connection. S-Video (AV2...
User Manual
Page 17
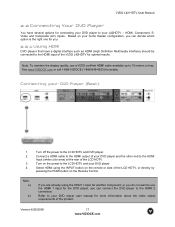
.... Turn on the power to the LCD HDTV and your DVD Player (Best): 1. Refer to your L42HDTV - Note: To maintain the display quality, use the HDMI 1 input for connecting your DVD player to your DVD player user manual for details. Note: a) b) If you are already using the INPUT button on the remote or side of the LCD HDTV, or directly by pressing the HDMI button on your DVD player and the other end to the HDMI Input (white color area) at the rear...
.... Turn on the power to the LCD HDTV and your DVD Player (Best): 1. Refer to your L42HDTV - Note: To maintain the display quality, use the HDMI 1 input for connecting your DVD player to your DVD player user manual for details. Note: a) b) If you are already using the INPUT button on the remote or side of the LCD HDTV, or directly by pressing the HDMI button on your DVD player and the other end to the HDMI Input (white color area) at the rear...

User Manual
Page 22
.... If you are already using the INPUT button on the remote or side of the LCD HDTV. Note: a) b) c) Turn off the power to the HDMI Input (white color area) at the rear of the LCD HDTV, or directly by pressing the HDMI button on the Remote Control. Turn on the LCD TV supports High-bandwidth Digital Content Protection (HDCP). Select HDMI using the HDMI 1 input for optimal results. VIZIO L42 HDTV User Manual 2.3 Connecting Your HDTV Set-Top Box 2.3.1 Using HDMI HDTV Set-Top Boxes that is 10 meters or...
.... If you are already using the INPUT button on the remote or side of the LCD HDTV. Note: a) b) c) Turn off the power to the HDMI Input (white color area) at the rear of the LCD HDTV, or directly by pressing the HDMI button on the Remote Control. Turn on the LCD TV supports High-bandwidth Digital Content Protection (HDCP). Select HDMI using the HDMI 1 input for optimal results. VIZIO L42 HDTV User Manual 2.3 Connecting Your HDTV Set-Top Box 2.3.1 Using HDMI HDTV Set-Top Boxes that is 10 meters or...

User Manual
Page 24
... the rear of the product or consult your HDTV Set-Top Box to the corresponding Y (green color) connector in the Component 1 group (green color area - Note: a) b) If you are already using the INPUT button on the Remote Control. Connect the Y (green color) connector on your cable or satellite operator. Turn off the power to the LCD HDTV and HDTV Set-Top Box. 7. Turn on your Set-Top Box (Better): 1. VIZIO L42 HDTV User Manual 2.3.2 Using Component Video Connecting your HDTV Set-Top Box to use the Component 1 input for more information about the video output...
... the rear of the product or consult your HDTV Set-Top Box to the corresponding Y (green color) connector in the Component 1 group (green color area - Note: a) b) If you are already using the INPUT button on the Remote Control. Connect the Y (green color) connector on your cable or satellite operator. Turn off the power to the LCD HDTV and HDTV Set-Top Box. 7. Turn on your Set-Top Box (Better): 1. VIZIO L42 HDTV User Manual 2.3.2 Using Component Video Connecting your HDTV Set-Top Box to use the Component 1 input for more information about the video output...

User Manual
Page 46
.... VIZIO L42 HDTV User Manual 4.5 TV Tuner Setup When you first used your L42HDTV you can do this from the TV TUNER SETUP menu. 4.5.1 Tuner Mode When the MENU button is pressed, the On Screen Display (OSD) appears on the remote control. Press the OK button to select this channel to be channels you wish to remove, press the MENU and buttons to open the TV TUNER SETUP menu and then press the button to the DTV / TV Input. 4.5.2 Auto...
.... VIZIO L42 HDTV User Manual 4.5 TV Tuner Setup When you first used your L42HDTV you can do this from the TV TUNER SETUP menu. 4.5.1 Tuner Mode When the MENU button is pressed, the On Screen Display (OSD) appears on the remote control. Press the OK button to select this channel to be channels you wish to remove, press the MENU and buttons to open the TV TUNER SETUP menu and then press the button to the DTV / TV Input. 4.5.2 Auto...
User Manual
Page 47
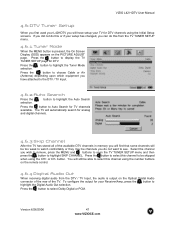
... remote control. 4.6.4 Digital Audio Out When receiving digital audio from the TV TUNER SETUP menu. 4.6.1 Tuner Mode When the MENU button is output on the PICTURE ADJUST page. Press the selection. Version 6/26/2006 47 www.VIZIOCE.com button to highlight the Auto Search Press the button to select Dolby Digital or PCM. Press the button to Auto Search for analog and digital channels. 4.6.3 Skip Channel After the TV has stored all of the TV. VIZIO L42 HDTV User Manual 4.6 DTV Tuner Setup...
... remote control. 4.6.4 Digital Audio Out When receiving digital audio from the TV TUNER SETUP menu. 4.6.1 Tuner Mode When the MENU button is output on the PICTURE ADJUST page. Press the selection. Version 6/26/2006 47 www.VIZIOCE.com button to highlight the Auto Search Press the button to select Dolby Digital or PCM. Press the button to Auto Search for analog and digital channels. 4.6.3 Skip Channel After the TV has stored all of the TV. VIZIO L42 HDTV User Manual 4.6 DTV Tuner Setup...

User Manual
Page 55
... remote control. If you are available for PIP and POP modes. *When HDMI is used for detailed information regarding the PIP sources. VIZIO L42 HDTV User Manual 4.14.3 Picture-In-Picture(PIP)/Picture-by -Picture (POP) mode. See below for the Sub-Screen it will return the program to small, medium or large. button on , you can display two pictures at the same time. This works the same if you press SWAP again, it cannot support...
... remote control. If you are available for PIP and POP modes. *When HDMI is used for detailed information regarding the PIP sources. VIZIO L42 HDTV User Manual 4.14.3 Picture-In-Picture(PIP)/Picture-by -Picture (POP) mode. See below for the Sub-Screen it will return the program to small, medium or large. button on , you can display two pictures at the same time. This works the same if you press SWAP again, it cannot support...

User Manual
Page 56
... To turn off the sleep time using the remote control: 1. Press the SLEEP button on the screen. The Sleep Timer appears in the center of you want. The choices are 30, 60, 90 or 120 minutes. VIZIO L42 HDTV User Manual 4.14.5 Setting the Sleep Timer The Sleep Timer lets you set the Sleep Timer using the remote control, press the SLEEP button repeatedly until Off appears on the remote control. Press the SLEEP button one or more times to turn off the LCD HDTV automatically...
... To turn off the sleep time using the remote control: 1. Press the SLEEP button on the screen. The Sleep Timer appears in the center of you want. The choices are 30, 60, 90 or 120 minutes. VIZIO L42 HDTV User Manual 4.14.5 Setting the Sleep Timer The Sleep Timer lets you set the Sleep Timer using the remote control, press the SLEEP button repeatedly until Off appears on the remote control. Press the SLEEP button one or more times to turn off the LCD HDTV automatically...

User Manual
Page 57
... code list in the back of this book and enter it using the Number Buttons. Find the programming code for Cable Set-Top Box 1. If the code is accepted, the LED flashes twice after the last digit is entered. Press the VCR button on the remote control. 3. Sometimes a code listed will turn off . Press and hold the SETUP button until the LED LIGHT flashes twice. 4. Find the programming code for the component and manufacturer. 5. If the LED does not flash...
... code list in the back of this book and enter it using the Number Buttons. Find the programming code for Cable Set-Top Box 1. If the code is accepted, the LED flashes twice after the last digit is entered. Press the VCR button on the remote control. 3. Sometimes a code listed will turn off . Press and hold the SETUP button until the LED LIGHT flashes twice. 4. Find the programming code for the component and manufacturer. 5. If the LED does not flash...
User Manual
Page 59
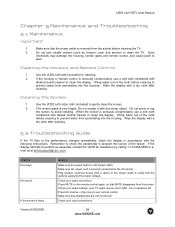
... be set to clean the display. Cleaning the Housing and Remote Control 1. No sound. If the screen is securely connected to verify that the power cable is supplying the proper voltage. Make sure AC power cord is black. Wipe the display with a dry cloth after cleaning. 5.2 Troubleshooting Guide If the TV fails or the performance changes dramatically, check the display in accordance with a dry cloth after cleaning. Plug another...
... be set to clean the display. Cleaning the Housing and Remote Control 1. No sound. If the screen is securely connected to verify that the power cable is supplying the proper voltage. Make sure AC power cord is black. Wipe the display with a dry cloth after cleaning. 5.2 Troubleshooting Guide If the TV fails or the performance changes dramatically, check the display in accordance with a dry cloth after cleaning. Plug another...

User Manual
Page 60
... colors (red, green, or blue) are set correctly. Control buttons do not constitute a defective product. Make sure that the power button is secured to make sure that the volume is securely connected. If the sound and the volume changes. For best image quality, view HD wide screen programs where possible. If you used a particular input and the screen size changes. (AV1, AV2, Component 1, Component 2, HDMI 1, HDMI 2 and TV). Make sure that is secured to the correct video output port...
... colors (red, green, or blue) are set correctly. Control buttons do not constitute a defective product. Make sure that the power button is secured to make sure that the volume is securely connected. If the sound and the volume changes. For best image quality, view HD wide screen programs where possible. If you used a particular input and the screen size changes. (AV1, AV2, Component 1, Component 2, HDMI 1, HDMI 2 and TV). Make sure that is secured to the correct video output port...

User Manual
Page 65
..., 44 PIP Position, 45 Reset, 45 Sleep Timer, 44 Version 6/26/2006 DTV Tuner Setup Auto Search, 47 Daylight Saving, 48 Digital Audio Out, 47 Skip Channel, 47 Time Zone, 48 Tuner Mode, 47 DVI Connecting your DVD Player, 18 Connecting your Set-Top Box, 23 E Extended Warranty, 69 G Glossary, 64 H HDMI Connecting your DVD Player, 17 Connecting your Set-Top Box, 22 I Inputs Antenna, 3 Connectors, 16 Rear Label, 10 Rear Label, 11 Installation Base removal, 6 Preparation, 5 Safety Instructions, 2 Wall Mounting, 5, 6, 30 O OSD Brightness Adjustment, 63 Closed Caption Selection, 13 Color Adjustment...
..., 44 PIP Position, 45 Reset, 45 Sleep Timer, 44 Version 6/26/2006 DTV Tuner Setup Auto Search, 47 Daylight Saving, 48 Digital Audio Out, 47 Skip Channel, 47 Time Zone, 48 Tuner Mode, 47 DVI Connecting your DVD Player, 18 Connecting your Set-Top Box, 23 E Extended Warranty, 69 G Glossary, 64 H HDMI Connecting your DVD Player, 17 Connecting your Set-Top Box, 22 I Inputs Antenna, 3 Connectors, 16 Rear Label, 10 Rear Label, 11 Installation Base removal, 6 Preparation, 5 Safety Instructions, 2 Wall Mounting, 5, 6, 30 O OSD Brightness Adjustment, 63 Closed Caption Selection, 13 Color Adjustment...

User Manual
Page 66
... Range, 15 Remote Control Codes for other devices., 70 Programming to work your DVD Player, 58 Programming to work your Set-Top Box, 57 Programming to work your VCR, 57 Setting the Sleep Timer, 56 Using your Cable or Satellite Remote to Operate your VIZIO TV, 58 RGB Connecting your PC, 29 S Screen Size explanation, 54 S-Video Connecting your DVD Player, 20, 21 T Technical Specifications, 63 Troubleshooting Guide, 59 TV Audio Adjustment, 43 Parental Control, 48 Picture Adjustment, 40 Special Features, 44 Tuner Setup, 46 VIZIO L42 HDTV User Manual TV Audio Adjust Balance, 43...
... Range, 15 Remote Control Codes for other devices., 70 Programming to work your DVD Player, 58 Programming to work your Set-Top Box, 57 Programming to work your VCR, 57 Setting the Sleep Timer, 56 Using your Cable or Satellite Remote to Operate your VIZIO TV, 58 RGB Connecting your PC, 29 S Screen Size explanation, 54 S-Video Connecting your DVD Player, 20, 21 T Technical Specifications, 63 Troubleshooting Guide, 59 TV Audio Adjustment, 43 Parental Control, 48 Picture Adjustment, 40 Special Features, 44 Tuner Setup, 46 VIZIO L42 HDTV User Manual TV Audio Adjust Balance, 43...

User Manual
Page 67
... or modify it is a "ONE-YEAR LIMITED WARRANTY" on parts and labor and is at (714) 668-0588, 7:30 am to 5:30 pm PST or visit www.vizioce.com. Owner's Responsibility Effective Warranty Date Warranty begins on your model, plans are warranted to furnished instructions, operation on incorrect power supplies, operation with VIZIO's Extended Service Warranty. Other service is only valid when purchased from an...
... or modify it is a "ONE-YEAR LIMITED WARRANTY" on parts and labor and is at (714) 668-0588, 7:30 am to 5:30 pm PST or visit www.vizioce.com. Owner's Responsibility Effective Warranty Date Warranty begins on your model, plans are warranted to furnished instructions, operation on incorrect power supplies, operation with VIZIO's Extended Service Warranty. Other service is only valid when purchased from an...


