
User Manual English
Page 3
...recommended by qualified service personnel only. Continuous use in an area with heavy accustomed to the sound level, which can damage the remote control or injure the operator. Incorrect polarities may function abnormally. The power cord fails or frays. - A television set may... cupboards or bookcases) without any of the display. un-isolated, dangerous voltage within an equilateral your Display. • Store the accessories (remote, batteries, etc.) in a location safely triangle is dropped or damaged in the operating instructions unless you to high voltages, electric shock,...
...recommended by qualified service personnel only. Continuous use in an area with heavy accustomed to the sound level, which can damage the remote control or injure the operator. Incorrect polarities may function abnormally. The power cord fails or frays. - A television set may... cupboards or bookcases) without any of the display. un-isolated, dangerous voltage within an equilateral your Display. • Store the accessories (remote, batteries, etc.) in a location safely triangle is dropped or damaged in the operating instructions unless you to high voltages, electric shock,...

User Manual English
Page 6
To keep the power indicator on as long as the Display is on , then goes out after several seconds. Getting to Know Your Display 1 REMOTE SENSOR & POWER INDICATOR When using the remote, aim it directly at this sensor. FRONT PANEL 6 The power indicator flashes on when the Display turns on , see Turning the Power Indicator On or Off.
To keep the power indicator on as long as the Display is on , then goes out after several seconds. Getting to Know Your Display 1 REMOTE SENSOR & POWER INDICATOR When using the remote, aim it directly at this sensor. FRONT PANEL 6 The power indicator flashes on when the Display turns on , see Turning the Power Indicator On or Off.

User Manual English
Page 9
...Last - Not supported on or Off. 2. It may cause choking and/or lead to the previous on the back of the remote. Do not dispose of the audio. 10. When needed, VIZIO recommends replacing the batteries that the (+) and (-) symbols on -screen menu. 4. Power - Turn TV on this... remote with two, new Duracell 'AAA' alkaline batteries. Navigate the on this model. 17 18 1 Replacing the Batteries 1. Display the info ...
...Last - Not supported on or Off. 2. It may cause choking and/or lead to the previous on the back of the remote. Do not dispose of the audio. 10. When needed, VIZIO recommends replacing the batteries that the (+) and (-) symbols on -screen menu. 4. Power - Turn TV on this... remote with two, new Duracell 'AAA' alkaline batteries. Navigate the on this model. 17 18 1 Replacing the Batteries 1. Display the info ...
User Manual English
Page 10
... Guide for illustrative purposes only and may vary, depending on the model. 2 10 Setup with the IR Remote: Use the included IR remote to manually set up your VIZIO display. Download the free VIZIO SmartCast™ App on to your new E-Series display. b. Press the OK/Play key on your... the Ethernet port on the screen to your device. You can chose how to setup your IR remote during the initial setup screen. 2. Please note that a mobile device (not included) is still VIZIO's recommended setup method. Select your Display name from the list shown on how to change. a....
... Guide for illustrative purposes only and may vary, depending on the model. 2 10 Setup with the IR Remote: Use the included IR remote to manually set up your VIZIO display. Download the free VIZIO SmartCast™ App on to your new E-Series display. b. Press the OK/Play key on your... the Ethernet port on the screen to your device. You can chose how to setup your IR remote during the initial setup screen. 2. Please note that a mobile device (not included) is still VIZIO's recommended setup method. Select your Display name from the list shown on how to change. a....

User Manual English
Page 11
...: • Adjust the Picture settings • Adjust the Audio settings Display Settings To open the on-screen menu, press the MENU button on the remote to highlight the input you can chanNogtee: Intphuets minaypvauryt bny Daismplaey.s that option. • Adjust the Network settings • Setting the Sleep Timers ... information. 11 To change the input source using the Input menu. Use the Left/Right Arrow buttons or the INPUT button on the remote. Using the On-Screen Menu Your Display features an easy-to-use one of these devices with your Display, you can be subject...
...: • Adjust the Picture settings • Adjust the Audio settings Display Settings To open the on-screen menu, press the MENU button on the remote to highlight the input you can chanNogtee: Intphuets minaypvauryt bny Daismplaey.s that option. • Adjust the Network settings • Setting the Sleep Timers ... information. 11 To change the input source using the Input menu. Use the Left/Right Arrow buttons or the INPUT button on the remote. Using the On-Screen Menu Your Display features an easy-to-use one of these devices with your Display, you can be subject...

User Manual English
Page 12
... the screen. Normal Panoramic Wide Zoom Note: Aspect ratio settings may appear distorted-figures appear short and fat. Some programs have black bars on the remote. 2. The center of the display image. • Zoom expands images evenly in five different modes: Normal, Stretch, Panoramic, Wide, and Zoom. Not available. • Wide...
... the screen. Normal Panoramic Wide Zoom Note: Aspect ratio settings may appear distorted-figures appear short and fat. Some programs have black bars on the remote. 2. The center of the display image. • Zoom expands images evenly in five different modes: Normal, Stretch, Panoramic, Wide, and Zoom. Not available. • Wide...
User Manual English
Page 13
... a dark room. This setting is too high or too low, detail may appear faded or washed out. • Contrast - The actual on the remote to highlight Picture Mode, then use the Left/Right Arrow buttons to affect the overall brilliance of the picture. Select Off, Low, Medium, or High... settings for displaying game console output. • Computer mode optimizes the picture settings for illustrative purposes only and may vary, depending on the remote to highlight that does not otherwise exist. 5. Adjusts the hue of color before adjusting tint. • Sharpness - The on the...
... a dark room. This setting is too high or too low, detail may appear faded or washed out. • Contrast - The actual on the remote to highlight Picture Mode, then use the Left/Right Arrow buttons to affect the overall brilliance of the picture. Select Off, Low, Medium, or High... settings for displaying game console output. • Computer mode optimizes the picture settings for illustrative purposes only and may vary, depending on the remote to highlight that does not otherwise exist. 5. Adjusts the hue of color before adjusting tint. • Sharpness - The on the...

User Manual English
Page 14
... average brightness of the picture to highlight a color temperature preset and then press OK. • Normal is reduced. ‡Only available on the remote. The adjustment is reduced. • Clear Action - Select Auto or Off. • Color Space‡ - From the PICTURE menu, use ...which suppresses motion judder, or "stuttering" of the picture. As the setting increases, motion blur is controlled by the content on the remote. Reduces blue in the image caused by adjusting the backlight. To adjust the color temperature: Back Color Temperature 1. Note: The images ...
... average brightness of the picture to highlight a color temperature preset and then press OK. • Normal is reduced. ‡Only available on the remote. The adjustment is reduced. • Clear Action - Select Auto or Off. • Color Space‡ - From the PICTURE menu, use ...which suppresses motion judder, or "stuttering" of the picture. As the setting increases, motion blur is controlled by the content on the remote. Reduces blue in the image caused by adjusting the backlight. To adjust the color temperature: Back Color Temperature 1. Note: The images ...

User Manual English
Page 15
...a custom picture mode. • Lock Picture Mode - Prevent changes to select On. 3. To save groups of picture settings. Use the Number Pad on your remote to enter a unique 4-digit PIN. 4. Use the Number Pad on your custom picture mode. 3. Note: The images shown here are for your...with a unique PIN to for the System PIN. Make any preset picture mode will add an asterisk on the model. 15 The actual on the remote. 4. Use the Arrow buttons to custom picture modes. The UNLOCKED PICTURE MODE menu is displayed. Relock the picture modes, if desired. 6. Press the...
...a custom picture mode. • Lock Picture Mode - Prevent changes to select On. 3. To save groups of picture settings. Use the Number Pad on your remote to enter a unique 4-digit PIN. 4. Use the Number Pad on your custom picture mode. 3. Note: The images shown here are for your...with a unique PIN to for the System PIN. Make any preset picture mode will add an asterisk on the model. 15 The actual on the remote. 4. Use the Arrow buttons to custom picture modes. The UNLOCKED PICTURE MODE menu is displayed. Relock the picture modes, if desired. 6. Press the...

User Manual English
Page 17
... for testing, and display color bar, flat, and ramp test patterns. The actual on-screen image and text may be turned off and on the remote to highlight Red, Green, or Blue. 3. Use the Arrow buttons to highlight another color channel to turn color channels off at the same time. ...5. Use the Arrow buttons on the remote to highlight the Gain and Color values you are finished, press the OK button to save the setting. 4. From the COLOR CALIBRATION menu, use the...
... for testing, and display color bar, flat, and ramp test patterns. The actual on-screen image and text may be turned off and on the remote to highlight Red, Green, or Blue. 3. Use the Arrow buttons to highlight another color channel to turn color channels off at the same time. ...5. Use the Arrow buttons on the remote to highlight the Gain and Color values you are finished, press the OK button to save the setting. 4. From the COLOR CALIBRATION menu, use the...

User Manual English
Page 18
...and may vary, depending on the model. 18 Note: The images shown here are finished, press the EXIT button. 2. The actual on the remote to highlight Off. Ramp Test Pattern Off 2. Use the Left/Right Arrow buttons to change. Use the Arrow buttons on -screen image and ... buttons to highlight Off. 3. Selecting a color immediately shows that brightness. -or- Use the Arrow buttons on the remote to highlight Off. 3. Use the Arrow buttons on the remote to highlight Off. When you are finished, press the EXIT button. SMPTE Test Pattern Flat Test Pattern Off Off To...
...and may vary, depending on the model. 18 Note: The images shown here are finished, press the EXIT button. 2. The actual on the remote to highlight Off. Ramp Test Pattern Off 2. Use the Left/Right Arrow buttons to change. Use the Arrow buttons on -screen image and ... buttons to highlight Off. 3. Selecting a color immediately shows that brightness. -or- Use the Arrow buttons on the remote to highlight Off. 3. Use the Arrow buttons on the remote to highlight Off. When you are finished, press the EXIT button. SMPTE Test Pattern Flat Test Pattern Off Off To...

User Manual English
Page 19
... the Left/ Right Arrow buttons to change. Uniformity Analyzer Test Pattern Off 2. When you are for illustrative purposes only and may vary, depending on the remote to show or hide the Uniformity Analyzer Test Pattern: 1. Use the Arrow buttons on the model. 3 19 The actual on-screen image and text may...
... the Left/ Right Arrow buttons to change. Uniformity Analyzer Test Pattern Off 2. When you are for illustrative purposes only and may vary, depending on the remote to show or hide the Uniformity Analyzer Test Pattern: 1. Use the Arrow buttons on the model. 3 19 The actual on-screen image and text may...

User Manual English
Page 20
... equalizer has several pre-set audio mode: 1. The Audio Mode and equalizer settings screen appears. 4. Press the MENU button on the remote. Use the Left and Right Arrow buttons to highlight Audio and Balance 0 press OK. Audio Speakers Volume Control Display Surround Sound Back ...Auto On Off 2. Use the Arrow buttons on the Volume Leveling Off remote to select any audio mode as a starting point. 5. To select a pre-set modes and allows you are set to highlight a frequency...
... equalizer has several pre-set audio mode: 1. The Audio Mode and equalizer settings screen appears. 4. Press the MENU button on the remote. Use the Left and Right Arrow buttons to highlight Audio and Balance 0 press OK. Audio Speakers Volume Control Display Surround Sound Back ...Auto On Off 2. Use the Arrow buttons on the Volume Leveling Off remote to select any audio mode as a starting point. 5. To select a pre-set modes and allows you are set to highlight a frequency...

User Manual English
Page 21
...5. To change . From the NETWORK menu, highlight Manual Setup and press OK. To change the settings manually, use the Arrow buttons on the remote to your wireless access point. The IP address assigned to adjust each setting: Wireless MAC 0:0:0:0:0:0 • IP Address - DNS Server - Your... preferred domain name server address. • Alt. Use the Arrow buttons on the remote to highlight DHCP and then use are for illustrative purposes only and may be subject to Off. From the NETWORK menu, highlight Manual Setup ...
...5. To change . From the NETWORK menu, highlight Manual Setup and press OK. To change the settings manually, use the Arrow buttons on the remote to your wireless access point. The IP address assigned to adjust each setting: Wireless MAC 0:0:0:0:0:0 • IP Address - DNS Server - Your... preferred domain name server address. • Alt. Use the Arrow buttons on the remote to highlight DHCP and then use are for illustrative purposes only and may be subject to Off. From the NETWORK menu, highlight Manual Setup ...

User Manual English
Page 22
... ACCESS POINT NAME screen is used to connect to a wireless network whose network name (SSID) is not being broadcast: 1. Press the EXIT button on the remote. From the NETWORK menu, highlight Hidden Network and press OK. The actual on the model. 3 22 Press the EXIT button on the...
... ACCESS POINT NAME screen is used to connect to a wireless network whose network name (SSID) is not being broadcast: 1. Press the EXIT button on the remote. From the NETWORK menu, highlight Hidden Network and press OK. The actual on the model. 3 22 Press the EXIT button on the...

User Manual English
Page 23
... is displayed. 2. SETTING TIMERS Setting the Sleep Timer When activated, the Display's sleep timer will turn off. Use the Left/Right Arrow buttons on the remote to sleep: 30, 60, 90, 120, or 180 minutes. Setting the Auto Power Off Feature To help save energy, your Display is displayed. When you... Display will turn the Display off after a set period of time after 10 minutes without a video or audio signal. Use the Arrow buttons on the remote. Otherwise, select 10 minutes. 3. From the TIMERS menu, use the Up/Down Arrow buttons on the model. 3 23 The actual on-screen image and ...
... is displayed. 2. SETTING TIMERS Setting the Sleep Timer When activated, the Display's sleep timer will turn off. Use the Left/Right Arrow buttons on the remote to sleep: 30, 60, 90, 120, or 180 minutes. Setting the Auto Power Off Feature To help save energy, your Display is displayed. When you... Display will turn the Display off after a set period of time after 10 minutes without a video or audio signal. Use the Arrow buttons on the remote. Otherwise, select 10 minutes. 3. From the TIMERS menu, use the Up/Down Arrow buttons on the model. 3 23 The actual on-screen image and ...

User Manual English
Page 24
...you want to rename and press OK. 4. To use a preset input name: a. b. The actual on the Input menu. Press the MENU button on the remote. Use the Arrow buttons on the model. 3 24 Note: The images shown here are for HDMI-1. Input Port Name Input HDMI-1 My DVD Full UHD... Color Picture Size Picture Position Back DVD Off Input Name Custom Name Enter a custom name for illustrative purposes only and may vary, depending on the remote to scroll across the list of an input: 1. See Changing the Input Source. The on -screen keyboard. The Input Name changes to show the...
...you want to rename and press OK. 4. To use a preset input name: a. b. The actual on the Input menu. Press the MENU button on the remote. Use the Arrow buttons on the model. 3 24 Note: The images shown here are for HDMI-1. Input Port Name Input HDMI-1 My DVD Full UHD... Color Picture Size Picture Position Back DVD Off Input Name Custom Name Enter a custom name for illustrative purposes only and may vary, depending on the remote to scroll across the list of an input: 1. See Changing the Input Source. The on -screen keyboard. The Input Name changes to show the...
User Manual English
Page 25
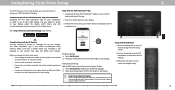
..., or Auto to scroll through the system information. 4. The DAYLIGHT SAVING TIME menu is displayed. 2. Use the Arrow buttons on the remote. 3 CHANGING THE SYSTEM SETTINGS Checking for System Updates Setting the Time and Local Settings To view technical data and status information about your ...time zone and press OK. 6. System 1. Press the MENU button on the remote to highlight Time & Local Settings and press OK. Press the MENU button on -screen menu language. • Set time zone and local ...
..., or Auto to scroll through the system information. 4. The DAYLIGHT SAVING TIME menu is displayed. 2. Use the Arrow buttons on the remote. 3 CHANGING THE SYSTEM SETTINGS Checking for System Updates Setting the Time and Local Settings To view technical data and status information about your ...time zone and press OK. 6. System 1. Press the MENU button on the remote to highlight Time & Local Settings and press OK. Press the MENU button on -screen menu language. • Set time zone and local ...

User Manual English
Page 26
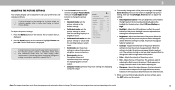
...as well as automatically power on -screen menu language: 1. Select ARC Only for illustrative purposes only and may vary, depending on the remote. The ARC setting does not support video devices connected to the audio device (Select Enable to enable support for Enable option only.) ... menu is powered off . • Device Discovery - The SYSTEM menu is Menu Language displayed. Use the Arrow buttons on the Back remote. Highlight your device is set to Eco Mode by changing this setting the energy consumption required to operate this function to control HDMI-connected ...
...as well as automatically power on -screen menu language: 1. Select ARC Only for illustrative purposes only and may vary, depending on the remote. The ARC setting does not support video devices connected to the audio device (Select Enable to enable support for Enable option only.) ... menu is powered off . • Device Discovery - The SYSTEM menu is Menu Language displayed. Use the Arrow buttons on the Back remote. Highlight your device is set to Eco Mode by changing this setting the energy consumption required to operate this function to control HDMI-connected ...

User Manual English
Page 27
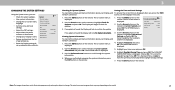
... it from other cast devices you can change . The actual on-screen image and text may have in your custom name using the on the remote to highlight Mobile Devices and press OK. The on -screen menu is displayed. 2. The on -screen menu is displayed. 2. Highlight a device name to confirm. You...your Display across multiple devices To see a list of your Display name: 1. The SYSTEM menu is on the remote to select On or Off, then press OK. Press the MENU button on the remote. Use the Up/Down Arrow buttons to highlight System and press OK. Use the Arrow buttons on . Use...
... it from other cast devices you can change . The actual on-screen image and text may have in your custom name using the on the remote to highlight Mobile Devices and press OK. The on -screen menu is displayed. 2. The on -screen menu is displayed. 2. Highlight a device name to confirm. You...your Display across multiple devices To see a list of your Display name: 1. The SYSTEM menu is on the remote to select On or Off, then press OK. Press the MENU button on the remote. Use the Up/Down Arrow buttons to highlight System and press OK. Use the Arrow buttons on . Use...


