User Manual (English)
Page 3
... contents to operate within the first year after purchase. Extended Warranties For peace of the polarized or grounding-type plug. Your TV is designed and manufactured to ensure there are provided for the installation, use attachments/accessories specified by the manufacturer. A polarized ...other apparatus (including amplifiers) that you to important warnings or notices as part of your new VIZIO product, read these instructions before using your product and retain them for your TV from the apparatus. • Only use , and maintenance of electric shock or component damage...
... contents to operate within the first year after purchase. Extended Warranties For peace of the polarized or grounding-type plug. Your TV is designed and manufactured to ensure there are provided for the installation, use attachments/accessories specified by the manufacturer. A polarized ...other apparatus (including amplifiers) that you to important warnings or notices as part of your new VIZIO product, read these instructions before using your product and retain them for your TV from the apparatus. • Only use , and maintenance of electric shock or component damage...
User Manual (English)
Page 4
... to power surges. • Do not attempt to a power outlet, power is used for long period of time. Operating your TV and any objects on the top of your TV. Do not place any heat source, such as power-supply cord or plug is intended to alert the user to the...to smoke or moisture may cause fire or electric shock. • Slots and openings in a bookcase or cabinet unless proper ventilation is required, contact your TV cabinet. The manufacturer's warranty does not cover user abuse or improper installations. • The power cord must be operated only from the type of the...
... to power surges. • Do not attempt to a power outlet, power is used for long period of time. Operating your TV and any objects on the top of your TV. Do not place any heat source, such as power-supply cord or plug is intended to alert the user to the...to smoke or moisture may cause fire or electric shock. • Slots and openings in a bookcase or cabinet unless proper ventilation is required, contact your TV cabinet. The manufacturer's warranty does not cover user abuse or improper installations. • The power cord must be operated only from the type of the...
User Manual (English)
Page 5
... of electrical shock to do not perform any way. Pulling on the apparatus. • The mains plug or appliance coupler is used for use your TV may be placed on the power cord may damage the wires inside the cord and cause fire or electric shock. Do not expose batteries to... cause fire or electric shock. • Follow instructions for repair. Unplug the power cord immediately and contact your dealer for moving your TV. - To reduce the risk of your TV is dropped and the housing is dropped or damaged in this case may cause the batteries to dripping or splashing and no...
... of electrical shock to do not perform any way. Pulling on the apparatus. • The mains plug or appliance coupler is used for use your TV may be placed on the power cord may damage the wires inside the cord and cause fire or electric shock. Do not expose batteries to... cause fire or electric shock. • Follow instructions for repair. Unplug the power cord immediately and contact your dealer for moving your TV. - To reduce the risk of your TV is dropped and the housing is dropped or damaged in this case may cause the batteries to dripping or splashing and no...
User Manual (English)
Page 6
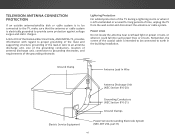
...circuits, or where it is electrically grounded to provide some protection against voltage surges and static charges. Lightning Protection For added protection of the TV during a lightning storm or when it could fall into such power lines or circuits. Remember, the screen of the coaxial cable is ...intended to be connected to proper grounding of the mast and supporting structure, grounding of time, unplug the TV from the wall outlet and disconnect the antenna or cable system. Ground Clamp Antenna Lead In Wire Antenna Discharge Unit (NEC Section 810-...
...circuits, or where it is electrically grounded to provide some protection against voltage surges and static charges. Lightning Protection For added protection of the TV during a lightning storm or when it could fall into such power lines or circuits. Remember, the screen of the coaxial cable is ...intended to be connected to proper grounding of the mast and supporting structure, grounding of time, unplug the TV from the wall outlet and disconnect the antenna or cable system. Ground Clamp Antenna Lead In Wire Antenna Discharge Unit (NEC Section 810-...
User Manual (English)
Page 7
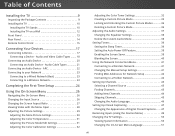
... Audio Language 46 Setting Up Closed Captioning 47 Changing the Appearance of Contents Installing the TV 9 Inspecting the Package Contents 9 Installing the TV 10 Installing the TV Stands 10 Installing the TV on a Wall 12 Front Panel 13 Rear Panel 14 Remote Control Front 15 Connecting ...Cable Types 21 Connecting an Audio Device - Table of Digital Closed Captions........ 47 Renaming Inputs (Using the Devices Menu 49 Changing the TV Settings 50 Viewing System Information 50 Changing the On-Screen Menu Language 51 vii Audio and Video Cable Types......... 18 Connecting an Audio ...
... Audio Language 46 Setting Up Closed Captioning 47 Changing the Appearance of Contents Installing the TV 9 Inspecting the Package Contents 9 Installing the TV 10 Installing the TV Stands 10 Installing the TV on a Wall 12 Front Panel 13 Rear Panel 14 Remote Control Front 15 Connecting ...Cable Types 21 Connecting an Audio Device - Table of Digital Closed Captions........ 47 Renaming Inputs (Using the Devices Menu 49 Changing the TV Settings 50 Viewing System Information 50 Changing the On-Screen Menu Language 51 vii Audio and Video Cable Types......... 18 Connecting an Audio ...
User Manual (English)
Page 8
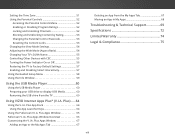
...View Mode Settings 54 Adjusting the Wide Mode (Aspect Ratio 54 Changing Your TV's DLNA Name 55 Controlling Other Devices with CEC 55 Turning the Power Indicator On or Off 56 Restoring ...the TV to Factory Default Settings 57 Enabling and Disabling Smart Interactivity 57 Using the Guided Setup ... USB Media Player 60 Preparing your USB drive to the My Apps Tab 67 Deleting an App from the TV 60 Using VIZIO Internet Apps Plus® (V.I.A. Plus App Dock 64 Using the App Launcher Keys 64 Using the Fullscreen V.I...
...View Mode Settings 54 Adjusting the Wide Mode (Aspect Ratio 54 Changing Your TV's DLNA Name 55 Controlling Other Devices with CEC 55 Turning the Power Indicator On or Off 56 Restoring ...the TV to Factory Default Settings 57 Enabling and Disabling Smart Interactivity 57 Using the Guided Setup ... USB Media Player 60 Preparing your USB drive to the My Apps Tab 67 Deleting an App from the TV 60 Using VIZIO Internet Apps Plus® (V.I.A. Plus App Dock 64 Using the App Launcher Keys 64 Using the Fullscreen V.I...

User Manual (English)
Page 9
VIZIO LED HDTV Remote Control with Batteries 2 x Quick Start Guides (1 x English, 1 x French/Spanish) TV Stands Power Cord 9 4 x Phillips Screws PACKAGE CONTENTS Use the images below to inspect the package contents. Installing the TV 1 INSPECTING THE PACKAGE CONTENTS Before installing your new TV, take a moment to ensure nothing is missing or damaged.
VIZIO LED HDTV Remote Control with Batteries 2 x Quick Start Guides (1 x English, 1 x French/Spanish) TV Stands Power Cord 9 4 x Phillips Screws PACKAGE CONTENTS Use the images below to inspect the package contents. Installing the TV 1 INSPECTING THE PACKAGE CONTENTS Before installing your new TV, take a moment to ensure nothing is missing or damaged.
User Manual (English)
Page 10
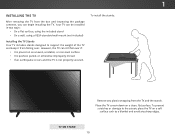
... using a VESA-standard wall mount (not included) Installing the TV Stands Your TV includes stands designed to the screen, place the TV on a soft surface such as a blanket and avoid any plastic wrapping from the TV and the stands. However, the TV can begin installing the TV. To install the stands: Remove any sharp edges... keep it from the box and inspecting the package contents, you can still fall over . 1 INSTALLING THE TV After removing the TV from falling over if: • It is placed on an uneven, unstable, or non-level surface • It is pushed, pulled, or otherwise ...
... using a VESA-standard wall mount (not included) Installing the TV Stands Your TV includes stands designed to the screen, place the TV on a soft surface such as a blanket and avoid any plastic wrapping from the TV and the stands. However, the TV can begin installing the TV. To install the stands: Remove any sharp edges... keep it from the box and inspecting the package contents, you can still fall over . 1 INSTALLING THE TV After removing the TV from falling over if: • It is placed on an uneven, unstable, or non-level surface • It is pushed, pulled, or otherwise ...
User Manual (English)
Page 11
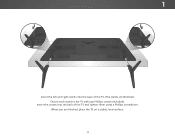
When you are identical.) Secure each stand to the TV with two Phillips screws (included). Insert the screws into the base of the TV and tighten them using a Phillips screwdriver. 1 Insert the left and right stands into the back of the TV. (The stands are finished, place the TV on a stable, level surface. 11
When you are identical.) Secure each stand to the TV with two Phillips screws (included). Insert the screws into the base of the TV and tighten them using a Phillips screwdriver. 1 Insert the left and right stands into the back of the TV. (The stands are finished, place the TV on a stable, level surface. 11

User Manual (English)
Page 12
... sure the surface is capable of supporting the weight of debris that came with a UL-listed wall mount bracket rated for your TV, you . E40-C2 E40x-C2 E43-C2 E48-C2 E55-C2 E65x-C2 Screw Size: M6 Hole Pattern: Weight w/o Stand: 200 mm (V) x 200 mm (H) 15.87 lbs M6 200 mm (V) x 200 mm... mount you will need a wall mount. WALL MOUNT SCREW LOCATIONS 12 Consult the information below to help you can scratch or damage the TV. 3. Disconnect any cables connected to the wall, carefully following the instructions that can begin the installation. Remove the base by loosening and ...
... sure the surface is capable of supporting the weight of debris that came with a UL-listed wall mount bracket rated for your TV, you . E40-C2 E40x-C2 E43-C2 E48-C2 E55-C2 E65x-C2 Screw Size: M6 Hole Pattern: Weight w/o Stand: 200 mm (V) x 200 mm (H) 15.87 lbs M6 200 mm (V) x 200 mm... mount you will need a wall mount. WALL MOUNT SCREW LOCATIONS 12 Consult the information below to help you can scratch or damage the TV. 3. Disconnect any cables connected to the wall, carefully following the instructions that can begin the installation. Remove the base by loosening and ...
User Manual (English)
Page 13
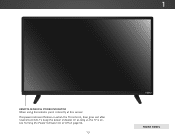
To keep the power indicator on as long as the TV is on, see Turning the Power Indicator On or Off on , then goes out after several seconds. The power indicator flashes on when the TV turns on page 56. 13 FRONT PANEL 1 REMOTE SENSOR & POWER INDICATOR When using the remote, point it directly at this sensor.
To keep the power indicator on as long as the TV is on, see Turning the Power Indicator On or Off on , then goes out after several seconds. The power indicator flashes on when the TV turns on page 56. 13 FRONT PANEL 1 REMOTE SENSOR & POWER INDICATOR When using the remote, point it directly at this sensor.
User Manual (English)
Page 14
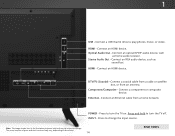
... is for illustrative purposes only and may vary, depending on . The actual number of ports and their locations may be subject to turn the TV off. DTV/TV (Coaxial) - Connect a component or composite device. Ethernet - Press and hold to change . Connect an HDMI device. INPUT - Connect an Ethernet cable from an ...antenna. 1 REAR PANEL USB - Connect an HDMI device. POWER - HDMI - Connect an RCA audio device, such as home audio receiver. Press to turn the TV on the model. 14 REAR PANEL Connect a USB thumb drive to play photos, music, or video.
... is for illustrative purposes only and may vary, depending on . The actual number of ports and their locations may be subject to turn the TV off. DTV/TV (Coaxial) - Connect a component or composite device. Ethernet - Press and hold to change . Connect an HDMI device. INPUT - Connect an Ethernet cable from an ...antenna. 1 REAR PANEL USB - Connect an HDMI device. POWER - HDMI - Connect an RCA audio device, such as home audio receiver. Press to turn the TV on the model. 14 REAR PANEL Connect a USB thumb drive to play photos, music, or video.
User Manual (English)
Page 15
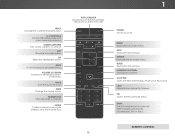
... menu. MENU Display the on -screen menu. ARROW Navigate the on and off .) 1 POWER Turn TV on -screen menu. CHANNEL UP/DOWN Change the channel. V BUTTON Open the VIZIO Internet Apps Plus® (V.I.A. CLOSED CAPTIONS Turn closed captions on -screen menu. APP LAUNCHER Quickly launch the... pictured App. (Also turns on the TV if it is off . OK Select the highlighted option. INFO Display...
... menu. MENU Display the on -screen menu. ARROW Navigate the on and off .) 1 POWER Turn TV on -screen menu. CHANNEL UP/DOWN Change the channel. V BUTTON Open the VIZIO Internet Apps Plus® (V.I.A. CLOSED CAPTIONS Turn closed captions on -screen menu. APP LAUNCHER Quickly launch the... pictured App. (Also turns on the TV if it is off . OK Select the highlighted option. INFO Display...
User Manual (English)
Page 17
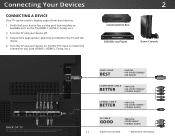
...Comp, etc.). 2. Verify that matches an available port on the model. Set the TV's input to change. Connecting Your Devices CONNECTING A DEVICE Your TV can be subject to match the connection you used to the TV and the device. 4. HDMI CABLE* BEST • DIGITAL • HD VIDEO ...• ANALOG • VIDEO (480i)** • STEREO AUDIO 17 * Cables not included. ** Maximum resolution. Turn the TV and your device has a video port that your device on. Turn the TV and your device off. 3. Connect the appropriate cable (not included) to display output from most devices. 1.
...Comp, etc.). 2. Verify that matches an available port on the model. Set the TV's input to change. Connecting Your Devices CONNECTING A DEVICE Your TV can be subject to match the connection you used to the TV and the device. 4. HDMI CABLE* BEST • DIGITAL • HD VIDEO ...• ANALOG • VIDEO (480i)** • STEREO AUDIO 17 * Cables not included. ** Maximum resolution. Turn the TV and your device has a video port that your device on. Turn the TV and your device off. 3. Connect the appropriate cable (not included) to display output from most devices. 1.
User Manual (English)
Page 18
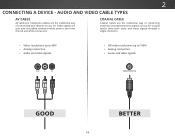
... GOOD BETTER 18 AUDIO AND VIDEO CABLE TYPES AV CABLE AV cables (or Composite cables) are the traditional way of connecting your devices to your TV. Coaxial cables carry both audio and video signals through a single connector. • Video resolutions up to 480i • Analog connection • Audio and video signals...
... GOOD BETTER 18 AUDIO AND VIDEO CABLE TYPES AV CABLE AV cables (or Composite cables) are the traditional way of connecting your devices to your TV. Coaxial cables carry both audio and video signals through a single connector. • Video resolutions up to 480i • Analog connection • Audio and video signals...
User Manual (English)
Page 20
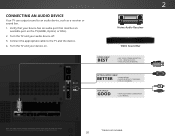
... an audio device, such as a receiver or sound bar. 1. CONNECTING AN AUDIO DEVICE Your TV can output sound to the TV and the device. 4. The actual number of ports and their locations may vary, depending on . 2 Home Audio Receiver VIZIO Sound Bar HDMI CABLE* BEST • ARC 2-WAY COMMUNICATION • 2.0-5.1 DIGITAL AUDIO •...; 2.0 CHANNEL Note: The image shown here is for illustrative purposes only and may be subject to change. Verify that your audio device off. 3. Turn the TV and your device has an audio port that matches an available port on the...
... an audio device, such as a receiver or sound bar. 1. CONNECTING AN AUDIO DEVICE Your TV can output sound to the TV and the device. 4. The actual number of ports and their locations may vary, depending on . 2 Home Audio Receiver VIZIO Sound Bar HDMI CABLE* BEST • ARC 2-WAY COMMUNICATION • 2.0-5.1 DIGITAL AUDIO •...; 2.0 CHANNEL Note: The image shown here is for illustrative purposes only and may be subject to change. Verify that your audio device off. 3. Turn the TV and your device has an audio port that matches an available port on the...
User Manual (English)
Page 21
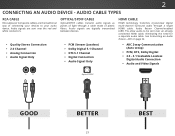
ARC on page 22. Audio Return Channel-enabled (ARC) TVs allow audio to your devices to be sent over the red and white connectors. 2 CONNECTING AN AUDIO DEVICE - HDMI CABLE HDMI technology transmits crystal-clear ...
ARC on page 22. Audio Return Channel-enabled (ARC) TVs allow audio to your devices to be sent over the red and white connectors. 2 CONNECTING AN AUDIO DEVICE - HDMI CABLE HDMI technology transmits crystal-clear ...

User Manual (English)
Page 22
... (Audio) HDMI Your Home Audio Receiver HDMI 2 With HDMI ARC Built-in Tuner VIZIO Internet Apps Plus® Without an HDMI ARC setup, your TV needs an extra cable to connect it to your home audio receiver, with no need for an extra cable. Your Home Audio Receiver HDMI Your ... carries digital HD (high definition) video to your home audio receiver. The audio signal is analog-only. ARC Without HDMI ARC Built-in Tuner Your TV HDMI VIZIO Internet Apps Plus® HDMI ARC transmits all-digital audio from your...
... (Audio) HDMI Your Home Audio Receiver HDMI 2 With HDMI ARC Built-in Tuner VIZIO Internet Apps Plus® Without an HDMI ARC setup, your TV needs an extra cable to connect it to your home audio receiver, with no need for an extra cable. Your Home Audio Receiver HDMI Your ... carries digital HD (high definition) video to your home audio receiver. The audio signal is analog-only. ARC Without HDMI ARC Built-in Tuner Your TV HDMI VIZIO Internet Apps Plus® HDMI ARC transmits all-digital audio from your...

User Manual (English)
Page 23
...a Wired Network (Best) 1. Use the Guided Network Setup to the Ethernet port on the model. 23 Router / Modem CONNECTING TO YOUR NETWORK Your TV is for illustrative purposes only and may vary, depending on the back of ports and their locations may be connected to your router and to... configure the TV. See Using the Guided Setup Menu on page 58. Ensure you have a router or modem broadcasting as high-speed wireless signal (802.11n recommended)....
...a Wired Network (Best) 1. Use the Guided Network Setup to the Ethernet port on the model. 23 Router / Modem CONNECTING TO YOUR NETWORK Your TV is for illustrative purposes only and may vary, depending on the back of ports and their locations may be connected to your router and to... configure the TV. See Using the Guided Setup Menu on page 58. Ensure you have a router or modem broadcasting as high-speed wireless signal (802.11n recommended)....
User Manual (English)
Page 24
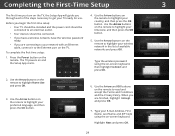
... read and accept the Terms and Conditions and the Privacy Policy. Select Store Demo for in the list of the steps necessary to highlight your TV ready for in-home use . Seleccione "Home Use" por Modo de Casa o "Store Demo" por Demostración de Tienda. Store Mode Home Mode 3. When you... OK button. 6. Use the Arrow buttons on the remote to highlight your mode. Completing the First-Time Setup 3 The first time you turn on the TV, the Setup App will guide you through each of available networks and press OK. Press the Power button on and the Setup App starts. 4.
... read and accept the Terms and Conditions and the Privacy Policy. Select Store Demo for in the list of the steps necessary to highlight your TV ready for in-home use . Seleccione "Home Use" por Modo de Casa o "Store Demo" por Demostración de Tienda. Store Mode Home Mode 3. When you... OK button. 6. Use the Arrow buttons on the remote to highlight your mode. Completing the First-Time Setup 3 The first time you turn on the TV, the Setup App will guide you through each of available networks and press OK. Press the Power button on and the Setup App starts. 4.


