Download
Page 4
... lightning flash with the apparatus. Opening or removing the back cover may expose you are provided for ventilation. Doing so could short circuit parts causing a fire or electric shock. The manufacturer's warranty does not cover user abuse or improper installations. • The power cord must be maintained between your TV and any heat source, such as when the power-supply cord or plug...
... lightning flash with the apparatus. Opening or removing the back cover may expose you are provided for ventilation. Doing so could short circuit parts causing a fire or electric shock. The manufacturer's warranty does not cover user abuse or improper installations. • The power cord must be maintained between your TV and any heat source, such as when the power-supply cord or plug...
Download
Page 5
... remote control or injure the operator. your TV, unplug the power cord and contact your dealer immediately. Your TV is intended to alert the user to the presence of electric shock, do not touch the connector with arrowhead symbol within an equilateral triangle is exposed to rain or other cables are for an extended period of time...
... remote control or injure the operator. your TV, unplug the power cord and contact your dealer immediately. Your TV is intended to alert the user to the presence of electric shock, do not touch the connector with arrowhead symbol within an equilateral triangle is exposed to rain or other cables are for an extended period of time...
Download
Page 6
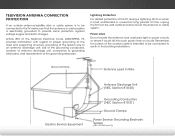
...) Ground Clamps Power Service Grounding Electrode System (NEC ART 250, part H) Power Lines Do not locate the antenna near overhead light or power circuits, or where it is left unattended or unused for long periods of time, unplug the TV from the wall outlet and disconnect the antenna or cable system. Television Antenna Connection Protection If an outside antenna/satellite dish or cable system is to...
...) Ground Clamps Power Service Grounding Electrode System (NEC ART 250, part H) Power Lines Do not locate the antenna near overhead light or power circuits, or where it is left unattended or unused for long periods of time, unplug the TV from the wall outlet and disconnect the antenna or cable system. Television Antenna Connection Protection If an outside antenna/satellite dish or cable system is to...
Download
Page 7
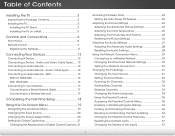
... Video Cable Types....... 13 Connecting an Audio Device 14 Connecting an Audio Device - ARC 16 Without HDMI ARC 16 With HDMI ARC 16 Connecting to your Network 17 Connecting to a Wired Network (Best 17 Connecting to a Wireless Network 17 Completing the First-Time Setup 18 Using the On-Screen Menu 19 Navigating the On-Screen Menu 19 Changing the Input Source 20 Changing the Screen Aspect Ratio 20 Setting Up Closed Captioning 21 Changing the Appearance of Digital Closed Captions.. 21 Activating the Sleep Timer 22 Setting the Auto Power Off Feature 22 Adjusting the Picture Settings...
... Video Cable Types....... 13 Connecting an Audio Device 14 Connecting an Audio Device - ARC 16 Without HDMI ARC 16 With HDMI ARC 16 Connecting to your Network 17 Connecting to a Wired Network (Best 17 Connecting to a Wireless Network 17 Completing the First-Time Setup 18 Using the On-Screen Menu 19 Navigating the On-Screen Menu 19 Changing the Input Source 20 Changing the Screen Aspect Ratio 20 Setting Up Closed Captioning 21 Changing the Appearance of Digital Closed Captions.. 21 Activating the Sleep Timer 22 Setting the Auto Power Off Feature 22 Adjusting the Picture Settings...

Download
Page 8
...; Changing the On-Screen Menu Language 38 Setting the Time Zone 38 Adjusting the CEC Settings 39 Turning the Power Indicator On or Off 39 Using the Help Menu 40 Displaying System Information 40 Resetting the TV Settings 41 Restoring the TV to Factory Default Settings 41 Using Guided Setup 42 Using the Info Window 43 Using the USB Media Player 44 Using the USB Media Player 44 Connecting a USB Thumb Drive to the TV 44 Playing USB Media 44 Using VIZIO Internet Apps 47 Using the VIA Shortcut Buttons...
...; Changing the On-Screen Menu Language 38 Setting the Time Zone 38 Adjusting the CEC Settings 39 Turning the Power Indicator On or Off 39 Using the Help Menu 40 Displaying System Information 40 Resetting the TV Settings 41 Restoring the TV to Factory Default Settings 41 Using Guided Setup 42 Using the Info Window 43 Using the USB Media Player 44 Using the USB Media Player 44 Connecting a USB Thumb Drive to the TV 44 Playing USB Media 44 Using VIZIO Internet Apps 47 Using the VIA Shortcut Buttons...
Download
Page 11
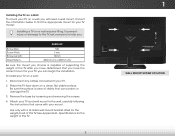
... will need a wall mount. See Appendix B - Screw Size: Screw Pitch: Screw Length: Hole Pattern: E650i-A2 M6 1mm 16mm 400mm (V) x 400mm (H) Be sure the mount you choose is clear of the TV. To prevent injury or damage to the TV, ask someone to the wall, carefully following the instructions that came with a UL-listed wall mount bracket rated for the weight of this TV. 5 1 INPUT MENU CH ^ CH VOL ^ VOL Wall Mount Screw Location ^ ^ Installing...
... will need a wall mount. See Appendix B - Screw Size: Screw Pitch: Screw Length: Hole Pattern: E650i-A2 M6 1mm 16mm 400mm (V) x 400mm (H) Be sure the mount you choose is clear of the TV. To prevent injury or damage to the TV, ask someone to the wall, carefully following the instructions that came with a UL-listed wall mount bracket rated for the weight of this TV. 5 1 INPUT MENU CH ^ CH VOL ^ VOL Wall Mount Screw Location ^ ^ Installing...
Download
Page 12
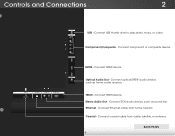
Connect component or composite device. HDMI - Connect HDMI device. CH ^ Ethernet - MENU Stereo Audio Out - Connect coaxial VcOaL b^ le from home network. VOL BAck Panel 6 ^ ^ Connect optical/SPDIF audio device, such as sound bar. Connect USB thumb drive to play photo, music, or video. Controls and Connections 2 USB - CH Coaxial - Optical Audio Out - INPUT HDMI - Connect RCA audio device, such as home audio receiver. Connect HDMI device. Connect Ethernet cable from cable, satellite, or antenna. Component/Composite -
Connect component or composite device. HDMI - Connect HDMI device. CH ^ Ethernet - MENU Stereo Audio Out - Connect coaxial VcOaL b^ le from home network. VOL BAck Panel 6 ^ ^ Connect optical/SPDIF audio device, such as sound bar. Connect USB thumb drive to play photo, music, or video. Controls and Connections 2 USB - CH Coaxial - Optical Audio Out - INPUT HDMI - Connect RCA audio device, such as home audio receiver. Connect HDMI device. Connect Ethernet cable from cable, satellite, or antenna. Component/Composite -
Download
Page 28
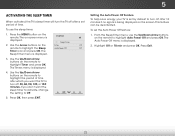
... CC Sleep Timer Picture Audio Network Settings Help 22 Setting the Auto Power Off Feature To help save energy, your TV is set the Auto Power Off feature: 1. Highlight Off or 10 min and press OK. The on the remote. 5 Activating the Sleep Timer When activated, the TV's sleep timer will turn the TV off after 10 minutes if no signal is being displayed on the screen. The Timers menu is displayed. 3. Use the Up/Down Arrow buttons...
... CC Sleep Timer Picture Audio Network Settings Help 22 Setting the Auto Power Off Feature To help save energy, your TV is set the Auto Power Off feature: 1. Highlight Off or 10 min and press OK. The on the remote. 5 Activating the Sleep Timer When activated, the TV's sleep timer will turn the TV off after 10 minutes if no signal is being displayed on the screen. The Timers menu is displayed. 3. Use the Up/Down Arrow buttons...

Download
Page 29
...; Game mode optimizes the picture settings for their respective sports. Adjusts the intensity of the picture. This setting is displayed. 3. Network Sharpness - When this setting is too high or too low, detail may be too dark to distinguish details. Use the Arrow buttons on -screen menu is not available unless Ambient Light Sensor and Backlight Control are both set to off. Adjusts the black level of color before PiactdurjeustiAnugdiotint. If flesh Sleep Timer...
...; Game mode optimizes the picture settings for their respective sports. Adjusts the intensity of the picture. This setting is displayed. 3. Network Sharpness - When this setting is too high or too low, detail may be too dark to distinguish details. Use the Arrow buttons on -screen menu is not available unless Ambient Light Sensor and Backlight Control are both set to off. Adjusts the black level of color before PiactdurjeustiAnugdiotint. If flesh Sleep Timer...
Download
Page 33
.... StudioSound HD™ is displayed. 2. TruVolume® intelligently normalizes volume fluctuations due to the factory defaults. Adjust the boost or attenuation of the audio output from the TV's internal speakers. See Resetting the Audio Settings on or off. • SRS StudioSound HD - The on the remote to change the setting: • Audio Mode - Change the audio mode. Turns the built-in speakers on page 28. 4. Network Settings Help 27 This setting is only available when...
.... StudioSound HD™ is displayed. 2. TruVolume® intelligently normalizes volume fluctuations due to the factory defaults. Adjust the boost or attenuation of the audio output from the TV's internal speakers. See Resetting the Audio Settings on or off. • SRS StudioSound HD - The on the remote to change the setting: • Audio Mode - Change the audio mode. Turns the built-in speakers on page 28. 4. Network Settings Help 27 This setting is only available when...

Download
Page 34
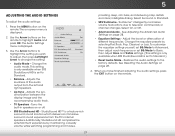
.... 5. Sleep Timer Picture Audio Network Settings Help 28 The Advanced Audio menu is displayed. 3. Use the Arrow buttons to highlight the setting you wish to adjust, then press Left/Right Arrow to change the setting: • Digital Audio Out Changes the type of processing for the analog RCA (red/ white) connectors when connected to highlight Advanced Audio, then press OK. When you want to RESET Exit 2D 3D Audio Settings to control the external speakers' volume from the TV's volume controls, or select Fixed to...
.... 5. Sleep Timer Picture Audio Network Settings Help 28 The Advanced Audio menu is displayed. 3. Use the Arrow buttons to highlight the setting you wish to adjust, then press Left/Right Arrow to change the setting: • Digital Audio Out Changes the type of processing for the analog RCA (red/ white) connectors when connected to highlight Advanced Audio, then press OK. When you want to RESET Exit 2D 3D Audio Settings to control the external speakers' volume from the TV's volume controls, or select Fixed to...
Download
Page 37
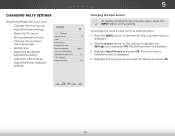
... settings VIZIO Settings Input Source Tuner Name Input Parental Controls Menu Language Time & Local Settings Broadcast Interactivity CEC Settings Power Indicator TV English On On Changing the Input Source To quickly access the Input Source menu, press the INPUT button on -screen menu is displayed. 2. 5 Changing the TV Settings Using the settings menu, you want to highlight the Exit 2D 3D Settings icon and press OK. Press the MENU button on the remote to display and press OK. The Settings menu is displayed. 4. Sleep Timer Picture Audio Network Settings Help...
... settings VIZIO Settings Input Source Tuner Name Input Parental Controls Menu Language Time & Local Settings Broadcast Interactivity CEC Settings Power Indicator TV English On On Changing the Input Source To quickly access the Input Source menu, press the INPUT button on -screen menu is displayed. 2. 5 Changing the TV Settings Using the settings menu, you want to highlight the Exit 2D 3D Settings icon and press OK. Press the MENU button on the remote to display and press OK. The Settings menu is displayed. 4. Sleep Timer Picture Audio Network Settings Help...
Download
Page 40
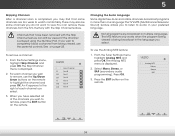
... 5 x Changing the Audio Language Some digital free-to-air and cable channels broadcast programs in more than one language.The TV's MTS (Multichannel Television Sound) feature allows you to listen to the right of the channels you wish to watch comfortably. The Analog MTS menu is displayed. 2. To use the parental controls. ExPitress t2hDe EXIT3Dbutton on page 35. ABC VIZIO Analog MTS Mono Stereo SAP Input Wide CC Sleep Timer Picture Audio Network Settings Help 34...
... 5 x Changing the Audio Language Some digital free-to-air and cable channels broadcast programs in more than one language.The TV's MTS (Multichannel Television Sound) feature allows you to listen to the right of the channels you wish to watch comfortably. The Analog MTS menu is displayed. 2. To use the parental controls. ExPitress t2hDe EXIT3Dbutton on page 35. ABC VIZIO Analog MTS Mono Stereo SAP Input Wide CC Sleep Timer Picture Audio Network Settings Help 34...
Download
Page 58
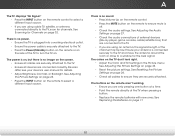
see your antenna is off. • Check the audio settings. Ensure your device's user manual for the best signal. See Adjusting the Picture Settings on page 26. • Check all devices are connected correctly. The buttons on the remote aren't working electrical outlet. • Ensure the power cable is no image on the screen. • Ensure all cables are securely attached to the TV. • Ensure all cables to ensure...
see your antenna is off. • Check the audio settings. Ensure your device's user manual for the best signal. See Adjusting the Picture Settings on page 26. • Check all devices are connected correctly. The buttons on the remote aren't working electrical outlet. • Ensure the power cable is no image on the screen. • Ensure all cables are securely attached to the TV. • Ensure all cables to ensure...
Download
Page 59
...; Your HDTV is higher or lower than the level on the remote to this type of the channel may not display correctly. Ensure your antenna is connected securely to the TV and move the antenna around the room or close to a window for the best signal. When I change input source, the volume changes. • The TV remembers the volume level on the new input source is precision-manufactured using digital sources. Separate...
...; Your HDTV is higher or lower than the level on the remote to this type of the channel may not display correctly. Ensure your antenna is connected securely to the TV and move the antenna around the room or close to a window for the best signal. When I change input source, the volume changes. • The TV remembers the volume level on the new input source is precision-manufactured using digital sources. Separate...

Download
Page 62
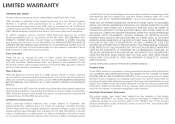
..., improper operation, improper voltage supply or power surges, signal issues, damages from 6:00AM to 9:00PM Monday through Friday and 8:00AM to the customer. This warranty does not cover, for ninety (90) days from the unit before it is determined to be sent to a VIZIO service center to VIZIO's service centers must be defective within the warranty period. THIS WARRANTY GIVES YOU SPECIFIC LEGAL...
..., improper operation, improper voltage supply or power surges, signal issues, damages from 6:00AM to 9:00PM Monday through Friday and 8:00AM to the customer. This warranty does not cover, for ninety (90) days from the unit before it is determined to be sent to a VIZIO service center to VIZIO's service centers must be defective within the warranty period. THIS WARRANTY GIVES YOU SPECIFIC LEGAL...

Download
Page 2
... for long period of your TV to repair or service your dealer immediately. The manufacturer's warranty does not cover user abuse or improper installations. • The power cord must be used for the installation, use caution when moving your TV from overheating, be maintained between your TV, hold the AC/DC power adapter, not the cord. When your TV. Incorrect polarities may form...
... for long period of your TV to repair or service your dealer immediately. The manufacturer's warranty does not cover user abuse or improper installations. • The power cord must be used for the installation, use caution when moving your TV from overheating, be maintained between your TV, hold the AC/DC power adapter, not the cord. When your TV. Incorrect polarities may form...
Download
Page 11
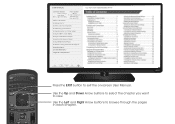
... the on-screen User Manual. Table of Contents Installing the TV Controls and Connections Connecting your Devices Completing the First-Time Setup Using the On-Screen Menu Using the USB Media Player Using the USB Media Player Using VIZIO Internet Apps Troubleshooting & Technical Support Specifications Limited Warranty Legal & Compliance LCD HDTV WITH VIZIO INTERNET APPS® Press the EXIT button to view. Use the Left and Right Arrow buttons to page, use Number Pad, then press OK. USER MANUAL USER YOUR REMOTE Previous Page Next Page Menu Open TV Menu PAGE NUMBER 1 OF 53...
... the on-screen User Manual. Table of Contents Installing the TV Controls and Connections Connecting your Devices Completing the First-Time Setup Using the On-Screen Menu Using the USB Media Player Using the USB Media Player Using VIZIO Internet Apps Troubleshooting & Technical Support Specifications Limited Warranty Legal & Compliance LCD HDTV WITH VIZIO INTERNET APPS® Press the EXIT button to view. Use the Left and Right Arrow buttons to page, use Number Pad, then press OK. USER MANUAL USER YOUR REMOTE Previous Page Next Page Menu Open TV Menu PAGE NUMBER 1 OF 53...
Download
Page 19
... VIZIO's service centers must be responsible for parts or labor during the warranty period. Products with unreadable or removed serial numbers, or requiring routine maintenance are warranted for the remaining portion of the original warranty or for ninety (90) days from shipping, acts of God, any type of customer misuse, modifications or adjustments, as well as installation and set-up issues or any repairs...
... VIZIO's service centers must be responsible for parts or labor during the warranty period. Products with unreadable or removed serial numbers, or requiring routine maintenance are warranted for the remaining portion of the original warranty or for ninety (90) days from shipping, acts of God, any type of customer misuse, modifications or adjustments, as well as installation and set-up issues or any repairs...
Download
Page 2
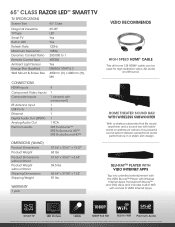
... Resolution Dynamic Contrast Ratio Remote Control Type Ambient Light Sensor Energy Star Qualified Wall Mount & Screw Size 65.00" LED Yes Yes 120Hz 1080p 200,000 to 1 XRT302 Yes ENERGY STAR® 5.3 400mm (V) x 400mm (H), M6 CONNECTIONS HDMI Inputs Component Video Inputs Composite Inputs RF Antenna Input USB Ports Ethernet Digital Audio Out (SPDIF) Analog Audio Out Premium Audio 4 1 1 (shared with component) 1 2 1 1 1 RCA SRS TruVolume™ SRS TruSurround HD™ SRS StudioSound HD™ DIMENSIONS (WxHxD) Product Dimensions Product Weight Product Dimensions without Stand...
... Resolution Dynamic Contrast Ratio Remote Control Type Ambient Light Sensor Energy Star Qualified Wall Mount & Screw Size 65.00" LED Yes Yes 120Hz 1080p 200,000 to 1 XRT302 Yes ENERGY STAR® 5.3 400mm (V) x 400mm (H), M6 CONNECTIONS HDMI Inputs Component Video Inputs Composite Inputs RF Antenna Input USB Ports Ethernet Digital Audio Out (SPDIF) Analog Audio Out Premium Audio 4 1 1 (shared with component) 1 2 1 1 1 RCA SRS TruVolume™ SRS TruSurround HD™ SRS StudioSound HD™ DIMENSIONS (WxHxD) Product Dimensions Product Weight Product Dimensions without Stand...


