
Download
Page 5
.... Do not try to repair your TV in fire or electric shock. • Do not use of electrical shock to leak which can damage the remote control or injure the operator. Continued use your TV changes substantially. • This apparatus shall not be of sufficient magnitude to do not touch the...
.... Do not try to repair your TV in fire or electric shock. • Do not use of electrical shock to leak which can damage the remote control or injure the operator. Continued use your TV changes substantially. • This apparatus shall not be of sufficient magnitude to do not touch the...
Download
Page 7
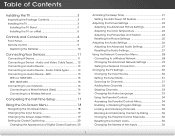
... Contents Installing the TV 3 Inspecting the Package Contents 3 Installing the TV 3 Installing the TV Stand 3 Installing the TV on a Wall 5 Controls and Connections 6 Front Panel 8 Remote Control 9 Replacing the Batteries 10 Connecting Your Devices 11 Connecting A Device 11 Connecting a Device -
... Contents Installing the TV 3 Inspecting the Package Contents 3 Installing the TV 3 Installing the TV Stand 3 Installing the TV on a Wall 5 Controls and Connections 6 Front Panel 8 Remote Control 9 Replacing the Batteries 10 Connecting Your Devices 11 Connecting A Device 11 Connecting a Device -
Download
Page 9
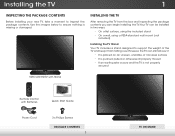
... or damaged. Installing the TV 1 Inspecting the Package Contents Before installing your new TV, take a moment to ensure nothing is not properly secured VIZIO LED HDTV with Stand Remote Control with Batteries Quick Start Guide Power Cord 3 x Philips Screws Package Contents 3 TV on Stand Use the images below to inspect the package...
... or damaged. Installing the TV 1 Inspecting the Package Contents Before installing your new TV, take a moment to ensure nothing is not properly secured VIZIO LED HDTV with Stand Remote Control with Batteries Quick Start Guide Power Cord 3 x Philips Screws Package Contents 3 TV on Stand Use the images below to inspect the package...
Download
Page 14
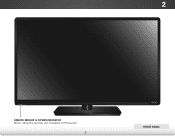
2 Front Panel REMOTE SENSOR & POWER INDICATOR When using the remote, aim it directly at this sensor. 8 Front Panel
2 Front Panel REMOTE SENSOR & POWER INDICATOR When using the remote, aim it directly at this sensor. 8 Front Panel
Download
Page 15
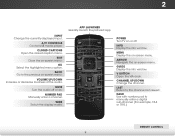
... the on -screen menu. Menu Display the on -screen menu. Last Return to manually enter a digital sub-channel. (For example, 18-4 or 18-5.) Remote Control 9 Wide Switch the display mode. Guide Display the info window. Power Turn TV on . V Button Open the VIA dock. Mute Turn the audio ...channel last viewed. A/V Controls Control USB media player. Back Go to the previous on -screen menu. Ok Select the highlighted menu option. 2 Remote Control Input Change the currently-displayed input. App launcher Quickly launch the pictured app. Exit Close the on -screen menu.
... the on -screen menu. Menu Display the on -screen menu. Last Return to manually enter a digital sub-channel. (For example, 18-4 or 18-5.) Remote Control 9 Wide Switch the display mode. Guide Display the info window. Power Turn TV on . V Button Open the VIA dock. Mute Turn the audio ...channel last viewed. A/V Controls Control USB media player. Back Go to the previous on -screen menu. Ok Select the highlighted menu option. 2 Remote Control Input Change the currently-displayed input. App launcher Quickly launch the pictured app. Exit Close the on -screen menu.
Download
Page 16
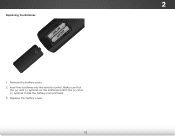
Replace the battery cover. 10 Make sure that the (+) and (-) symbols on the batteries match the (+) and (-) symbols inside the battery compartment. 3. Remove the battery cover. 2. Insert two batteries into the remote control. 2 Replacing the Batteries 1.
Replace the battery cover. 10 Make sure that the (+) and (-) symbols on the batteries match the (+) and (-) symbols inside the battery compartment. 3. Remove the battery cover. 2. Insert two batteries into the remote control. 2 Replacing the Batteries 1.
Download
Page 23
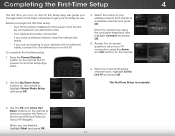
...the name of your TV ready for Yahoo! Use the OK and Arrow Up/ Down buttons on the remote to highlight Home Mode Setup and press OK. When you have the network key ready. • If ...TV Widgets. Press the Power/Standby button on and the Setup App starts. 4. Use the Up/Down Arrow buttons on the remote to read and accept the Terms of Service and Privacy Policy for use. Before you begin the first-time setup: • ... and press OK. Enter the network key using the Arrow and OK buttons on the remote. 6. To complete the first-time setup: 1. The First-Time Setup is complete. 3.
...the name of your TV ready for Yahoo! Use the OK and Arrow Up/ Down buttons on the remote to highlight Home Mode Setup and press OK. When you have the network key ready. • If ...TV Widgets. Press the Power/Standby button on and the Setup App starts. 4. Use the Up/Down Arrow buttons on the remote to read and accept the Terms of Service and Privacy Policy for use. Before you begin the first-time setup: • ... and press OK. Enter the network key using the Arrow and OK buttons on the remote. 6. To complete the first-time setup: 1. The First-Time Setup is complete. 3.
Download
Page 24
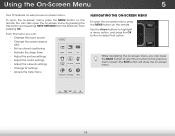
... • Adjust the picture settings • Adjust the audio settings • Adjust the network settings • Change TV settings • Access the help menu VIZIO ABC Input Wide CC Sleep Timer Picture Audio Network Settings Help Navigating the On-Screen Menu To open the on-screen menu, press the MENU... button on the remote. Wide Zoom Normal Panoramic While navigating the on-screen menu, you can also open the on-screen menu, press the MENU button on the...
... • Adjust the picture settings • Adjust the audio settings • Adjust the network settings • Change TV settings • Access the help menu VIZIO ABC Input Wide CC Sleep Timer Picture Audio Network Settings Help Navigating the On-Screen Menu To open the on-screen menu, press the MENU... button on the remote. Wide Zoom Normal Panoramic While navigating the on-screen menu, you can also open the on-screen menu, press the MENU button on the...
Download
Page 25
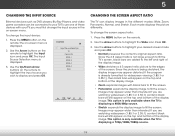
... as DVD players, Blu-Ray Players, and video game consoles can display images in the on the top and bottom of the display image. VIZIO Input Source Selection TV Comp/AV HDMI-1 HDMI-2 HDMI-3 HDMI-4 RGB Changing the Screen Aspect Ratio The TV can be connected to your TV...the display image to fill the Exit TV's2Dscreen3D, black bars are watching widescreen (1.85:1 or 2.35:1) content, black NetworkbaSersttinwgisll stHilel lpappear on the remote to highlight the input source you are watching widescreen (1.85:1 or 2.35:1) content, black bars will appear on the top and bottom of the ...
... as DVD players, Blu-Ray Players, and video game consoles can display images in the on the top and bottom of the display image. VIZIO Input Source Selection TV Comp/AV HDMI-1 HDMI-2 HDMI-3 HDMI-4 RGB Changing the Screen Aspect Ratio The TV can be connected to your TV...the display image to fill the Exit TV's2Dscreen3D, black bars are watching widescreen (1.85:1 or 2.35:1) content, black NetworkbaSersttinwgisll stHilel lpappear on the remote to highlight the input source you are watching widescreen (1.85:1 or 2.35:1) content, black bars will appear on the top and bottom of the ...
Download
Page 26
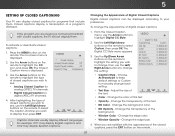
...for digital (ATSC) TV channels. 4. Change the background color. To activate or deactivate closed captions: 1. Use the Arrow buttons on the remote to manually change Extiht e se2ttDing: 3D • Caption Style - The Closed Caption menu is not being broadcast with the appearance of the ...and press OK. After highlighting the type of closed captions you are satisfied with closed captions you are viewing is displayed. 3. VIZIO Digital CC Style Caption Style Custom Text Size As Broadcast Color As Broadcast Opacity As Broadcast 3. CC BG Color BG Opacity ...
...for digital (ATSC) TV channels. 4. Change the background color. To activate or deactivate closed captions: 1. Use the Arrow buttons on the remote to manually change Extiht e se2ttDing: 3D • Caption Style - The Closed Caption menu is not being broadcast with the appearance of the ...and press OK. After highlighting the type of closed captions you are satisfied with closed captions you are viewing is displayed. 3. VIZIO Digital CC Style Caption Style Custom Text Size As Broadcast Color As Broadcast Opacity As Broadcast 3. CC BG Color BG Opacity ...
Download
Page 27
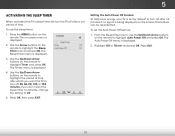
... change the setting to highlight Timer and press OK. To set period of time. Highlight Off or 10 min and press OK. The on the remote. Use the Up/Down Arrow buttons on the screen. From the Sleep Timer menu, use the sleep timer: 1. Press Exit. This feature can ...be deactivated. The WiAdeuto ZPooomwer-NOorfmf aml ePnaunoriasmdicisplayed. 2. Press the MENU button on -screen menu is VIZIO displayed. Press OK, then press EXIT. Setting the Auto Power Off Feature To help save energy, your TV is being displayed on the...
... change the setting to highlight Timer and press OK. To set period of time. Highlight Off or 10 min and press OK. The on the remote. Use the Up/Down Arrow buttons on the screen. From the Sleep Timer menu, use the sleep timer: 1. Press Exit. This feature can ...be deactivated. The WiAdeuto ZPooomwer-NOorfmf aml ePnaunoriasmdicisplayed. 2. Press the MENU button on -screen menu is VIZIO displayed. Press OK, then press EXIT. Setting the Auto Power Off Feature To help save energy, your TV is being displayed on the...
Download
Page 28
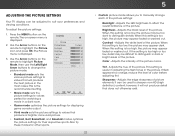
... too low, the picture may appear faded or washed out. AdCjCusts the hue of the picture. Use the Arrow buttons on the remote to distinguish in a dark room. • Game mode optimizes the picture settings for watching a movie in dark or bright areas ...; Football, Golf, Basketball, and Baseball modes optimize the picture settings for other sports. • Custom picture mode allows you to manually change the picture mode: VIZIO Picture Picture Mode Backlight Brightness Contrast Color Tint Sharpness Custom - + 50 - + 50 - + 50 - + 50 - +0 - +0 More • Standard...
... too low, the picture may appear faded or washed out. AdCjCusts the hue of the picture. Use the Arrow buttons on the remote to distinguish in a dark room. • Game mode optimizes the picture settings for watching a movie in dark or bright areas ...; Football, Golf, Basketball, and Baseball modes optimize the picture settings for other sports. • Custom picture mode allows you to manually change the picture mode: VIZIO Picture Picture Mode Backlight Brightness Contrast Color Tint Sharpness Custom - + 50 - + 50 - + 50 - + 50 - +0 - +0 More • Standard...
Download
Page 29
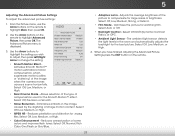
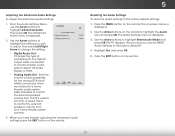
...film. Use the Arrow buttons to highlight the setting you havAeBCfinished adjusting the Advanced Picture Settings, press the EXIT button on the remote. Allows selection of the type of brightness. Select Off, Low, Medium, or High. • Color Enhancement - Optimizes the...Contrast Ratio), or OPC. • Ambient Light Sensor - 5 Adjusting the Advanced Picture Settings To adjust the advanced picture settings: 1. VIZIO Advanced Picture Smooth Motion Effect Medium Real Cinema Mode Smooth Noise Reduction Low MPEG NR Low Color Enhancement Normal 3. Select Off, Precision or...
...film. Use the Arrow buttons to highlight the setting you havAeBCfinished adjusting the Advanced Picture Settings, press the EXIT button on the remote. Allows selection of the type of brightness. Select Off, Low, Medium, or High. • Color Enhancement - Optimizes the...Contrast Ratio), or OPC. • Ambient Light Sensor - 5 Adjusting the Advanced Picture Settings To adjust the advanced picture settings: 1. VIZIO Advanced Picture Smooth Motion Effect Medium Real Cinema Mode Smooth Noise Reduction Low MPEG NR Low Color Enhancement Normal 3. Select Off, Precision or...
Download
Page 30
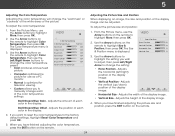
... an image, the size and position of the picture. From the Picture menu, use the Arrow buttons on the remote to VIZIO WihdeighlZigoohmt MoNorerm,atlhePnanoprarm eiscs OK. Use the ArrowABbCuttons to highlight the setting you have finished adjusting the color temperature, press... the EXIT button on the remote. Adjusts the horizontal (left/right) Sleep Timer poPsicittiuoren image. When you wish to adjust, ...
... an image, the size and position of the picture. From the Picture menu, use the Arrow buttons on the remote to VIZIO WihdeighlZigoohmt MoNorerm,atlhePnanoprarm eiscs OK. Use the ArrowABbCuttons to highlight the setting you have finished adjusting the color temperature, press... the EXIT button on the remote. Adjusts the horizontal (left/right) Sleep Timer poPsicittiuoren image. When you wish to adjust, ...
Download
Page 31
5 Resetting the Picture Settings To reset the picture settings to highlight More, then press OK. 2. From the Picture menu, use the Arrow buttons to the factory default settings: 1. The TV displays, "Are you sure you want to RESET Picture Settings to highlight Reset Picture Mode, then press OK. Use the Arrow buttons on the remote. 25 Highlight Yes and press OK. 4. Press the EXIT button on the remote to the factory defaults?" 3.
5 Resetting the Picture Settings To reset the picture settings to highlight More, then press OK. 2. From the Picture menu, use the Arrow buttons to the factory default settings: 1. The TV displays, "Are you sure you want to RESET Picture Settings to highlight Reset Picture Mode, then press OK. Use the Arrow buttons on the remote. 25 Highlight Yes and press OK. 4. Press the EXIT button on the remote to the factory defaults?" 3.
Download
Page 32
...sound experience from the left and right speakers. • Lip Sync - See Resetting the Audio Settings on Picture Audio the remote. Restores the audio settings to Surround Sound Off highlight the setting you have finished adjusting the audio settings, press Sltehepe Timer ... Equalizer Settings Reset Audio Mode • Audio Mode - The on-screen menu is displayed. Use the Arrow buttons on the remote. VIZIO Audio Settings Audio Mode Balance - Lip Sync - Use the Arrow buttons to the Input facWtoidrey defCaCults. Adjusts the synchronization between program...
...sound experience from the left and right speakers. • Lip Sync - See Resetting the Audio Settings on Picture Audio the remote. Restores the audio settings to Surround Sound Off highlight the setting you have finished adjusting the audio settings, press Sltehepe Timer ... Equalizer Settings Reset Audio Mode • Audio Mode - The on-screen menu is displayed. Use the Arrow buttons on the remote. VIZIO Audio Settings Audio Mode Balance - Lip Sync - Use the Arrow buttons to the Input facWtoidrey defCaCults. Adjusts the synchronization between program...
Download
Page 33
...audio settings: 1. The Advanced Audio menu is displayed. 2. Use the Arrow buttons to the factory defaults?" 4. VIZIO Advanced Audio Digital Audio Out Analog Audio Out PCM Fixed 3. The on the remote. The Audio Settings menu is displayed. 3. Sleep Timer Picture Audio Network Settings Help 27 Sets the volume control...press OK. From the Audio Settings Menu, use the Arrow buttons to highlight Reset Audio Mode and press OK. Press the MENU button on the remote. Select Off, Dolby Digital, or PCM. • Analog Audio Out - The TV displays, "Are you sure you want to RESET Exit ...
...audio settings: 1. The Advanced Audio menu is displayed. 2. Use the Arrow buttons to the factory defaults?" 4. VIZIO Advanced Audio Digital Audio Out Analog Audio Out PCM Fixed 3. The on the remote. The Audio Settings menu is displayed. 3. Sleep Timer Picture Audio Network Settings Help 27 Sets the volume control...press OK. From the Audio Settings Menu, use the Arrow buttons to highlight Reset Audio Mode and press OK. Press the MENU button on the remote. Select Off, Dolby Digital, or PCM. • Analog Audio Out - The TV displays, "Are you sure you want to RESET Exit ...
Download
Page 34
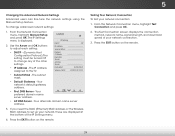
...Network Connection menu is the network's SSID) and press OK. 5. Highlight Show keyboard and press OK to open the on the remote to a wireless network whose network name (SSID) is being broadcast: If your TV is not being broadcast: 1. Use the Arrow... Panoramic 5. Picture Audio 8. The on -screen keyboard, enter your wireless network (this is displayed. 3. This is displayed. 4. VIZIO Network connection Wired Connection Disconnected Wireless Access Points Manual Setup Enter Access Point Name Test Connection Advanced network settings 6. Highlight Enter Access Point...
...Network Connection menu is the network's SSID) and press OK. 5. Highlight Show keyboard and press OK to open the on the remote to a wireless network whose network name (SSID) is being broadcast: If your TV is not being broadcast: 1. Use the Arrow... Panoramic 5. Picture Audio 8. The on -screen keyboard, enter your wireless network (this is displayed. 3. This is displayed. 4. VIZIO Network connection Wired Connection Disconnected Wireless Access Points Manual Setup Enter Access Point Name Test Connection Advanced network settings 6. Highlight Enter Access Point...
Download
Page 35
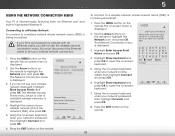
...highlight Manual Setup and press OK. Your preferred domain name server address. • Alt DNS Server - Press the EXIT button on the remote. The Test Connection screen displays the connection method, network name, signal strength, and download speed of the other settings. • IP ...MAC address to the TV. DNS Server - Testing Your Network Connection To test your network connection. Press the EXIT button on the remote. VIZIO IP Setting DHCP Off IP Address Subnet Mask Default Gateway Pref. The subnet mask. • Default Gateway - To change any of ...
...highlight Manual Setup and press OK. Your preferred domain name server address. • Alt DNS Server - Press the EXIT button on the remote. The Test Connection screen displays the connection method, network name, signal strength, and download speed of the other settings. • IP ...MAC address to the TV. DNS Server - Testing Your Network Connection To test your network connection. Press the EXIT button on the remote. VIZIO IP Setting DHCP Off IP Address Subnet Mask Default Gateway Pref. The subnet mask. • Default Gateway - To change any of ...
Download
Page 36
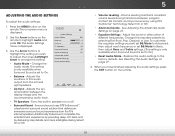
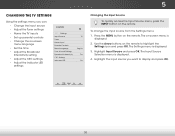
...8226; Set the time • Adjust the Broadcast Interactivity setting • Adjust the CEC settings • Adjust the Indicator LED settings VIZIO Settings Input Source Tuner Name Input Parental Controls Menu Language Time & Local Settings Broadcast Interactivity CEC Settings Indicator LED TV English On On ...Changing the Input Source To quickly access the Input Source menu, press the INPUT button on the remote to display and press OK. The on the remote. The Input Source Selection menu is displayed. 3. The Settings menu is displayed. 4. 5 Changing the TV Settings ...
...8226; Set the time • Adjust the Broadcast Interactivity setting • Adjust the CEC settings • Adjust the Indicator LED settings VIZIO Settings Input Source Tuner Name Input Parental Controls Menu Language Time & Local Settings Broadcast Interactivity CEC Settings Indicator LED TV English On On ...Changing the Input Source To quickly access the Input Source menu, press the INPUT button on the remote to display and press OK. The on the remote. The Input Source Selection menu is displayed. 3. The Settings menu is displayed. 4. 5 Changing the TV Settings ...


