
E601i-A3 User Manual
Page 3
...an extended warranty service plan, visit www.VIZIO.com. It is designed and manufactured to protect your VIZIO product at (877) 878-4946. Keep these instructions before connecting other apparatus (including amplifiers) that you see this Manual When you either: • Register your... investment beyond the standard warranty, VIZIO offers on-site extended warranty service plans. A polarized plug has two blades and a third ...
...an extended warranty service plan, visit www.VIZIO.com. It is designed and manufactured to protect your VIZIO product at (877) 878-4946. Keep these instructions before connecting other apparatus (including amplifiers) that you see this Manual When you either: • Register your... investment beyond the standard warranty, VIZIO offers on-site extended warranty service plans. A polarized plug has two blades and a third ...
E601i-A3 User Manual
Page 15
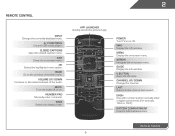
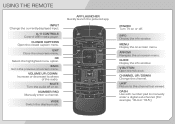
... display mode. V Button Open the VIA dock. Guide Display the info window. Closed Captions Open the closed caption menu. Number Pad Manually enter a channel. Menu Display the on -screen menu. Dash Use with number pad to manually enter a digital sub-channel. (For example, 18-4 or 18-5.) battery compartment Insert 2 AAA batteries here.
... display mode. V Button Open the VIA dock. Guide Display the info window. Closed Captions Open the closed caption menu. Number Pad Manually enter a channel. Menu Display the on -screen menu. Dash Use with number pad to manually enter a digital sub-channel. (For example, 18-4 or 18-5.) battery compartment Insert 2 AAA batteries here.
E601i-A3 User Manual
Page 25
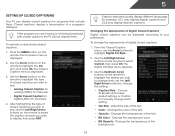
... may display Spanish captions. To change each setting. • Text Size - To activate or deactivate closed captions: 1. Use the Arrow buttons on the remote to manually change the appearance of closed captions can display closed captions you wish to see : • Analog Closed Caption for analog (NTSC) TV channels. • Digital...
... may display Spanish captions. To change each setting. • Text Size - To activate or deactivate closed captions: 1. Use the Arrow buttons on the remote to manually change the appearance of closed captions can display closed captions you wish to see : • Analog Closed Caption for analog (NTSC) TV channels. • Digital...
E601i-A3 User Manual
Page 27
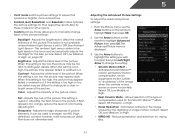
... color before adjusting tint. Adjusting the Advanced Picture Settings To adjust the advanced picture settings: 1. Use the Arrow buttons to highlight the setting you to manually change the setting: • Smooth Motion Effect Activates Smooth Motion™ motion estimation/motion compensation, which suppresses motion judder, or "studdering" of image motion content...
... color before adjusting tint. Adjusting the Advanced Picture Settings To adjust the advanced picture settings: 1. Use the Arrow buttons to highlight the setting you to manually change the setting: • Smooth Motion Effect Activates Smooth Motion™ motion estimation/motion compensation, which suppresses motion judder, or "studdering" of image motion content...
E601i-A3 User Manual
Page 28
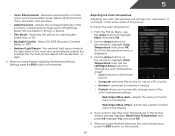
... Arrow buttons to change the color temperature preset: • Cool produces a blue-hued picture. • Computer optimizes the picture for use the Arrow buttons to manually change the "warmness" or "coolness" of the white areas of each color in the display. The Color Temperature menu is optimized for watching film. Highlight...
... Arrow buttons to change the color temperature preset: • Cool produces a blue-hued picture. • Computer optimizes the picture for use the Arrow buttons to manually change the "warmness" or "coolness" of the white areas of each color in the display. The Color Temperature menu is optimized for watching film. Highlight...
E601i-A3 User Manual
Page 33
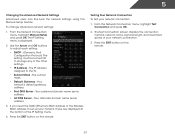
... Protocol) This setting must be turned Off to change advanced network settings: 1. Press the EXIT button on the remote. From the Network Connection menu, highlight Manual Setup and press OK. Press the EXIT button on the remote. 27 To change any of your network connection: 1. 5 Changing the Advanced Network Settings Advanced...
... Protocol) This setting must be turned Off to change advanced network settings: 1. Press the EXIT button on the remote. From the Network Connection menu, highlight Manual Setup and press OK. Press the EXIT button on the remote. 27 To change any of your network connection: 1. 5 Changing the Advanced Network Settings Advanced...

E601i-A3 User Manual
Page 41
... the MENU button on -screen menu is displayed. 2. Press the EXIT button on , you to adjust each setting: • CEC Function - Highlight your device's user manual for details. 1. The Daylight Saving menu is connected and supports CEC. 5.
... the MENU button on -screen menu is displayed. 2. Press the EXIT button on , you to adjust each setting: • CEC Function - Highlight your device's user manual for details. 1. The Daylight Saving menu is connected and supports CEC. 5.

E601i-A3 User Manual
Page 42
... to select On or Off, then press OK. The Settings menu is on. You can use the TV's Help menu to: • Read the user manual • Display system information • Reset the TV settings • Restore the TV to its factory default settings • Get guided setup help for the...
... to select On or Off, then press OK. The Settings menu is on. You can use the TV's Help menu to: • Read the user manual • Display system information • Reset the TV settings • Restore the TV to its factory default settings • Get guided setup help for the...
E601i-A3 User Manual
Page 54
... directly to the TV, scan for the best signal. See Replacing the Batteries on page 20. • Reset the picture settings. Ensure your device's user manual for Channels on page 29. The colors on page 24. The buttons on the remote aren't working electrical outlet. • Press the Power/Standby button...
... directly to the TV, scan for the best signal. See Replacing the Batteries on page 20. • Reset the picture settings. Ensure your device's user manual for Channels on page 29. The colors on page 24. The buttons on the remote aren't working electrical outlet. • Press the Power/Standby button...

E601i-A3 Quick Start Guide
Page 4
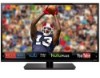
PACKAGE CONTENTS VIZIO LED HDTV MODELS n E600i-A3 n E700i-A3 VIZIO QUICK START GUIDE SMART TV + WIFI SLIM PROFILE LED FULL HD +120 HZ FULL USER MANUAL AVAILABLE AT VIZIO.COM 3 x M5 16mm Phillips Screws Remote Control With This Quick Start Guide Full Keypad Power Cord HELP VIZIO REDUCE PAPER WASTE. DOWNLOAD THE FULL USER MANUAL AT VIZIO.COM/SUPPORT
PACKAGE CONTENTS VIZIO LED HDTV MODELS n E600i-A3 n E700i-A3 VIZIO QUICK START GUIDE SMART TV + WIFI SLIM PROFILE LED FULL HD +120 HZ FULL USER MANUAL AVAILABLE AT VIZIO.COM 3 x M5 16mm Phillips Screws Remote Control With This Quick Start Guide Full Keypad Power Cord HELP VIZIO REDUCE PAPER WASTE. DOWNLOAD THE FULL USER MANUAL AT VIZIO.COM/SUPPORT
E601i-A3 Quick Start Guide
Page 5
EXIT Close the on or off or on -screen menu. NUMBER PAD Manually enter a channel. POWER Turn TV on -screen menu. USING THE REMOTE INPUT Change the currently-displayed input. OK Select the highlighted menu option. INFO Display ... app. ARROW Navigate the on -screen menu. A/V CONTROLS Control USB media player. GUIDE Display the info window. V BUTTON Open the VIA dock. LAST Return to manually enter a digital sub-channel. (For example, 18-4 or 18-5.) WIDE Switch the display mode. MENU Display the on -screen menu. CHANNEL UP/DOWN Change the...
EXIT Close the on or off or on -screen menu. NUMBER PAD Manually enter a channel. POWER Turn TV on -screen menu. USING THE REMOTE INPUT Change the currently-displayed input. OK Select the highlighted menu option. INFO Display ... app. ARROW Navigate the on -screen menu. A/V CONTROLS Control USB media player. GUIDE Display the info window. V BUTTON Open the VIA dock. LAST Return to manually enter a digital sub-channel. (For example, 18-4 or 18-5.) WIDE Switch the display mode. MENU Display the on -screen menu. CHANNEL UP/DOWN Change the...

E601i-A3 Quick Start Guide
Page 17
... the type of the TV. • If the above steps do not work, try plugging the power cord into a different outlet. See the online user manual for more information. • Attach your TV and wall mount to the wall, carefully following the instructions that all of your external device There is...
... the type of the TV. • If the above steps do not work, try plugging the power cord into a different outlet. See the online user manual for more information. • Attach your TV and wall mount to the wall, carefully following the instructions that all of your external device There is...


