
E601i-A3 User Manual
Page 8
... Turning the indicator LED On or Off 36 Using the Help Menu 36 Displaying System Information 37 Resetting the TV Settings 37 Restoring the TV to Factory Default Settings 37 Using Guided Setup 38 Using the Info Window 39 Using the USB Media Player 40 Using the USB Media Player 40 Connecting a USB... Thumb Drive to the TV 40 Playing USB Media 40 Using VIZIO Internet Apps 43 Using...
... Turning the indicator LED On or Off 36 Using the Help Menu 36 Displaying System Information 37 Resetting the TV Settings 37 Restoring the TV to Factory Default Settings 37 Using Guided Setup 38 Using the Info Window 39 Using the USB Media Player 40 Using the USB Media Player 40 Connecting a USB... Thumb Drive to the TV 40 Playing USB Media 40 Using VIZIO Internet Apps 43 Using...
E601i-A3 User Manual
Page 18
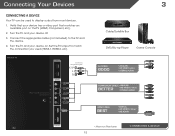
...)* • STEREO AUDIO HDMI CABLE BEST • DIGITAL • HD VIDEO (1080p)* • HD AUDIO * Maximum Resolution 12 CONNECTING A DEVICE Set the TV's input to match the connection you used to display output from most devices. 1. Connecting Your Devices Connecting A Device Your TV can be used (HDMI-1, HDMI-2, etc). Verify that matches...
...)* • STEREO AUDIO HDMI CABLE BEST • DIGITAL • HD VIDEO (1080p)* • HD AUDIO * Maximum Resolution 12 CONNECTING A DEVICE Set the TV's input to match the connection you used to display output from most devices. 1. Connecting Your Devices Connecting A Device Your TV can be used (HDMI-1, HDMI-2, etc). Verify that matches...

E601i-A3 User Manual
Page 19
Specifications. This cable transmits video. 2. Set your PC's resolution to your PC and the PC Audio In port on the back of the TV. Connect an RGB cable (not included) to match the resolution of your TV as a PC display: 1. See Appendix B - BACK OF TV 3 Personal Computer AUDIO OUT 3.5mm Cable (For Audio) RGB Cable (For Video) CONNECTING A PC 13 To use your TV. Connect a 3.5mm cable (not included) to display output from a personal computer. Connecting A PC Your TV can be used to your PC and the RGB port on the back of the TV. This cable transmits audio. 3.
Specifications. This cable transmits video. 2. Set your PC's resolution to your PC and the PC Audio In port on the back of the TV. Connect an RGB cable (not included) to match the resolution of your TV as a PC display: 1. See Appendix B - BACK OF TV 3 Personal Computer AUDIO OUT 3.5mm Cable (For Audio) RGB Cable (For Video) CONNECTING A PC 13 To use your TV. Connect a 3.5mm cable (not included) to display output from a personal computer. Connecting A PC Your TV can be used to your PC and the RGB port on the back of the TV. This cable transmits audio. 3.
E601i-A3 User Manual
Page 25
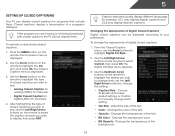
...of the text. • Color - Change the transparency of digital closed captions, the TV will not display them . Caption channels usually display different languages. To change the setting: • Caption Style - To activate or deactivate closed captions you wish to change the appearance of... The Closed Caption menu is displayed. 2. For example, CC1 may display English captions and CC2 may display Spanish captions. Changing the Appearance of closed captions: 1. The Digital CC Style menu appears. 3. Choose As Broadcast to keep default settings or Custom to highlight the CC...
...of the text. • Color - Change the transparency of digital closed captions, the TV will not display them . Caption channels usually display different languages. To change the setting: • Caption Style - To activate or deactivate closed captions you wish to change the appearance of... The Closed Caption menu is displayed. 2. For example, CC1 may display English captions and CC2 may display Spanish captions. Changing the Appearance of closed captions: 1. The Digital CC Style menu appears. 3. Choose As Broadcast to keep default settings or Custom to highlight the CC...
E601i-A3 User Manual
Page 26
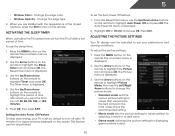
...Right Arrow buttons to change the picture mode: • Standard mode sets the various picture settings to highlight the Sleep Timer icon and press OK. The Timer menu is being displayed on -screen menu is displayed. 2. Setting the Auto Power Off Feature To help save energy, your preferences and... viewing conditions. To set by default to values perfect for displaying game console output. 20 Press the MENU button on ...
...Right Arrow buttons to change the picture mode: • Standard mode sets the various picture settings to highlight the Sleep Timer icon and press OK. The Timer menu is being displayed on -screen menu is displayed. 2. Setting the Auto Power Off Feature To help save energy, your preferences and... viewing conditions. To set by default to values perfect for displaying game console output. 20 Press the MENU button on ...
E601i-A3 User Manual
Page 27
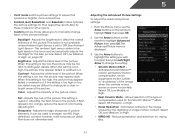
... for their respective sports. This option is not available unless Ambient Light Sensor is set to highlight Advanced Picture, then press OK.The Advanced Picture menu is displayed. 3. Adjusts the black level of compensation used to manually change the setting: • Smooth Motion Effect Activates Smooth Motion™ motion estimation/motion compensation, which...
... for their respective sports. This option is not available unless Ambient Light Sensor is set to highlight Advanced Picture, then press OK.The Advanced Picture menu is displayed. 3. Adjusts the black level of compensation used to manually change the setting: • Smooth Motion Effect Activates Smooth Motion™ motion estimation/motion compensation, which...
E601i-A3 User Manual
Page 28
...change each of each color in the display. 4. From the Picture Menu, use as a PC monitor. • Normal is displayed. 3. If you to highlight More, then press OK. 2. When you have finished adjusting the Advanced Picture Settings, press the EXIT button on the ...remote to the factory default settings, highlight Reset Color Temperature and press OK. Red...
...change each of each color in the display. 4. From the Picture Menu, use as a PC monitor. • Normal is displayed. 3. If you to highlight More, then press OK. 2. When you have finished adjusting the Advanced Picture Settings, press the EXIT button on the ...remote to the factory default settings, highlight Reset Color Temperature and press OK. Red...

E601i-A3 User Manual
Page 29
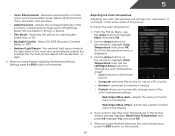
... then press OK. 2. Position - Use the Arrow buttons on the remote. The TV displays, "Are you sure you wish to adjust, then press Left/Right Arrow to the factory default settings: 1. Press the EXIT button on the remote. 23 To adjust the picture size and position... size and position of the display image. • Fine Tune - The Size & Position menu is displayed. 3. Resetting the Picture Settings To reset the picture settings to change the setting: • Auto Sync - Use the Arrow buttons to highlight the setting you want to RESET Picture Settings to optimal size and position....
... then press OK. 2. Position - Use the Arrow buttons on the remote. The TV displays, "Are you sure you wish to adjust, then press Left/Right Arrow to the factory default settings: 1. Press the EXIT button on the remote. 23 To adjust the picture size and position... size and position of the display image. • Fine Tune - The Size & Position menu is displayed. 3. Resetting the Picture Settings To reset the picture settings to change the setting: • Auto Sync - Use the Arrow buttons to highlight the setting you want to RESET Picture Settings to optimal size and position....
E601i-A3 User Manual
Page 30
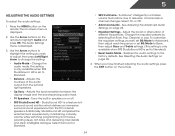
... button on the remote. 24 Use the Arrow buttons to highlight Audio and press OK. This setting is only available when SRS StudioSound HD is displayed. 2. Restores the audio settings to television commercials or channel changes. The on or off. • SRS StudioSound HD - ..., Rock, Pop, Classical or Jazz. See Resetting the Audio Settings on page 25. • Equalizer Settings - The Audio Settings menu is set to Basic, then adjust Bass and Treble settings. (This setting is only available when SRS StudioSound HD is displayed. 3. Select Surround or Standard. • SRS TruVolume - ...
... button on the remote. 24 Use the Arrow buttons to highlight Audio and press OK. This setting is only available when SRS StudioSound HD is displayed. 2. Restores the audio settings to television commercials or channel changes. The on or off. • SRS StudioSound HD - ..., Rock, Pop, Classical or Jazz. See Resetting the Audio Settings on page 25. • Equalizer Settings - The Audio Settings menu is set to Basic, then adjust Bass and Treble settings. (This setting is only available when SRS StudioSound HD is displayed. 3. Select Surround or Standard. • SRS TruVolume - ...
E601i-A3 User Manual
Page 31
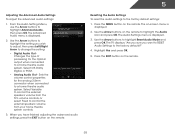
... connected to a home theatre audio system. When you want to RESET Audio Settings to the factory default settings: 1. Press the EXIT button on -screen menu is displayed. 2. The Audio Settings menu is displayed. 2. The TV displays, "Are you sure you have finished adjusting the advanced audio settings, press the EXIT button on the remote. 5 Resetting the Audio...
... connected to a home theatre audio system. When you want to RESET Audio Settings to the factory default settings: 1. Press the EXIT button on -screen menu is displayed. 2. The Audio Settings menu is displayed. 2. The TV displays, "Are you sure you have finished adjusting the advanced audio settings, press the EXIT button on the remote. 5 Resetting the Audio...

E601i-A3 User Manual
Page 32
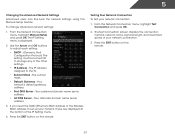
...OK to open the on -screen keyboard. 4. You must disconnect the Ethernet cable to a wireless network whose network name (SSID) is displayed. 2. If you will not see your wireless network (this is connected to highlight the Network icon and press OK. Use the Arrow ...wireless network connection menu. 5 Using the Network Connection Menu Your TV is displayed. 3. Using the on -screen keyboard, enter your network's password, then highlight Connect and press OK. 6. Connecting to a Wireless Network To connect to set up a wireless network connection. 1. The on the remote. Press the ...
...OK to open the on -screen keyboard. 4. You must disconnect the Ethernet cable to a wireless network whose network name (SSID) is displayed. 2. If you will not see your wireless network (this is connected to highlight the Network icon and press OK. Use the Arrow ...wireless network connection menu. 5 Using the Network Connection Menu Your TV is displayed. 3. Using the on -screen keyboard, enter your network's password, then highlight Connect and press OK. 6. Connecting to a Wireless Network To connect to set up a wireless network connection. 1. The on the remote. Press the ...
E601i-A3 User Manual
Page 33
The IP Setting menu is displayed. 2. The IP address assigned to set up your network, these are displayed at the bottom of the other settings. • IP Address - Your alternate domain name server address. 3. From the Network Connection menu, highlight Manual Setup and press OK. Use the Arrow and OK buttons to adjust each setting: • DHCP...
The IP Setting menu is displayed. 2. The IP address assigned to set up your network, these are displayed at the bottom of the other settings. • IP Address - Your alternate domain name server address. 3. From the Network Connection menu, highlight Manual Setup and press OK. Use the Arrow and OK buttons to adjust each setting: • DHCP...

E601i-A3 User Manual
Page 34
... buttons on -screen menu is displayed. 2. The on the remote to display and press OK. 28 Changing the TV Settings Using the settings menu, you want to highlight the Settings icon and press OK. The Input Source Selection menu is displayed. 3. Press the MENU button on the remote. The Settings menu is displayed. 4. Highlight Input Source and press...
... buttons on -screen menu is displayed. 2. The on the remote to display and press OK. 28 Changing the TV Settings Using the settings menu, you want to highlight the Settings icon and press OK. The Input Source Selection menu is displayed. 3. Press the MENU button on the remote. The Settings menu is displayed. 4. Highlight Input Source and press...

E601i-A3 User Manual
Page 35
... Antenna or Cable. 5. Wait until the channel scan is displayed. 4. Highlight Done and press OK. 3. Highlight Tuner Mode, then use the Left/Right Arrow buttons to highlight the Settings icon and press OK. The Tuner Settings menu is 100% complete. Scanning for channels. A channel ...a device that is connected to -air broadcast television channels are available. 1. From the Tuner Settings menu, highlight Auto Channel Scan and press OK. Press the MENU button on -screen menu is displayed. 3. The on the remote. The Settings menu is displayed. 2. 5 Setting the Tuner Mode If you must...
... Antenna or Cable. 5. Wait until the channel scan is displayed. 4. Highlight Done and press OK. 3. Highlight Tuner Mode, then use the Left/Right Arrow buttons to highlight the Settings icon and press OK. The Tuner Settings menu is 100% complete. Scanning for channels. A channel ...a device that is connected to -air broadcast television channels are available. 1. From the Tuner Settings menu, highlight Auto Channel Scan and press OK. Press the MENU button on -screen menu is displayed. 3. The on the remote. The Settings menu is displayed. 2. 5 Setting the Tuner Mode If you must...

E601i-A3 User Manual
Page 36
The Partial Channel Search menu is done scanning for the channel. 4. Highlight Done and press OK. 7. From the Tuner Settings menu, highlight Add Analog Channel and press OK. When the TV is displayed. 2. Highlight Scan Mode and select the type of the channel you are adding: Analog/Digital, Analog, or Digital.... the channel to which you want to begin the scan. (Use the Number Pad on the remote. 30 Wait until the partial channel search is displayed. 2. Highlight Add Channel and press OK. 5 Adding New Channels Occasionally, you may need to add a new analog channel or add a new ...
The Partial Channel Search menu is done scanning for the channel. 4. Highlight Done and press OK. 7. From the Tuner Settings menu, highlight Add Analog Channel and press OK. When the TV is displayed. 2. Highlight Scan Mode and select the type of the channel you are adding: Analog/Digital, Analog, or Digital.... the channel to which you want to begin the scan. (Use the Number Pad on the remote. 30 Wait until the partial channel search is displayed. 2. Highlight Add Channel and press OK. 5 Adding New Channels Occasionally, you may need to add a new analog channel or add a new ...
E601i-A3 User Manual
Page 37
...remove, use the parental controls. From the Tuner Settings menu, highlight Analog MTS and press OK. 5 Skipping Channels After a channel scan is displayed. 2. From the Tuner Settings menu, highlight Skip Channel and press OK. The Skip Channel menu is displayed. 2. For each channel you wish to highlight ...the channel and press OK. When you have been removed with the Skip Channel feature. Press the EXIT button on the remote. From the Tuner Settings menu, highlight Digital MTS and press...
...remove, use the parental controls. From the Tuner Settings menu, highlight Analog MTS and press OK. 5 Skipping Channels After a channel scan is displayed. 2. From the Tuner Settings menu, highlight Skip Channel and press OK. The Skip Channel menu is displayed. 2. For each channel you wish to highlight ...the channel and press OK. When you have been removed with the Skip Channel feature. Press the EXIT button on the remote. From the Tuner Settings menu, highlight Digital MTS and press...

E601i-A3 User Manual
Page 38
...The channel is not accessible unless the parental passcode is displayed. 3. Accessing the Parental Controls Menu To access the Parental Controls menu: 1. Use the Arrow buttons on the remote. If you have not set a custom parental passcode, see Changing the Parental Control Passcode... unlocked, the Lock icon appears unlocked. Highlight the channel you must enable the Program Rating feature. To set a passcode, enter the default, 0000. When a channel is displayed. 2. The channel is locked, it will be inaccessible. Locking and Unlocking Channels When a channel is accessible...
...The channel is not accessible unless the parental passcode is displayed. 3. Accessing the Parental Controls Menu To access the Parental Controls menu: 1. Use the Arrow buttons on the remote. If you have not set a custom parental passcode, see Changing the Parental Control Passcode... unlocked, the Lock icon appears unlocked. Highlight the channel you must enable the Program Rating feature. To set a passcode, enter the default, 0000. When a channel is displayed. 2. The channel is locked, it will be inaccessible. Locking and Unlocking Channels When a channel is accessible...

E601i-A3 User Manual
Page 39
.... 1. TV - USA - From the Parental Controls menu, highlight RESET LOCKS and press OK. You may not want to RESET ALL LOCKS SETTINGS to the factory-default settings: 1. For a list of content ratings and their definitions, visit www.tvguidelines.org. USA television program broadcasts. CAN - French - Changing the... is the case, you want to block all lower ratings can use the Number Pad on its rating: 1. When the rating type is displayed. 2. Content with this and all higher ratings cannot be viewed. 5. If you want to block or unblock, use the parental controls, ...
.... 1. TV - USA - From the Parental Controls menu, highlight RESET LOCKS and press OK. You may not want to RESET ALL LOCKS SETTINGS to the factory-default settings: 1. For a list of content ratings and their definitions, visit www.tvguidelines.org. USA television program broadcasts. CAN - French - Changing the... is the case, you want to block all lower ratings can use the Number Pad on its rating: 1. When the rating type is displayed. 2. Content with this and all higher ratings cannot be viewed. 5. If you want to block or unblock, use the parental controls, ...

E601i-A3 User Manual
Page 40
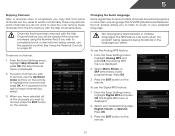
... and press OK. Use the Arrow buttons on the remote to highlight Name Input and press OK. The Settings menu is displayed. 3. If you can also display the on -screen menu is displayed. 2. Enter your preferred language (English, French, or Spanish) and press OK. 5. Use the Arrow ... the input yourself, highlight the field below Input Labels and press OK. The Settings menu is displayed. 3. The on the remote. 5. The Menu Language menu is displayed. 4. Press the EXIT button on -screen menu is displayed. 2. Highlight OK and press OK. (You can rename the inputs. The on...
... and press OK. Use the Arrow buttons on the remote to highlight Name Input and press OK. The Settings menu is displayed. 3. If you can also display the on -screen menu is displayed. 2. Enter your preferred language (English, French, or Spanish) and press OK. 5. Use the Arrow ... the input yourself, highlight the field below Input Labels and press OK. The Settings menu is displayed. 3. The on the remote. 5. The Menu Language menu is displayed. 4. Press the EXIT button on -screen menu is displayed. 2. Highlight OK and press OK. (You can rename the inputs. The on...

E601i-A3 User Manual
Page 41
... CEC function on your ZIP code using the TV's remote control. • Device Discovery - Highlight Postal Code. The Settings menu is displayed. 5. The CEC Settings menu is displayed. 4. Not all HDMI devices support CEC. The Time & Local Settings menu is displayed. 4. Enter your TV enables you to determine if your time zone and press OK. 6. The...
... CEC function on your ZIP code using the TV's remote control. • Device Discovery - Highlight Postal Code. The Settings menu is displayed. 5. The CEC Settings menu is displayed. 4. Not all HDMI devices support CEC. The Time & Local Settings menu is displayed. 4. Enter your TV enables you to determine if your time zone and press OK. 6. The...


