
E601i-A3 User Manual
Page 1
USER GUIDE MMODDEELLS // E3D320VX // E3ED64200V1Xi-A3 // E3ED74700V1Xi-A3 INSTALLING YOUR new TV CONTROLS & CONNECTIONS CONNECTING YOUR DEVICES USING THE ON-SCREEN MENU USING THE USB MEDIA PLAYER USING VIZIO INTERNET APPS TROUBLESHOOTING & SUPPORT Help, SPECs, warranty & LEGAL
USER GUIDE MMODDEELLS // E3D320VX // E3ED64200V1Xi-A3 // E3ED74700V1Xi-A3 INSTALLING YOUR new TV CONTROLS & CONNECTIONS CONNECTING YOUR DEVICES USING THE ON-SCREEN MENU USING THE USB MEDIA PLAYER USING VIZIO INTERNET APPS TROUBLESHOOTING & SUPPORT Help, SPECs, warranty & LEGAL

E601i-A3 User Manual
Page 3
...of your product and retain them for future reference. When you either: • Register your VIZIO product at (877) 878-4946. Install in electric shock or fire.To prevent your TV from the apparatus. • Only use attachments/accessories specified by the manufacturer. • Use... to alert you see this apparatus near any ventilation openings. Important Safety Instructions Your TV is intended to ensure there are provided for your investment beyond the standard warranty, VIZIO offers on or pinched, particularly at plugs, convenience receptacles, and the point where ...
...of your product and retain them for future reference. When you either: • Register your VIZIO product at (877) 878-4946. Install in electric shock or fire.To prevent your TV from the apparatus. • Only use attachments/accessories specified by the manufacturer. • Use... to alert you see this apparatus near any ventilation openings. Important Safety Instructions Your TV is intended to ensure there are provided for your investment beyond the standard warranty, VIZIO offers on or pinched, particularly at plugs, convenience receptacles, and the point where ...
E601i-A3 User Manual
Page 4
...; The power cord must be operated only from tip-over. • Unplug this apparatus during electrical storms. • Unplug your TV. • Your TV should be replaced when using different voltage than the specified voltage may expose you are not blocked or covered. Any other hazards. Opening...presence of un-isolated, dangerous voltage within an equilateral triangle is used for long period of the display. To ensure reliable operation of your TV and to smoke. Do not place any way, such as a radiator, heater, oven, amplifier etc. If you to qualified service personnel...
...; The power cord must be operated only from tip-over. • Unplug this apparatus during electrical storms. • Unplug your TV. • Your TV should be replaced when using different voltage than the specified voltage may expose you are not blocked or covered. Any other hazards. Opening...presence of un-isolated, dangerous voltage within an equilateral triangle is used for long period of the display. To ensure reliable operation of your TV and to smoke. Do not place any way, such as a radiator, heater, oven, amplifier etc. If you to qualified service personnel...
E601i-A3 User Manual
Page 5
.... • The exclamation point within the product's enclosure that contained in the operating instructions unless you are unplugged before moving your TV in environments with liquids, such as the disconnect device, the disconnect device shall remain readily operable. • CAUTION - Incorrect polarities...or high humidity may cause fire or electric shock. • Follow instructions for use by qualified service personnel only. Operating your TV. Pulling on the apparatus. • The mains plug or appliance coupler is damaged, the internal components may function abnormally. To...
.... • The exclamation point within the product's enclosure that contained in the operating instructions unless you are unplugged before moving your TV in environments with liquids, such as the disconnect device, the disconnect device shall remain readily operable. • CAUTION - Incorrect polarities...or high humidity may cause fire or electric shock. • Follow instructions for use by qualified service personnel only. Operating your TV. Pulling on the apparatus. • The mains plug or appliance coupler is damaged, the internal components may function abnormally. To...

E601i-A3 User Manual
Page 6
Remember, the screen of time, unplug the TV from the wall outlet and disconnect the antenna or cable system. Power Lines Do not ...where it is left unattended or unused for long periods of the coaxial cable is intended to be connected to the TV, make sure that the antenna or cable system is electrically grounded to provide some protection against voltage surges and static ...the grounding conductors, location of antenna discharge unit, connection to grounding electrodes, and requirements of the TV during a lightning storm or when it could fall into such power lines or circuits.
Remember, the screen of time, unplug the TV from the wall outlet and disconnect the antenna or cable system. Power Lines Do not ...where it is left unattended or unused for long periods of the coaxial cable is intended to be connected to the TV, make sure that the antenna or cable system is electrically grounded to provide some protection against voltage surges and static ...the grounding conductors, location of antenna discharge unit, connection to grounding electrodes, and requirements of the TV during a lightning storm or when it could fall into such power lines or circuits.
E601i-A3 User Manual
Page 7
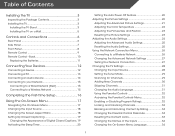
...Menu 26 Connecting to a Wireless Network 26 Changing the Advanced Network Settings 27 Testing Your Network Connection 27 Changing the TV Settings 28 Changing the Input Source 28 Setting the Tuner Mode 29 Scanning for Channels 29 Adding New Channels 30 Skipping...33 Changing the Parental Control Passcode 33 Resetting the Content Locks 33 Changing the Names of Contents Installing the TV 3 Inspecting the Package Contents 3 Installing the TV 3 Installing the TV Stand 3 Installing the TV on a Wall 5 Controls and Connections 6 Rear Panel 6 Side Panel 7 Front Panel 8 Remote Control...
...Menu 26 Connecting to a Wireless Network 26 Changing the Advanced Network Settings 27 Testing Your Network Connection 27 Changing the TV Settings 28 Changing the Input Source 28 Setting the Tuner Mode 29 Scanning for Channels 29 Adding New Channels 30 Skipping...33 Changing the Parental Control Passcode 33 Resetting the Content Locks 33 Changing the Names of Contents Installing the TV 3 Inspecting the Package Contents 3 Installing the TV 3 Installing the TV Stand 3 Installing the TV on a Wall 5 Controls and Connections 6 Rear Panel 6 Side Panel 7 Front Panel 8 Remote Control...
E601i-A3 User Manual
Page 8
... the CEC Settings 35 Turning the indicator LED On or Off 36 Using the Help Menu 36 Displaying System Information 37 Resetting the TV Settings 37 Restoring the TV to Factory Default Settings 37 Using Guided Setup 38 Using the Info Window 39 Using the USB Media Player 40 Using the USB... Media Player 40 Connecting a USB Thumb Drive to the TV 40 Playing USB Media 40 Using VIZIO Internet Apps 43 Using the VIA Shortcut Buttons 43 Using the VIA Dock 43 Moving an App on the VIA Dock 43...
... the CEC Settings 35 Turning the indicator LED On or Off 36 Using the Help Menu 36 Displaying System Information 37 Resetting the TV Settings 37 Restoring the TV to Factory Default Settings 37 Using Guided Setup 38 Using the Info Window 39 Using the USB Media Player 40 Using the USB... Media Player 40 Connecting a USB Thumb Drive to the TV 40 Playing USB Media 40 Using VIZIO Internet Apps 43 Using the VIA Shortcut Buttons 43 Using the VIA Dock 43 Moving an App on the VIA Dock 43...
E601i-A3 User Manual
Page 9
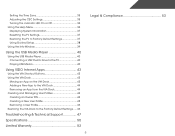
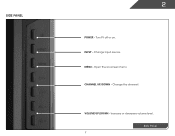
...M5 16mm Phillips Screws Package Contents 3 TV on an uneven, unstable, or non-level surface • It is pushed, pulled, or otherwise improperly moved • If an earthquake occurs and the TV is missing or damaged. VIZIO HDTV Installing the TV After removing the TV from falling over if: • It... is placed on Stand Installing the TV 1 Inspecting the Package Contents Before installing your new TV, take a moment to support the weight of the TV and keep it ...
...M5 16mm Phillips Screws Package Contents 3 TV on an uneven, unstable, or non-level surface • It is pushed, pulled, or otherwise improperly moved • If an earthquake occurs and the TV is missing or damaged. VIZIO HDTV Installing the TV After removing the TV from falling over if: • It... is placed on Stand Installing the TV 1 Inspecting the Package Contents Before installing your new TV, take a moment to support the weight of the TV and keep it ...

E601i-A3 User Manual
Page 10
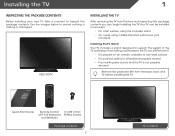
...least 1" of space between the back of Base Place the TV screen-down on a clean, flat surface. One person should hold the base while the other objects (walls, etc). To prevent scratches or damage to the screen, place the TV on a flat, level, and stable surface. It is recommended... that two people perform the base install procedure. 1 1 Back of TV 2 Bottom of the TV and any other tightens the screws. 4 Move the TV with attached stand into the base with the TV and tighten the three (3) included Phillips screws into an upright position and place on a ...
...least 1" of space between the back of Base Place the TV screen-down on a clean, flat surface. One person should hold the base while the other objects (walls, etc). To prevent scratches or damage to the screen, place the TV on a flat, level, and stable surface. It is recommended... that two people perform the base install procedure. 1 1 Back of TV 2 Bottom of the TV and any other tightens the screws. 4 Move the TV with attached stand into the base with the TV and tighten the three (3) included Phillips screws into an upright position and place on a ...
E601i-A3 User Manual
Page 11
... the instructions that you have the correct mount for the weight of the TV. Remove the base by loosening and removing the screws. 4. See Appendix B - To prevent injury or damage to the TV, ask someone to the wall. 5 E601i-A3 E701i-A3 Screw Size: Screw Length: Hole Pattern: M6 10mm 400mm (V) x 400mm (H) M6 10mm 400mm...
... the instructions that you have the correct mount for the weight of the TV. Remove the base by loosening and removing the screws. 4. See Appendix B - To prevent injury or damage to the TV, ask someone to the wall. 5 E601i-A3 E701i-A3 Screw Size: Screw Length: Hole Pattern: M6 10mm 400mm (V) x 400mm (H) M6 10mm 400mm...
E601i-A3 User Manual
Page 13
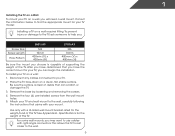
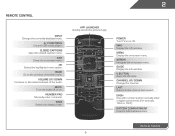
VOLUME UP/DOWN - Side Panel 7 INPUT - Change input source. CHANNEL UP/DOWN - MENU - Increase or decrease volume level. Open the on . Turn TV off or on -screen menu. Side Panel 2 POWER - Change the channel.
VOLUME UP/DOWN - Side Panel 7 INPUT - Change input source. CHANNEL UP/DOWN - MENU - Increase or decrease volume level. Open the on . Turn TV off or on -screen menu. Side Panel 2 POWER - Change the channel.
E601i-A3 User Manual
Page 15
Power Turn TV on -screen menu. V Button Open the VIA dock. Remote Control 9 Back Go to the previous on or off or on -screen menu. Channel Up/Down ...
Power Turn TV on -screen menu. V Button Open the VIA dock. Remote Control 9 Back Go to the previous on or off or on -screen menu. Channel Up/Down ...
E601i-A3 User Manual
Page 18
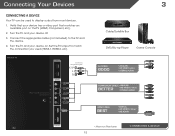
... to component inputs: Y/V L R Match colored connectors to match the connection you used to the TV and the device. 4. Set the TV's input to colored ports. 3 Cable/Satellite Box DVD/Blu-ray Player Game Console AV CABLE GOOD • ANALOG • SD VIDEO (...• STEREO AUDIO HDMI CABLE BEST • DIGITAL • HD VIDEO (1080p)* • HD AUDIO * Maximum Resolution 12 CONNECTING A DEVICE Turn the TV and your device has a video port that matches an available port on . Connect the appropriate cable (not included) to display output from most devices. 1. Verify...
... to component inputs: Y/V L R Match colored connectors to match the connection you used to the TV and the device. 4. Set the TV's input to colored ports. 3 Cable/Satellite Box DVD/Blu-ray Player Game Console AV CABLE GOOD • ANALOG • SD VIDEO (...• STEREO AUDIO HDMI CABLE BEST • DIGITAL • HD VIDEO (1080p)* • HD AUDIO * Maximum Resolution 12 CONNECTING A DEVICE Turn the TV and your device has a video port that matches an available port on . Connect the appropriate cable (not included) to display output from most devices. 1. Verify...

E601i-A3 User Manual
Page 19
This cable transmits video. 2. Set your PC's resolution to your TV. See Appendix B - Specifications. Connect a 3.5mm cable (not included) to match the resolution of your PC and the PC Audio In port on the back of the TV. Connecting A PC Your TV can be used to your TV as a PC display: 1. BACK OF TV 3 Personal Computer AUDIO OUT 3.5mm Cable (For Audio) RGB Cable (For Video) CONNECTING A PC 13 Connect an RGB cable (not included) to display output from a personal computer. This cable transmits audio. 3. To use your PC and the RGB port on the back of the TV.
This cable transmits video. 2. Set your PC's resolution to your TV. See Appendix B - Specifications. Connect a 3.5mm cable (not included) to match the resolution of your PC and the PC Audio In port on the back of the TV. Connecting A PC Your TV can be used to your TV as a PC display: 1. BACK OF TV 3 Personal Computer AUDIO OUT 3.5mm Cable (For Audio) RGB Cable (For Video) CONNECTING A PC 13 Connect an RGB cable (not included) to display output from a personal computer. This cable transmits audio. 3. To use your PC and the RGB port on the back of the TV.
E601i-A3 User Manual
Page 20
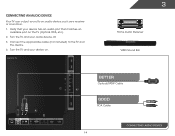
Turn the TV and your device on the TV (Optical, RCA, etc). 2. Verify that your audio device off. 3. BACK OF TV 3 Home Audio Receiver VIZIO Sound Bar BETTER Optical/SPDIF Cable AUDIO OUT GOOD RCA Cable CONNECTING AUDIO DEVICE 14 Turn the TV and your device has an audio port that matches an available port on . Connecting an audio device Your TV can output sound to the TV and the device. 4. Connect the appropriate cable (not included) to an audio device, such as a receiver or sound bar. 1.
Turn the TV and your device on the TV (Optical, RCA, etc). 2. Verify that your audio device off. 3. BACK OF TV 3 Home Audio Receiver VIZIO Sound Bar BETTER Optical/SPDIF Cable AUDIO OUT GOOD RCA Cable CONNECTING AUDIO DEVICE 14 Turn the TV and your device has an audio port that matches an available port on . Connecting an audio device Your TV can output sound to the TV and the device. 4. Connect the appropriate cable (not included) to an audio device, such as a receiver or sound bar. 1.

E601i-A3 User Manual
Page 21
...See below. 2. Ensure you have a router or modem broadcasting as high-speed wireless signal (802.11n recommended). 2. Connecting to your network Your TV is internet-ready. Connect an ethernet cable to your home network with a Wired or Wireless connection. Use the Guided Network Setup to the ethernet... port on the back of the TV. Use the Guided Network Setup to a Wired Network (Best) 1. Connecting to configure the TV. It can be connected to your router and to configure the TV. Ethernet Cable AUDIO OUT Router / Modem CONNECTING TO A WIRED...
...See below. 2. Ensure you have a router or modem broadcasting as high-speed wireless signal (802.11n recommended). 2. Connecting to your network Your TV is internet-ready. Connect an ethernet cable to your home network with a Wired or Wireless connection. Use the Guided Network Setup to the ethernet... port on the back of the TV. Use the Guided Network Setup to a Wired Network (Best) 1. Connecting to configure the TV. It can be connected to your router and to configure the TV. Ethernet Cable AUDIO OUT Router / Modem CONNECTING TO A WIRED...
E601i-A3 User Manual
Page 22
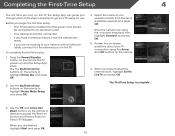
... the network key using the Arrow and OK buttons on -screen keyboard, then highlight Connect and press OK. 5. Answer the on-screen questions about your TV connection using the on the remote. 6. Select the name of your wireless network from the list of the steps necessary to get your network with... an ethernet cable, connect it to the ethernet port on the remote to your TV ready for Yahoo! When you are connecting to read and accept the Terms of Service and Privacy Policy for use. When you have the network...
... the network key using the Arrow and OK buttons on -screen keyboard, then highlight Connect and press OK. 5. Answer the on-screen questions about your TV connection using the on the remote. 6. Select the name of your wireless network from the list of the steps necessary to get your network with... an ethernet cable, connect it to the ethernet port on the remote to your TV ready for Yahoo! When you are connecting to read and accept the Terms of Service and Privacy Policy for use. When you have the network...
E601i-A3 User Manual
Page 23
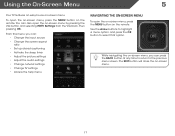
... close the on the remote. To open the on-screen menu, press the MENU button on -screen menu. 17 Using the On-Screen Menu 5 Your TV features an easy-to-use on -screen menu, you can: • Change the input source • Change the screen aspect ratio • Set up closed... captioning • Activate the sleep timer • Adjust the picture settings • Adjust the audio settings • Change network settings • Change TV settings • Access the help menu Navigating the On-Screen Menu To open the on-screen menu, press the MENU button on -screen menu by...
... close the on the remote. To open the on-screen menu, press the MENU button on -screen menu. 17 Using the On-Screen Menu 5 Your TV features an easy-to-use on -screen menu, you can: • Change the input source • Change the screen aspect ratio • Set up closed... captioning • Activate the sleep timer • Adjust the picture settings • Adjust the audio settings • Change network settings • Change TV settings • Access the help menu Navigating the On-Screen Menu To open the on-screen menu, press the MENU button on -screen menu by...
E601i-A3 User Manual
Page 24
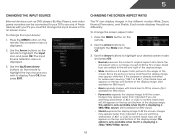
...OK. Each mode displays the picture differently. Since the picture is displaying a 720p/1080i/1080p source. 18 This option is only available when the TV is being stretched, the display image may appear distorted. 5 Changing the Input Source External devices such as DVD players, Blu-Ray Players, and ...35:1) content, black bars will still appear on -screen menu is already formatted for RBG input) • Panoramic expands the display image to your TV.To use one of the display image. If you wish to fill the screen. Use the Arrow buttons on the remote. 2. Changing the Screen ...
...OK. Each mode displays the picture differently. Since the picture is displaying a 720p/1080i/1080p source. 18 This option is only available when the TV is being stretched, the display image may appear distorted. 5 Changing the Input Source External devices such as DVD players, Blu-Ray Players, and ...35:1) content, black bars will still appear on -screen menu is already formatted for RBG input) • Panoramic expands the display image to your TV.To use one of the display image. If you wish to fill the screen. Use the Arrow buttons on the remote. 2. Changing the Screen ...
E601i-A3 User Manual
Page 25
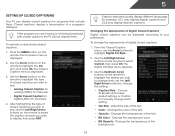
... From the Closed Caption menu, use the Left/Right Arrow buttons on -screen menu is displayed. 2. Adjust the size of closed captions, the TV will not display them . To activate or deactivate closed captions you are viewing is displayed. 3. Use the Arrow buttons on the remote. Use the... settings or Custom to highlight Digital CC Style. 2. If the program you wish to see : • Analog Closed Caption for analog (NTSC) TV channels. • Digital Closed Caption for programs that include them . The Closed Caption menu is not being broadcast with closed captions you wish to ...
... From the Closed Caption menu, use the Left/Right Arrow buttons on -screen menu is displayed. 2. Adjust the size of closed captions, the TV will not display them . To activate or deactivate closed captions you are viewing is displayed. 3. Use the Arrow buttons on the remote. Use the... settings or Custom to highlight Digital CC Style. 2. If the program you wish to see : • Analog Closed Caption for analog (NTSC) TV channels. • Digital Closed Caption for programs that include them . The Closed Caption menu is not being broadcast with closed captions you wish to ...


