
E601i-A3 User Manual
Page 5
... not be used as the disconnect device, the disconnect device shall remain readily operable. • CAUTION - Do not try to leak which can damage the remote control or injure the operator. Continued use of your TV. - When your TV will not be exposed to rain or other cables are unplugged before moving...
... not be used as the disconnect device, the disconnect device shall remain readily operable. • CAUTION - Do not try to leak which can damage the remote control or injure the operator. Continued use of your TV. - When your TV will not be exposed to rain or other cables are unplugged before moving...
E601i-A3 User Manual
Page 7
... Scanning for Channels 29 Adding New Channels 30 Skipping Channels 31 Changing the Audio Language 31 Using the Parental Controls 32 Accessing the Parental Controls Menu 32 Enabling or Disabling Program Ratings 32 Locking and Unlocking Channels 32 Blocking and Unblocking Content by Rating ... the TV 3 Inspecting the Package Contents 3 Installing the TV 3 Installing the TV Stand 3 Installing the TV on a Wall 5 Controls and Connections 6 Rear Panel 6 Side Panel 7 Front Panel 8 Remote Control 9 Remote Control - Table of the Inputs 34 Changing the On-Screen Menu Language 34 1
... Scanning for Channels 29 Adding New Channels 30 Skipping Channels 31 Changing the Audio Language 31 Using the Parental Controls 32 Accessing the Parental Controls Menu 32 Enabling or Disabling Program Ratings 32 Locking and Unlocking Channels 32 Blocking and Unblocking Content by Rating ... the TV 3 Inspecting the Package Contents 3 Installing the TV 3 Installing the TV Stand 3 Installing the TV on a Wall 5 Controls and Connections 6 Rear Panel 6 Side Panel 7 Front Panel 8 Remote Control 9 Remote Control - Table of the Inputs 34 Changing the On-Screen Menu Language 34 1
E601i-A3 User Manual
Page 9
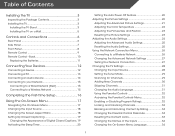
... and keep it from falling over if: • It is placed on Stand Use the images below to inspect the package contents. Quick Start Guide Remote Control with Full Keyboard and Batteries 3 x M5 16mm Phillips Screws Package Contents 3 TV on an uneven, unstable, or non-level surface • It is ... Remove the protective film from the box and inspecting the package contents you can begin installing the TV. Your TV can still fall over . VIZIO HDTV Installing the TV After removing the TV from the base, neck, and TV before installing the TV. Installing the TV 1 Inspecting the ...
... and keep it from falling over if: • It is placed on Stand Use the images below to inspect the package contents. Quick Start Guide Remote Control with Full Keyboard and Batteries 3 x M5 16mm Phillips Screws Package Contents 3 TV on an uneven, unstable, or non-level surface • It is ... Remove the protective film from the box and inspecting the package contents you can begin installing the TV. Your TV can still fall over . VIZIO HDTV Installing the TV After removing the TV from the base, neck, and TV before installing the TV. Installing the TV 1 Inspecting the ...
E601i-A3 User Manual
Page 15
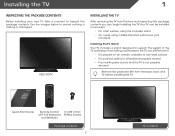
.... Back Go to the previous on -screen menu. Guide Display the info window. Dash Use with number pad to the channel last viewed. Remote Control 9 Volume Up/Down Increase or decrease loudness of the audio. Menu Display the on -screen menu. Channel Up/Down Change the channel. V... Button Open the VIA dock. Power Turn TV on -screen menu. 2 Remote Control Input Change the currently-displayed input. A/V Controls Control USB media player. Exit Close the on or off or on -screen menu. Wide Switch the display mode. Info Display the ...
.... Back Go to the previous on -screen menu. Guide Display the info window. Dash Use with number pad to the channel last viewed. Remote Control 9 Volume Up/Down Increase or decrease loudness of the audio. Menu Display the on -screen menu. Channel Up/Down Change the channel. V... Button Open the VIA dock. Power Turn TV on -screen menu. 2 Remote Control Input Change the currently-displayed input. A/V Controls Control USB media player. Exit Close the on or off or on -screen menu. Wide Switch the display mode. Info Display the ...
E601i-A3 User Manual
Page 16
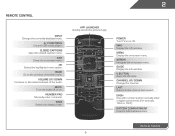
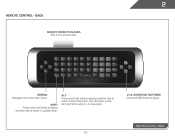
Shortcut buttons Control VIZIO Internet Apps Remote Control - For example, press ALT and W to enter a blue character. Alt Press and hold while pressing another key to enter a # character. V.I.A. BacK do not cover this area This is the transmitter. SHIFT Press and hold while pressing another key to enter a capital letter. Back 10 2 Remote Control - ARROW Navigate the on-screen menu.
Shortcut buttons Control VIZIO Internet Apps Remote Control - For example, press ALT and W to enter a blue character. Alt Press and hold while pressing another key to enter a # character. V.I.A. BacK do not cover this area This is the transmitter. SHIFT Press and hold while pressing another key to enter a capital letter. Back 10 2 Remote Control - ARROW Navigate the on-screen menu.
E601i-A3 User Manual
Page 17
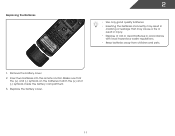
... local hazardous waste regulations. • Keep batteries away from children and pets. 11 Replacing the Batteries AAA BATTERY AAA BATTERY 1. Insert two batteries into the remote control. AAA BATTERY 3D AAA BATTERY 2 • Use only good quality batteries. • Inserting the batteries incorrectly may result in cracking or leakage that the (+) and...
... local hazardous waste regulations. • Keep batteries away from children and pets. 11 Replacing the Batteries AAA BATTERY AAA BATTERY 1. Insert two batteries into the remote control. AAA BATTERY 3D AAA BATTERY 2 • Use only good quality batteries. • Inserting the batteries incorrectly may result in cracking or leakage that the (+) and...
E601i-A3 User Manual
Page 28
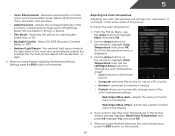
... each color in the display. 4. Select Auto or Off. • Backlight Control - From the Picture Menu, use as a PC monitor. • Normal is displayed. 3. Use the Arrow buttons on the remote. Adjusts the amount of brightness. If you to compensate for large areas of ...DCR (Dynamic Contrast Ratio), or OPC. • Ambient Light Sensor - To adjust the color temperature: 1. Use the Arrow buttons on the remote. 22 Reduces oversaturation of the color temperature settings: Red/Green/Blue Gain - When you have finished adjusting the Advanced Picture Settings, press the...
... each color in the display. 4. Select Auto or Off. • Backlight Control - From the Picture Menu, use as a PC monitor. • Normal is displayed. 3. Use the Arrow buttons on the remote. Adjusts the amount of brightness. If you to compensate for large areas of ...DCR (Dynamic Contrast Ratio), or OPC. • Ambient Light Sensor - To adjust the color temperature: 1. Use the Arrow buttons on the remote. 22 Reduces oversaturation of the color temperature settings: Red/Green/Blue Gain - When you have finished adjusting the Advanced Picture Settings, press the...
E601i-A3 User Manual
Page 31
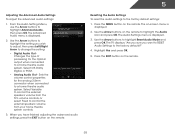
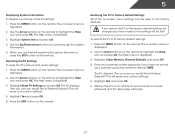
... Audio menu is displayed. 3. Select Variable to control the external speakers' volume from your home theatre system controls. 3. When you have finished adjusting the advanced audio settings, press the EXIT button on the remote to the factory default settings: 1. Use the Arrow buttons on the remote. 5 Resetting the Audio Settings To reset the audio...
... Audio menu is displayed. 3. Select Variable to control the external speakers' volume from your home theatre system controls. 3. When you have finished adjusting the advanced audio settings, press the EXIT button on the remote to the factory default settings: 1. Use the Arrow buttons on the remote. 5 Resetting the Audio Settings To reset the audio...

E601i-A3 User Manual
Page 34
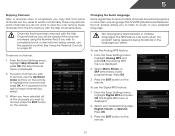
Use the Arrow buttons on the remote. Highlight the input source you can: • Change the input source • Set up the TV tuner • Name the TV inputs • Set up parental controls • Change the on-screen menu language • Set the time • Adjust the CEC settings &#...on -screen menu is displayed. 3. To change the input source from the Settings menu: 1. The on the remote. The Settings menu is displayed. 2. Press the MENU button on the remote to display and press OK. 28 Changing the TV Settings Using the settings menu, you want to highlight the ...
Use the Arrow buttons on the remote. Highlight the input source you can: • Change the input source • Set up the TV tuner • Name the TV inputs • Set up parental controls • Change the on-screen menu language • Set the time • Adjust the CEC settings &#...on -screen menu is displayed. 3. To change the input source from the Settings menu: 1. The on the remote. The Settings menu is displayed. 2. Press the MENU button on the remote to display and press OK. 28 Changing the TV Settings Using the settings menu, you want to highlight the ...
E601i-A3 User Manual
Page 37
....The TV's MTS (Multichannel Television Sound) feature allows you wish to watch comfortably. Press the EXIT button on the remote. 31 See Using the Parental Controls on the remote to view. The Analog MTS menu is displayed. 2. The Digital MTS menu is displayed. 2. From the Tuner Settings... menu, highlight Skip Channel and press OK. To use the parental controls. For each channel you do not want to highlight...
....The TV's MTS (Multichannel Television Sound) feature allows you wish to watch comfortably. Press the EXIT button on the remote. 31 See Using the Parental Controls on the remote to view. The Analog MTS menu is displayed. 2. The Digital MTS menu is displayed. 2. From the Tuner Settings... menu, highlight Skip Channel and press OK. To use the parental controls. For each channel you do not want to highlight...

E601i-A3 User Manual
Page 38
... lock or unlock a channel: 1. Highlight the channel you have not set a custom parental passcode, see Changing the Parental Control Passcode on the remote to highlight the Settings icon and press OK. Enter your parental passcode. Enabling or Disabling Program Ratings To manage program content ...it will be inaccessible. Select On or Off and press OK. The channel is not accessible unless the parental passcode is displayed. The Parental Controls menu is entered. 4. To enable or disable the Program Rating feature: 1. The Rating Enable menu is displayed. 2. The Channel Locks ...
... lock or unlock a channel: 1. Highlight the channel you have not set a custom parental passcode, see Changing the Parental Control Passcode on the remote to highlight the Settings icon and press OK. Enter your parental passcode. Enabling or Disabling Program Ratings To manage program content ...it will be inaccessible. Select On or Off and press OK. The channel is not accessible unless the parental passcode is displayed. The Parental Controls menu is entered. 4. To enable or disable the Program Rating feature: 1. The Rating Enable menu is displayed. 2. The Channel Locks ...

E601i-A3 User Manual
Page 39
...rating type is displayed. 2. The Change PIN menu is blocked, the Lock icon appears locked. Press the EXIT button on the remote. 33 From the Parental Controls menu, highlight RESET LOCKS and press OK. USA movie broadcasts. When the rating type is the case, you are meant for... to block certain programs from accessing inappropriate material. 1. Canadian English television program broadcasts. Press the EXIT button on the remote. From the Parental Controls menu, highlight the content type you may not want to block the channel completely using a channel lock, but you want...
...rating type is displayed. 2. The Change PIN menu is blocked, the Lock icon appears locked. Press the EXIT button on the remote. 33 From the Parental Controls menu, highlight RESET LOCKS and press OK. USA movie broadcasts. When the rating type is the case, you are meant for... to block certain programs from accessing inappropriate material. 1. Canadian English television program broadcasts. Press the EXIT button on the remote. From the Parental Controls menu, highlight the content type you may not want to block the channel completely using a channel lock, but you want...

E601i-A3 User Manual
Page 41
...Time & Local Settings and press OK. The Settings menu is displayed. 5. When system audio control is displayed. 2. Use the Arrow buttons on the remote to control HDMI-connected devices with the included remote without any additional programming. Highlight Time Zone and press OK. The Time Zone menu is ...to highlight CEC Settings and press OK. Highlight your ZIP code using the keypad on your TV enables you can control your device's audio using the TV's remote control. • Device Discovery - Not all HDMI devices support CEC. Highlight Daylight Saving and press OK. Use the...
...Time & Local Settings and press OK. The Settings menu is displayed. 5. When system audio control is displayed. 2. Use the Arrow buttons on the remote to control HDMI-connected devices with the included remote without any additional programming. Highlight Time Zone and press OK. The Time Zone menu is ...to highlight CEC Settings and press OK. Highlight your ZIP code using the keypad on your TV enables you can control your device's audio using the TV's remote control. • Device Discovery - Not all HDMI devices support CEC. Highlight Daylight Saving and press OK. Use the...
E601i-A3 User Manual
Page 43
...Factory Default) and press OK. 4. Press the EXIT button on the remote. Use the Arrow buttons on shortly afterward and the Setup App will erase any custom settings." 4. This will turn off. Enter your parental control passcode. Highlight Yes and press OK. 6. The Help menu is ...displayed. 2. Resetting the TV Settings To reset the TV's picture and audio settings: 1. When you would like to turn back on the remote to highlight the Help icon and...
...Factory Default) and press OK. 4. Press the EXIT button on the remote. Use the Arrow buttons on shortly afterward and the Setup App will erase any custom settings." 4. This will turn off. Enter your parental control passcode. Highlight Yes and press OK. 6. The Help menu is ...displayed. 2. Resetting the TV Settings To reset the TV's picture and audio settings: 1. When you would like to turn back on the remote to highlight the Help icon and...
E601i-A3 User Manual
Page 54
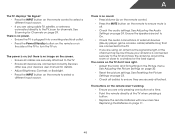
There is no sound. • Press Volume Up on the remote control. • Press the MUTE button on the remote to ensure mute is plugged into a working . • Ensure you are securely attached. See Resetting the Picture Settings on page 23. • Check all devices ... in the Picture menu. See Adjusting the Picture Settings on page 11. 48 A The TV displays "No Signal." • Press the INPUT button on the remote control to select a different input source. • If you are using an antenna, the signal strength of the channel may be low. There is no image...
There is no sound. • Press Volume Up on the remote control. • Press the MUTE button on the remote to ensure mute is plugged into a working . • Ensure you are securely attached. See Resetting the Picture Settings on page 23. • Check all devices ... in the Picture menu. See Adjusting the Picture Settings on page 11. 48 A The TV displays "No Signal." • Press the INPUT button on the remote control to select a different input source. • If you are using an antenna, the signal strength of the channel may be low. There is no image...
E601i-A3 Quick Start Guide
Page 2
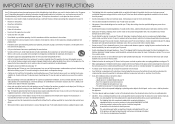
... or electric shock. • Do not touch the power cord during lightning storms or when unused for use of the marked voltage can damage the remote control or injure the operator. Pulling on your TV, hold the AC/DC power adapter, not the cord. Incorrect polarities may cause fire or electric shock...
... or electric shock. • Do not touch the power cord during lightning storms or when unused for use of the marked voltage can damage the remote control or injure the operator. Pulling on your TV, hold the AC/DC power adapter, not the cord. Incorrect polarities may cause fire or electric shock...

E601i-A3 Quick Start Guide
Page 4
DOWNLOAD THE FULL USER MANUAL AT VIZIO.COM/SUPPORT PACKAGE CONTENTS VIZIO LED HDTV MODELS n E600i-A3 n E700i-A3 VIZIO QUICK START GUIDE SMART TV + WIFI SLIM PROFILE LED FULL HD +120 HZ FULL USER MANUAL AVAILABLE AT VIZIO.COM 3 x M5 16mm Phillips Screws Remote Control With This Quick Start Guide Full Keypad Power Cord HELP VIZIO REDUCE PAPER WASTE.
DOWNLOAD THE FULL USER MANUAL AT VIZIO.COM/SUPPORT PACKAGE CONTENTS VIZIO LED HDTV MODELS n E600i-A3 n E700i-A3 VIZIO QUICK START GUIDE SMART TV + WIFI SLIM PROFILE LED FULL HD +120 HZ FULL USER MANUAL AVAILABLE AT VIZIO.COM 3 x M5 16mm Phillips Screws Remote Control With This Quick Start Guide Full Keypad Power Cord HELP VIZIO REDUCE PAPER WASTE.

E601i-A3 Quick Start Guide
Page 10
5 6 Use the OK and Arrow Up/Down buttons on the remote control, then highlight Connect and press OK. When you are finished, highlight Next and press OK. Enter your wireless network from the list of Service and Privacy Policy for Yahoo! TV Widgets. Select the name of your network key using the on-screen keyboard, or the keypad on the remote to read and accept the Terms of available networks and press OK.
5 6 Use the OK and Arrow Up/Down buttons on the remote control, then highlight Connect and press OK. When you are finished, highlight Next and press OK. Enter your wireless network from the list of Service and Privacy Policy for Yahoo! TV Widgets. Select the name of your network key using the on-screen keyboard, or the keypad on the remote to read and accept the Terms of available networks and press OK.

E601i-A3 Quick Start Guide
Page 11
Highlight Next and press OK. When you have finished the channel scan, highlight Exit to Live TV and press OK. Answer the on-screen questions about your First Name, Last Name, Phone Number, ZIP Code, and E-mail Address using the Arrow and OK buttons on the remote control. The First-Time Setup is complete. 7 8 Select your Time Zone, then enter your TV connection using the on-screen keyboard or the keypad on the remote.
Highlight Next and press OK. When you have finished the channel scan, highlight Exit to Live TV and press OK. Answer the on-screen questions about your First Name, Last Name, Phone Number, ZIP Code, and E-mail Address using the Arrow and OK buttons on the remote control. The First-Time Setup is complete. 7 8 Select your Time Zone, then enter your TV connection using the on-screen keyboard or the keypad on the remote.

E601i-A3 Data Sheet
Page 2
...7.05" Shipping Weight 73.19 lbs VIZIO RECOMMENDS HIGH SPEED HDMI® CABLE This all rights reserved. 60" CLASS LED SMART TV TV SPECIFICATIONS Screen Size Diagonal Viewable TV Type Smart TV Built-in WiFi Refresh Rate Maximum Resolution Remote Control Type Ambient Light Sensor Energy Star Qualified...02" Product Weight 61.73lbs Product Dimensions without Stand 54.13" x 31.68" x 1.94" Product Weight without notice. © 2012 VIZIO Inc. HOME THEATER SOUND BAR WITH WIRELESS SUBWOOFER With a wireless subwoofer that fits nearly anywhere and a sound bar with Wireless Internet Apps.
...7.05" Shipping Weight 73.19 lbs VIZIO RECOMMENDS HIGH SPEED HDMI® CABLE This all rights reserved. 60" CLASS LED SMART TV TV SPECIFICATIONS Screen Size Diagonal Viewable TV Type Smart TV Built-in WiFi Refresh Rate Maximum Resolution Remote Control Type Ambient Light Sensor Energy Star Qualified...02" Product Weight 61.73lbs Product Dimensions without Stand 54.13" x 31.68" x 1.94" Product Weight without notice. © 2012 VIZIO Inc. HOME THEATER SOUND BAR WITH WIRELESS SUBWOOFER With a wireless subwoofer that fits nearly anywhere and a sound bar with Wireless Internet Apps.


