
Download
Page 2
... equilateral triangle is provided. • Never push any object into your TV and easily accessible. • Only power of the marked voltage can damage the remote control or injure the operator. Never spill liquids on the apparatus. • The mains plug or appliance coupler is damaged, the internal components may cause...
... equilateral triangle is provided. • Never push any object into your TV and easily accessible. • Only power of the marked voltage can damage the remote control or injure the operator. Never spill liquids on the apparatus. • The mains plug or appliance coupler is damaged, the internal components may cause...

Download
Page 3
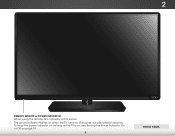
PACKAGE CONTENTS VIZIO LED HDTV with Stand Remote Control with Batteries This Quick Start Guide Power Cord 7 x M4 10mm Phillips Screws
PACKAGE CONTENTS VIZIO LED HDTV with Stand Remote Control with Batteries This Quick Start Guide Power Cord 7 x M4 10mm Phillips Screws

Download
Page 4
... CLOSED CAPTIONS Open the closed caption menu. BACK Go to the previous on -screen menu. ARROW Navigate the on -screen menu. V BUTTON Open the VIZIO Internet Apps Plus® dock. CHANNEL UP/DOWN Change the channel. APP LAUNCHER Quickly launch the pictured app. DASH Use with number pad to the... channel last viewed. INFO Display the info window. NUMBER PAD Manually enter a channel. USING THE REMOTE INPUT Change the currently-displayed input. A/V CONTROLS Control USB media player. EXIT Close the on -screen menu. MUTE Turn the audio off .
... CLOSED CAPTIONS Open the closed caption menu. BACK Go to the previous on -screen menu. ARROW Navigate the on -screen menu. V BUTTON Open the VIZIO Internet Apps Plus® dock. CHANNEL UP/DOWN Change the channel. APP LAUNCHER Quickly launch the pictured app. DASH Use with number pad to the... channel last viewed. INFO Display the info window. NUMBER PAD Manually enter a channel. USING THE REMOTE INPUT Change the currently-displayed input. A/V CONTROLS Control USB media player. EXIT Close the on -screen menu. MUTE Turn the audio off .
Download
Page 8
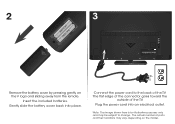
2 3 Remove the battery cover by pressing gently on the model. The flat edge of the connector goes toward the outside of ports and their locations may be subject to the back of the TV. The actual number of the TV. Gently slide the battery cover back into an electrical outlet. Insert the included batteries. Note: The image shown here is for illustrative purposes only and may vary, depending on the V logo and sliding away from the remote. Plug the power cord into place. Connect the power cord to change.
2 3 Remove the battery cover by pressing gently on the model. The flat edge of the connector goes toward the outside of ports and their locations may be subject to the back of the TV. The actual number of the TV. Gently slide the battery cover back into an electrical outlet. Insert the included batteries. Note: The image shown here is for illustrative purposes only and may vary, depending on the V logo and sliding away from the remote. Plug the power cord into place. Connect the power cord to change.

Download
Page 9
Turn the TV on by pressing the Power button on the remote to the back of TV Ethernet Cable If you have a high-speed internet connection, connect an Ethernet cable from your TV also has built-in ... the on-screen instructions to the Internet with Wi-Fi section for more information. The Setup App is displayed. Use the Arrow buttons on the remote. 4 5 Back of the TV as shown. For the best Smart TV experience...
Turn the TV on by pressing the Power button on the remote to the back of TV Ethernet Cable If you have a high-speed internet connection, connect an Ethernet cable from your TV also has built-in ... the on-screen instructions to the Internet with Wi-Fi section for more information. The Setup App is displayed. Use the Arrow buttons on the remote. 4 5 Back of the TV as shown. For the best Smart TV experience...

Download
Page 10
VIEWING THE ON-SCREEN USER MANUAL 1 2 MENU Button VIZIO TV SETTINGS Picture Audio Timers Network Tuner CC Closed Captions Devices System Guided Setup User Manual Wide Zoom Normal Panoramic Exit 2D 3D ABC User Input Wide CC Manual Sleep Timer Picture Audio Network Settings Help Press the MENU button on the Remote Control to display the TV SETTINGS menu. Highlight User Manual and press OK.
VIEWING THE ON-SCREEN USER MANUAL 1 2 MENU Button VIZIO TV SETTINGS Picture Audio Timers Network Tuner CC Closed Captions Devices System Guided Setup User Manual Wide Zoom Normal Panoramic Exit 2D 3D ABC User Input Wide CC Manual Sleep Timer Picture Audio Network Settings Help Press the MENU button on the Remote Control to display the TV SETTINGS menu. Highlight User Manual and press OK.

Download
Page 11
...YOUR REMOTE Previous Page Next Page Menu Open TV Menu PAGE NUMBER 1 OF 53 To skip to view. Table of Contents Installing the TV Controls and Connections Connecting your Devices Completing the First-Time Setup Using the On-Screen Menu Using the USB Media Player Using VIZIO Internet... Apps Troubleshooting & Technical Support Specifications Limited Warranty Legal & Compliance HDTV WITH VIZIO INTERNET APPS® Use the Up and Down Arrow buttons to select the chapter you want...
...YOUR REMOTE Previous Page Next Page Menu Open TV Menu PAGE NUMBER 1 OF 53 To skip to view. Table of Contents Installing the TV Controls and Connections Connecting your Devices Completing the First-Time Setup Using the On-Screen Menu Using the USB Media Player Using VIZIO Internet... Apps Troubleshooting & Technical Support Specifications Limited Warranty Legal & Compliance HDTV WITH VIZIO INTERNET APPS® Use the Up and Down Arrow buttons to select the chapter you want...
Download
Page 18
... is off. • Press MENU, then select Audio. The TV displays "No Signal." • Be sure your connected devices are black/ gray bars on the remote until the screen is set to On. There is connected (TV, HDMI-1, COMP, etc.). Select the type of your settings will be lost. Select Reset... cord is securely connected to the AC socket on the TV and to a working electrical outlet. • Press the POWER button on the remote or on the remote and select the input to ensure that all of setup you have changed the default Parental Control Passcode, enter it now. There are turned...
... is off. • Press MENU, then select Audio. The TV displays "No Signal." • Be sure your connected devices are black/ gray bars on the remote until the screen is set to On. There is connected (TV, HDMI-1, COMP, etc.). Select the type of your settings will be lost. Select Reset... cord is securely connected to the AC socket on the TV and to a working electrical outlet. • Press the POWER button on the remote or on the remote and select the input to ensure that all of setup you have changed the default Parental Control Passcode, enter it now. There are turned...
Download
Page 5
... disconnect device, the disconnect device shall remain readily operable. • CAUTION - Your TV is intended to alert the user to leak which can damage the remote control or injure the operator. h• The lightning flash with arrowhead symbol within an equilateral triangle is dropped or damaged in environments with heavy dust...
... disconnect device, the disconnect device shall remain readily operable. • CAUTION - Your TV is intended to alert the user to leak which can damage the remote control or injure the operator. h• The lightning flash with arrowhead symbol within an equilateral triangle is dropped or damaged in environments with heavy dust...

Download
Page 7
... 3 Inspecting the Package Contents 3 Installing the TV 3 Installing the TV Stand 3 Installing the TV on a Wall 5 Controls and Connections 6 Back Panel 6 Side Panel 7 Front Panel 8 Remote Control 9 Replacing the Batteries 10 Connecting Your Devices 11 Connecting A Device 11 Connecting a Device - Table of the Inputs 35 Using the Parental Controls 35 Accessing...
... 3 Inspecting the Package Contents 3 Installing the TV 3 Installing the TV Stand 3 Installing the TV on a Wall 5 Controls and Connections 6 Back Panel 6 Side Panel 7 Front Panel 8 Remote Control 9 Replacing the Batteries 10 Connecting Your Devices 11 Connecting A Device 11 Connecting a Device - Table of the Inputs 35 Using the Parental Controls 35 Accessing...

Download
Page 9
... the box and inspecting the package contents you can still fall over . Use the images below to ensure nothing is not properly secured Power Cord Remote Control with stand Quick Start Guide INSTALLING THE TV After removing the TV from falling over if: • It is placed on an uneven, unstable... mount (not included) Installing the TV Stand Your TV includes a stand designed to inspect the package contents. However, the TV can begin installing the TV. VIZIO LED HDTV with Batteries 7 x M4 10mm Philips Screws PACKAGE CONTENTS 3 TV ON STAND
... the box and inspecting the package contents you can still fall over . Use the images below to ensure nothing is not properly secured Power Cord Remote Control with stand Quick Start Guide INSTALLING THE TV After removing the TV from falling over if: • It is placed on an uneven, unstable... mount (not included) Installing the TV Stand Your TV includes a stand designed to inspect the package contents. However, the TV can begin installing the TV. VIZIO LED HDTV with Batteries 7 x M4 10mm Philips Screws PACKAGE CONTENTS 3 TV ON STAND
Download
Page 14
To keep the power indicator on as long as the TV is on, see Turning the Power Indicator On or Off on , then goes out after several seconds. The power indicator flashes on when the TV turns on page 39. 8 FRONT PANEL 2 FRONT PANEL REMOTE SENSOR & POWER INDICATOR When using the remote, aim it directly at this sensor.
To keep the power indicator on as long as the TV is on, see Turning the Power Indicator On or Off on , then goes out after several seconds. The power indicator flashes on when the TV turns on page 39. 8 FRONT PANEL 2 FRONT PANEL REMOTE SENSOR & POWER INDICATOR When using the remote, aim it directly at this sensor.

Download
Page 15
.../DOWN Increase or decrease loudness of the audio. ARROW Navigate the on -screen menu. GUIDE Display the info window. V BUTTON Open the VIZIO Internet Apps Plus® dock. DASH Use with number pad to the previous on-screen menu. A/V CONTROLS Control USB media player. EXIT .../DOWN Change the channel. NUMBER PAD Manually enter a channel. MUTE Turn the audio off . LAST Return to the channel last viewed. 2 REMOTE CONTROL APP LAUNCHER Quickly launch the pictured app. INPUT Change the currently-displayed input. CLOSED CAPTIONS Open the closed caption menu. INFO Display the ...
.../DOWN Increase or decrease loudness of the audio. ARROW Navigate the on -screen menu. GUIDE Display the info window. V BUTTON Open the VIZIO Internet Apps Plus® dock. DASH Use with number pad to the previous on-screen menu. A/V CONTROLS Control USB media player. EXIT .../DOWN Change the channel. NUMBER PAD Manually enter a channel. MUTE Turn the audio off . LAST Return to the channel last viewed. 2 REMOTE CONTROL APP LAUNCHER Quickly launch the pictured app. INPUT Change the currently-displayed input. CLOSED CAPTIONS Open the closed caption menu. INFO Display the ...

Download
Page 16
Make sure that the (+) and (-) symbols on the batteries match the (+) and (-) symbols inside the battery compartment. 3. Insert two batteries into the remote control. Remove the battery cover. 2. Replace the battery cover. 10 2 Replacing the Batteries 1.
Make sure that the (+) and (-) symbols on the batteries match the (+) and (-) symbols inside the battery compartment. 3. Insert two batteries into the remote control. Remove the battery cover. 2. Replace the battery cover. 10 2 Replacing the Batteries 1.
Download
Page 24
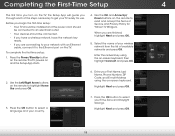
... App will guide you through each of the steps necessary to get your TV ready for Yahoo! Use the Left/Right Arrow buttons on the remote to an electrical outlet. • Your devices should be connected to highlight Home Use and press OK. 6. TV Widgets. Use the OK and Arrow Up.../ Down buttons on -screen keyboard. Enter the network key using the on the remote to read and accept the Terms of available networks and press OK. The TV powers on the remote. Highlight Next and press OK. 3. Before you begin the first-time setup: • Your TV should...
... App will guide you through each of the steps necessary to get your TV ready for Yahoo! Use the Left/Right Arrow buttons on the remote to an electrical outlet. • Your devices should be connected to highlight Home Use and press OK. 6. TV Widgets. Use the OK and Arrow Up.../ Down buttons on -screen keyboard. Enter the network key using the on the remote to read and accept the Terms of available networks and press OK. The TV powers on the remote. Highlight Next and press OK. 3. Before you begin the first-time setup: • Your TV should...
Download
Page 25
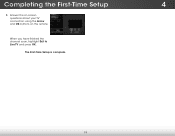
Answer the on-screen questions about your TV connection using the Arrow and OK buttons on the remote. The First-Time Setup is complete. 19 When you have finished the channel scan, highlight Exit to Live TV and press OK. Completing the First-Time Setup 4 8.
Answer the on-screen questions about your TV connection using the Arrow and OK buttons on the remote. The First-Time Setup is complete. 19 When you have finished the channel scan, highlight Exit to Live TV and press OK. Completing the First-Time Setup 4 8.

Download
Page 26
...remote. From this menu, you can : • Adjust the Picture settings • Adjust the Audio settings • Activate the Sleep Timer • Adjust the Network settings • Adjust the Tuner settings • Set up Closed Captioning • Adjust TV Settings • Access the Guided Setup • Access the User Manual VIZIO...the On-Screen Menu 5 Your TV features an easy-to-use on -screen menu. Wide Zoom Normal Panoramic While navigating the on the remote. The EXIT button will close the on -screen menu. You can also open the on-screen menu, press the MENU button on -screen...
...remote. From this menu, you can : • Adjust the Picture settings • Adjust the Audio settings • Activate the Sleep Timer • Adjust the Network settings • Adjust the Tuner settings • Set up Closed Captioning • Adjust TV Settings • Access the Guided Setup • Access the User Manual VIZIO...the On-Screen Menu 5 Your TV features an easy-to-use on -screen menu. Wide Zoom Normal Panoramic While navigating the on the remote. The EXIT button will close the on -screen menu. You can also open the on-screen menu, press the MENU button on -screen...
Download
Page 27
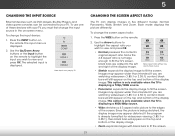
...bars will still appear on the top and bottom of the display image. Each mode displays the picture differently. Press the WIDE button on the remote. Images may appear wider than intended. If the program is already formatted for widescreen viewing (1.85:1 or 2.35:1), then black bars will ...Zoom Note: Aspect ratio settings may vary by TV. This option is only available when the TV is displayed. 2. Press the INPUT button on the remote. 2. Since the 4:3 aspect ratio is being stretched, the display image may vary by Input source. • Stretch expands the display image to ...
...bars will still appear on the top and bottom of the display image. Each mode displays the picture differently. Press the WIDE button on the remote. Images may appear wider than intended. If the program is already formatted for widescreen viewing (1.85:1 or 2.35:1), then black bars will ...Zoom Note: Aspect ratio settings may vary by TV. This option is only available when the TV is displayed. 2. Press the INPUT button on the remote. 2. Since the 4:3 aspect ratio is being stretched, the display image may vary by Input source. • Stretch expands the display image to ...

Download
Page 28
...Picture Mode, then use the Left/Right Arrow buttons to change each setting: • Backlight - Use the Arrow buttons on the remote to affect the overall brilliance of the picture. • Brightness - When this setting is too low, the picture may be difAfiBcCult ... press OK. Adjusts the white level of picture tint. When Exit this2Dsetting3Dis too high, the picture may be too dark to change the picture mode: VIZIO PICTURE Picture Mode Backlight Brightness Contrast Color Tint Sharpness Standard - + 50 - + 50 - + 50 - + 50 - +0 - +0 More • Standard mode sets...
...Picture Mode, then use the Left/Right Arrow buttons to change each setting: • Backlight - Use the Arrow buttons on the remote to affect the overall brilliance of the picture. • Brightness - When this setting is too low, the picture may be difAfiBcCult ... press OK. Adjusts the white level of picture tint. When Exit this2Dsetting3Dis too high, the picture may be too dark to change the picture mode: VIZIO PICTURE Picture Mode Backlight Brightness Contrast Color Tint Sharpness Standard - + 50 - + 50 - + 50 - + 50 - +0 - +0 More • Standard mode sets...

Download
Page 29
... in the display. 4. When you have finished adjusting the color temperature, press the EXIT button on the remote. 23 Adjusting the Color Temperature Adjusting the color temperature will change each of the color temperature settings: VIZIO COLOR TEMPERATURE Color Temperature Red Gain - - To adjust the picture size and position: 1. Vertical Size - + 32...
... in the display. 4. When you have finished adjusting the color temperature, press the EXIT button on the remote. 23 Adjusting the Color Temperature Adjusting the color temperature will change each of the color temperature settings: VIZIO COLOR TEMPERATURE Color Temperature Red Gain - - To adjust the picture size and position: 1. Vertical Size - + 32...


