E500i-A1 User Manual
Page 7
Table of Contents Installing the TV 3 Inspecting the Package Contents 3 Installing the TV 3 Installing the TV Stand 3 Base Installation (E420i 4 Base Installation Continued (E420i 5 Base Installation (E500i 6 Base Installation Continued (E500i 7 Installing the TV on a Wall 8 Controls and Connections 10 Rear Panel 10 Side Panel 11 Front Panel 12 Remote Control 13 Replacing the Batteries 14 ...
Table of Contents Installing the TV 3 Inspecting the Package Contents 3 Installing the TV 3 Installing the TV Stand 3 Base Installation (E420i 4 Base Installation Continued (E420i 5 Base Installation (E500i 6 Base Installation Continued (E500i 7 Installing the TV on a Wall 8 Controls and Connections 10 Rear Panel 10 Side Panel 11 Front Panel 12 Remote Control 13 Replacing the Batteries 14 ...

E500i-A1 User Manual
Page 10
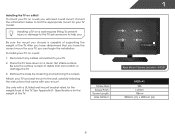
Align the neck piece with the bottom of the TV and slide it into the holes as shown above . 4 1 Base Installation (E420i) 1 2 To install the base: Place the TV screen-down on a soft surface, such as carpet, rug, or blanket. Using a phillips screwdriver, tighten three (3) M4 14 mm screws into place as shown above . To prevent scratches or damage to the screen, place the TV on a clean, flat surface.
Align the neck piece with the bottom of the TV and slide it into the holes as shown above . 4 1 Base Installation (E420i) 1 2 To install the base: Place the TV screen-down on a soft surface, such as carpet, rug, or blanket. Using a phillips screwdriver, tighten three (3) M4 14 mm screws into place as shown above . To prevent scratches or damage to the screen, place the TV on a clean, flat surface.
E500i-A1 User Manual
Page 11
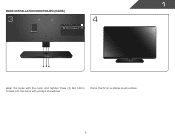
1 Base Installation Continued (E420i) 3 4 Align the base with the neck and tighten three (3) M4 14mm screws into the base with phillips screwdriver Place the TV on a stable, level surface. 5
1 Base Installation Continued (E420i) 3 4 Align the base with the neck and tighten three (3) M4 14mm screws into the base with phillips screwdriver Place the TV on a stable, level surface. 5

E500i-A1 User Manual
Page 12
To prevent scratches or damage to the screen, place the TV on a clean, flat surface. Using a phillips screwdriver, tighten Four (4) M4 16 mm screws into place as shown above . 6 Align the neck piece with the bottom of the TV and slide it into the holes as carpet, rug, or blanket. 1 Base Installation (E500i) 1 2 To install the base: Place the TV screen-down on a soft surface, such as shown above .
To prevent scratches or damage to the screen, place the TV on a clean, flat surface. Using a phillips screwdriver, tighten Four (4) M4 16 mm screws into place as shown above . 6 Align the neck piece with the bottom of the TV and slide it into the holes as carpet, rug, or blanket. 1 Base Installation (E500i) 1 2 To install the base: Place the TV screen-down on a soft surface, such as shown above .

E500i-A1 User Manual
Page 13
1 Base Installation Continued (E500i) 3 4 Align the base with the neck and tighten three (3) M6 12mm screws into the base with phillips screwdriver Place the TV on a stable, level surface. 7
1 Base Installation Continued (E500i) 3 4 Align the base with the neck and tighten three (3) M6 12mm screws into the base with phillips screwdriver Place the TV on a stable, level surface. 7
E500i-A1 User Manual
Page 14
..., you . To install yovur TV on a clean, flat, stable surface. Remove the base by loosening and removing the screws. Be sure the mount you can scratch or damage the TV. 3. Place the TV face-down on a wall: 1. E420i E420i-A1 M6 1.0mm 18mm 200mm (V) x 200mm (H) 8 To prevent injury or damage to the...
..., you . To install yovur TV on a clean, flat, stable surface. Remove the base by loosening and removing the screws. Be sure the mount you can scratch or damage the TV. 3. Place the TV face-down on a wall: 1. E420i E420i-A1 M6 1.0mm 18mm 200mm (V) x 200mm (H) 8 To prevent injury or damage to the...

E500i-A1 User Manual
Page 41
... Block feature to the factory defaults?" 2. From the Parental Controls menu, highlight the content type you want to RESET ALL LOCKS SETTINGS to block content based on the remote to select On. 6. USA television program broadcasts. Movie - CAN - CAN - French - For each rating type you want to block all unrated content...
... Block feature to the factory defaults?" 2. From the Parental Controls menu, highlight the content type you want to RESET ALL LOCKS SETTINGS to block content based on the remote to select On. 6. USA television program broadcasts. Movie - CAN - CAN - French - For each rating type you want to block all unrated content...

E500i-A1 User Manual
Page 43
... CEC Settings and press OK. The Daylight Saving menu is displayed. 5. The on the remote. Use the Arrow buttons on , you the most accurate location-based information, such as weather or news. 8. Press the EXIT button on -screen menu is displayed. 2. This is not affected by VIA Apps to give you... highlight Time & Local Settings and press OK. You can control your device's audio using the keypad on the remote. When the TV is off, the VIZIO logo will be off. Press the MENU button on -screen menu is displayed. 2. Use the Arrow buttons on the remote to determine if your TV...
... CEC Settings and press OK. The Daylight Saving menu is displayed. 5. The on the remote. Use the Arrow buttons on , you the most accurate location-based information, such as weather or news. 8. Press the EXIT button on -screen menu is displayed. 2. This is not affected by VIA Apps to give you... highlight Time & Local Settings and press OK. You can control your device's audio using the keypad on the remote. When the TV is off, the VIZIO logo will be off. Press the MENU button on -screen menu is displayed. 2. Use the Arrow buttons on the remote to determine if your TV...

E500i-A1 User Manual
Page 53
... Setup • Connecting Your Devices • Technical Problems • And More Phone: (877) 878-4946 (TOLL-FREE) Email: techsupport@VIZIO.com Web: www.VIZIO.com/support Hours of operation: Monday - YOUR PRODUCT INCLUDES FREE LIFETIME TECH SUPPORT The VIZIO support team is highly trained and is based in the United States. LET US HELP!
... Setup • Connecting Your Devices • Technical Problems • And More Phone: (877) 878-4946 (TOLL-FREE) Email: techsupport@VIZIO.com Web: www.VIZIO.com/support Hours of operation: Monday - YOUR PRODUCT INCLUDES FREE LIFETIME TECH SUPPORT The VIZIO support team is highly trained and is based in the United States. LET US HELP!
E500i-A1 User Manual
Page 59
...made to operate the equipment. 2. Operation is not responsible for compliance with the FCC Rules could void the user's authority to VIZIO at www.VIZIO.com. The manufacturer is subject to this VIA device by unauthorized modification to the following two conditions: (1) this device may not... limits. 3. FCC warning Changes or modifications not expressly approved by turning the equipment off and on your VIZIO VIA device. USA: UL Canada: CSA Germany: VDE UK: BASE/BS Japan: Electric Appliance Control Act Open Source Software Notice Your VIA device may cause undesired operation. This...
...made to operate the equipment. 2. Operation is not responsible for compliance with the FCC Rules could void the user's authority to VIZIO at www.VIZIO.com. The manufacturer is subject to this VIA device by unauthorized modification to the following two conditions: (1) this device may not... limits. 3. FCC warning Changes or modifications not expressly approved by turning the equipment off and on your VIZIO VIA device. USA: UL Canada: CSA Germany: VDE UK: BASE/BS Japan: Electric Appliance Control Act Open Source Software Notice Your VIA device may cause undesired operation. This...

E500i-A1 Quick Start Guide
Page 3
Sunday: 8 am to 4 pm (PST) We speak English • Se habla Español • Nous parlons Français Friday: 5 am to 9 pm (PST) Saturday - We can help with: • New Product Setup • Connecting Your Devices • Technical Problems • And More Phone: (877) 878-4946 (TOLL-FREE) Email: techsupport@VIZIO.com Web: www.VIZIO.com/support Hours of operation: Monday - DO YOU HAVE QUESTIONS? LET US HELP! YOUR PRODUCT INCLUDES FREE LIFETIME TECH SUPPORT The VIZIO support team is highly trained and is based in the United States.
Sunday: 8 am to 4 pm (PST) We speak English • Se habla Español • Nous parlons Français Friday: 5 am to 9 pm (PST) Saturday - We can help with: • New Product Setup • Connecting Your Devices • Technical Problems • And More Phone: (877) 878-4946 (TOLL-FREE) Email: techsupport@VIZIO.com Web: www.VIZIO.com/support Hours of operation: Monday - DO YOU HAVE QUESTIONS? LET US HELP! YOUR PRODUCT INCLUDES FREE LIFETIME TECH SUPPORT The VIZIO support team is highly trained and is based in the United States.

E500i-A1 Quick Start Guide
Page 7
INSTALLING THE BASE 1 2 Place the TV screen-down on a soft surface, such as carpet, rug, or blanket. To prevent scratches or damage to the screen, place the TV on a clean, flat surface. Using a phillips screwdriver, tighten four (4) M4 16 mm screws into place as shown above . Align the neck piece with the bottom of the TV and slide it into the holes as shown above .
INSTALLING THE BASE 1 2 Place the TV screen-down on a soft surface, such as carpet, rug, or blanket. To prevent scratches or damage to the screen, place the TV on a clean, flat surface. Using a phillips screwdriver, tighten four (4) M4 16 mm screws into place as shown above . Align the neck piece with the bottom of the TV and slide it into the holes as shown above .

E500i-A1 Quick Start Guide
Page 8
3 4 Align the base with the neck and tighten three (3) M6 12mm screws into the base with phillips screwdriver. Place the TV on a stable, level surface.
3 4 Align the base with the neck and tighten three (3) M6 12mm screws into the base with phillips screwdriver. Place the TV on a stable, level surface.

E500i-A1 Quick Start Guide
Page 18
... modifications not expressly approved by the party responsible for help. If this equipment. USA: UL Germany: VDE Japan: Electric Appliance Control Act Canada: CSA UK: BASE/BS Be sure mute is not responsible for compliance could void the user's authority to operate this equipment does cause harmful interference to radio or...
... modifications not expressly approved by the party responsible for help. If this equipment. USA: UL Germany: VDE Japan: Electric Appliance Control Act Canada: CSA UK: BASE/BS Be sure mute is not responsible for compliance could void the user's authority to operate this equipment does cause harmful interference to radio or...
E500i-A1 Data Sheet
Page 1
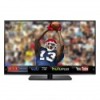
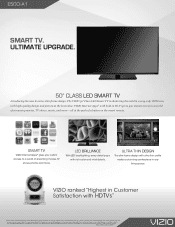
...a stunning centerpiece in Wi-Fi gives you instant access to change without notice. © 2012 VIZIO Inc. Trademarks shown are based on experiences and perceptions of streaming movies, TV shows, photos and more - Images used are ...VIZIO, the V logo, Where Vision Meets Value, Razor LED and other VIZIO trademarks are the intellectual property of their respective owners. Product features and specifications are for illustration purposes only. *When compared to a world of consumers who purchased an HDTV in a way only VIZIO can, with rich color and vivid details. E500i-A1...
...a stunning centerpiece in Wi-Fi gives you instant access to change without notice. © 2012 VIZIO Inc. Trademarks shown are based on experiences and perceptions of streaming movies, TV shows, photos and more - Images used are ...VIZIO, the V logo, Where Vision Meets Value, Razor LED and other VIZIO trademarks are the intellectual property of their respective owners. Product features and specifications are for illustration purposes only. *When compared to a world of consumers who purchased an HDTV in a way only VIZIO can, with rich color and vivid details. E500i-A1...

