E500i-A0 User Manual
Page 4
...power-supply cord or plug is damaged, liquid has been spilled or objects have an electrician install the correct outlet, or use caution when moving your TV safely. Never spill liquids on your TV during electrical storms. • Unplug your TV. • Your TV should be operated only from the type of your TV cabinet. The manufacturer's warranty...combination to avoid injury from overheating, be used , use an adapter to ground your TV from damage due to power surges. • Do not attempt to repair or service your TV close to smoke or moisture may compromise the integrity...
...power-supply cord or plug is damaged, liquid has been spilled or objects have an electrician install the correct outlet, or use caution when moving your TV safely. Never spill liquids on your TV during electrical storms. • Unplug your TV. • Your TV should be operated only from the type of your TV cabinet. The manufacturer's warranty...combination to avoid injury from overheating, be used , use an adapter to ground your TV from damage due to power surges. • Do not attempt to repair or service your TV close to smoke or moisture may compromise the integrity...
E500i-A0 User Manual
Page 5
... vases, shall be placed on the power cord may damage the wires inside the cord and cause fire or electric shock. Operating your TV away from moisture. When your TV, hold the AC/DC power adapter, not the cord. Continuous use by qualified service personnel only. Ensure that contained in ... with heavy dust or high humidity. These servicing instructions are unplugged before moving your TV. Opening or removing the back cover may expose you are qualified to leak which can damage the remote control or injure the operator. If your TV is dropped and the housing...
... vases, shall be placed on the power cord may damage the wires inside the cord and cause fire or electric shock. Operating your TV away from moisture. When your TV, hold the AC/DC power adapter, not the cord. Continuous use by qualified service personnel only. Ensure that contained in ... with heavy dust or high humidity. These servicing instructions are unplugged before moving your TV. Opening or removing the back cover may expose you are qualified to leak which can damage the remote control or injure the operator. If your TV is dropped and the housing...
E500i-A0 User Manual
Page 6
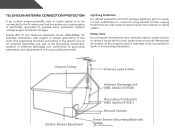
... connected to provide some protection against voltage surges and static charges. Article 810 of the National Electrical Code, ANSI/NFPSA 70, provides information with regard to proper grounding of the mast and supporting structure, grounding of time, unplug the TV from the wall outlet and disconnect the antenna or cable system. Power Lines Do not locate the antenna near overhead light...
... connected to provide some protection against voltage surges and static charges. Article 810 of the National Electrical Code, ANSI/NFPSA 70, provides information with regard to proper grounding of the mast and supporting structure, grounding of time, unplug the TV from the wall outlet and disconnect the antenna or cable system. Power Lines Do not locate the antenna near overhead light...
E500i-A0 User Manual
Page 7
... 6 Rear Panel 6 Side Panel 7 Front Panel 8 Remote Control 9 Replacing the Batteries 10 Connecting Your Devices 11 Connecting A Device 11 Connecting an Audio Device 12 Connecting to your Network 13 Connecting to a Wired Network (Best 13 Connecting to a Wireless Network 13 Completing the First-Time Setup 14 Using the On-Screen Menu 15 Navigating the On-Screen Menu 15 Changing the Input Source 16 Changing the Screen Aspect Ratio 16 Setting Up Closed Captioning 17 Changing the Appearance of Digital Closed Captions.. 17 Activating the Sleep Timer 18 Setting the Auto Power Off...
... 6 Rear Panel 6 Side Panel 7 Front Panel 8 Remote Control 9 Replacing the Batteries 10 Connecting Your Devices 11 Connecting A Device 11 Connecting an Audio Device 12 Connecting to your Network 13 Connecting to a Wired Network (Best 13 Connecting to a Wireless Network 13 Completing the First-Time Setup 14 Using the On-Screen Menu 15 Navigating the On-Screen Menu 15 Changing the Input Source 16 Changing the Screen Aspect Ratio 16 Setting Up Closed Captioning 17 Changing the Appearance of Digital Closed Captions.. 17 Activating the Sleep Timer 18 Setting the Auto Power Off...
E500i-A0 User Manual
Page 8
Turning the Power Indicator Light On or Off 33 Using the Help Menu 33 Displaying System Information 34 Resetting the TV Settings 34 Restoring the TV to Factory Default Settings 34 Using Guided Setup 35 Using the Info Window 36 Using the USB Media Player 37 Using the USB Media Player 37 Connecting a USB Thumb Drive to the TV 37 Playing USB Media 37 Using VIZIO Internet Apps 39 Using the VIA Shortcut Buttons 39 Using the VIA Dock 39 Moving an App on the...
Turning the Power Indicator Light On or Off 33 Using the Help Menu 33 Displaying System Information 34 Resetting the TV Settings 34 Restoring the TV to Factory Default Settings 34 Using Guided Setup 35 Using the Info Window 36 Using the USB Media Player 37 Using the USB Media Player 37 Connecting a USB Thumb Drive to the TV 37 Playing USB Media 37 Using VIZIO Internet Apps 39 Using the VIA Shortcut Buttons 39 Using the VIA Dock 39 Moving an App on the...

E500i-A0 User Manual
Page 11
... cables connected to help you can scratch or damage the TV. 3. Remove the base by loosening and removing the screws. 4. To install your TV on a wall, you have determined that came with a UL-listed wall mount bracket rated for your TV. 2. Consult the information below to the wall, carefully following the instructions that you will need a wall mount. See Appendix A - Be sure the surface is capable of supporting the weight...
... cables connected to help you can scratch or damage the TV. 3. Remove the base by loosening and removing the screws. 4. To install your TV on a wall, you have determined that came with a UL-listed wall mount bracket rated for your TV. 2. Consult the information below to the wall, carefully following the instructions that you will need a wall mount. See Appendix A - Be sure the surface is capable of supporting the weight...
E500i-A0 User Manual
Page 15
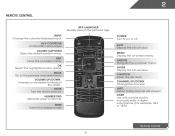
... menu option. Menu Display the on -screen menu. Wide Switch the display mode. Last Return to manually enter a digital sub-channel. (For example, 18-4 or 18-5.) Remote Control 9 Dash Use with number pad to the channel last viewed. Closed Captions Open the closed caption menu. Back Go to the previous on -screen menu. Number Pad Manually enter a channel. Power Turn TV on or off or on. Guide Display the info window. V Button Open the VIA dock. 2 Remote Control Input Change the currently-displayed input. Arrow Navigate the on -screen menu. A/V Controls Control USB media...
... menu option. Menu Display the on -screen menu. Wide Switch the display mode. Last Return to manually enter a digital sub-channel. (For example, 18-4 or 18-5.) Remote Control 9 Dash Use with number pad to the channel last viewed. Closed Captions Open the closed caption menu. Back Go to the previous on -screen menu. Number Pad Manually enter a channel. Power Turn TV on or off or on. Guide Display the info window. V Button Open the VIA dock. 2 Remote Control Input Change the currently-displayed input. Arrow Navigate the on -screen menu. A/V Controls Control USB media...
E500i-A0 User Manual
Page 17
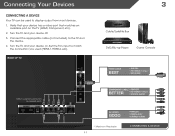
... 3 Cable/Satellite Box DVD/Blu-ray Player Game Console HDMI CABLE BEST • DIGITAL • HD VIDEO (1080p)* • HD AUDIO Match colored connectors to the TV and the device. 4. Verify that matches an available port on . Connect the appropriate cable (not included) to colored ports. Turn the TV and your device has a video port that your device on the TV (HDMI, Component, etc). 2. Turn the TV and your device off. 3. Set the TV's input...
... 3 Cable/Satellite Box DVD/Blu-ray Player Game Console HDMI CABLE BEST • DIGITAL • HD VIDEO (1080p)* • HD AUDIO Match colored connectors to the TV and the device. 4. Verify that matches an available port on . Connect the appropriate cable (not included) to colored ports. Turn the TV and your device has a video port that your device on the TV (HDMI, Component, etc). 2. Turn the TV and your device off. 3. Set the TV's input...
E500i-A0 User Manual
Page 25
... Arrow buttons to highlight the setting you to manually change the setting: • Noise Reduction Diminishes artifacts in the image caused by the digitizing of the picture. Tint - It can be difficult to distinguish in the picture. 5 • Game mode optimizes the picture settings for displaying game console output. • Vivid mode sets the picture settings to values that does not otherwise exist. Adjusts the LED brightness to change each of some colors...
... Arrow buttons to highlight the setting you to manually change the setting: • Noise Reduction Diminishes artifacts in the image caused by the digitizing of the picture. Tint - It can be difficult to distinguish in the picture. 5 • Game mode optimizes the picture settings for displaying game console output. • Vivid mode sets the picture settings to values that does not otherwise exist. Adjusts the LED brightness to change each of some colors...

E500i-A0 User Manual
Page 28
... selecting Jazz, Classical, Pop, Rock, or Flat. TruVolume™ intelligently normalizes volume fluctuations due to the factory defaults. See Adjusting the Advanced Audio Settings on the remote. 3. Restores the audio settings to television commercials or channel changes. Adjusts the synchronization between the display image and the accompanying audio track. • TV Speakers - StudioSound HD™ is displayed. The Audio Settings menu is a feature-rich surround sound solution which delivers an immersive surround...
... selecting Jazz, Classical, Pop, Rock, or Flat. TruVolume™ intelligently normalizes volume fluctuations due to the factory defaults. See Adjusting the Advanced Audio Settings on the remote. 3. Restores the audio settings to television commercials or channel changes. Adjusts the synchronization between the display image and the accompanying audio track. • TV Speakers - StudioSound HD™ is displayed. The Audio Settings menu is a feature-rich surround sound solution which delivers an immersive surround...
E500i-A0 User Manual
Page 29
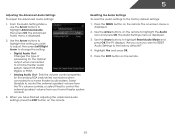
... on-screen menu is displayed. 2. Use the Arrow buttons to the factory default settings: 1. Select Off, Dolby Digital, or PCM. • Analog Audio Out - Sets the volume control properties for the Optical output when connected to a home theater audio system. The TV displays, "Are you sure you want to RESET Audio Settings to highlight Advanced Audio, then press OK. When you wish to adjust, then press Left/Right Arrow to change the setting: • Digital Audio Out Changes the type...
... on-screen menu is displayed. 2. Use the Arrow buttons to the factory default settings: 1. Select Off, Dolby Digital, or PCM. • Analog Audio Out - Sets the volume control properties for the Optical output when connected to a home theater audio system. The TV displays, "Are you sure you want to RESET Audio Settings to highlight Advanced Audio, then press OK. When you wish to adjust, then press Left/Right Arrow to change the setting: • Digital Audio Out Changes the type...
E500i-A0 User Manual
Page 32
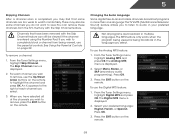
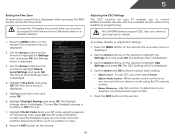
... must set the tuner mode. 1. The on the remote to the RF input, such as an external antenna or cable TV connection, you must scan for Channels Before the TV can : • Change the input source • Adjust the Tuner settings • Name the TV inputs • Set up parental controls • Change the on-screen menu language • Set the time • Adjust the CEC settings • Adjust the Power Indicator Changing the Input Source To quickly access the Input Source menu, press the INPUT button on -screen menu is connected to...
... must set the tuner mode. 1. The on the remote to the RF input, such as an external antenna or cable TV connection, you must scan for Channels Before the TV can : • Change the input source • Adjust the Tuner settings • Name the TV inputs • Set up parental controls • Change the on-screen menu language • Set the time • Adjust the CEC settings • Adjust the Power Indicator Changing the Input Source To quickly access the Input Source menu, press the INPUT button on -screen menu is connected to...
E500i-A0 User Manual
Page 34
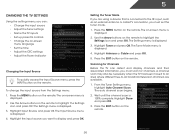
... the EXIT button on the remote. To remove a channel: 1. From the Tuner Settings menu, highlight Analog MTS and press OK. Select Mono, Stereo, or SAP (secondary audio programming). Press the EXIT button on the remote. 28 The Skip Channel menu is displayed. 2. Changing the Audio Language Some digital free-to-air and cable channels broadcast programs in multiple languages. The MTS feature only works when the program being viewed is displayed. 2. From the Tuner Settings menu, highlight Digital MTS and...
... the EXIT button on the remote. To remove a channel: 1. From the Tuner Settings menu, highlight Analog MTS and press OK. Select Mono, Stereo, or SAP (secondary audio programming). Press the EXIT button on the remote. 28 The Skip Channel menu is displayed. 2. Changing the Audio Language Some digital free-to-air and cable channels broadcast programs in multiple languages. The MTS feature only works when the program being viewed is displayed. 2. From the Tuner Settings menu, highlight Digital MTS and...
E500i-A0 User Manual
Page 38
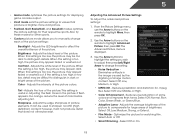
... be connected to give you can control your device's user manual for details. 1. Use the Arrow buttons on , you the most accurate location-based information, such as weather or news. 8. Enter your time zone and press OK. 6. Press the MENU button on the remote. The Time & Local Settings menu is displayed. 3. Highlight your ZIP code using the TV's remote control. • Device Discovery - Press the MENU button on the remote. Not all HDMI devices support...
... be connected to give you can control your device's user manual for details. 1. Use the Arrow buttons on , you the most accurate location-based information, such as weather or news. 8. Enter your time zone and press OK. 6. Press the MENU button on the remote. The Time & Local Settings menu is displayed. 3. Highlight your ZIP code using the TV's remote control. • Device Discovery - Press the MENU button on the remote. Not all HDMI devices support...
E500i-A0 User Manual
Page 50
... player, game console, cable/satellite box) that are using cable TV, satellite, or antenna connected directly to select a different input source. The buttons on the remote aren't working electrical outlet. • Ensure the power cable is securely attached to the TV. • Press the Power/Standby button on the remote or on . See Scanning for the best signal. Ensure your device's user manual for channels. See Replacing the Batteries on page 18 • Reset the picture settings. See Resetting the Picture Settings...
... player, game console, cable/satellite box) that are using cable TV, satellite, or antenna connected directly to select a different input source. The buttons on the remote aren't working electrical outlet. • Ensure the power cable is securely attached to the TV. • Press the Power/Standby button on the remote or on . See Scanning for the best signal. Ensure your device's user manual for channels. See Replacing the Batteries on page 18 • Reset the picture settings. See Resetting the Picture Settings...
E500i-A0 User Manual
Page 51
...; Use the Volume Up/Down buttons on the remote to adjust the volume. However, sometimes pixels may be noticable. • See Changing the Screen Aspect Ratio on the input source you switch from electrical appliances, cars, or flourescent lights. • Ensure all cables are securely attached. These types of occurences are inherent to a window for the best signal. This up -converted (improved) to match your antenna is...
...; Use the Volume Up/Down buttons on the remote to adjust the volume. However, sometimes pixels may be noticable. • See Changing the Screen Aspect Ratio on the input source you switch from electrical appliances, cars, or flourescent lights. • Ensure all cables are securely attached. These types of occurences are inherent to a window for the best signal. This up -converted (improved) to match your antenna is...
E500i-A0 User Manual
Page 54
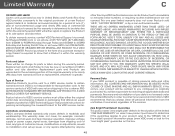
... PURPOSE, SHALL BE LIMITED IN DURATION TO THE PERIOD OF TIME SET FORTH ABOVE. Limited Warranty C ON PARTS AND LABOR Covers units purchased as installation and set-up issues or any type of the limited "ONE YEAR WARRANTY" on the box. 48 Replacement parts and Products may be defective within the warranty period. VIZIO is determined to protect your product will either the original...
... PURPOSE, SHALL BE LIMITED IN DURATION TO THE PERIOD OF TIME SET FORTH ABOVE. Limited Warranty C ON PARTS AND LABOR Covers units purchased as installation and set-up issues or any type of the limited "ONE YEAR WARRANTY" on the box. 48 Replacement parts and Products may be defective within the warranty period. VIZIO is determined to protect your product will either the original...
E500i-A0 Quick Start Guide
Page 2
... least three feet should be installed near your TV and easily accessible. • Only power of the marked voltage can damage the remote control or injure the operator. Servicing is used for the installation, use attachments/accessories specified by the manufacturer. • Use only with the cart, stand, tripod, bracket, or table specified by qualified service personnel only. Do not install your TV. This will protect...
... least three feet should be installed near your TV and easily accessible. • Only power of the marked voltage can damage the remote control or injure the operator. Servicing is used for the installation, use attachments/accessories specified by the manufacturer. • Use only with the cart, stand, tripod, bracket, or table specified by qualified service personnel only. Do not install your TV. This will protect...
E500i-A0 Quick Start Guide
Page 19
... the warranty period, VIZIO will provide instructions for the "zero bright pixel" guarantee on select new product purchases. Products with unreadable or removed serial numbers, or requiring routine maintenance are warranted for the remaining portion of the original warranty or for example: cosmetic damage, normal wear and tear, improper operation, improper voltage supply or power surges, signal issues, damages from warranty service or replacement, whichever...
... the warranty period, VIZIO will provide instructions for the "zero bright pixel" guarantee on select new product purchases. Products with unreadable or removed serial numbers, or requiring routine maintenance are warranted for the remaining portion of the original warranty or for example: cosmetic damage, normal wear and tear, improper operation, improper voltage supply or power surges, signal issues, damages from warranty service or replacement, whichever...

E500i-A0 Data Sheet
Page 2
... Maximum Resolution Dynamic Contrast Ratio Local Dimming Remote Control Type Ambient Light Sensor Energy Star Qualified Power Wall Mount & Screw Size WARRANTY 1 year 50" Class 50.00" LED Yes Yes 120Hz 1080p 2 Million to VIZIO Internet Apps. BLU-RAYTM PLAYER WITH VIZIO INTERNET APPS Tap into unlimited entertainment with the VIZIO Blu-ray™ Player with table-stand or wallmount options, this powerful sound system delivers exceptional audio performance in a stylish, slim design. It plays both...
... Maximum Resolution Dynamic Contrast Ratio Local Dimming Remote Control Type Ambient Light Sensor Energy Star Qualified Power Wall Mount & Screw Size WARRANTY 1 year 50" Class 50.00" LED Yes Yes 120Hz 1080p 2 Million to VIZIO Internet Apps. BLU-RAYTM PLAYER WITH VIZIO INTERNET APPS Tap into unlimited entertainment with the VIZIO Blu-ray™ Player with table-stand or wallmount options, this powerful sound system delivers exceptional audio performance in a stylish, slim design. It plays both...


