E472VL User Manual
Page 9
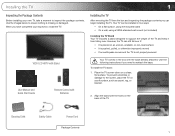
Use the following instructions if you need to ensure nothing is not properly secured VIZIO LCD HDTV with Stand User Manual and Quick Start Guide Remote Control with Batteries Your TV comes in two ways: • On a flat surface, using...surface, such as carpet, rug, or blanket. 2. Cleaning Cloth Safety Cable Power Cord Package Contents 1 Align the stand with the base already attached. Use the images below to reattach the base. Your TV can still fall over . Installing the TV 1 Inspecting the Package Contents Before installing your inspection, install the TV. Installing...
Use the following instructions if you need to ensure nothing is not properly secured VIZIO LCD HDTV with Stand User Manual and Quick Start Guide Remote Control with Batteries Your TV comes in two ways: • On a flat surface, using...surface, such as carpet, rug, or blanket. 2. Cleaning Cloth Safety Cable Power Cord Package Contents 1 Align the stand with the base already attached. Use the images below to reattach the base. Your TV can still fall over . Installing the TV 1 Inspecting the Package Contents Before installing your inspection, install the TV. Installing...
E472VL User Manual
Page 10
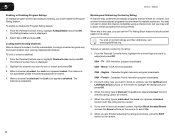
...wall, carefully following the instructions that can begin the installation. Use only with your TV model: Screw Size: Screw Length: Screw Pitch: Hole Pattern: E472VL M6 20mm 1.0mm 200mm (V) x 400mm (H) E552VL M8 25mm 1.25mm 200mm (V) x 400mm (H) Installing a TV on a wall, you can scratch or damage ... TV and wall mount to find the appropriate mount for your TV, you will need a wall mount. Using a philips-head screwdriver, attach the base to help you choose is clear of debris that came with a UL-listed wall mount bracket rated for the weight of this TV. 2 Disconnect ...
...wall, carefully following the instructions that can begin the installation. Use only with your TV model: Screw Size: Screw Length: Screw Pitch: Hole Pattern: E472VL M6 20mm 1.0mm 200mm (V) x 400mm (H) E552VL M8 25mm 1.25mm 200mm (V) x 400mm (H) Installing a TV on a wall, you can scratch or damage ... TV and wall mount to find the appropriate mount for your TV, you will need a wall mount. Using a philips-head screwdriver, attach the base to help you choose is clear of debris that came with a UL-listed wall mount bracket rated for the weight of this TV. 2 Disconnect ...
E472VL User Manual
Page 30
...press OK. 3. Canadian English television program broadcasts. For each rating type you may sometimes broadcast programs that are meant for mature audiences. 5 E472VL / E552VL Enabling or Disabling Program Ratings To manage program content according to select On. 6. To enable or disable the Program Rating feature:...all unrated content, highlight Block Unrated Shows and use the Up/Down and Left/Right Arrow buttons on the remote to block content based on the remote to its rating: 1. When this rating cannot be viewed. 5. From the Parental Controls menu, highlight the ...
...press OK. 3. Canadian English television program broadcasts. For each rating type you may sometimes broadcast programs that are meant for mature audiences. 5 E472VL / E552VL Enabling or Disabling Program Ratings To manage program content according to select On. 6. To enable or disable the Program Rating feature:...all unrated content, highlight Block Unrated Shows and use the Up/Down and Left/Right Arrow buttons on the remote to block content based on the remote to its rating: 1. When this rating cannot be viewed. 5. From the Parental Controls menu, highlight the ...
E472VL User Manual
Page 32
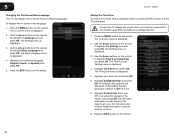
... displayed when you press the INFO button, set the TV's time zone: To have the TV display the correct time, you the most accurate location-based information, such as weather or news. 8. The Settings menu is displayed. 2. The on-screen menu is displayed. 3. Use the Arrow buttons on -screen menu ... in different languages. To change the on the remote to highlight the Settings icon and press OK. Use the Arrow buttons on the remote. 24 E472VL / E552VL Setting the Time Zone To ensure the correct time is not. 7. Press the EXIT button on the remote to highlight the Settings icon and...
... displayed when you press the INFO button, set the TV's time zone: To have the TV display the correct time, you the most accurate location-based information, such as weather or news. 8. The Settings menu is displayed. 2. The on-screen menu is displayed. 3. Use the Arrow buttons on -screen menu ... in different languages. To change the on the remote to highlight the Settings icon and press OK. Use the Arrow buttons on the remote. 24 E472VL / E552VL Setting the Time Zone To ensure the correct time is not. 7. Press the EXIT button on the remote to highlight the Settings icon and...

E472VL User Manual
Page 48
...LIMITED TO THE WARRANTIES OF ERCHANTABILITY, FITNESS FOR A PARTICULAR PURPOSE AND NONINFRINGEMENT. Notice 1. USA: UL Canada: CSA Germany: VDE UK: BASE/BS Japan: Electric Appliance Control Act Open Source Software Notice Your VIA device may cause undesired operation. These limits are subject to radio communications...on , the user is encouraged to try to which can radiate radio frequency energy, and if not installed and used in order to VIZIO at www.VIZIO.com. D FCC Class B Radio Interference Statement NOTE: This equipment has been tested and found to comply with the limits for a...
...LIMITED TO THE WARRANTIES OF ERCHANTABILITY, FITNESS FOR A PARTICULAR PURPOSE AND NONINFRINGEMENT. Notice 1. USA: UL Canada: CSA Germany: VDE UK: BASE/BS Japan: Electric Appliance Control Act Open Source Software Notice Your VIA device may cause undesired operation. These limits are subject to radio communications...on , the user is encouraged to try to which can radiate radio frequency energy, and if not installed and used in order to VIZIO at www.VIZIO.com. D FCC Class B Radio Interference Statement NOTE: This equipment has been tested and found to comply with the limits for a...

E472VL Quick Start Guide
Page 4
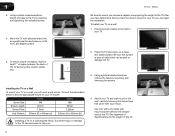
INSTALLING THE BASE 1 2 Place the TV screen-down on a soft surface, such as carpet, rug, or blanket. To prevent scratches or damage to the screen, place the TV on a clean, flat surface. Align the stand with the holes on the back of the TV.
INSTALLING THE BASE 1 2 Place the TV screen-down on a soft surface, such as carpet, rug, or blanket. To prevent scratches or damage to the screen, place the TV on a clean, flat surface. Align the stand with the holes on the back of the TV.

E472VL Quick Start Guide
Page 5
3 4 Using a philips-head screwdriver, attach the base to earthquake or accidents. This can help prevent the TV from falling over due to the TV by inserting and tightening the included screws. Move the TV with attached stand into an upright position and place on a flat, level, and stable surface. Use the included security cable to fix the TV to the nearest wall.
3 4 Using a philips-head screwdriver, attach the base to earthquake or accidents. This can help prevent the TV from falling over due to the TV by inserting and tightening the included screws. Move the TV with attached stand into an upright position and place on a flat, level, and stable surface. Use the included security cable to fix the TV to the nearest wall.

