

E472VL User Manual
Page 2
...is a trademark of HDMI Licensing LLC. SRS StudioSound HD is incorporated under license from SRS Labs, Inc. Changing the factory default picture settings or enabling other features will be achieved. Manufactured under license from Dolby Laboratories. Dolby and the double-D symbol are trademarks of Dolby Laboratories... or registered trademarks of SRS Labs, Inc. This product qualifies for ENERGY STAR in the "factory default" setting and this is the setting in which power savings will increase power consumption that could exceed the limits necessary to qualify for ENERGY STAR rating....
...is a trademark of HDMI Licensing LLC. SRS StudioSound HD is incorporated under license from SRS Labs, Inc. Changing the factory default picture settings or enabling other features will be achieved. Manufactured under license from Dolby Laboratories. Dolby and the double-D symbol are trademarks of Dolby Laboratories... or registered trademarks of SRS Labs, Inc. This product qualifies for ENERGY STAR in the "factory default" setting and this is the setting in which power savings will increase power consumption that could exceed the limits necessary to qualify for ENERGY STAR rating....
E472VL User Manual
Page 6
... receive TV programming through an antenna now need a converter box to continue to receive over-the-air TV. Analog-only television sets that the antenna or cable system is electrically grounded to provide some protection against voltage surges and static charges. Analog-only TVs ... ANSI/NFPSA 70, provides information with cable and satellite TV services, gaming consoles, VCRs, DVD players, and similar products. E472VL / E552VL Television Antenna Connection Protection If an outside antenna/satellite dish or cable system is to be connected to earth in the building ...
... receive TV programming through an antenna now need a converter box to continue to receive over-the-air TV. Analog-only television sets that the antenna or cable system is electrically grounded to provide some protection against voltage surges and static charges. Analog-only TVs ... ANSI/NFPSA 70, provides information with cable and satellite TV services, gaming consoles, VCRs, DVD players, and similar products. E472VL / E552VL Television Antenna Connection Protection If an outside antenna/satellite dish or cable system is to be connected to earth in the building ...

E472VL User Manual
Page 7
... Rear Panel 3 Front Panel 3 Remote Control 4 Left Side Panel 4 Replacing the Batteries 5 Connecting Your Devices 6 Before You Begin 6 Connecting Your Devices 6 Setting Up Your Network Connection 8 Connecting to A Wired Network 8 Connecting to a Wireless Network 8 Completing the First-Time Setup 9 Using the On-Screen Menu 10 ... Locks 23 Changing the Names of the Inputs 23 Changing the On-Screen Menu Language 24 Setting the Time Zone 24 Adjusting the CEC Settings 25 Turning the VIZIO Logo On or Off 25 Using the Help Menu 25 Displaying System Information 25 Resetting the...
... Rear Panel 3 Front Panel 3 Remote Control 4 Left Side Panel 4 Replacing the Batteries 5 Connecting Your Devices 6 Before You Begin 6 Connecting Your Devices 6 Setting Up Your Network Connection 8 Connecting to A Wired Network 8 Connecting to a Wireless Network 8 Completing the First-Time Setup 9 Using the On-Screen Menu 10 ... Locks 23 Changing the Names of the Inputs 23 Changing the On-Screen Menu Language 24 Setting the Time Zone 24 Adjusting the CEC Settings 25 Turning the VIZIO Logo On or Off 25 Using the Help Menu 25 Displaying System Information 25 Resetting the...
E472VL User Manual
Page 8
...Media Player 28 Connecting a USB Thumb Drive to the TV 28 Playing USB Media 28 Using VIZIO Internet Apps 31 Using the VIA Shortcut Buttons 31 Using the VIA Dock 31 Moving an ...a New User Profile 33 Removing a User Profile 33 Restoring the VIA Dock to the Factory Default Settings 34 Troubleshooting & Technical Support 35 The TV displays "No Signal 35 There is no power 35 ...I see "noise" or static on the screen 36 When I change input source, the volume changes 36 E472VL / E552VL When I change input source, the display image changes size 36 Specifications 37 Limited Warranty 39 ON...
...Media Player 28 Connecting a USB Thumb Drive to the TV 28 Playing USB Media 28 Using VIZIO Internet Apps 31 Using the VIA Shortcut Buttons 31 Using the VIA Dock 31 Moving an ...a New User Profile 33 Removing a User Profile 33 Restoring the VIA Dock to the Factory Default Settings 34 Troubleshooting & Technical Support 35 The TV displays "No Signal 35 There is no power 35 ...I see "noise" or static on the screen 36 When I change input source, the volume changes 36 E472VL / E552VL When I change input source, the display image changes size 36 Specifications 37 Limited Warranty 39 ON...
E472VL User Manual
Page 13
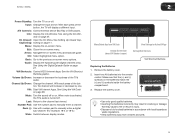
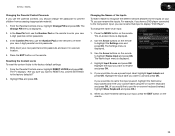
A/V Controls: Control external device (Blu-Ray or DVD player). See Setting Up Closed CapCaptioning) tioning on -screen menu. Exit: Close the on page 11. Back: Go to the channel last viewed. VIA Shortcuts: Control VIZIO Internet Apps. With each press of old or dead batteries in cracking or leakage that the ...highlighted menu option. Guide: Display the episode guide (digital channels only). Info: Display the Info Window. See Using the VIA Dock on or off . E472VL / E552VL 2 Power/Standby: Turn the TV on page 28. CC (Closed: Open the CC Menu. See Using the Digital Episode Guide on the...
A/V Controls: Control external device (Blu-Ray or DVD player). See Setting Up Closed CapCaptioning) tioning on -screen menu. Exit: Close the on page 11. Back: Go to the channel last viewed. VIA Shortcuts: Control VIZIO Internet Apps. With each press of old or dead batteries in cracking or leakage that the ...highlighted menu option. Guide: Display the episode guide (digital channels only). Info: Display the Info Window. See Using the VIA Dock on or off . E472VL / E552VL 2 Power/Standby: Turn the TV on page 28. CC (Closed: Open the CC Menu. See Using the Digital Episode Guide on the...
E472VL User Manual
Page 14
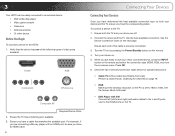
... example, if you are ready to use your device and the TV, ensure you have the corresponding cable. Ensure each end of the cable is set to the HDMI ports on the TV. 3 Your HDTV can be sure you have an HDMI cable. 6 Connecting Your Devices Connecting Your Devices Once you... the HDTV: 1. When you are off. 2. Check the list of video ports available: HDMI RGB Component RF/Antenna Composite AV Required Device Ports 2. Press OK. 6. Set the Screen Mode to Normal. • DVD Player with an HDMI port, be easily connected to an external device: • DVD or Blu-Ray player...
... example, if you are ready to use your device and the TV, ensure you have the corresponding cable. Ensure each end of the cable is set to the HDMI ports on the TV. 3 Your HDTV can be sure you have an HDMI cable. 6 Connecting Your Devices Connecting Your Devices Once you... the HDTV: 1. When you are off. 2. Check the list of video ports available: HDMI RGB Component RF/Antenna Composite AV Required Device Ports 2. Press OK. 6. Set the Screen Mode to Normal. • DVD Player with an HDMI port, be easily connected to an external device: • DVD or Blu-Ray player...

E472VL User Manual
Page 16
... have: • An ethernet cable long enough to reach your TV • A router or modem with an available ethernet port • A high-speed internet connection 2. 3 Setting Up Your Network Connection Your TV is internet-ready, and can be connected to your home network in two ways: • Wired, using your home.... Connecting to A Wired Network To connect to a wireless network: 1. Use the Guided Network Setup to configure the TV. See Using Guided Setup on page 26. 8 E472VL / E552VL Use the Guided Network Setup to configure the TV.
... have: • An ethernet cable long enough to reach your TV • A router or modem with an available ethernet port • A high-speed internet connection 2. 3 Setting Up Your Network Connection Your TV is internet-ready, and can be connected to your home network in two ways: • Wired, using your home.... Connecting to A Wired Network To connect to a wireless network: 1. Use the Guided Network Setup to configure the TV. See Using Guided Setup on page 26. 8 E472VL / E552VL Use the Guided Network Setup to configure the TV.
E472VL User Manual
Page 18
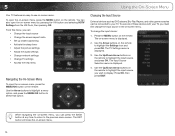
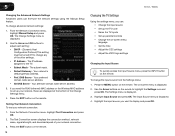
...8226; Change the input source • Change the screen aspect radio • Set up closed captioning • Activate the sleep timer • Adjust the picture settings • Adjust the audio settings • Change network settings • Change TV settings • Access the help menu Navigating the On-Screen Menu To open the ... can also open the on-screen menu, press the MENU/OK button on -screen menu by pressing the VIA button and selecting HDTV Settings from the VIA Dock, then pressing OK. Using the On-Screen Menu Changing the Input Source External devices such as DVD players, Blu...
...8226; Change the input source • Change the screen aspect radio • Set up closed captioning • Activate the sleep timer • Adjust the picture settings • Adjust the audio settings • Change network settings • Change TV settings • Access the help menu Navigating the On-Screen Menu To open the ... can also open the on-screen menu, press the MENU/OK button on -screen menu by pressing the VIA button and selecting HDTV Settings from the VIA Dock, then pressing OK. Using the On-Screen Menu Changing the Input Source External devices such as DVD players, Blu...
E472VL User Manual
Page 19
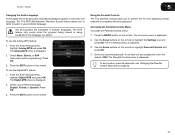
...3. To change the screen aspect ratio: 1. Since the 4:3 aspect ratio is not being stretched, the display image may display Spanish captions. 11 Setting Up Closed Captioning Your TV can display images in four different modes: Wide, Zoom, Normal, and Stretch. To activate or deactivate closed captions you ...black bars are watching widescreen (1.85:1 or 2.35:1) content, black bars will still appear on the top and bottom of the display image. E472VL / E552VL 5 Changing the Screen Aspect Ratio The TV can display closed captions, the TV will appear on the top and bottom of the ...
...3. To change the screen aspect ratio: 1. Since the 4:3 aspect ratio is not being stretched, the display image may display Spanish captions. 11 Setting Up Closed Captioning Your TV can display images in four different modes: Wide, Zoom, Normal, and Stretch. To activate or deactivate closed captions you ...black bars are watching widescreen (1.85:1 or 2.35:1) content, black bars will still appear on the top and bottom of the display image. E472VL / E552VL 5 Changing the Screen Aspect Ratio The TV can display closed captions, the TV will appear on the top and bottom of the ...
E472VL User Manual
Page 20
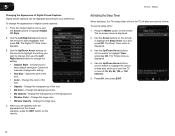
... displayed. 2. 5 Changing the Appearance of Digital Closed Captions Digital closed captions can be displayed according to change the setting: • Caption Style - Choose Auto to keep default settings or Custom to highlight Digital CC Style. 2. To use the Arrow buttons to manually change , then use the... Timer icon and press OK. Change the edge type. 4. E472VL / E552VL Activating the Sleep Timer When activated, the TV's sleep timer will turn off after a set period of time after which you wish to change each setting. • Text Size - When you are satisfied with the...
... displayed. 2. 5 Changing the Appearance of Digital Closed Captions Digital closed captions can be displayed according to change the setting: • Caption Style - Choose Auto to keep default settings or Custom to highlight Digital CC Style. 2. To use the Arrow buttons to manually change , then use the... Timer icon and press OK. Change the edge type. 4. E472VL / E552VL Activating the Sleep Timer When activated, the TV's sleep timer will turn off after a set period of time after which you wish to change each setting. • Text Size - When you are satisfied with the...
E472VL User Manual
Page 21
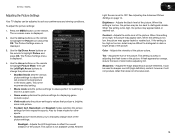
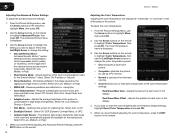
... too high, the picture may appear faded or washed out. Sharpness - Adjusts the edge sharpness of the picture. E472VL / E552VL Adjusting the Picture Settings Your TV display can be used to sharpen non-HD (high definition) content; Use the Arrow buttons on page 14....will produce the best picture in dark or bright areas of the picture. To adjust the picture settings: 1. When this setting is set to manually change the picture mode: • Standard mode sets the various picture settings to values that will not produce detail that produce a brighter, more vivid picture. • ...
... too high, the picture may appear faded or washed out. Sharpness - Adjusts the edge sharpness of the picture. E472VL / E552VL Adjusting the Picture Settings Your TV display can be used to sharpen non-HD (high definition) content; Use the Arrow buttons on page 14....will produce the best picture in dark or bright areas of the picture. To adjust the picture settings: 1. When this setting is set to manually change the picture mode: • Standard mode sets the various picture settings to values that will not produce detail that produce a brighter, more vivid picture. • ...
E472VL User Manual
Page 22
... Select Off, DCR (Dynamic Contrast Ratio), or OPC. • Ambient Light Sensor - When you have finished adjusting the Advanced Picture Settings, press the EXIT button on the remote. To adjust the color temperature: 1. Adjusts the amount of each of some colors and improves... you have finished adjusting the color temperature, press the EXIT button on the remote. 14 E472VL / E552VL Adjusting the Color Temperature Adjusting the color temperature will change the setting: • Smooth Motion Effect Activates Smooth Motion™ motion estimation/motion compensation, which suppresses...
... Select Off, DCR (Dynamic Contrast Ratio), or OPC. • Ambient Light Sensor - When you have finished adjusting the Advanced Picture Settings, press the EXIT button on the remote. To adjust the color temperature: 1. Adjusts the amount of each of some colors and improves... you have finished adjusting the color temperature, press the EXIT button on the remote. 14 E472VL / E552VL Adjusting the Color Temperature Adjusting the color temperature will change the setting: • Smooth Motion Effect Activates Smooth Motion™ motion estimation/motion compensation, which suppresses...
E472VL User Manual
Page 23
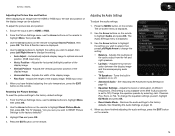
...on page 16. • Equalizer Settings - Adjusts the boost or attenuation of different frequencies. (This setting is only available when SRS TruSurround HD is set to highlight Size & Position, then press OK. See Resetting the Audio Settings on the remote. E472VL / E552VL 5 Adjusting the Picture Size... and Position When displaying an image from the left /right) position of the display image. • Vertical Position - The Audio Settings menu is displayed. 4. Use the Arrow ...
...on page 16. • Equalizer Settings - Adjusts the boost or attenuation of different frequencies. (This setting is only available when SRS TruSurround HD is set to highlight Size & Position, then press OK. See Resetting the Audio Settings on the remote. E472VL / E552VL 5 Adjusting the Picture Size... and Position When displaying an image from the left /right) position of the display image. • Vertical Position - The Audio Settings menu is displayed. 4. Use the Arrow ...
E472VL User Manual
Page 24
...' volume from the TV's volume controls, or select Fixed to a home theater audio system. When you want to RESET Audio Settings to television commercials or channel changes. Additionally, StudioSound HD completes the entertainment experience by maintaining a steady volume while watching programming and... movies, providing deep, rich bass, and delivering crisp details and clear, intelligible dialog. E472VL / E552VL Resetting the Audio Settings To reset the audio settings to highlight Reset Audio Mode and press OK. Use the Arrow buttons to the factory default...
...' volume from the TV's volume controls, or select Fixed to a home theater audio system. When you want to RESET Audio Settings to television commercials or channel changes. Additionally, StudioSound HD completes the entertainment experience by maintaining a steady volume while watching programming and... movies, providing deep, rich bass, and delivering crisp details and clear, intelligible dialog. E472VL / E552VL Resetting the Audio Settings To reset the audio settings to highlight Reset Audio Mode and press OK. Use the Arrow buttons to the factory default...
E472VL User Manual
Page 25
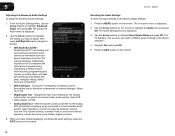
.... 17 Use the Arrow buttons on the remote to highlight the Network icon and press OK. Press the EXIT button on the remote. E472VL / E552VL 5 Using the Network Connection Menu Your TV is displayed. 2. The on -screen keyboard, enter your network's password, then highlight... The Network Connection menu is displayed. 3. The Network Connection menu is displayed. 3. Highlight the name of available wireless networks, is connected to set up a wireless network connection. 1. Using the on -screen menu is internet-ready, featuring both an ethernet port and built-in high-speed...
.... 17 Use the Arrow buttons on the remote to highlight the Network icon and press OK. Press the EXIT button on the remote. E472VL / E552VL 5 Using the Network Connection Menu Your TV is displayed. 2. The on -screen keyboard, enter your network's password, then highlight... The Network Connection menu is displayed. 3. The Network Connection menu is displayed. 3. Highlight the name of available wireless networks, is connected to set up a wireless network connection. 1. Using the on -screen menu is internet-ready, featuring both an ethernet port and built-in high-speed...
E472VL User Manual
Page 26
... RJ45 (ethernet) MAC address or the Wireless MAC address to set up parental controls • Change the on-screen menu language • Set the time • Adjust the CEC settings • Adjust the VIZIO logo settings Changing the Input Source To quickly access the Input Source menu,...Testing Your Network Connection To test your network connection. 3. 5 E472VL / E552VL Changing the Advanced Network Settings Advanced users can : • Change the input source • Set up the TV tuner • Name the TV inputs • Set up your network, these are displayed at the bottom of your...
... RJ45 (ethernet) MAC address or the Wireless MAC address to set up parental controls • Change the on-screen menu language • Set the time • Adjust the CEC settings • Adjust the VIZIO logo settings Changing the Input Source To quickly access the Input Source menu,...Testing Your Network Connection To test your network connection. 3. 5 E472VL / E552VL Changing the Advanced Network Settings Advanced users can : • Change the input source • Set up the TV tuner • Name the TV inputs • Set up your network, these are displayed at the bottom of your...
E472VL User Manual
Page 27
...antenna or cable TV connection, you must scan for Channels Before the TV can detect and display channels and their associated information, you must set the tuner mode. 1. The auto channel scan begins. 2. Highlight Done and press OK. 3. Scanning for channels. Press the EXIT button ...on -screen menu is displayed. 2. E472VL / E552VL 5 Setting the Tuner Mode If you are using a device that is connected to -air broadcast television channels are available. 1. Press the EXIT button on ...
...antenna or cable TV connection, you must scan for Channels Before the TV can detect and display channels and their associated information, you must set the tuner mode. 1. The auto channel scan begins. 2. Highlight Done and press OK. 3. Scanning for channels. Press the EXIT button ...on -screen menu is displayed. 2. E472VL / E552VL 5 Setting the Tuner Mode If you are using a device that is connected to -air broadcast television channels are available. 1. Press the EXIT button on ...
E472VL User Manual
Page 28
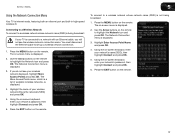
...menu is displayed. 2. Highlight Start and press OK. If you are adding. 3. The partial channel search begins. 6. Highlight Done and press OK. 7. From the Tuner Settings menu, highlight Skip Channel. When the TV is entered using the Partial Channel Search and Add Analog Channel options. Channels that some channels you select... the type of channel you may also be viewed if the channel is done scanning for the channel. 4. To add a single new analog channel: 1. 5 E472VL / E552VL Adding New Channels Occasionally, you are adding: Analog/Digital, Analog, or Digital. 3.
...menu is displayed. 2. Highlight Start and press OK. If you are adding. 3. The partial channel search begins. 6. Highlight Done and press OK. 7. From the Tuner Settings menu, highlight Skip Channel. When the TV is entered using the Partial Channel Search and Add Analog Channel options. Channels that some channels you select... the type of channel you may also be viewed if the channel is done scanning for the channel. 4. To add a single new analog channel: 1. 5 E472VL / E552VL Adding New Channels Occasionally, you are adding: Analog/Digital, Analog, or Digital. 3.
E472VL User Manual
Page 29
...French, or Spanish. Not all programs are broadcast in your preferred language. From the Tuner Settings menu, highlight Analog MTS and press OK. From the Tuner Settings menu, highlight Digital MTS and press OK. E472VL / E552VL 5 Changing the Audio Language Some digital free-to prevent the TV from displaying...Controls menu is being broadcast in the language you to listen to audio in multiple languages. Press the MENU button on the remote. To set a passcode, enter the default, 0000. Press the EXIT button on the remote. The Digital MTS menu is displayed. 2. The on the...
...French, or Spanish. Not all programs are broadcast in your preferred language. From the Tuner Settings menu, highlight Analog MTS and press OK. From the Tuner Settings menu, highlight Digital MTS and press OK. E472VL / E552VL 5 Changing the Audio Language Some digital free-to prevent the TV from displaying...Controls menu is being broadcast in the language you to listen to audio in multiple languages. Press the MENU button on the remote. To set a passcode, enter the default, 0000. Press the EXIT button on the remote. The Digital MTS menu is displayed. 2. The on the...
E472VL User Manual
Page 31
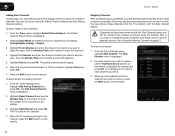
...remote to re-enter your input, press the EXIT button on the remote to highlight the Settings icon and press OK. Press the MENU button on the remote to highlight Name Input and press OK. E472VL / E552VL 5 Changing the Parental Control Passcode If you use the parental controls, you ... control passcode. 3. If you would like to display "DVD Player". The Name Input menu is displayed. 3. If you want to the factory-default settings: 1. From the Parental Controls menu, highlight Change PIN and press OK. In the New Pin field, use and press OK. Resetting the Content Locks...
...remote to re-enter your input, press the EXIT button on the remote to highlight the Settings icon and press OK. Press the MENU button on the remote to highlight Name Input and press OK. E472VL / E552VL 5 Changing the Parental Control Passcode If you use the parental controls, you ... control passcode. 3. If you would like to display "DVD Player". The Name Input menu is displayed. 3. If you want to the factory-default settings: 1. From the Parental Controls menu, highlight Change PIN and press OK. In the New Pin field, use and press OK. Resetting the Content Locks...


