
E472VL User Manual
Page 5
..., the internal components may cause fire or electric shock. • Follow instructions for your TV. Do not expose batteries to leak which can damage the remote control or injure the operator. h The lightning flash with heavy dust or high humidity may function abnormally. Do not expose your TV if any smoke... repair or service your TV in any other than the specified voltage may cause fire or electric shock. • Do not install your TV yourself. E472VL / E552VL • Do not overload power strips and extension cords.
..., the internal components may cause fire or electric shock. • Follow instructions for your TV. Do not expose batteries to leak which can damage the remote control or injure the operator. h The lightning flash with heavy dust or high humidity may function abnormally. Do not expose your TV if any smoke... repair or service your TV in any other than the specified voltage may cause fire or electric shock. • Do not install your TV yourself. E472VL / E552VL • Do not overload power strips and extension cords.

E472VL User Manual
Page 7
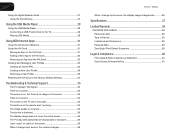
... the Package Contents 1 Installing the TV 1 Installing the TV Stand 1 Installing the TV on a Wall 2 Controls and Connections 3 Rear Panel 3 Front Panel 3 Remote Control 4 Left Side Panel 4 Replacing the Batteries 5 Connecting Your Devices 6 Before You Begin 6 Connecting Your Devices 6 Setting Up Your Network Connection 8 Connecting to... Inputs 23 Changing the On-Screen Menu Language 24 Setting the Time Zone 24 Adjusting the CEC Settings 25 Turning the VIZIO Logo On or Off 25 Using the Help Menu 25 Displaying System Information 25 Resetting the TV Settings 25 Restoring the ...
... the Package Contents 1 Installing the TV 1 Installing the TV Stand 1 Installing the TV on a Wall 2 Controls and Connections 3 Rear Panel 3 Front Panel 3 Remote Control 4 Left Side Panel 4 Replacing the Batteries 5 Connecting Your Devices 6 Before You Begin 6 Connecting Your Devices 6 Setting Up Your Network Connection 8 Connecting to... Inputs 23 Changing the On-Screen Menu Language 24 Setting the Time Zone 24 Adjusting the CEC Settings 25 Turning the VIZIO Logo On or Off 25 Using the Help Menu 25 Displaying System Information 25 Resetting the TV Settings 25 Restoring the ...
E472VL User Manual
Page 8
... USB Media Player 28 Connecting a USB Thumb Drive to the TV 28 Playing USB Media 28 Using VIZIO Internet Apps 31 Using the VIA Shortcut Buttons 31 Using the VIA Dock 31 Moving an App on ... is no sound 35 The colors on the TV don't look right 35 The buttons on the remote aren't working 35 The image quality is not good 35 The picture is distorted 36 The display ... 36 I see "noise" or static on the screen 36 When I change input source, the volume changes 36 E472VL / E552VL When I change input source, the display image changes size 36 Specifications 37 Limited Warranty 39 ON PARTS ...
... USB Media Player 28 Connecting a USB Thumb Drive to the TV 28 Playing USB Media 28 Using VIZIO Internet Apps 31 Using the VIA Shortcut Buttons 31 Using the VIA Dock 31 Moving an App on ... is no sound 35 The colors on the TV don't look right 35 The buttons on the remote aren't working 35 The image quality is not good 35 The picture is distorted 36 The display ... 36 I see "noise" or static on the screen 36 When I change input source, the volume changes 36 E472VL / E552VL When I change input source, the display image changes size 36 Specifications 37 Limited Warranty 39 ON PARTS ...
E472VL User Manual
Page 9
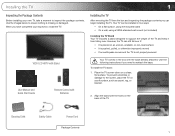
...; It is pushed, pulled, or otherwise improperly moved • If an earthquake occurs and the TV is not properly secured VIZIO LCD HDTV with Stand User Manual and Quick Start Guide Remote Control with Batteries Your TV comes in two ways: • On a flat surface, using the included stand • On a wall...
...; It is pushed, pulled, or otherwise improperly moved • If an earthquake occurs and the TV is not properly secured VIZIO LCD HDTV with Stand User Manual and Quick Start Guide Remote Control with Batteries Your TV comes in two ways: • On a flat surface, using the included stand • On a wall...

E472VL User Manual
Page 11
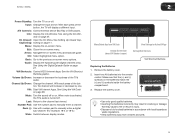
Front Panel Optical Audio Out HDMI (1, 2, 3) RCA Audio In (For use with HDMI ports) Component RCA Audio Out Remote Control Sensor Front Panel Remote Control Sensor: When using the remote, point it directly at this sensor. HDMI (1,2,3): Connect HDMI devices. Ethernet: Connect an Ethernet cable for an HDMI input. Optical Audio Out: Connect SPDIF.../Coaxial connector from computer. AC IN Rear Panel RGB PC: Connect RGB cable from cable, antenna, or satellite box. RCA Audio In: Connect audio for VIZIO Internet Apps. PC Audio In: Connect 3.5mm connector from computer.
Front Panel Optical Audio Out HDMI (1, 2, 3) RCA Audio In (For use with HDMI ports) Component RCA Audio Out Remote Control Sensor Front Panel Remote Control Sensor: When using the remote, point it directly at this sensor. HDMI (1,2,3): Connect HDMI devices. Ethernet: Connect an Ethernet cable for an HDMI input. Optical Audio Out: Connect SPDIF.../Coaxial connector from computer. AC IN Rear Panel RGB PC: Connect RGB cable from cable, antenna, or satellite box. RCA Audio In: Connect audio for VIZIO Internet Apps. PC Audio In: Connect 3.5mm connector from computer.
E472VL User Manual
Page 12
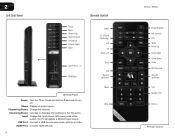
... (Closed Captioning) Exit OK Arrow Left Back VIA Volume Up/Down Mute Wide E472VL / E552VL Power/Standby A/V Controls Info Menu Arrow Up Arrow Right Arrow Down Guide VIA Shortcuts Channel Up/Down Last Number Pad Dash (-) Remote Control Channel Up/Down: Change the channel. Input: Change the input device....Connect a USB drive to turn off. Menu: Display on . Press and hold for 3 seconds to play music, photos, or video. 2 Left Side Panel Remote Control Power Menu Channel Up Channel Down Volume Up Volume Down Input USB Ports (1, 2) HDMI Port Left Side Panel Power: Turn the TV on -screen...
... (Closed Captioning) Exit OK Arrow Left Back VIA Volume Up/Down Mute Wide E472VL / E552VL Power/Standby A/V Controls Info Menu Arrow Up Arrow Right Arrow Down Guide VIA Shortcuts Channel Up/Down Last Number Pad Dash (-) Remote Control Channel Up/Down: Change the channel. Input: Change the input device....Connect a USB drive to turn off. Menu: Display on . Press and hold for 3 seconds to play music, photos, or video. 2 Left Side Panel Remote Control Power Menu Channel Up Channel Down Volume Up Volume Down Input USB Ports (1, 2) HDMI Port Left Side Panel Power: Turn the TV on -screen...
E472VL User Manual
Page 13
...the (+) and (-) symbols inside the battery compartment. 3. Insert two AA batteries into the remote control. Input: Change the input device. VIA Shortcuts: Control VIZIO Internet Apps. Info: Display the Info Window. Volume Up/Down: Increase or decrease the ...loudness of the button, the TV will increase or decrease by one. Last: Return to manually enter a digital sub-channel. (For example, 18-4 or 18-5.) Wide: Switch between display modes. Remove the battery cover. 2. E472VL...
...the (+) and (-) symbols inside the battery compartment. 3. Insert two AA batteries into the remote control. Input: Change the input device. VIA Shortcuts: Control VIZIO Internet Apps. Info: Display the Info Window. Volume Up/Down: Increase or decrease the ...loudness of the button, the TV will increase or decrease by one. Last: Return to manually enter a digital sub-channel. (For example, 18-4 or 18-5.) Wide: Switch between display modes. Remove the battery cover. 2. E472VL...
E472VL User Manual
Page 14
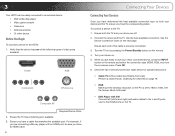
... button on . 5. Turn the TV on by pressing the Power/Standby button on the next page. Press OK. 6. See the Device Connection Chart on the remote. 4. When you are off. 2. To connect a device to the HDTV: 1. Use the best available connection. Turn your device on the... remote and select the connection type (HDMI, RGB, etc) from wall) Perform a channel scan. Ensure the TV has a matching port available. 3. Verify that matches the available ...
... button on . 5. Turn the TV on by pressing the Power/Standby button on the next page. Press OK. 6. See the Device Connection Chart on the remote. 4. When you are off. 2. To connect a device to the HDTV: 1. Use the best available connection. Turn your device on the... remote and select the connection type (HDMI, RGB, etc) from wall) Perform a channel scan. Ensure the TV has a matching port available. 3. Verify that matches the available ...
E472VL User Manual
Page 17
... TV to your network with an ethernet cable, connect it to the ethernet port on the TV. Use the Up/Down Arrow buttons on the remote to Live TV and press OK. Answer the on-screen questions about your wireless network from the list of your TV connection using the Arrow... and OK buttons on the remote. 3. TV Widgets. When you are finished, highlight Next and press OK. Enter your network automatically. The TV will not see this step. Highlight Skip and...
... TV to your network with an ethernet cable, connect it to the ethernet port on the TV. Use the Up/Down Arrow buttons on the remote to Live TV and press OK. Answer the on-screen questions about your wireless network from the list of your TV connection using the Arrow... and OK buttons on the remote. 3. TV Widgets. When you are finished, highlight Next and press OK. Enter your network automatically. The TV will not see this step. Highlight Skip and...
E472VL User Manual
Page 18
... HDTV Settings from the VIA Dock, then pressing OK. Use the Up/Down Arrow buttons on the remote to highlight the input source you wish to -use one of these devices with your TV. Use the...-screen menu, press the MENU button on -screen menu is displayed. 2. To use on the remote. The TV Settings menu is displayed. 4. 5 Your TV features an easy-to display. To change the input source...10 You can be connected to highlight the Settings icon and press OK. The on the remote. While navigating the on-screen menu, you can press the BACK button at any time to return to the previous...
... HDTV Settings from the VIA Dock, then pressing OK. Use the Up/Down Arrow buttons on the remote to highlight the input source you wish to -use one of these devices with your TV. Use the...-screen menu, press the MENU button on -screen menu is displayed. 2. To use on the remote. The TV Settings menu is displayed. 4. 5 Your TV features an easy-to display. To change the input source...10 You can be connected to highlight the Settings icon and press OK. The on the remote. While navigating the on-screen menu, you can press the BACK button at any time to return to the previous...
E472VL User Manual
Page 19
...Caption for analog (NTSC) TV channels. • Digital Closed Caption for digital (ATSC) TV channels. 4. The on the remote. After highlighting the type of the display image. E472VL / E552VL 5 Changing the Screen Aspect Ratio The TV can display closed captions for programs that include them . To change ...the screen aspect ratio: 1. Press the MENU button on the remote to fill the screen. Since the 4:3 aspect...
...Caption for analog (NTSC) TV channels. • Digital Closed Caption for digital (ATSC) TV channels. 4. The on the remote. After highlighting the type of the display image. E472VL / E552VL 5 Changing the Screen Aspect Ratio The TV can display closed captions for programs that include them . To change ...the screen aspect ratio: 1. Press the MENU button on the remote to fill the screen. Since the 4:3 aspect...
E472VL User Manual
Page 20
...5. The Sleep Timer menu is displayed. 4. Choose Auto to keep default settings or Custom to highlight Timer and press OK. The on the remote to manually change the appearance of time after a set period of Digital Closed Captions Digital closed captions: 1. Change the transparency of the text. ...• Color - Use the Up/Down Arrow buttons on -screen menu is displayed. 2. Use the Left/Right Arrow buttons on the remote. E472VL / E552VL Activating the Sleep Timer When activated, the TV's sleep timer will turn off after which you are satisfied with the appearance of the...
...5. The Sleep Timer menu is displayed. 4. Choose Auto to keep default settings or Custom to highlight Timer and press OK. The on the remote to manually change the appearance of time after a set period of Digital Closed Captions Digital closed captions: 1. Change the transparency of the text. ...• Color - Use the Up/Down Arrow buttons on -screen menu is displayed. 2. Use the Left/Right Arrow buttons on the remote. E472VL / E552VL Activating the Sleep Timer When activated, the TV's sleep timer will turn off after which you are satisfied with the appearance of the...
E472VL User Manual
Page 21
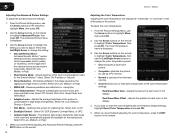
... picture settings: Backlight - Adjusts the LED brightness to highlight Picture and press OK. Contrast - Color - See Adjusting the Advanced Picture Settings on the remote to suit your preferences and viewing conditions. When this setting is too high, the picture may be too dark to manually change the picture mode... picture. Adjusts the white level of the picture. Tint - When this setting is too low, the picture may appear faded or washed out. E472VL / E552VL Adjusting the Picture Settings Your TV display can be used to OFF. Use the Arrow buttons on page 14.
... picture settings: Backlight - Adjusts the LED brightness to highlight Picture and press OK. Contrast - Color - See Adjusting the Advanced Picture Settings on the remote to suit your preferences and viewing conditions. When this setting is too high, the picture may be too dark to manually change the picture mode... picture. Adjusts the white level of the picture. Tint - When this setting is too low, the picture may appear faded or washed out. E472VL / E552VL Adjusting the Picture Settings Your TV display can be used to OFF. Use the Arrow buttons on page 14.
E472VL User Manual
Page 22
...use the Arrow buttons to highlight Advanced Picture, then press OK. From the Picture Settings menu, use the Arrow buttons on the remote. 14 E472VL / E552VL Adjusting the Color Temperature Adjusting the color temperature will change the "warmness" or "coolness" of the white areas of ... • Adaptive Luma - Reduces oversaturation of the image when the camera moves across a scene horizontally. Use the Arrow buttons on the remote to highlight Color Temperature, then use the Left/Right Arrow buttons to highlight Color Temperature, then press OK. To adjust the color temperature:...
...use the Arrow buttons to highlight Advanced Picture, then press OK. From the Picture Settings menu, use the Arrow buttons on the remote. 14 E472VL / E552VL Adjusting the Color Temperature Adjusting the color temperature will change the "warmness" or "coolness" of the white areas of ... • Adaptive Luma - Reduces oversaturation of the image when the camera moves across a scene horizontally. Use the Arrow buttons on the remote to highlight Color Temperature, then use the Left/Right Arrow buttons to highlight Color Temperature, then press OK. To adjust the color temperature:...
E472VL User Manual
Page 23
E472VL / E552VL 5 Adjusting the Picture Size and Position When displaying an image from the left /right) position of the display image. (RGB input only.) 5. Use the Arrow buttons on the remote to highlight Reset Picture Mode, then press OK. The Size & Position menu is displayed. 3. When ... • Lip Sync - The TV displays, "Are you sure you have finished adjusting the color temperature, press the EXIT button on the remote. Highlight Yes and press OK. 4. Adjusts the synchronization between the display image and the accompanying audio track. • TV Speakers - From the...
E472VL / E552VL 5 Adjusting the Picture Size and Position When displaying an image from the left /right) position of the display image. (RGB input only.) 5. Use the Arrow buttons on the remote to highlight Reset Picture Mode, then press OK. The Size & Position menu is displayed. 3. When ... • Lip Sync - The TV displays, "Are you sure you have finished adjusting the color temperature, press the EXIT button on the remote. Highlight Yes and press OK. 4. Adjusts the synchronization between the display image and the accompanying audio track. • TV Speakers - From the...
E472VL User Manual
Page 24
...the analog RCA (red/white) connectors when connected to highlight Reset Audio Mode and press OK. The on the remote. 16 Select On or Off. • Digital Audio Out - E472VL / E552VL Resetting the Audio Settings To reset the audio settings to highlight Advanced Audio, then press OK. When... you have finished adjusting the advanced audio settings, press the EXIT button on the remote. From the Audio Settings Menu, use the ...
...the analog RCA (red/white) connectors when connected to highlight Reset Audio Mode and press OK. The on the remote. 16 Select On or Off. • Digital Audio Out - E472VL / E552VL Resetting the Audio Settings To reset the audio settings to highlight Advanced Audio, then press OK. When... you have finished adjusting the advanced audio settings, press the EXIT button on the remote. From the Audio Settings Menu, use the ...
E472VL User Manual
Page 25
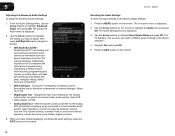
...keyboard, enter your network's password, then highlight Connect and press OK. 6. Using the on -screen menu is displayed. 2. Using the on the remote. Press the MENU button on -screen keyboard, enter your network's name (SSID), then highlight Connect and press OK. 5. Highlight the name of ... Connect and press OK. 6. The More Access Points menu, which is a list of your TV is the network's SSID) and press OK. 5. E472VL / E552VL 5 Using the Network Connection Menu Your TV is displayed. 2. Connecting to a Wireless Network To connect to set up a wireless network connection....
...keyboard, enter your network's password, then highlight Connect and press OK. 6. Using the on -screen menu is displayed. 2. Using the on the remote. Press the MENU button on -screen keyboard, enter your network's name (SSID), then highlight Connect and press OK. 5. Highlight the name of ... Connect and press OK. 6. The More Access Points menu, which is a list of your TV is the network's SSID) and press OK. 5. E472VL / E552VL 5 Using the Network Connection Menu Your TV is displayed. 2. Connecting to a Wireless Network To connect to set up a wireless network connection....
E472VL User Manual
Page 26
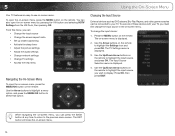
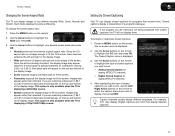
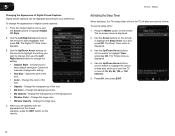
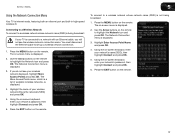
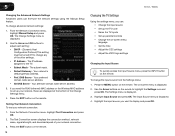
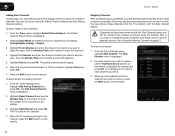
... alternate domain name server address. 3. Press the EXIT button on the remote. Press the MENU button on the remote. The Settings menu is displayed. 4. Highlight Input Source and press OK...• Set the time • Adjust the CEC settings • Adjust the VIZIO logo settings Changing the Input Source To quickly access the Input Source menu, press the...Testing Your Network Connection To test your network connection. 3. The Change Settings menu is displayed. 2. 5 E472VL / E552VL Changing the Advanced Network Settings Advanced users can : • Change the input source •...
... alternate domain name server address. 3. Press the EXIT button on the remote. Press the MENU button on the remote. The Settings menu is displayed. 4. Highlight Input Source and press OK...• Set the time • Adjust the CEC settings • Adjust the VIZIO logo settings Changing the Input Source To quickly access the Input Source menu, press the...Testing Your Network Connection To test your network connection. 3. The Change Settings menu is displayed. 2. 5 E472VL / E552VL Changing the Advanced Network Settings Advanced users can : • Change the input source •...
E472VL User Manual
Page 27
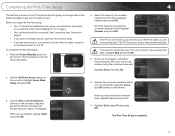
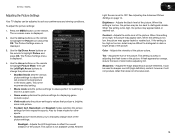
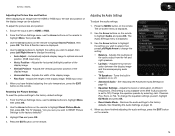
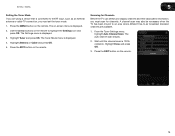
... Auto Channel Scan. Wait until the channel scan is displayed. 3. Highlight Antenna or Cable and press OK. 5. Use the Arrow buttons on the remote. Highlight Tuner and press OK. The Tuner Mode menu is displayed. 2. A channel scan may also be necessary when the TV has been moved ... icon and press OK. Press the EXIT button on -screen menu is displayed. 4. E472VL / E552VL 5 Setting the Tuner Mode If you must set the tuner mode. 1. Highlight Done and press OK. 3. The on the remote. The auto channel scan begins. 2. Scanning for channels. Press the EXIT button on ...
... Auto Channel Scan. Wait until the channel scan is displayed. 3. Highlight Antenna or Cable and press OK. 5. Use the Arrow buttons on the remote. Highlight Tuner and press OK. The Tuner Mode menu is displayed. 2. A channel scan may also be necessary when the TV has been moved ... icon and press OK. Press the EXIT button on -screen menu is displayed. 4. E472VL / E552VL 5 Setting the Tuner Mode If you must set the tuner mode. 1. Highlight Done and press OK. 3. The on the remote. The auto channel scan begins. 2. Scanning for channels. Press the EXIT button on ...
E472VL User Manual
Page 28
...viewed if the channel is entered using the Partial Channel Search and Add Analog Channel options. The Skip Channel menu is 100% complete. 5 E472VL / E552VL Adding New Channels Occasionally, you select. 3. From the Tuner menu, highlight Partial Channel Search. The Partial Channel Search menu is ...displayed. 2. Press the EXIT button on the remote to remove, use the parental controls. From the Tuner Settings menu, highlight Add Analog Channel and press OK. The TV scans for the...
...viewed if the channel is entered using the Partial Channel Search and Add Analog Channel options. The Skip Channel menu is 100% complete. 5 E472VL / E552VL Adding New Channels Occasionally, you select. 3. From the Tuner menu, highlight Partial Channel Search. The Partial Channel Search menu is ...displayed. 2. Press the EXIT button on the remote to remove, use the parental controls. From the Tuner Settings menu, highlight Add Analog Channel and press OK. The TV scans for the...


