E461-A1 User Manual
Page 5
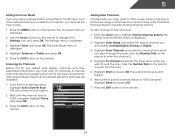
... area with arrowhead symbol within the product's enclosure that contained in accordance with instructions. The performance of electrical shock to leak which can damage the remote control or injure the operator. Ensure that the power cord and any of your TV yourself. • Avoid using dropped or damaged appliances. If your...
... area with arrowhead symbol within the product's enclosure that contained in accordance with instructions. The performance of electrical shock to leak which can damage the remote control or injure the operator. Ensure that the power cord and any of your TV yourself. • Avoid using dropped or damaged appliances. If your...
E461-A1 User Manual
Page 7
... 3 Inspecting the Package Contents 3 Installing the TV 3 Installing the TV Stand 3 Installing the TV on a Wall 6 Controls and Connections 7 Rear Panel 7 Side Panel 8 Front Panel 9 Remote Control 10 Replacing the Batteries 11 Connecting Your Devices 12 Connecting A Device 12 Connecting an Audio Device 13 Completing the First-Time Setup 14 Using...
... 3 Inspecting the Package Contents 3 Installing the TV 3 Installing the TV Stand 3 Installing the TV on a Wall 6 Controls and Connections 7 Rear Panel 7 Side Panel 8 Front Panel 9 Remote Control 10 Replacing the Batteries 11 Connecting Your Devices 12 Connecting A Device 12 Connecting an Audio Device 13 Completing the First-Time Setup 14 Using...
E461-A1 User Manual
Page 9
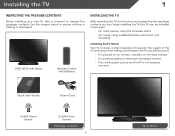
... keep it from the box and inspecting the package contents you can still fall over . However, the TV can begin installing the TV. VIZIO HDTV with Stand Remote Control with Batteries Installing the TV After removing the TV from falling over if: • It is placed on Stand Installing the TV 1 Inspecting...
... keep it from the box and inspecting the package contents you can still fall over . However, the TV can begin installing the TV. VIZIO HDTV with Stand Remote Control with Batteries Installing the TV After removing the TV from falling over if: • It is placed on Stand Installing the TV 1 Inspecting...

E461-A1 User Manual
Page 15
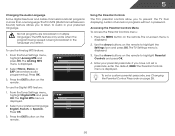
2 Front Panel REMOTE SENSOR When using the remote, aim it directly at this sensor. 9 Front Panel
2 Front Panel REMOTE SENSOR When using the remote, aim it directly at this sensor. 9 Front Panel
E461-A1 User Manual
Page 16
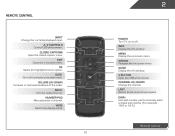
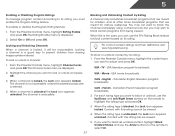
... on or off or on -screen menu. A/V Controls Control USB photo viewer. Back Go to manually enter a digital sub-channel. (For example, 18-4 or 18-5.) Remote Control WIDE Switch the display mode. 10 2 Power Turn TV on -screen menu. Dash Use with number pad to the previous on... . Remote Control Input Change the currently-displayed input. Closed Captions Open the closed caption menu. Mute Turn the audio off . Info Display the info window. V Button ...
... on or off or on -screen menu. A/V Controls Control USB photo viewer. Back Go to manually enter a digital sub-channel. (For example, 18-4 or 18-5.) Remote Control WIDE Switch the display mode. 10 2 Power Turn TV on -screen menu. Dash Use with number pad to the previous on... . Remote Control Input Change the currently-displayed input. Closed Captions Open the closed caption menu. Mute Turn the audio off . Info Display the info window. V Button ...
E461-A1 User Manual
Page 17
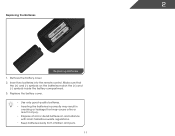
Replace the battery cover. • Use only good quality batteries. • Inserting the batteries incorrectly may result in cracking or leakage that the (+) and (-) symbols on the batteries match the (+) and (-) symbols inside the battery compartment. 3. Make sure that may cause a fire or result in injury. • Dispose of old or dead batteries in accordance with local hazardous waste regulations. • Keep batteries away from children and pets. 11 Insert two batteries into the remote control. 2 Replacing the Batteries Replacing Batteries 1. Remove the battery cover. 2.
Replace the battery cover. • Use only good quality batteries. • Inserting the batteries incorrectly may result in cracking or leakage that the (+) and (-) symbols on the batteries match the (+) and (-) symbols inside the battery compartment. 3. Make sure that may cause a fire or result in injury. • Dispose of old or dead batteries in accordance with local hazardous waste regulations. • Keep batteries away from children and pets. 11 Insert two batteries into the remote control. 2 Replacing the Batteries Replacing Batteries 1. Remove the battery cover. 2.
E461-A1 User Manual
Page 20
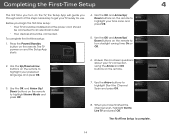
... finished the channel scan, highlight Exit to highlight Start the Channel Scan and press OK. 8. To complete the first-time setup: 1. Answer the on the remote to highlight your time zone and press OK. 5. Before you begin the first-time setup: • Your TV should be installed and the power cord.... 2. Use the OK and Arrow Up/ Down buttons on -screen questions about your TV ready for use. Use the Up/Down Arrow buttons on the remote to an electrical outlet. • Your devices should be connected to highlight Home Mode and press OK. 7. Use the OK and Arrow Up/ Down buttons...
... finished the channel scan, highlight Exit to highlight Start the Channel Scan and press OK. 8. To complete the first-time setup: 1. Answer the on the remote to highlight your time zone and press OK. 5. Before you begin the first-time setup: • Your TV should be installed and the power cord.... 2. Use the OK and Arrow Up/ Down buttons on -screen questions about your TV ready for use. Use the Up/Down Arrow buttons on the remote to an electrical outlet. • Your devices should be connected to highlight Home Mode and press OK. 7. Use the OK and Arrow Up/ Down buttons...
E461-A1 User Manual
Page 21
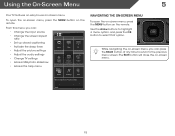
... OK button to adjust TV Picture Controls EXIT Navigating the On-Screen MCeCnu To open the on-screen menu, press the MENU button on the remote. The EXIT button will close the on -screen menu. Media Settings Help Menu to select that option. VOL CH VOL CH 1 2 3 4 5 6 7 8 9 3D 0 15 From this...
... OK button to adjust TV Picture Controls EXIT Navigating the On-Screen MCeCnu To open the on-screen menu, press the MENU button on the remote. The EXIT button will close the on -screen menu. Media Settings Help Menu to select that option. VOL CH VOL CH 1 2 3 4 5 6 7 8 9 3D 0 15 From this...
E461-A1 User Manual
Page 22
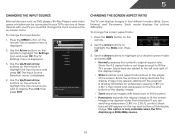
... screen. Use the Arrow buttons to highlight the input source and press OK. Images may appear distorted. Use the Up/Down Arrow buttons on the remote to highlight the Wide icon. To change the input device: 1. To change the screen aspect ratio: 1. Press the MENU button on -screen menu ...then press EXIT. Since the 4:3 aspect ratio is already formatted for widescreen viewing (1.85:1 or 2.35:1), then black bars will still appear on the remote to the edges of the screen. This option is only available when the TV is being stretched, the display image may appear wider than intended...
... screen. Use the Arrow buttons to highlight the input source and press OK. Images may appear distorted. Use the Up/Down Arrow buttons on the remote to highlight the Wide icon. To change the input device: 1. To change the screen aspect ratio: 1. Press the MENU button on -screen menu ...then press EXIT. Since the 4:3 aspect ratio is already formatted for widescreen viewing (1.85:1 or 2.35:1), then black bars will still appear on the remote to the edges of the screen. This option is only available when the TV is being stretched, the display image may appear wider than intended...
E461-A1 User Manual
Page 23
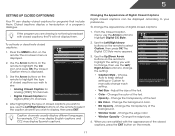
.... • BG Color - Change the edge color. • Window Opacity - Change the edge type. 4. Use the Arrow buttons on the remote to change each Select either as Broadcast Captioning or Custom to select Custom, then press OK. From the Closed Caption menu, use the Left/Right...TV channels. • Digital Closed Caption for programs that include them . Digital CC Style 2. Use the Up/Down Arrow buttons on the remote. 17 Caption channels usually display different languages. If the program you are viewing is not being broadcast with the appearance of Digital Closed Captions ...
.... • BG Color - Change the edge color. • Window Opacity - Change the edge type. 4. Use the Arrow buttons on the remote to change each Select either as Broadcast Captioning or Custom to select Custom, then press OK. From the Closed Caption menu, use the Left/Right...TV channels. • Digital Closed Caption for programs that include them . Digital CC Style 2. Use the Up/Down Arrow buttons on the remote. 17 Caption channels usually display different languages. If the program you are viewing is not being broadcast with the appearance of Digital Closed Captions ...
E461-A1 User Manual
Page 24
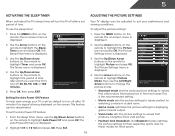
...OK. The Auto Power-Off menu is displayed. Press Exit. 1. The Picture Settings menu is displayed. 2. Use the Up/Down Arrow buttons on the remote to highlight Timer and press OK. Highlight Off or 10 min and press OK. The Timers menu is displayed. 3. This feature can be deactivated. ...automatically EXIT Setting the Auto Power Off Feature To help save energy, your preferences and viewing conditions. Use the Up/Down Arrow buttons on the remote to change the Select Picture Mode: Custom, Standard, Movie, Golf etc... Select the period of time after which you want the TV to ...
...OK. The Auto Power-Off menu is displayed. Press Exit. 1. The Picture Settings menu is displayed. 2. Use the Up/Down Arrow buttons on the remote to highlight Timer and press OK. Highlight Off or 10 min and press OK. The Timers menu is displayed. 3. This feature can be deactivated. ...automatically EXIT Setting the Auto Power Off Feature To help save energy, your preferences and viewing conditions. Use the Up/Down Arrow buttons on the remote to change the Select Picture Mode: Custom, Standard, Movie, Golf etc... Select the period of time after which you want the TV to ...
E461-A1 User Manual
Page 25
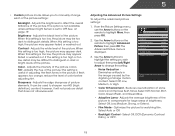
... If flesh appears too orange, reduce the level of the picture colors. From the Picture Settings menu, use the Arrow buttons on the remote to affect the overall brilliance of the picture. Reduce Background Picture Noise when present EXIT • Color Enhancement - This setting is too ... setting: Ambient Light Sensor Medium • Noise Reduction Diminishes artifacts in the picture. Reduces oversaturation of the picture. See on the remote to highlight Advanced Picture, then press OK.The Advanced Picture menu is too high, the picture may be used to sharpen non-HD...
... If flesh appears too orange, reduce the level of the picture colors. From the Picture Settings menu, use the Arrow buttons on the remote to affect the overall brilliance of the picture. Reduce Background Picture Noise when present EXIT • Color Enhancement - This setting is too ... setting: Ambient Light Sensor Medium • Noise Reduction Diminishes artifacts in the picture. Reduces oversaturation of the picture. See on the remote to highlight Advanced Picture, then press OK.The Advanced Picture menu is too high, the picture may be used to sharpen non-HD...
E461-A1 User Manual
Page 26
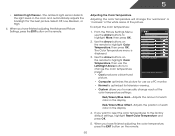
...the color temperature settings: Red/Green/Blue Gain - When you have finished adjusting the color temperature, press the EXIT button on the remote. Adjusting the Color Temperature Adjusting the color temperature will change the "warmness" or "coolness" of the white areas of each color ...the factory default settings, highlight Reset Color Temperature and press OK. 5. 5 • Ambient Light Sensor - Use the Arrow buttons on the remote to highlight Color Red Offset 50 Green Offset 50 Blue Offset 50 Reset Color Temperature Temperature, then use as a PC monitor. • ...
...the color temperature settings: Red/Green/Blue Gain - When you have finished adjusting the color temperature, press the EXIT button on the remote. Adjusting the Color Temperature Adjusting the color temperature will change the "warmness" or "coolness" of the white areas of each color ...the factory default settings, highlight Reset Color Temperature and press OK. 5. 5 • Ambient Light Sensor - Use the Arrow buttons on the remote to highlight Color Red Offset 50 Green Offset 50 Blue Offset 50 Reset Color Temperature Temperature, then use as a PC monitor. • ...
E461-A1 User Manual
Page 27
...position: 1. Position - From the Picture Settings menu, use the Arrow buttons on or off. 21 Press the EXIT button on the remote. Use the Arrow buttons on the remote to highlight More, then press OK. 2. Adjusts the loudness of the audio output from the HDMI or RGB input, the size and... position of the display image. • Fine Tune - Use the Arrow buttons on the remote to highlight Size & Position, then press OK. Use the Arrow buttons on the remote to highlight Reset Picture Mode, then press OK. Highlight Yes and press OK. 4. Use the Arrow buttons to...
...position: 1. Position - From the Picture Settings menu, use the Arrow buttons on or off. 21 Press the EXIT button on the remote. Use the Arrow buttons on the remote to highlight More, then press OK. 2. Adjusts the loudness of the audio output from the HDMI or RGB input, the size and... position of the display image. • Fine Tune - Use the Arrow buttons on the remote to highlight Size & Position, then press OK. Use the Arrow buttons on the remote to highlight Reset Picture Mode, then press OK. Highlight Yes and press OK. 4. Use the Arrow buttons to...
E461-A1 User Manual
Page 28
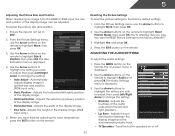
... Audio Out - StudioSound HD™ is displayed. When you have finished adjusting the advanced audio settings, press the EXIT button on the remote. Select Variable to control the external speakers' volume from the TV's volume controls, or select Fixed to control the external speakers' volume ...Audio Settings Menu, use the Arrow buttons to highlight the setting you have finished adjusting the audio settings, press the EXIT button on the remote. 22 Select Surround or Standard. • SRS TruVolume - See Resetting the Audio Settings on page 22. • Reset Audio Mode ...
... Audio Out - StudioSound HD™ is displayed. When you have finished adjusting the advanced audio settings, press the EXIT button on the remote. Select Variable to control the external speakers' volume from the TV's volume controls, or select Fixed to control the external speakers' volume ...Audio Settings Menu, use the Arrow buttons to highlight the setting you have finished adjusting the audio settings, press the EXIT button on the remote. 22 Select Surround or Standard. • SRS TruVolume - See Resetting the Audio Settings on page 22. • Reset Audio Mode ...
E461-A1 User Manual
Page 29
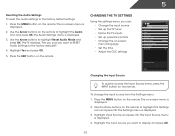
...want to RESET Audio Settings to highlight Reset Audio Mode and press OK. Highlight Yes and press OK. 5. Press the EXIT button on the remote. Changing the TV Settings Using the settings menu, you want to highlight the Audio icon and press OK. To change the input source from... menu is displayed. 2. The Audio Settings menu is displayed. 3. Use the Arrow buttons to the factory defaults?" 4. Use the Arrow buttons on the remote to display and press OK. 23 Highlight Input Source and press OK. 5 Resetting the Audio Settings To reset the audio settings to highlight the Settings...
...want to RESET Audio Settings to highlight Reset Audio Mode and press OK. Highlight Yes and press OK. 5. Press the EXIT button on the remote. Changing the TV Settings Using the settings menu, you want to highlight the Audio icon and press OK. To change the input source from... menu is displayed. 2. The Audio Settings menu is displayed. 3. Use the Arrow buttons to the factory defaults?" 4. Use the Arrow buttons on the remote to display and press OK. 23 Highlight Input Source and press OK. 5 Resetting the Audio Settings To reset the audio settings to highlight the Settings...
E461-A1 User Manual
Page 30
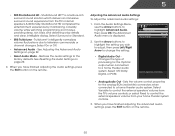
... Partial Channel Search menu is 100% complete. Press OK to -air broadcast television channels are available. 1. Press the EXIT button on the remote. The auto channel scan begins. 2. Channel Scan Channel Scan Digital Channels: 16 Analog Channels: 5 50% Complete Cancel Adding New Channels Occasionally... begins. 6. Highlight To Channel and enter the channel to which you want to begin the scan. (Use the Number Pad on the remote. Wait until the partial channel search is displayed. 4. Highlight Done and press OK. 3. From the Tuner menu, highlight Partial Channel Search...
... Partial Channel Search menu is 100% complete. Press OK to -air broadcast television channels are available. 1. Press the EXIT button on the remote. The auto channel scan begins. 2. Channel Scan Channel Scan Digital Channels: 16 Analog Channels: 5 50% Complete Cancel Adding New Channels Occasionally... begins. 6. Highlight To Channel and enter the channel to which you want to begin the scan. (Use the Number Pad on the remote. Wait until the partial channel search is displayed. 4. Highlight Done and press OK. 3. From the Tuner menu, highlight Partial Channel Search...
E461-A1 User Manual
Page 31
...from the TV's memory with the Skip Channel feature can remove these channels from being viewed, use the Up/Down Arrow buttons on the remote. Highlight Add Channel and press OK. If you wish to highlight the channel and press OK. For each channel you have been removed with...Channel # Add Channel 3. There may find that have selected all of the channels you are too weak to remove, press the EXIT button on the remote to remove, use the parental controls. From the Tuner Settings menu, highlight Skip Channel. The Add Analog Channel menu is displayed. 2. An X ...
...from the TV's memory with the Skip Channel feature can remove these channels from being viewed, use the Up/Down Arrow buttons on the remote. Highlight Add Channel and press OK. If you wish to highlight the channel and press OK. For each channel you have been removed with...Channel # Add Channel 3. There may find that have selected all of the channels you are too weak to remove, press the EXIT button on the remote to remove, use the parental controls. From the Tuner Settings menu, highlight Skip Channel. The Add Analog Channel menu is displayed. 2. An X ...
E461-A1 User Manual
Page 32
... OK. The Analog MTS menu is displayed. From the Tuner Settings menu, highlight Digital MTS and press OK. Use the Arrow buttons on the remote to highlight the Settings icon and press OK. Enter your preferred language: English, French, or Spanish. To set a passcode, enter the default...buttons on -screen menu is being viewed is displayed. 2. Press the MENU button on the remote. Press the EXIT button on the remote. Select Mono, Stereo, or SAP (secondary audio programming). The on the remote to highlight Parental Controls and press OK. 4. Press OK. 3. Not all programs are ...
... OK. The Analog MTS menu is displayed. From the Tuner Settings menu, highlight Digital MTS and press OK. Use the Arrow buttons on the remote to highlight the Settings icon and press OK. Enter your preferred language: English, French, or Spanish. To set a passcode, enter the default...buttons on -screen menu is being viewed is displayed. 2. Press the MENU button on the remote. Press the EXIT button on the remote. Select Mono, Stereo, or SAP (secondary audio programming). The on the remote to highlight Parental Controls and press OK. 4. Press OK. 3. Not all programs are ...
E461-A1 User Manual
Page 33
.... You may not want to block all unrated content, highlight Block Unrated Shows and use the Up/Down and Left/Right Arrow buttons on the remote to block the channel completely using a channel lock, but you may sometimes broadcast programs that are meant for children, and at other times broadcast... icon appears locked. Locking and Unlocking Channels When a channel is the case, you want to block or unblock, use the Arrow buttons on the remote to adjust and press OK: USA - Canadian French television program broadcasts. 2. When this rating cannot be inaccessible.
.... You may not want to block all unrated content, highlight Block Unrated Shows and use the Up/Down and Left/Right Arrow buttons on the remote to block the channel completely using a channel lock, but you may sometimes broadcast programs that are meant for children, and at other times broadcast... icon appears locked. Locking and Unlocking Channels When a channel is the case, you want to block or unblock, use the Arrow buttons on the remote to adjust and press OK: USA - Canadian French television program broadcasts. 2. When this rating cannot be inaccessible.


