
E461-A1 User Manual
Page 1
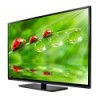
USER GUIDE MOMDOEDLELSS // E3D320VX // E3ED44260V1X -A1 // E3D470VX Installing your new tv CONTROLS & CONNECTIONS connecting your devices using the on-screen menu using the usb media player TROUBLESHOOTING & SUPPORT Help, SPECs, warranty & LEGAL
USER GUIDE MOMDOEDLELSS // E3D320VX // E3ED44260V1X -A1 // E3D470VX Installing your new tv CONTROLS & CONNECTIONS connecting your devices using the on-screen menu using the usb media player TROUBLESHOOTING & SUPPORT Help, SPECs, warranty & LEGAL

E461-A1 User Manual
Page 3
...or call toll free at (877) 878-4946. Product Registration To purchase or inquire about accessories and installation services for Choosing VIZIO And congratulations on your TV from being walked on -site extended warranty service plans. When Reading this Manual When you see this symbol, please read the ... Do not use attachments/accessories specified by the manufacturer, or sold If the provided plug does not fit into your TV. To get the most out of your new VIZIO product, read the accompanying important warning or notice. We recommend that produce heat. • Do not defeat the safety...
...or call toll free at (877) 878-4946. Product Registration To purchase or inquire about accessories and installation services for Choosing VIZIO And congratulations on your TV from being walked on -site extended warranty service plans. When Reading this Manual When you see this symbol, please read the ... Do not use attachments/accessories specified by the manufacturer, or sold If the provided plug does not fit into your TV. To get the most out of your new VIZIO product, read the accompanying important warning or notice. We recommend that produce heat. • Do not defeat the safety...
E461-A1 User Manual
Page 4
...or has been dropped. • Unplug the power cord before turning on the label. When a cart is a safety feature. Operating your TV. • When moving the cart/apparatus combination to smoke. To ensure reliable operation of the marked voltage can be sure these openings are ... power cord. • The lightning flash with arrowhead symbol within the inside of high temperature, condensation may form in any objects on your TV safely. Any other voltage than the voltage specified. with a third grounding pin). The manufacturer's warranty does not cover user abuse or...
...or has been dropped. • Unplug the power cord before turning on the label. When a cart is a safety feature. Operating your TV. • When moving the cart/apparatus combination to smoke. To ensure reliable operation of the marked voltage can be sure these openings are ... power cord. • The lightning flash with arrowhead symbol within the inside of high temperature, condensation may form in any objects on your TV safely. Any other voltage than the voltage specified. with a third grounding pin). The manufacturer's warranty does not cover user abuse or...
E461-A1 User Manual
Page 5
...the user to the presence of uninsulated DANGEROUS VOLTAGE within the product's enclosure that may be of sufficient magnitude to constitute a risk of your TV, hold the AC/DC power adapter, not the cord. If your dealer and refer all servicing to excessive heat such as the disconnect device...an equilateral triangle is damaged, the internal components may damage the wires inside the cord and cause fire or electric shock. Continued use your TV away from moisture. The performance of electrical shock to dripping or splashing and no objects fill with liquids, such as vases, shall be ...
...the user to the presence of uninsulated DANGEROUS VOLTAGE within the product's enclosure that may be of sufficient magnitude to constitute a risk of your TV, hold the AC/DC power adapter, not the cord. If your dealer and refer all servicing to excessive heat such as the disconnect device...an equilateral triangle is damaged, the internal components may damage the wires inside the cord and cause fire or electric shock. Continued use your TV away from moisture. The performance of electrical shock to dripping or splashing and no objects fill with liquids, such as vases, shall be ...
E461-A1 User Manual
Page 6
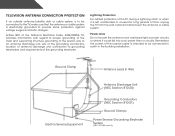
...or where it is electrically grounded to provide some protection against voltage surges and static charges. Lightning Protection For added protection of time, unplug the TV from the wall outlet and disconnect the antenna or cable system. Remember, the screen of the grounding electrode. Television Antenna Connection Protection ..., location of antenna discharge unit, connection to grounding electrodes, and requirements of the coaxial cable is intended to be connected to the TV, make sure that the antenna or cable system is left unattended or unused for long periods of the...
...or where it is electrically grounded to provide some protection against voltage surges and static charges. Lightning Protection For added protection of time, unplug the TV from the wall outlet and disconnect the antenna or cable system. Remember, the screen of the grounding electrode. Television Antenna Connection Protection ..., location of antenna discharge unit, connection to grounding electrodes, and requirements of the coaxial cable is intended to be connected to the TV, make sure that the antenna or cable system is left unattended or unused for long periods of the...
E461-A1 User Manual
Page 7
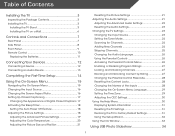
...21 Resetting the Picture Settings 21 Adjusting the Audio Settings 21 Adjusting the Advanced Audio Settings 22 Resetting the Audio Settings 23 Changing the TV Settings 23 Changing the Input Source 23 Setting the Tuner Mode 24 Scanning for Channels 24 Adding New Channels 24 Skipping Channels 25 Changing... 29 Setting the Time Zone 29 Adjusting the CEC Settings 30 Using the Help Menu 30 Displaying System Information 31 Resetting the TV Settings 31 Restoring the TV to Factory Default Settings 31 Using the Setup Wizard 32 Using the Info Window 33 Using USB Photo Slideshow 34 1
...21 Resetting the Picture Settings 21 Adjusting the Audio Settings 21 Adjusting the Advanced Audio Settings 22 Resetting the Audio Settings 23 Changing the TV Settings 23 Changing the Input Source 23 Setting the Tuner Mode 24 Scanning for Channels 24 Adding New Channels 24 Skipping Channels 25 Changing... 29 Setting the Time Zone 29 Adjusting the CEC Settings 30 Using the Help Menu 30 Displaying System Information 31 Resetting the TV Settings 31 Restoring the TV to Factory Default Settings 31 Using the Setup Wizard 32 Using the Info Window 33 Using USB Photo Slideshow 34 1
E461-A1 User Manual
Page 8
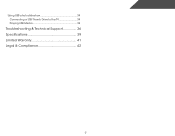
Using USB photo slideshow 34 Connecting a USB Thumb Drive to the TV 34 Playing USB Media 34 Troubleshooting & Technical Support 36 Specifications 39 Limited Warranty 41 Legal & Compliance 42 2
Using USB photo slideshow 34 Connecting a USB Thumb Drive to the TV 34 Playing USB Media 34 Troubleshooting & Technical Support 36 Specifications 39 Limited Warranty 41 Legal & Compliance 42 2
E461-A1 User Manual
Page 9
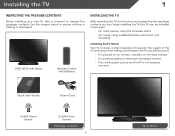
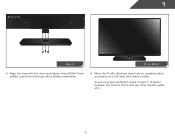
...; On a wall, using a VESA-standard wall mount (not included) Installing the TV Stand Your TV includes a stand designed to inspect the package contents. However, the TV can begin installing the TV. VIZIO HDTV with Stand Remote Control with Batteries Installing the TV After removing the TV from falling over if: • It is placed on Stand Installing...
...; On a wall, using a VESA-standard wall mount (not included) Installing the TV Stand Your TV includes a stand designed to inspect the package contents. However, the TV can begin installing the TV. VIZIO HDTV with Stand Remote Control with Batteries Installing the TV After removing the TV from falling over if: • It is placed on Stand Installing...
E461-A1 User Manual
Page 10
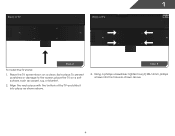
Back of TV 3 PC AUDIO Back of the TV and slide it into the holes as carpet, rug, or blanket. 2. To prevent scratches or damage to the screen, place the TV on a clean, flat surface. Place the TV screen-down on a soft surface, such as shown above . Using a phillips screwdriver, tighten four(4) M6 16mm phillips screws into place as shown above . 4 Align the neck piece with the bottom of TV 1 Step 2 To install the TV stand: 1. Step 3 3.
Back of TV 3 PC AUDIO Back of the TV and slide it into the holes as carpet, rug, or blanket. 2. To prevent scratches or damage to the screen, place the TV on a clean, flat surface. Place the TV screen-down on a soft surface, such as shown above . Using a phillips screwdriver, tighten four(4) M6 16mm phillips screws into place as shown above . 4 Align the neck piece with the bottom of TV 1 Step 2 To install the TV stand: 1. Step 3 3.
E461-A1 User Manual
Page 11
Back of the TV and any other objects (walls, etc). 5 Move the TV with a phillips screwdriver. 5. To ensure proper ventilation, leave at least 1" of space between the back of TV 3 PC AUDIO 1 Step 4 TV on a flat, level, and stable surface. Align the base with the neck and tighten three(3) M6 12mm phillips screws into the base with attached stand into an upright position and place on Stand 4.
Back of the TV and any other objects (walls, etc). 5 Move the TV with a phillips screwdriver. 5. To ensure proper ventilation, leave at least 1" of space between the back of TV 3 PC AUDIO 1 Step 4 TV on a flat, level, and stable surface. Align the base with the neck and tighten three(3) M6 12mm phillips screws into the base with attached stand into an upright position and place on Stand 4.

E461-A1 User Manual
Page 12
... following the instructions that can begin the installation. Attach your TV and wall mount to find the appropriate mount for your TV, you will need a wall mount. To prevent injury or damage to the TV, ask someone to your mount. E461-A1 Screw Size: Screw Length: Screw Pitch: Hole Pattern: M6... 18mm 1.0mm 400mm (V) x 400mm (H) Be sure the mount you . Be sure the surface is capable of supporting the weight of the TV. Remove the base by loosening...
... following the instructions that can begin the installation. Attach your TV and wall mount to find the appropriate mount for your TV, you will need a wall mount. To prevent injury or damage to the TV, ask someone to your mount. E461-A1 Screw Size: Screw Length: Screw Pitch: Hole Pattern: M6... 18mm 1.0mm 400mm (V) x 400mm (H) Be sure the mount you . Be sure the surface is capable of supporting the weight of the TV. Remove the base by loosening...

E461-A1 User Manual
Page 13
Controls and Connections Rear Panel Back of TV 3 2 USB - Connect optical/SPDIF audio device, such as home audio receiver. Component/Composite - Connect RCA audio cable to view photo slideshow. HDMI - Connect HDMI device. Rear Panel 7 Connect coaxial cable from cable, satellite, or antenna. Coaxial - Connect USB thumb drive to audio device. Connect component and composite devices. Optical Audio Out - Stereo Audio Out -
Controls and Connections Rear Panel Back of TV 3 2 USB - Connect optical/SPDIF audio device, such as home audio receiver. Component/Composite - Connect RCA audio cable to view photo slideshow. HDMI - Connect HDMI device. Rear Panel 7 Connect coaxial cable from cable, satellite, or antenna. Coaxial - Connect USB thumb drive to audio device. Connect component and composite devices. Optical Audio Out - Stereo Audio Out -
E461-A1 User Manual
Page 14
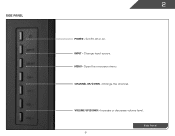
VOLUME UP/DOWN - Change input source. MENU - Increase or decrease volume level. Open the on . CHANNEL UP/DOWN - Side Panel 2 POWER - Turn TV off or on -screen menu. Side Panel 8 INPUT - Change the channel.
VOLUME UP/DOWN - Change input source. MENU - Increase or decrease volume level. Open the on . CHANNEL UP/DOWN - Side Panel 2 POWER - Turn TV off or on -screen menu. Side Panel 8 INPUT - Change the channel.
E461-A1 User Manual
Page 16
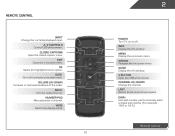
... on -screen menu. Channel Up/Down Change the channel. Remote Control Input Change the currently-displayed input. WIDE Switch the display mode. 10 2 Power Turn TV on -screen menu. Dash Use with number pad to the channel last viewed. Volume Up/Down Increase or decrease loudness of the audio. Last Return...
... on -screen menu. Channel Up/Down Change the channel. Remote Control Input Change the currently-displayed input. WIDE Switch the display mode. 10 2 Power Turn TV on -screen menu. Dash Use with number pad to the channel last viewed. Volume Up/Down Increase or decrease loudness of the audio. Last Return...
E461-A1 User Manual
Page 18
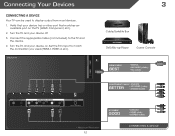
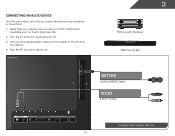
... included) to display output from most devices. 1. Turn the TV and your device on the TV (HDMI, Component, etc). 2. Turn the TV and your device has a video port that matches an available port on . Verify that your device off. 3. Set the TV's input to match the connection you used to the... TV and the device. 4. BACK OF TV 3 Cable/Satellite Box DVD/Blu-ray Player Game Console HDMI CABLE BEST • DIGITAL • HD VIDEO...
... included) to display output from most devices. 1. Turn the TV and your device on the TV (HDMI, Component, etc). 2. Turn the TV and your device has a video port that matches an available port on . Verify that your device off. 3. Set the TV's input to match the connection you used to the... TV and the device. 4. BACK OF TV 3 Cable/Satellite Box DVD/Blu-ray Player Game Console HDMI CABLE BEST • DIGITAL • HD VIDEO...
E461-A1 User Manual
Page 19
Connecting an audio device Your TV can output sound to the TV and the device. 4. Turn the TV and your device on the TV (Optical, etc). 2. Verify that your device has a audio port that matches an available port on . BACK OF TV 3 Home Audio Receiver VIZIO Sound Bar BETTER 3 Optical/SPDIF Cable GOOD 3.5mm Cable CONNECTING AUDIO DEVICE 13 Turn the TV and your audio device off. 3. Connect the appropriate cable (not included) to an audio device, such as a receiver or sound bar. 1.
Connecting an audio device Your TV can output sound to the TV and the device. 4. Turn the TV and your device on the TV (Optical, etc). 2. Verify that your device has a audio port that matches an available port on . BACK OF TV 3 Home Audio Receiver VIZIO Sound Bar BETTER 3 Optical/SPDIF Cable GOOD 3.5mm Cable CONNECTING AUDIO DEVICE 13 Turn the TV and your audio device off. 3. Connect the appropriate cable (not included) to an audio device, such as a receiver or sound bar. 1.
E461-A1 User Manual
Page 20
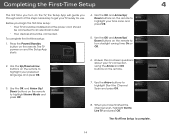
...Setup App starts. 4. Use the OK and Arrow Up/ Down buttons on the remote to highlight your TV connection using the Arrow and OK buttons on -screen questions about your time zone and press OK. ...5. Use the OK and Arrow Up/ Down buttons on the remote to highlight your TV ready for use. Use the Arrow buttons to highlight Home Mode and press OK. 7. Completing the First-...Time Setup 4 The first time you turn daylight saving time On or Off. 2. The TV powers on the remote. Use the Up/Down Arrow buttons on the remote to highlight Start the Channel Scan...
...Setup App starts. 4. Use the OK and Arrow Up/ Down buttons on the remote to highlight your TV connection using the Arrow and OK buttons on -screen questions about your time zone and press OK. ...5. Use the OK and Arrow Up/ Down buttons on the remote to highlight your TV ready for use. Use the Arrow buttons to highlight Home Mode and press OK. 7. Completing the First-...Time Setup 4 The first time you turn daylight saving time On or Off. 2. The TV powers on the remote. Use the Up/Down Arrow buttons on the remote to highlight Start the Channel Scan...
E461-A1 User Manual
Page 21
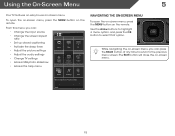
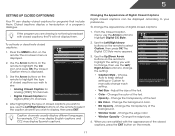
The EXIT button will close the on -screen menu. Using the On-Screen Menu 5 Your TV features an easy-to-use on -screen menu. Media Settings Help Menu to adjust TV Picture Controls EXIT Navigating the On-Screen MCeCnu To open the on-screen menu, press the MENU button on... • Set up closed captioning • Activate the sleep timer • Adjust the picture settings • Adjust the audio settings • Change TV settings • Access USB photo slideshow • Access the help menu ABC Input Wide CC Sleep Timer Picture Audio ? BACK OK INFO MENU GUIDE ...
The EXIT button will close the on -screen menu. Using the On-Screen Menu 5 Your TV features an easy-to-use on -screen menu. Media Settings Help Menu to adjust TV Picture Controls EXIT Navigating the On-Screen MCeCnu To open the on-screen menu, press the MENU button on... • Set up closed captioning • Activate the sleep timer • Adjust the picture settings • Adjust the audio settings • Change TV settings • Access USB photo slideshow • Access the help menu ABC Input Wide CC Sleep Timer Picture Audio ? BACK OK INFO MENU GUIDE ...
E461-A1 User Manual
Page 22
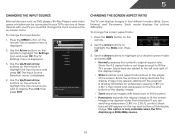
... display image. Use the Arrow buttons to highlight the Settings icon and press OK. Press OK. 3. The on-screen menu is displayed. Watch TV from your desired screen mode and press OK: • Normal preserves the content's original aspect ratio. Since the 4:3 aspect ratio is already formatted... edges of -the-wall. Press the MENU button on the remote. Since the picture is displayed. 3. This option is only available when the TV is displaying a 480i/480p source. 16 5 Changing the Input Source External devices such as DVD players, Blu-Ray Players, and video game consoles...
... display image. Use the Arrow buttons to highlight the Settings icon and press OK. Press OK. 3. The on-screen menu is displayed. Watch TV from your desired screen mode and press OK: • Normal preserves the content's original aspect ratio. Since the 4:3 aspect ratio is already formatted... edges of -the-wall. Press the MENU button on the remote. Since the picture is displayed. 3. This option is only available when the TV is displaying a 480i/480p source. 16 5 Changing the Input Source External devices such as DVD players, Blu-Ray Players, and video game consoles...
E461-A1 User Manual
Page 23
... them . Press the MENU button on the remote to select Custom, then press OK. After highlighting the type of digital closed captions, the TV will not display them . The Digital CC Style menu appears. 3. Adjust the size of the text. • BG Color - Change the... closed captions you are satisfied with closed captions: 1. Change the transparency of the text. • Opacity - 5 Setting Up Closed Captioning Your TV can be displayed according to your preference. Change the edge color. • Window Opacity - Use the Up/Down Arrow buttons on the remote to...
... them . Press the MENU button on the remote to select Custom, then press OK. After highlighting the type of digital closed captions, the TV will not display them . The Digital CC Style menu appears. 3. Adjust the size of the text. • BG Color - Change the... closed captions you are satisfied with closed captions: 1. Change the transparency of the text. • Opacity - 5 Setting Up Closed Captioning Your TV can be displayed according to your preference. Change the edge color. • Window Opacity - Use the Up/Down Arrow buttons on the remote to...


