E461-A1 User Manual
Page 3
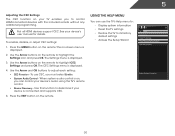
...manufacturer, or sold The wide blade or the third prong are no missing or damaged parts. When Reading this Manual When you either: • Register your VIZIO product at (877) 878-4946. It is designed and manufactured to ensure there are provided for your product ... please read the accompanying important warning or notice. Install in a safe place for future reference. • To reduce the risk of your TV from the apparatus. • Only use this symbol, please read the accompanying helpful tip. These plans provide additional coverage during the standard warranty...
...manufacturer, or sold The wide blade or the third prong are no missing or damaged parts. When Reading this Manual When you either: • Register your VIZIO product at (877) 878-4946. It is designed and manufactured to ensure there are provided for your product ... please read the accompanying important warning or notice. Install in a safe place for future reference. • To reduce the risk of your TV from the apparatus. • Only use this symbol, please read the accompanying helpful tip. These plans provide additional coverage during the standard warranty...
E461-A1 User Manual
Page 16
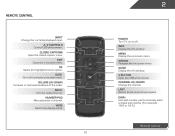
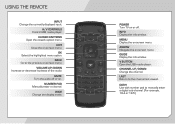
...the audio. Mute Turn the audio off . V Button Open the USB photo viewer. Remote Control Input Change the currently-displayed input. Number Pad Manually enter a channel. Guide Display the info window. Channel Up/Down Change the channel. Arrow Navigate the on -screen menu. Ok Select the highlighted... Display the on -screen menu. Last Return to the previous on-screen menu. Info Display the info window. Dash Use with number pad to manually enter a digital sub-channel. (For example, 18-4 or 18-5.) Remote Control Closed Captions Open the closed caption menu. Exit Close the on ...
...the audio. Mute Turn the audio off . V Button Open the USB photo viewer. Remote Control Input Change the currently-displayed input. Number Pad Manually enter a channel. Guide Display the info window. Channel Up/Down Change the channel. Arrow Navigate the on -screen menu. Ok Select the highlighted... Display the on -screen menu. Last Return to the previous on-screen menu. Info Display the info window. Dash Use with number pad to manually enter a digital sub-channel. (For example, 18-4 or 18-5.) Remote Control Closed Captions Open the closed caption menu. Exit Close the on ...
E461-A1 User Manual
Page 23
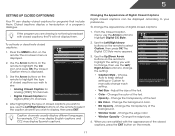
.../Right Arrow buttons on the remote to select the caption channel you wish to see : • Analog Closed Caption for analog (NTSC) TV channels. • Digital Closed Caption for programs that include them . Change the edge color. • Window Opacity - Use the Arrow ... CC Style. EXIT 4. Caption channels usually display different languages. Digital CC Style 2. Choose Auto to keep default settings or Custom to manually change each Select either as Broadcast Captioning or Custom to change the appearance of the closed captions: 1. Change the background color. •...
.../Right Arrow buttons on the remote to select the caption channel you wish to see : • Analog Closed Caption for analog (NTSC) TV channels. • Digital Closed Caption for programs that include them . Change the edge color. • Window Opacity - Use the Arrow ... CC Style. EXIT 4. Caption channels usually display different languages. Digital CC Style 2. Choose Auto to keep default settings or Custom to manually change each Select either as Broadcast Captioning or Custom to change the appearance of the closed captions: 1. Change the background color. •...
E461-A1 User Manual
Page 36
... Control - Use the Arrow buttons on the remote to adjust each setting: • CEC Function - See your device's user manual for details. 5 Adjusting the CEC Settings The CEC function on your TV enables you to determine if your device is connected and supports CEC. 5. Press the MENU button on the remote. Use...
... Control - Use the Arrow buttons on the remote to adjust each setting: • CEC Function - See your device's user manual for details. 5 Adjusting the CEC Settings The CEC function on your TV enables you to determine if your device is connected and supports CEC. 5. Press the MENU button on the remote. Use...
E461-A1 User Manual
Page 43
...on the remote aren't working electrical outlet. • Ensure the power cable is off. • Check the audio settings. Ensure your device's user manual for channels. The buttons on the remote to a window for the best signal. See Replacing the Batteries on page 18 • Reset the picture ... Press the INPUT button on page 21 Ensure the speakers are only pressing one button at a time. • Point the remote directly at the TV when pressing a button. • Replace the remote batteries with new ones. See Adjusting the Audio Settings on the remote to ensure they are using...
...on the remote aren't working electrical outlet. • Ensure the power cable is off. • Check the audio settings. Ensure your device's user manual for channels. The buttons on the remote to a window for the best signal. See Replacing the Batteries on page 18 • Reset the picture ... Press the INPUT button on page 21 Ensure the speakers are only pressing one button at a time. • Point the remote directly at the TV when pressing a button. • Replace the remote batteries with new ones. See Adjusting the Audio Settings on the remote to ensure they are using...
E461-A1 Quick Start Guide
Page 5
... menu. POWER Turn TV on . MUTE Turn the audio off or on or off. DASH Use with number pad to the channel last viewed. INFO Display the info window. BACK Go to the previous on -screen menu. ARROW Navigate the on -screen menu. NUMBER PAD Manually enter a channel.... WIDE Change the display mode. LAST return to manually enter a digital sub-channel. (For example, 18-4 or 18-5.) GUIDE Display the info window. A/V CONTROLS Control USb...
... menu. POWER Turn TV on . MUTE Turn the audio off or on or off. DASH Use with number pad to the channel last viewed. INFO Display the info window. BACK Go to the previous on -screen menu. ARROW Navigate the on -screen menu. NUMBER PAD Manually enter a channel.... WIDE Change the display mode. LAST return to manually enter a digital sub-channel. (For example, 18-4 or 18-5.) GUIDE Display the info window. A/V CONTROLS Control USb...


