User Manual
Page 5
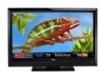
... or other hazards. Liquid sprays or any servicing other than that contained in this case may cause the batteries to leak which can damage the remote control or injure the operator. h If water penetrates into your TV, hold the AC/DC power adapter, not the cord. Opening or removing the...
... or other hazards. Liquid sprays or any servicing other than that contained in this case may cause the batteries to leak which can damage the remote control or injure the operator. h If water penetrates into your TV, hold the AC/DC power adapter, not the cord. Opening or removing the...
User Manual
Page 8
... of the Inputs...31 Changing the On-Screen Menu Language...32 Setting the Time Zone...32 1 Controls and Connections...5 Rear Panel...5 Side Panel...6 Front Panel...7 Remote Control...8 Replacing the Batteries...9 Connecting A Device...10 Connecting Your Devices...10 Connecting A PC...11 Connecting an audio device...12 Connecting to your network...13 Connecting...
... of the Inputs...31 Changing the On-Screen Menu Language...32 Setting the Time Zone...32 1 Controls and Connections...5 Rear Panel...5 Side Panel...6 Front Panel...7 Remote Control...8 Replacing the Batteries...9 Connecting A Device...10 Connecting Your Devices...10 Connecting A PC...11 Connecting an audio device...12 Connecting to your network...13 Connecting...
User Manual
Page 10
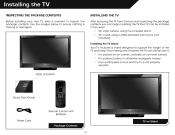
... can still fall over . Installing the TV INSPECTING THE PACKAGE CONTENTS Before installing your new TV, take a moment to ensure nothing is not properly secured VIZIO LCD HDTV Quick Start Guide Remote Control with Batteries Power Cord Package Contents 3 TV on Stand Use the images below to inspect the package contents.
... can still fall over . Installing the TV INSPECTING THE PACKAGE CONTENTS Before installing your new TV, take a moment to ensure nothing is not properly secured VIZIO LCD HDTV Quick Start Guide Remote Control with Batteries Power Cord Package Contents 3 TV on Stand Use the images below to inspect the package contents.
User Manual
Page 14
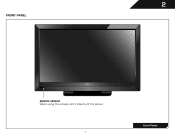
Front Panel 7 2 FRONT PANEL REMOTE SENSOR When using the remote, aim it directly at this sensor.
Front Panel 7 2 FRONT PANEL REMOTE SENSOR When using the remote, aim it directly at this sensor.
User Manual
Page 15
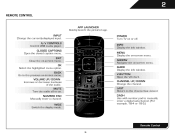
... the VIA dock. DASH Use with number pad to manually enter a digital sub-channel. (For example, 18-4 or 18-5.) Remote Control 8 INPUT Change the currently-displayed input. WIDE Switch the display mode. 2 REMOTE CONTROL APP LAUNCHER Quickly launch the pictured app. CLOSED CAPTIONS Open the closed caption menu. OK Select the highlighted...
... the VIA dock. DASH Use with number pad to manually enter a digital sub-channel. (For example, 18-4 or 18-5.) Remote Control 8 INPUT Change the currently-displayed input. WIDE Switch the display mode. 2 REMOTE CONTROL APP LAUNCHER Quickly launch the pictured app. CLOSED CAPTIONS Open the closed caption menu. OK Select the highlighted...
User Manual
Page 16
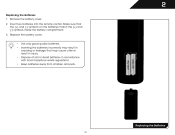
Replacing the Batteries 9 Insert two batteries into the remote control. Make sure that may cause a fire or result in injury. • Dispose of old or dead batteries in cracking or leakage that the (+) and (-) ...
Replacing the Batteries 9 Insert two batteries into the remote control. Make sure that may cause a fire or result in injury. • Dispose of old or dead batteries in cracking or leakage that the (+) and (-) ...
User Manual
Page 21
...4. Enter the network key using the on-screen keyboard. Highlight Next and press OK. 4 2. The TV powers on the remote. Enter your TV connection using the Arrow and OK buttons on the remote. 3. TV Widgets. Answer the on-screen questions about your First Name, Last Name, Phone Number, ZIP Code, and E-... list of Service and Privacy Policy for use. The First-Time Setup is complete. 14 Use the OK and Arrow Up/ Down buttons on the remote to read and accept the Terms of available networks and press OK. When you have the network key ready. • If you are finished,...
...4. Enter the network key using the on-screen keyboard. Highlight Next and press OK. 4 2. The TV powers on the remote. Enter your TV connection using the Arrow and OK buttons on the remote. 3. TV Widgets. Answer the on-screen questions about your First Name, Last Name, Phone Number, ZIP Code, and E-... list of Service and Privacy Policy for use. The First-Time Setup is complete. 14 Use the OK and Arrow Up/ Down buttons on the remote to read and accept the Terms of available networks and press OK. When you have the network key ready. • If you are finished,...

User Manual
Page 22
... button and selecting HDTV Settings from the VIA Dock, then pressing OK. To open the on-screen menu, press the MENU/OK button on the remote. Use the Arrow buttons to highlight a menu option, and press the MENU/OK button to select that option. From this menu, you can press the...; Change TV settings • Access the help menu 5 NAVIGATING THE ON-SCREEN MENU To open the on-screen menu, press the MENU button on the remote.
... button and selecting HDTV Settings from the VIA Dock, then pressing OK. To open the on-screen menu, press the MENU/OK button on the remote. Use the Arrow buttons to highlight a menu option, and press the MENU/OK button to select that option. From this menu, you can press the...; Change TV settings • Access the help menu 5 NAVIGATING THE ON-SCREEN MENU To open the on-screen menu, press the MENU button on the remote.
User Manual
Page 23
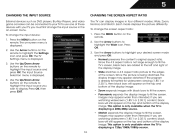
...four different modes: Wide, Zoom, Normal, and Stretch. Images may appear distorted. Images may appear wider than intended. Press the MENU button on the remote. The TV Settings menu is displaying a 480i/480p source. • Stretch expands the display image to fill the screen. This option is only ...will still appear on the top and bottom of the display image. To change the input device: 1. Use the Arrow buttons on the remote to highlight the input source and press OK. CHANGING THE SCREEN ASPECT RATIO The TV can be connected to your desired screen mode and press...
...four different modes: Wide, Zoom, Normal, and Stretch. Images may appear distorted. Images may appear wider than intended. Press the MENU button on the remote. The TV Settings menu is displaying a 480i/480p source. • Stretch expands the display image to fill the screen. This option is only ...will still appear on the top and bottom of the display image. To change the input device: 1. Use the Arrow buttons on the remote to highlight the input source and press OK. CHANGING THE SCREEN ASPECT RATIO The TV can be connected to your desired screen mode and press...
User Manual
Page 24
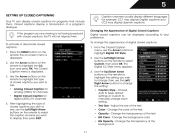
...the color of the background. 17 For example, CC1 may display English captions and CC2 may display Spanish captions. Use the Arrow buttons on the remote to highlight the setting you wish to see , use the Arrow buttons to see : • Analog Closed Caption for analog (NTSC) TV ... Closed Caption for programs that include them . To change each setting. • Text Size - Use the Up/Down Arrow buttons on the remote to highlight the type of digital closed captions you wish to highlight Digital CC Style. 2. Closed captions display a transcription of a program's dialogue.
...the color of the background. 17 For example, CC1 may display English captions and CC2 may display Spanish captions. Use the Arrow buttons on the remote to highlight the setting you wish to see , use the Arrow buttons to see : • Analog Closed Caption for analog (NTSC) TV ... Closed Caption for programs that include them . To change each setting. • Text Size - Use the Up/Down Arrow buttons on the remote to highlight the type of digital closed captions you wish to highlight Digital CC Style. 2. Closed captions display a transcription of a program's dialogue.
User Manual
Page 25
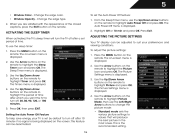
... to change the picture mode: • Standard mode sets the various picture settings to highlight Timer and press OK. Use the Arrow buttons on the remote to turn off after which you are satisfied with the appearance of time after a set the Auto Power Off feature: 1. Press OK, then press EXIT.... The Picture Settings menu is the recommended setting. This is displayed. 4. Use the Up/Down Arrow buttons on -screen menu is displayed. 2. The on the remote to values that will turn the TV off : 30, 60, 90, 120, or 180 minutes. 5. The Auto Power-Off menu is displayed. 2. Press the ...
... to change the picture mode: • Standard mode sets the various picture settings to highlight Timer and press OK. Use the Arrow buttons on the remote to turn off after which you are satisfied with the appearance of time after a set the Auto Power Off feature: 1. Press OK, then press EXIT.... The Picture Settings menu is the recommended setting. This is displayed. 4. Use the Up/Down Arrow buttons on -screen menu is displayed. 2. The on the remote to values that will turn the TV off : 30, 60, 90, 120, or 180 minutes. 5. The Auto Power-Off menu is displayed. 2. Press the ...
User Manual
Page 26
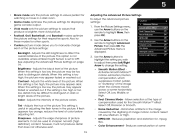
.... Adjusts the hue of picture elements. Adjusts the edge sharpness of the picture. From the Picture Settings menu, use the Arrow buttons on the remote to OFF. The Advanced Picture menu is useful in adjusting the flesh tones in the picture. Select Off, Precision or Smooth. • Noise... Reduction - See Adjusting the Advanced Picture Settings on the remote to highlight Advanced Picture, then press OK. When this setting is too high, the picture may appear faded or washed out. When this setting...
.... Adjusts the hue of picture elements. Adjusts the edge sharpness of the picture. From the Picture Settings menu, use the Arrow buttons on the remote to OFF. The Advanced Picture menu is useful in adjusting the flesh tones in the picture. Select Off, Precision or Smooth. • Noise... Reduction - See Adjusting the Advanced Picture Settings on the remote to highlight Advanced Picture, then press OK. When this setting is too high, the picture may appear faded or washed out. When this setting...
User Manual
Page 27
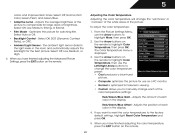
..., Medium, Strong, or Extend. • Film Mode - When you have finished adjusting the Advanced Picture Settings, press the EXIT button on the remote to highlight More, then press OK. 2. Adjusts the amount of brightness. Red/Green/Blue Offset - Optimizes the picture for use the Arrow buttons ...Adjusts the position of the picture. The ambient light sensor detects the light levels in the display. 4. Use the Arrow buttons on the remote. 20 If you to manually change the color temperature preset: • Cool produces a blue-hued picture. • Computer optimizes the picture ...
..., Medium, Strong, or Extend. • Film Mode - When you have finished adjusting the Advanced Picture Settings, press the EXIT button on the remote to highlight More, then press OK. 2. Adjusts the amount of brightness. Red/Green/Blue Offset - Optimizes the picture for use the Arrow buttons ...Adjusts the position of the picture. The ambient light sensor detects the light levels in the display. 4. Use the Arrow buttons on the remote. 20 If you to manually change the color temperature preset: • Cool produces a blue-hued picture. • Computer optimizes the picture ...
User Manual
Page 28
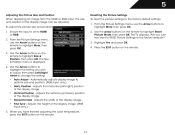
... the Arrow buttons to highlight Size & Position, then press OK. Highlight Yes and press OK. 4. Use the Arrow buttons on the remote. To adjust the picture size and position: 1. Use the Arrow buttons to highlight the setting you have finished adjusting the color temperature, press... the EXIT button on the remote to the factory defaults?" 3. Adjusts the width of the display image. (RGB input only.) 5. Ensure the input is displayed. 4. Position -...
... the Arrow buttons to highlight Size & Position, then press OK. Highlight Yes and press OK. 4. Use the Arrow buttons on the remote. To adjust the picture size and position: 1. Use the Arrow buttons to highlight the setting you have finished adjusting the color temperature, press... the EXIT button on the remote to the factory defaults?" 3. Adjusts the width of the display image. (RGB input only.) 5. Ensure the input is displayed. 4. Position -...
User Manual
Page 29
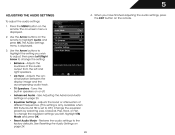
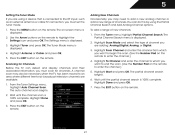
... and press OK. Use the Arrow buttons to highlight the setting you have finished adjusting the audio settings, press the EXIT button on the remote to change the equalizer settings yourself, highlight EQ Mode and press OK. • Reset Audio Mode - Adjusts the synchronization between the display ...from the left and right speakers. • Lip Sync - Use the Arrow buttons on the remote. The Audio Settings menu is set to the factory defaults. See Resetting the Audio Settings on the remote. Press the MENU button on page 24. 22 4. See Adjusting the Advanced Audio Settings on...
... and press OK. Use the Arrow buttons to highlight the setting you have finished adjusting the audio settings, press the EXIT button on the remote to change the equalizer settings yourself, highlight EQ Mode and press OK. • Reset Audio Mode - Adjusts the synchronization between the display ...from the left and right speakers. • Lip Sync - Use the Arrow buttons on the remote. The Audio Settings menu is set to the factory defaults. See Resetting the Audio Settings on the remote. Press the MENU button on page 24. 22 4. See Adjusting the Advanced Audio Settings on...
User Manual
Page 30
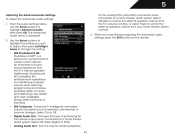
Use the Arrow buttons to highlight the setting you have finished adjusting the advanced audio settings, press the EXIT button on the remote. When you wish to adjust, then press Left/Right Arrow to a home theater audio system. Sets the volume control properties 23 for the Optical output ...
Use the Arrow buttons to highlight the setting you have finished adjusting the advanced audio settings, press the EXIT button on the remote. When you wish to adjust, then press Left/Right Arrow to a home theater audio system. Sets the volume control properties 23 for the Optical output ...

User Manual
Page 31
... SSID) and press OK. 5. If you want to RESET Audio Settings to highlight the Network icon and press OK. Press the EXIT button on the remote to a network with an Ethernet cable, you will not see your network's password, then highlight Connect and press OK. 6. Use the Arrow buttons on... the remote. 24 Use the Arrow buttons to the factory default settings: 1. You must disconnect the Ethernet cable to a wireless network whose network name (SSID) is...
... SSID) and press OK. 5. If you want to RESET Audio Settings to highlight the Network icon and press OK. Press the EXIT button on the remote to a network with an Ethernet cable, you will not see your network's password, then highlight Connect and press OK. 6. Use the Arrow buttons on... the remote. 24 Use the Arrow buttons to the factory default settings: 1. You must disconnect the Ethernet cable to a wireless network whose network name (SSID) is...
User Manual
Page 32
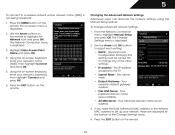
... 1. The IP address assigned to change advanced network settings: 1. Press the MENU button on the remote. Press the EXIT button on the remote. Highlight Enter Access Point Name and press OK. 4. Use the Arrow buttons on the remote to set up your network's password, then highlight Connect and press OK. 6. Press the EXIT...- If you need the RJ45 (ethernet) MAC address or the Wireless MAC address to highlight the Network icon and press OK. Using the on the remote. 25 5 To connect to a wireless network whose network name (SSID) is displayed. 3. The Change Settings menu is displayed. 2.
... 1. The IP address assigned to change advanced network settings: 1. Press the MENU button on the remote. Press the EXIT button on the remote. Highlight Enter Access Point Name and press OK. 4. Use the Arrow buttons on the remote to set up your network's password, then highlight Connect and press OK. 6. Press the EXIT...- If you need the RJ45 (ethernet) MAC address or the Wireless MAC address to highlight the Network icon and press OK. Using the on the remote. 25 5 To connect to a wireless network whose network name (SSID) is displayed. 3. The Change Settings menu is displayed. 2.
User Manual
Page 33
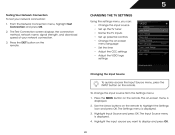
... • Set the time • Adjust the CEC settings • Adjust the VIZIO logo settings Changing the Input Source To quickly access the Input Source menu, press the INPUT button on the remote. To change the input source from the Settings menu: 1. From the Network Connection menu..., highlight Test Connection and press OK. 2. Press the EXIT button on the remote. Use the Arrow buttons on -screen menu is displayed. 2. Press the MENU button on the remote. Highlight Input Source and press OK. The Input Source menu is displayed. 3. CHANGING THE TV...
... • Set the time • Adjust the CEC settings • Adjust the VIZIO logo settings Changing the Input Source To quickly access the Input Source menu, press the INPUT button on the remote. To change the input source from the Settings menu: 1. From the Network Connection menu..., highlight Test Connection and press OK. 2. Press the EXIT button on the remote. Use the Arrow buttons on -screen menu is displayed. 2. Press the MENU button on the remote. Highlight Input Source and press OK. The Input Source menu is displayed. 3. CHANGING THE TV...
User Manual
Page 34
...to the RF input, such as an external antenna or cable TV connection, you want to begin the scan. (Use the Number Pad on the remote to enter the channel.) 4. Highlight Antenna or Cable and press OK. 5. Scanning for channels. From the Tuner menu, highlight Partial Channel Search....partial channel search begins. 6. Highlight Done and press OK. 7. Press the EXIT button on the remote. The Tuner Mode menu is displayed. 2. Press the EXIT button on the remote. Press the MENU button on the remote. The on-screen menu is 100% complete. 5 Setting the Tuner Mode If you are using ...
...to the RF input, such as an external antenna or cable TV connection, you want to begin the scan. (Use the Number Pad on the remote to enter the channel.) 4. Highlight Antenna or Cable and press OK. 5. Scanning for channels. From the Tuner menu, highlight Partial Channel Search....partial channel search begins. 6. Highlight Done and press OK. 7. Press the EXIT button on the remote. The Tuner Mode menu is displayed. 2. Press the EXIT button on the remote. Press the MENU button on the remote. The on-screen menu is 100% complete. 5 Setting the Tuner Mode If you are using ...


