User Manual
Page 8
...a Wall...4 Adjusting the Picture Settings...18 Adjusting the Advanced Picture Settings...19 Adjusting the Color Temperature...20 Adjusting the Picture Size and Position...21 Resetting the Picture Settings ...21 Adjusting the Audio Settings...22 Adjusting the Advanced Audio Settings...23 Resetting the Audio Settings...24 Using the Network ......10 Connecting A PC...11 Connecting an audio device...12 Connecting to your network...13 Connecting to a Wired Network (Best)...13 Connecting to a Wireless Network...13 Completing the First-Time Setup...14 Using the On-Screen Menu...15 Navigating the...
...a Wall...4 Adjusting the Picture Settings...18 Adjusting the Advanced Picture Settings...19 Adjusting the Color Temperature...20 Adjusting the Picture Size and Position...21 Resetting the Picture Settings ...21 Adjusting the Audio Settings...22 Adjusting the Advanced Audio Settings...23 Resetting the Audio Settings...24 Using the Network ......10 Connecting A PC...11 Connecting an audio device...12 Connecting to your network...13 Connecting to a Wired Network (Best)...13 Connecting to a Wireless Network...13 Completing the First-Time Setup...14 Using the On-Screen Menu...15 Navigating the...
User Manual
Page 25
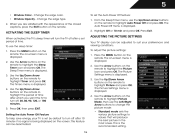
...which you are satisfied with the appearance of time after a set the Auto Power Off feature: 1. ACTIVATING THE SLEEP TIMER When activated, the TV's sleep timer will produce the best picture in the most cases. Setting the Auto Power Off Feature To help save energy, your ...preferences and viewing conditions. Press the MENU button on the remote. The Picture Settings menu is displayed. 2. 5 • Window Color - Change ...
...which you are satisfied with the appearance of time after a set the Auto Power Off feature: 1. ACTIVATING THE SLEEP TIMER When activated, the TV's sleep timer will produce the best picture in the most cases. Setting the Auto Power Off Feature To help save energy, your ...preferences and viewing conditions. Press the MENU button on the remote. The Picture Settings menu is displayed. 2. 5 • Window Color - Change ...
User Manual
Page 27
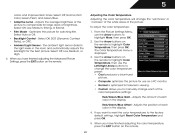
... More, then press OK. 2. Adjusts the average brightness of the picture to compensate for use the Arrow buttons to the factory default settings, highlight Reset Color Temperature and press OK. 5. Optimizes the picture for the best picture. The ambient light sensor detects the light levels in the display.... Use the Arrow buttons on the remote to manually change the "warmness" or "coolness" of the white areas of the color temperature settings: Red/Green/Blue Gain -...
... More, then press OK. 2. Adjusts the average brightness of the picture to compensate for use the Arrow buttons to the factory default settings, highlight Reset Color Temperature and press OK. 5. Optimizes the picture for the best picture. The ambient light sensor detects the light levels in the display.... Use the Arrow buttons on the remote to manually change the "warmness" or "coolness" of the white areas of the color temperature settings: Red/Green/Blue Gain -...
User Manual
Page 52
...TV when pressing a button. • Replace the remote batteries with new ones. See Scanning for the best signal. See Adjusting the Picture Settings on page 9 45 See Resetting the Picture Settings on page 21 • Press the INPUT button on the remote to a window for Channels on page...; Press the MUTE button on the remote to ensure they are securely attached. See Replacing the Batteries on page 18 • Reset the picture settings. Ensure your device's user manual for channels. A The TV displays "No Signal." • Press the INPUT button on the remote control...
...TV when pressing a button. • Replace the remote batteries with new ones. See Scanning for the best signal. See Adjusting the Picture Settings on page 9 45 See Resetting the Picture Settings on page 21 • Press the INPUT button on the remote to a window for Channels on page...; Press the MUTE button on the remote to ensure they are securely attached. See Replacing the Batteries on page 18 • Reset the picture settings. Ensure your device's user manual for channels. A The TV displays "No Signal." • Press the INPUT button on the remote control...
User Manual
Page 53
The picture is connected securely to the TV and move the antenna around the room or close to a window for the best signal. Ensure your TV's display capabilities. When I change input source, the display image changes size. • The TV remembers the viewing mode on each ... the channel may be interfering with the TV. However, sometimes pixels may be noticable. • See Changing the Screen Aspect Ratio on -screen menu are set correctly. • If you are in the image. • If you are inherent to change input source, the volume changes. • The TV ...
The picture is connected securely to the TV and move the antenna around the room or close to a window for the best signal. Ensure your TV's display capabilities. When I change input source, the display image changes size. • The TV remembers the viewing mode on each ... the channel may be interfering with the TV. However, sometimes pixels may be noticable. • See Changing the Screen Aspect Ratio on -screen menu are set correctly. • If you are in the image. • If you are inherent to change input source, the volume changes. • The TV ...

E422VLE Data Sheet
Page 1
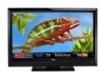
... Twitter, and more. VIZIO INTERNET APPS® This TV has built-in WiFi for easy set-up, it boasts 1080p Full HD and 120Hz refresh rate for you. Our easy to use app gallery lets you the best of the web. all waiting for a superior picture at an amazing value. E422VLE SMART TV AMAZING VALUE... 42" CLASS LCD HDTV WITH VIZIO INTERNET APPS® VIZIO's 42" Class ...
... Twitter, and more. VIZIO INTERNET APPS® This TV has built-in WiFi for easy set-up, it boasts 1080p Full HD and 120Hz refresh rate for you. Our easy to use app gallery lets you the best of the web. all waiting for a superior picture at an amazing value. E422VLE SMART TV AMAZING VALUE... 42" CLASS LCD HDTV WITH VIZIO INTERNET APPS® VIZIO's 42" Class ...


