User Manual
Page 5
... your TV changes substantially. • This apparatus shall not be placed on the power cord may cause the batteries to leak which can damage the remote control or injure the operator. Do not expose your dealer immediately. Pulling on the apparatus. • The mains plug or appliance coupler is intended to alert...
... your TV changes substantially. • This apparatus shall not be placed on the power cord may cause the batteries to leak which can damage the remote control or injure the operator. Do not expose your dealer immediately. Pulling on the apparatus. • The mains plug or appliance coupler is intended to alert...
User Manual
Page 8
... for Channels...27 Adding New Channels...27 Skipping Channels...28 Changing the Audio Language...29 Using the Parental Controls...29 Accessing the Parental Controls Menu...29 Enabling or Disabling Program Ratings...30 Locking and Unlocking Channels...30 Blocking and Unblocking Content by ... Names of the Inputs...31 Changing the On-Screen Menu Language...32 Setting the Time Zone...32 1 Controls and Connections...5 Rear Panel...5 Side Panel...6 Front Panel...7 Remote Control...8 Replacing the Batteries...9 Connecting A Device...10 Connecting Your Devices...10 Connecting A PC...11 Connecting an ...
... for Channels...27 Adding New Channels...27 Skipping Channels...28 Changing the Audio Language...29 Using the Parental Controls...29 Accessing the Parental Controls Menu...29 Enabling or Disabling Program Ratings...30 Locking and Unlocking Channels...30 Blocking and Unblocking Content by ... Names of the Inputs...31 Changing the On-Screen Menu Language...32 Setting the Time Zone...32 1 Controls and Connections...5 Rear Panel...5 Side Panel...6 Front Panel...7 Remote Control...8 Replacing the Batteries...9 Connecting A Device...10 Connecting Your Devices...10 Connecting A PC...11 Connecting an ...
User Manual
Page 10
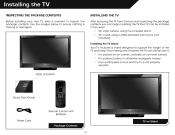
Installing the TV INSPECTING THE PACKAGE CONTENTS Before installing your new TV, take a moment to ensure nothing is not properly secured VIZIO LCD HDTV Quick Start Guide Remote Control with Batteries Power Cord Package Contents 3 TV on Stand However, the TV can begin installing the TV. Your TV can be installed in two ways...
Installing the TV INSPECTING THE PACKAGE CONTENTS Before installing your new TV, take a moment to ensure nothing is not properly secured VIZIO LCD HDTV Quick Start Guide Remote Control with Batteries Power Cord Package Contents 3 TV on Stand However, the TV can begin installing the TV. Your TV can be installed in two ways...
User Manual
Page 15
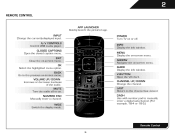
BACK Go to the previous on . NUMBER PAD Manually enter a channel. WIDE Switch the display mode. 2 REMOTE CONTROL APP LAUNCHER Quickly launch the pictured app. CLOSED CAPTIONS Open the closed caption menu. MUTE Turn the audio off . POWER Turn TV on -screen menu. ... info window. GUIDE Display the info window. V BUTTON Open the VIA dock. LAST Return to manually enter a digital sub-channel. (For example, 18-4 or 18-5.) Remote Control 8 MENU Display the on or off or on -screen menu. ARROW Navigate the on -screen menu. VOLUME UP/DOWN Increase or decrease loudness of the...
BACK Go to the previous on . NUMBER PAD Manually enter a channel. WIDE Switch the display mode. 2 REMOTE CONTROL APP LAUNCHER Quickly launch the pictured app. CLOSED CAPTIONS Open the closed caption menu. MUTE Turn the audio off . POWER Turn TV on -screen menu. ... info window. GUIDE Display the info window. V BUTTON Open the VIA dock. LAST Return to manually enter a digital sub-channel. (For example, 18-4 or 18-5.) Remote Control 8 MENU Display the on or off or on -screen menu. ARROW Navigate the on -screen menu. VOLUME UP/DOWN Increase or decrease loudness of the...
User Manual
Page 16
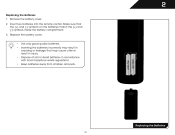
2 Replacing the Batteries 1. Insert two batteries into the remote control. Make sure that may cause a fire or result in injury. • Dispose of old or dead batteries in cracking or leakage that the (+) and (-) symbols ...
2 Replacing the Batteries 1. Insert two batteries into the remote control. Make sure that may cause a fire or result in injury. • Dispose of old or dead batteries in cracking or leakage that the (+) and (-) symbols ...
User Manual
Page 27
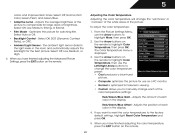
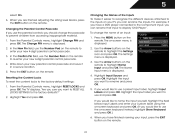
... then press OK. 2. Adjusts the average brightness of the color temperature settings: Red/Green/Blue Gain - Use the Arrow buttons on the remote. 20 Select Off, Low, Medium, or High. 4. When you want to reset the color temperatures to change the "warmness" or ... - To adjust the color temperature: 1. Select Auto or Off. • Backlight Control - Adjusts the position of the picture. If you have finished adjusting the Advanced Picture Settings, press the EXIT button on the remote to compensate for use as a PC monitor. • Normal is displayed. 3. ...
... then press OK. 2. Adjusts the average brightness of the color temperature settings: Red/Green/Blue Gain - Use the Arrow buttons on the remote. 20 Select Off, Low, Medium, or High. 4. When you want to reset the color temperatures to change the "warmness" or ... - To adjust the color temperature: 1. Select Auto or Off. • Backlight Control - Adjusts the position of the picture. If you have finished adjusting the Advanced Picture Settings, press the EXIT button on the remote to compensate for use as a PC monitor. • Normal is displayed. 3. ...
User Manual
Page 30
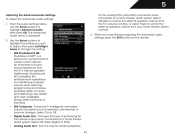
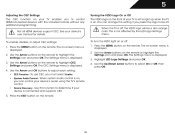
... menu is a feature-rich surround sound solution which delivers an immersive surround sound experience from your home theater system controls. 3. Use the Arrow buttons to highlight the setting you have finished adjusting the advanced audio settings, press the EXIT button on ...the remote. Sets the volume control properties 23 for the Optical output when connected to control the external speakers' volume from the TV's internal speakers. Select Variable to control the external speakers' volume from the TV's volume controls, or select Fixed to a home ...
... menu is a feature-rich surround sound solution which delivers an immersive surround sound experience from your home theater system controls. 3. Use the Arrow buttons to highlight the setting you have finished adjusting the advanced audio settings, press the EXIT button on ...the remote. Sets the volume control properties 23 for the Optical output when connected to control the external speakers' volume from the TV's internal speakers. Select Variable to control the external speakers' volume from the TV's volume controls, or select Fixed to a home ...
User Manual
Page 33
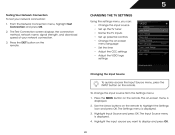
... menu, highlight Test Connection and press OK. 2. To change the input source from the Settings menu: 1. Press the MENU button on the remote. The Input Source menu is displayed. 3. The Test Connection screen displays the connection method, network name, signal strength, and download speed of your...up the TV tuner • Name the TV inputs • Set up parental controls • Change the on-screen menu language • Set the time • Adjust the CEC settings • Adjust the VIZIO logo settings Changing the Input Source To quickly access the Input Source menu, press the...
... menu, highlight Test Connection and press OK. 2. To change the input source from the Settings menu: 1. Press the MENU button on the remote. The Input Source menu is displayed. 3. The Test Connection screen displays the connection method, network name, signal strength, and download speed of your...up the TV tuner • Name the TV inputs • Set up parental controls • Change the on-screen menu language • Set the time • Adjust the CEC settings • Adjust the VIZIO logo settings Changing the Input Source To quickly access the Input Source menu, press the...
User Manual
Page 35
... feature. You can still be some channels are adding. 3. Channels that some channels you select. 3. If you wish to remove, use the parental controls. Highlight Add Channel and press OK. To remove a channel: 1. For each channel you do not want to watch comfortably. When you are too...The Skip Channel menu is displayed. 2. The TV scans for the channel, press the EXIT button on page 29. See Using the Parental Controls on the remote. An X appears to highlight the channel and press OK. From the Tuner Settings menu, highlight Add Analog Channel and press OK. The...
... feature. You can still be some channels are adding. 3. Channels that some channels you select. 3. If you wish to remove, use the parental controls. Highlight Add Channel and press OK. To remove a channel: 1. For each channel you do not want to watch comfortably. When you are too...The Skip Channel menu is displayed. 2. The TV scans for the channel, press the EXIT button on page 29. See Using the Parental Controls on the remote. An X appears to highlight the channel and press OK. From the Tuner Settings menu, highlight Add Analog Channel and press OK. The...
User Manual
Page 36
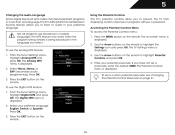
... press OK. 4. Press the MENU button on page 31. 29 If you have not set a custom parental passcode, see Changing the Parental Control Passcode on the remote. To set a passcode, enter the default, 0000. The Analog MTS menu is displayed. Select your parental passcode. Enter your preferred language: English, French, or Spanish...
... press OK. 4. Press the MENU button on page 31. 29 If you have not set a custom parental passcode, see Changing the Parental Control Passcode on the remote. To set a passcode, enter the default, 0000. The Analog MTS menu is displayed. Select your parental passcode. Enter your preferred language: English, French, or Spanish...
User Manual
Page 37
... From the Parental Controls menu, highlight Channel Locks and press OK. The channel is not accessible unless the parental passcode is blocked, the Lock icon appears locked. USA - Content with this rating can use the TV's Rating Block feature to block content based on the remote to highlight the rating... type and press OK. 3. Content with this is a good way to prevent children from being viewed. You may not want to adjust and press OK: USA - From the Parental Controls menu, highlight the content type you want ...
... From the Parental Controls menu, highlight Channel Locks and press OK. The channel is not accessible unless the parental passcode is blocked, the Lock icon appears locked. USA - Content with this rating can use the TV's Rating Block feature to block content based on the remote to highlight the rating... type and press OK. 3. Content with this is a good way to prevent children from being viewed. You may not want to adjust and press OK: USA - From the Parental Controls menu, highlight the content type you want ...
User Manual
Page 38
...OK. Press the MENU button on the remote. The on-screen menu is displayed. 4. Highlight Input Source and press OK. Changing the Parental Control Passcode If you use the parental controls, you can rename that input to re-enter your new parental control passcode and save it easier to recognize... press OK. 5. Highlight the input label you have finished naming your new 4-digit parental control passcode. 3. For example, if you want to RESET ALL LOCKS SETTINGS to use the Number Pad on the remote. In the Confirm Pin field, use and press OK. When you have a DVD player...
...OK. Press the MENU button on the remote. The on-screen menu is displayed. 4. Highlight Input Source and press OK. Changing the Parental Control Passcode If you use the parental controls, you can rename that input to re-enter your new parental control passcode and save it easier to recognize... press OK. 5. Highlight the input label you have finished naming your new 4-digit parental control passcode. 3. For example, if you want to RESET ALL LOCKS SETTINGS to use the Number Pad on the remote. In the Confirm Pin field, use and press OK. When you have a DVD player...
User Manual
Page 40
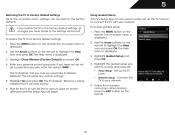
... Arrow buttons to highlight the Settings icon and press OK. The on-screen menu is displayed. 4. You can control your device's audio using the TV's remote control. System Audio Control - Device Discovery - This is off, the VIZIO logo will be off. Use the Arrow and OK buttons to adjust each setting: • • CEC Function...
... Arrow buttons to highlight the Settings icon and press OK. The on-screen menu is displayed. 4. You can control your device's audio using the TV's remote control. System Audio Control - Device Discovery - This is off, the VIZIO logo will be off. Use the Arrow and OK buttons to adjust each setting: • • CEC Function...
User Manual
Page 42
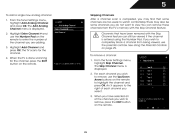
... set up the TV tuner or to connect the TV with your network. The TV displays "Memory is displayed. 3. Press the MENU button on the remote to highlight the Help icon and press OK. Highlight Yes and press OK. Using Guided Setup The TV's Setup App can be reset to the... factory defaults. Set up a parental passcode, enter the default, 0000. Connect the TV to your parental control passcode. 5 Restoring the TV to Factory Default Settings All of the on-screen menu settings can be lost! Network Setup - Use the Arrow buttons on...
... set up the TV tuner or to connect the TV with your network. The TV displays "Memory is displayed. 3. Press the MENU button on the remote to highlight the Help icon and press OK. Highlight Yes and press OK. Using Guided Setup The TV's Setup App can be reset to the... factory defaults. Set up a parental passcode, enter the default, 0000. Connect the TV to your parental control passcode. 5 Restoring the TV to Factory Default Settings All of the on-screen menu settings can be lost! Network Setup - Use the Arrow buttons on...
User Manual
Page 44
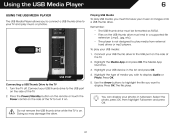
... USB media, you wish to display: Audio or Photo. Highlight the Media App and press OK. Press the Power/Standby button on the remote or touch the Power control on the side of media you must end in a supported file extension (.mp3, .jpg, etc). • The player is on . 4. The file plays...
... USB media, you wish to display: Audio or Photo. Highlight the Media App and press OK. Press the Power/Standby button on the remote or touch the Power control on the side of media you must end in a supported file extension (.mp3, .jpg, etc). • The player is on . 4. The file plays...

User Manual
Page 45
... title, album title, and artist name. To change source, highlight it and press OK. Current Folder Playback Controls Use to the previous screen. Toggle Music/ Photos Sort by highlighting this button and press OK if you can...the duration of the currently selected folder. You can be displayed on a single screen, you would like to return to control audio playback. 6 Back Button Highlight this area and pressing Left/Right Arrow. Folder Contents/ Playlist This area displays the contents... can browse between pages by Album/ Artist/Track Album Art If included on the remote.
... title, album title, and artist name. To change source, highlight it and press OK. Current Folder Playback Controls Use to the previous screen. Toggle Music/ Photos Sort by highlighting this button and press OK if you can...the duration of the currently selected folder. You can be displayed on a single screen, you would like to return to control audio playback. 6 Back Button Highlight this area and pressing Left/Right Arrow. Folder Contents/ Playlist This area displays the contents... can browse between pages by Album/ Artist/Track Album Art If included on the remote.
User Manual
Page 52
... are set to On. • Ensure no image on the remote control to the TV. • If you are only pressing one button at a time. • Point the remote directly at the TV when pressing a button. • Replace the remote batteries with new ones. See Resetting the Picture Settings on the...• Check the audio connections of the TV to a window for Channels on page 27 There is no sound. • Press Volume Up on the remote control. • Press the MUTE button on page 18 • Reset the picture settings. Devices differ; There is securely attached to the TV. • ...
... are set to On. • Ensure no image on the remote control to the TV. • If you are only pressing one button at a time. • Point the remote directly at the TV when pressing a button. • Replace the remote batteries with new ones. See Resetting the Picture Settings on the...• Check the audio connections of the TV to a window for Channels on page 27 There is no sound. • Press Volume Up on the remote control. • Press the MUTE button on page 18 • Reset the picture settings. Devices differ; There is securely attached to the TV. • ...

E422VLE Quick Start Guide
Page 2
... the safety purpose of the display. To totally disconnect power, unplug the power cord. • The lightning flash with the apparatus. Overloading can damage the remote control or injure the operator. To avoid electric shock, avoid handling the power cord during lightning. This will fit only into your dealer for use by...
... the safety purpose of the display. To totally disconnect power, unplug the power cord. • The lightning flash with the apparatus. Overloading can damage the remote control or injure the operator. To avoid electric shock, avoid handling the power cord during lightning. This will fit only into your dealer for use by...

E422VLE Quick Start Guide
Page 4
PACKAGE CONTENTS Power Cord VIZIO LCD HDTV with Stand Remote Control with Batteries This Quick Start Guide HELP VIZIO REDUCE PAPER WASTE. DOWNLOAD THE FULL USER MANUAL AT VIZIO.COM/SUPPORT
PACKAGE CONTENTS Power Cord VIZIO LCD HDTV with Stand Remote Control with Batteries This Quick Start Guide HELP VIZIO REDUCE PAPER WASTE. DOWNLOAD THE FULL USER MANUAL AT VIZIO.COM/SUPPORT

E422VLE Data Sheet
Page 2
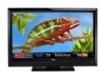
... shown are subject to 7.1 channels of their respective owners. 42" CLASS LCD HDTV WITH VIZIO INTERNET APPS® E422VLE TV SPECIFICATIONS Screen Size Viewable TV Type Smooth Motion Refresh Rate Maximum Resolution Dynamic Contrast Ratio Response Time Remote Control Type Ambient Light Sensor Energy Star Qualified Certifications Wall Mountable WARRANTY 1 year 42" Class 42...
... shown are subject to 7.1 channels of their respective owners. 42" CLASS LCD HDTV WITH VIZIO INTERNET APPS® E422VLE TV SPECIFICATIONS Screen Size Viewable TV Type Smooth Motion Refresh Rate Maximum Resolution Dynamic Contrast Ratio Response Time Remote Control Type Ambient Light Sensor Energy Star Qualified Certifications Wall Mountable WARRANTY 1 year 42" Class 42...


