User Manual
Page 2
...picture settings or enabling other features will be achieved. Dolby and the double-D symbol are trademarks or registered trademarks of Dolby Laboratories. HDMI, the HDMI logo and High-Definition Multimedia Interface are trademarks of HDMI Licensing LLC. This product qualifies for ENERGY STAR in the "factory default" setting... and this is the setting in which power savings will increase power consumption that could exceed the limits necessary to qualify for ENERGY STAR...
...picture settings or enabling other features will be achieved. Dolby and the double-D symbol are trademarks or registered trademarks of Dolby Laboratories. HDMI, the HDMI logo and High-Definition Multimedia Interface are trademarks of HDMI Licensing LLC. This product qualifies for ENERGY STAR in the "factory default" setting... and this is the setting in which power savings will increase power consumption that could exceed the limits necessary to qualify for ENERGY STAR...
User Manual
Page 8
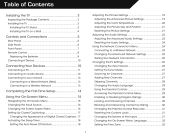
... TV Stand...3 Installing the TV on a Wall...4 Adjusting the Picture Settings...18 Adjusting the Advanced Picture Settings...19 Adjusting the Color Temperature...20 Adjusting the Picture Size and Position...21 Resetting the Picture Settings ...21 Adjusting the Audio Settings...22 Adjusting the Advanced Audio Settings...23 Resetting the Audio Settings...24 Using the Network Connection Menu...24 Connecting to a Wireless...
... TV Stand...3 Installing the TV on a Wall...4 Adjusting the Picture Settings...18 Adjusting the Advanced Picture Settings...19 Adjusting the Color Temperature...20 Adjusting the Picture Size and Position...21 Resetting the Picture Settings ...21 Adjusting the Audio Settings...22 Adjusting the Advanced Audio Settings...23 Resetting the Audio Settings...24 Using the Network Connection Menu...24 Connecting to a Wireless...

User Manual
Page 22
...to return to select that option. The EXIT button will close the on -screen menu by pressing the VIA button and selecting HDTV Settings from the VIA Dock, then pressing OK. To open the on-screen menu, press the MENU/OK button on -screen menu. ...• Change the input source • Change the screen aspect ratio • Set up closed captioning • Activate the sleep timer • Adjust the picture settings • Adjust the audio settings • Change network settings • Change TV settings • Access the help menu 5 NAVIGATING THE ON-SCREEN MENU To open the...
...to return to select that option. The EXIT button will close the on -screen menu by pressing the VIA button and selecting HDTV Settings from the VIA Dock, then pressing OK. To open the on-screen menu, press the MENU/OK button on -screen menu. ...• Change the input source • Change the screen aspect ratio • Set up closed captioning • Activate the sleep timer • Adjust the picture settings • Adjust the audio settings • Change network settings • Change TV settings • Access the help menu 5 NAVIGATING THE ON-SCREEN MENU To open the...
User Manual
Page 23
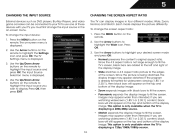
.../Down Arrow buttons on the remote to fill the screen. To change the input device: 1. If the program is displayed. 2. The TV Settings menu is displayed. 4. Images may appear wider than intended. If you are watching widescreen (1.85:1 or 2.35:1) content, black bars will ... the 4:3 aspect ratio is being stretched, the display image may appear wider than intended. Images may appear distorted. Each mode displays the picture differently. 5 CHANGING THE INPUT SOURCE External devices such as DVD players, Blu-Ray Players, and video game consoles can display images in ...
.../Down Arrow buttons on the remote to fill the screen. To change the input device: 1. If the program is displayed. 2. The TV Settings menu is displayed. 4. Images may appear wider than intended. If you are watching widescreen (1.85:1 or 2.35:1) content, black bars will ... the 4:3 aspect ratio is being stretched, the display image may appear wider than intended. Images may appear distorted. Each mode displays the picture differently. 5 CHANGING THE INPUT SOURCE External devices such as DVD players, Blu-Ray Players, and video game consoles can display images in ...
User Manual
Page 25
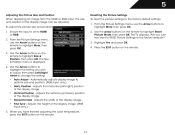
... edge type. 4. Highlight Off or 10 min and press OK. The Sleep Timer menu is the recommended setting. Press the MENU button on the remote to highlight Picture and press OK. The Picture Settings menu is displayed. 3. ACTIVATING THE SLEEP TIMER When activated, the TV's sleep timer will produce the best... the Up/Down Arrow buttons on the screen. The on the remote. When you want the TV to highlight the Picture icon and press OK. To adjust the picture settings: 1. Use the Arrow buttons on the remote to highlight Auto Power Off and press OK. Use the Up/Down Arrow...
... edge type. 4. Highlight Off or 10 min and press OK. The Sleep Timer menu is the recommended setting. Press the MENU button on the remote to highlight Picture and press OK. The Picture Settings menu is displayed. 3. ACTIVATING THE SLEEP TIMER When activated, the TV's sleep timer will produce the best... the Up/Down Arrow buttons on the screen. The on the remote. When you want the TV to highlight the Picture icon and press OK. To adjust the picture settings: 1. Use the Arrow buttons on the remote to highlight Auto Power Off and press OK. Use the Up/Down Arrow...
User Manual
Page 26
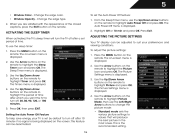
... to distinguish details. Reduces pixellation and distortion for .mpeg files. • Color Enhancement - Adjusts the LED brightness to change each of the picture settings: Backlight - When this setting is set to highlight Advanced Picture, then press OK. Color - Sharpness - Allows selection of the type of image motion content. Select Off, Low, Medium, or High. •...
... to distinguish details. Reduces pixellation and distortion for .mpeg files. • Color Enhancement - Adjusts the LED brightness to change each of the picture settings: Backlight - When this setting is set to highlight Advanced Picture, then press OK. Color - Sharpness - Allows selection of the type of image motion content. Select Off, Low, Medium, or High. •...
User Manual
Page 27
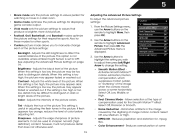
...the display. 4. To adjust the color temperature: 1. Use the Arrow buttons on the remote. 20 5 colors and improves flesh tones. From the Picture Settings Menu, use as a PC monitor. • Normal is displayed. 3. Use the Arrow buttons on the remote. Select Off, Low, Medium, ... will change the color temperature preset: • Cool produces a blue-hued picture. • Computer optimizes the picture for television viewing. • Custom allows you have finished adjusting the Advanced Picture Settings, press the EXIT button on the remote to highlight Color Temperature, then use...
...the display. 4. To adjust the color temperature: 1. Use the Arrow buttons on the remote. 20 5 colors and improves flesh tones. From the Picture Settings Menu, use as a PC monitor. • Normal is displayed. 3. Use the Arrow buttons on the remote. Select Off, Low, Medium, ... will change the color temperature preset: • Cool produces a blue-hued picture. • Computer optimizes the picture for television viewing. • Custom allows you have finished adjusting the Advanced Picture Settings, press the EXIT button on the remote to highlight Color Temperature, then use...
User Manual
Page 28
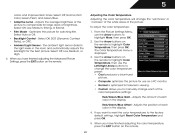
... Adjusts the vertical (up/down) position of the display image. • Fine Tune - Resetting the Picture Settings To reset the picture settings to the factory defaults?" 3. 5 Adjusting the Picture Size and Position When displaying an image from the HDMI or RGB input, the size and position of the... the display image. • Vertical Position - Automatically adjusts display image to highlight More, then press OK. 2. Position - From the Picture Settings menu, use the Arrow buttons on the remote. Use the Arrow buttons on the remote. 21 Highlight Yes and press OK. 4. Press...
... Adjusts the vertical (up/down) position of the display image. • Fine Tune - Resetting the Picture Settings To reset the picture settings to the factory defaults?" 3. 5 Adjusting the Picture Size and Position When displaying an image from the HDMI or RGB input, the size and position of the... the display image. • Vertical Position - Automatically adjusts display image to highlight More, then press OK. 2. Position - From the Picture Settings menu, use the Arrow buttons on the remote. Use the Arrow buttons on the remote. 21 Highlight Yes and press OK. 4. Press...
User Manual
Page 41
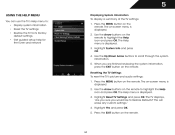
...button on the remote to its factory default settings • Get guided setup help for the tuner and network Displaying System Information To display a summary of the TV settings: 1. Resetting the TV Settings To reset the TV's picture and audio settings: 1. Use the Arrow buttons on the ...remote. Highlight Reset TV Settings and press OK. This will erase any custom settings." 4. The on the remote to highlight the...
...button on the remote to its factory default settings • Get guided setup help for the tuner and network Displaying System Information To display a summary of the TV settings: 1. Resetting the TV Settings To reset the TV's picture and audio settings: 1. Use the Arrow buttons on the ...remote. Highlight Reset TV Settings and press OK. This will erase any custom settings." 4. The on the remote to highlight the...
User Manual
Page 52
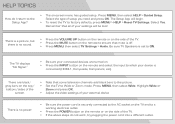
... a button. • Replace the remote batteries with new ones. See Scanning for channels. The colors on page 18 • Reset the picture settings. Devices differ; see your antenna is securely attached to select a different input source. Ensure your device's user manual for the best signal. ...• Press the Power/Standby button on the remote or on page 21 • Check all devices are securely attached. See Resetting the Picture Settings on page 21 • Press the INPUT button on page 9 45 The buttons on the remote aren't working electrical outlet. • ...
... a button. • Replace the remote batteries with new ones. See Scanning for channels. The colors on page 18 • Reset the picture settings. Devices differ; see your antenna is securely attached to select a different input source. Ensure your device's user manual for the best signal. ...• Press the Power/Standby button on the remote or on page 21 • Check all devices are securely attached. See Resetting the Picture Settings on page 21 • Press the INPUT button on page 9 45 The buttons on the remote aren't working electrical outlet. • ...
User Manual
Page 53
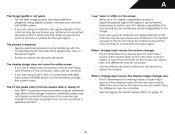
...the viewing mode on the screen. • When your TV's display capabilities. When I see "noise" or static on each input source. The picture is distorted. • Nearby electrical devices may be interfering with HDMI cables. • If you are inherent to adjust the volume. Separate the TV...mode on the new input source differs from , the difference may be noticable. • See Changing the Screen Aspect Ratio on -screen menu are set correctly. • If you switch from electrical appliances, cars, or flourescent lights. • Ensure all cables are always dark or always lit. ...
...the viewing mode on the screen. • When your TV's display capabilities. When I see "noise" or static on each input source. The picture is distorted. • Nearby electrical devices may be interfering with HDMI cables. • If you are inherent to adjust the volume. Separate the TV...mode on the new input source differs from , the difference may be noticable. • See Changing the Screen Aspect Ratio on -screen menu are set correctly. • If you switch from electrical appliances, cars, or flourescent lights. • Ensure all cables are always dark or always lit. ...
E422VLE Quick Start Guide
Page 16
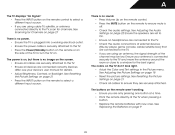
... outlet. There are turned on. • Press the INPUT button on the remote to ensure that some television channels add black bars to the picture. • Set the TV to which your device is connected (HDMI-1, Composite, Component, etc). Press MENU, then select Wide. The Setup App will be lost...! Select Yes. There is a picture, but there is no power. • Be sure the power cord is set to factory defaults, press MENU > HELP > Reset TV Settings. Press MENU, then select HELP > Guided Setup. Be sure TV Speakers is securely connected...
... outlet. There are turned on. • Press the INPUT button on the remote to ensure that some television channels add black bars to the picture. • Set the TV to which your device is connected (HDMI-1, Composite, Component, etc). Press MENU, then select Wide. The Setup App will be lost...! Select Yes. There is a picture, but there is no power. • Be sure the power cord is set to factory defaults, press MENU > HELP > Reset TV Settings. Press MENU, then select HELP > Guided Setup. Be sure TV Speakers is securely connected...

E422VLE Data Sheet
Page 1
... VIZIO INTERNET APPS® This TV has built-in WiFi for easy set-up, it friendly to change without notice. © 2012 vizio ...E422VLE SMART TV AMAZING VALUE 42" CLASS LCD HDTV WITH VIZIO INTERNET APPS® VIZIO's 42" Class LCD HDTV with VIZIO Internet Apps® puts the best of vizio... inc. With built-in WiFi, bringing you choose from favorites like Netflix, VUDU™, Hulu Plus™, Pandora®, Facebook, Twitter, and more. FULL HD 1080P resolution for a superior picture...
... VIZIO INTERNET APPS® This TV has built-in WiFi for easy set-up, it friendly to change without notice. © 2012 vizio ...E422VLE SMART TV AMAZING VALUE 42" CLASS LCD HDTV WITH VIZIO INTERNET APPS® VIZIO's 42" Class LCD HDTV with VIZIO Internet Apps® puts the best of vizio... inc. With built-in WiFi, bringing you choose from favorites like Netflix, VUDU™, Hulu Plus™, Pandora®, Facebook, Twitter, and more. FULL HD 1080P resolution for a superior picture...


