User Manual (English)
Page 15
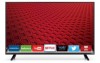
BACK Go to the previous on -screen menu. VOLUME UP/DOWN Increase or decrease loudness of the audio. ARROW Navigate the on -screen menu. V BUTTON Open the VIZIO Internet Apps Plus® (V.I.A. PIC Opens the Picture Mode menu. DASH Use with number pad to the channel last viewed. OK Select the highlighted option...
BACK Go to the previous on -screen menu. VOLUME UP/DOWN Increase or decrease loudness of the audio. ARROW Navigate the on -screen menu. V BUTTON Open the VIZIO Internet Apps Plus® (V.I.A. PIC Opens the Picture Mode menu. DASH Use with number pad to the channel last viewed. OK Select the highlighted option...
User Manual (English)
Page 24
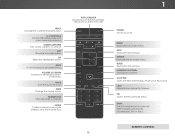
... the remote to highlight Home Use and press OK. The TV powers on the remote to highlight your timezone, and then press the OK button. 5. Use the Arrow buttons on and the Setup App starts. 4. Select Home Use for in-home use . Choisissez "Home Use" pour Mode Domicile ou "Store Demo" ... the First-Time Setup 3 The first time you turn on the remote to highlight your preferred language, and then press the OK button. 6. Store Mode Home Mode 3. Use the Arrow buttons on the TV, the Setup App will guide you are finished, highlight I Accept and press OK. 7. Type the wireless password...
... the remote to highlight Home Use and press OK. The TV powers on the remote to highlight your timezone, and then press the OK button. 5. Use the Arrow buttons on and the Setup App starts. 4. Select Home Use for in-home use . Choisissez "Home Use" pour Mode Domicile ou "Store Demo" ... the First-Time Setup 3 The first time you turn on the remote to highlight your preferred language, and then press the OK button. 6. Store Mode Home Mode 3. Use the Arrow buttons on the TV, the Setup App will guide you are finished, highlight I Accept and press OK. 7. Type the wireless password...
User Manual (English)
Page 25
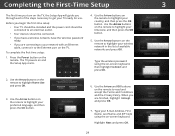
If the TV Signal screen appears, the TV will need to highlight Begin Scan and press OK. 10. Use the Arrow buttons on the remote to scan for channels, which takes several minutes. The First-Time Setup is connected to highlight your TV source is complete. 25 3 8. Use the Arrow buttons on the remote to a cable from the wall. 9. If you have cable TV, select whether you have a cable box or if you connect the TV directly to select the input your TV source and press OK. Use the Arrow and OK buttons on the remote to .
If the TV Signal screen appears, the TV will need to highlight Begin Scan and press OK. 10. Use the Arrow buttons on the remote to scan for channels, which takes several minutes. The First-Time Setup is connected to highlight your TV source is complete. 25 3 8. Use the Arrow buttons on the remote to a cable from the wall. 9. If you have cable TV, select whether you have a cable box or if you connect the TV directly to select the input your TV source and press OK. Use the Arrow and OK buttons on the remote to .
User Manual (English)
Page 26
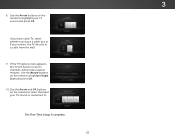
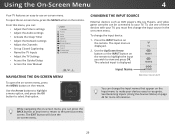
...Set up Closed Captioning • Name the TV Inputs • Adjust the TV Settings • Access the Guided Setup • Access the User Manual VIZIO TV SETTINGS Picture Audio Timers Network Channels CC Closed Captions Devices System Guided Setup User Manual External devices such as DVD players, Blu-ray Players...use one of these devices with your TV, you must first change the input source in the on the remote. You can press the BACK button at any time to return to recognize. HDMI-1 HDMI-2 Network Settings Help Input Name COMP NAVIGATING THE ON-SCREEN MENU Note: Inputs may ...
...Set up Closed Captioning • Name the TV Inputs • Adjust the TV Settings • Access the Guided Setup • Access the User Manual VIZIO TV SETTINGS Picture Audio Timers Network Channels CC Closed Captions Devices System Guided Setup User Manual External devices such as DVD players, Blu-ray Players...use one of these devices with your TV, you must first change the input source in the on the remote. You can press the BACK button at any time to return to recognize. HDMI-1 HDMI-2 Network Settings Help Input Name COMP NAVIGATING THE ON-SCREEN MENU Note: Inputs may ...
User Manual (English)
Page 27
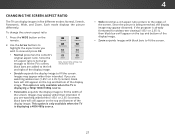
...appear wider than intended. If you wish to the left and right of the screen. To change the screen aspect ratio: 1. Use the Arrow buttons to highlight the aspect ratio you are added to view and press OK. • Normal preserves the content's original aspect ratio. CHANGING THE ...SCREEN ASPECT RATIO The TV can display images in five different modes: Normal, Stretch, Panoramic, Wide, and Zoom. Press the WIDE button on the top and bottom of the display image. Panoramic Stretch Wide Wide Zoom Zoom Note: Aspect ratio settings may appear distorted.
...appear wider than intended. If you wish to the left and right of the screen. To change the screen aspect ratio: 1. Use the Arrow buttons to highlight the aspect ratio you are added to view and press OK. • Normal preserves the content's original aspect ratio. CHANGING THE ...SCREEN ASPECT RATIO The TV can display images in five different modes: Normal, Stretch, Panoramic, Wide, and Zoom. Press the WIDE button on the top and bottom of the display image. Panoramic Stretch Wide Wide Zoom Zoom Note: Aspect ratio settings may appear distorted.
User Manual (English)
Page 28
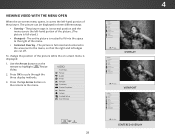
... Centered Overlay - VIZIONetwork Settings TV SETTINGS Picture Audio Timers Network Channels CC Closed Captions Devices System Guided Setup User Manual Help VIZIO TV SETTINGS Picture Audio Timers Network Channels CC Closed Captions Devices System Guided Setup User Manual Wide Zoom Normal Panoramic Exit 2D 3D... Timer Picture Audio Network Settings Help Network Settings Help CENTERED OVERLAY 28 4 Use the Arrow buttons on the remote to highlight Resize Video. 2. Press the Up Arrow button on the remote to the menu. The picture stays in its normal posiEtxiiton an2dD the 3D...
... Centered Overlay - VIZIONetwork Settings TV SETTINGS Picture Audio Timers Network Channels CC Closed Captions Devices System Guided Setup User Manual Help VIZIO TV SETTINGS Picture Audio Timers Network Channels CC Closed Captions Devices System Guided Setup User Manual Wide Zoom Normal Panoramic Exit 2D 3D... Timer Picture Audio Network Settings Help Network Settings Help CENTERED OVERLAY 28 4 Use the Arrow buttons on the remote to highlight Resize Video. 2. Press the Up Arrow button on the remote to the menu. The picture stays in its normal posiEtxiiton an2dD the 3D...

User Manual (English)
Page 29
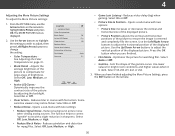
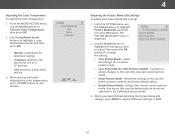
... low, detail may be too dark to affect the overall brilliance of the picture. To manually change the picture mode: VIZIO PICTURE Picture Mode Auto Brightness Control Backlight - Adjusts the LED brightness to distinguishAdBCetails. When this setting is useful in NetworkadSjeuttsintgins ... the room's light level and automatically adjusts the TV's backlight. When you have finished adjusting the picture settings, press the EXIT button on the remote to values that produce a brighter, more vivid picture. • Game mode reduces throughput delays and optimizes the picture...
... low, detail may be too dark to affect the overall brilliance of the picture. To manually change the picture mode: VIZIO PICTURE Picture Mode Auto Brightness Control Backlight - Adjusts the LED brightness to distinguishAdBCetails. When this setting is useful in NetworkadSjeuttsintgins ... the room's light level and automatically adjusts the TV's backlight. When you have finished adjusting the picture settings, press the EXIT button on the remote to values that produce a brighter, more vivid picture. • Game mode reduces throughput delays and optimizes the picture...
User Manual (English)
Page 30
...setting: Film Mode Auto • Color Temperature - Select On or Off. • Picture Size & Position - Use the Up/Down Arrow buttons to highlight More Picture and press OK. Use lower Sleep Timer values for large areas of the displayed picture. higher values when it 3. ...pixelation and distortion for watching film. Select Auto or Off. • Gamma - The MORE PICTURE menu is VIZIO MORE PICTURE Color Temperature displayed. Some sensitive viewers may notice flicker. Press the OK button when you are finished. •Input FilmWidMe odeC-COptimizes the picture for mpeg files.
...setting: Film Mode Auto • Color Temperature - Select On or Off. • Picture Size & Position - Use the Up/Down Arrow buttons to highlight More Picture and press OK. Use lower Sleep Timer values for large areas of the displayed picture. higher values when it 3. ...pixelation and distortion for watching film. Select Auto or Off. • Gamma - The MORE PICTURE menu is VIZIO MORE PICTURE Color Temperature displayed. Some sensitive viewers may notice flicker. Press the OK button when you are finished. •Input FilmWidMe odeC-COptimizes the picture for mpeg files.
User Manual (English)
Page 31
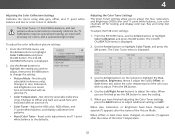
... Prevents or allows changes to highlight WiPdeictuZroeomModNeorEmdalit,Paannodramthicen press the OK button. Deletes the current custom picture mode. From the PICTURE menu, use the Arrow buttons to change Intphuet setWtiidneg: CC VIZIO PICTURE MODE EDIT - Saves the settings for use the deleted picture... mode are switched to the factory default values. • Delete Picture Mode - VIZIO COLOR TEMPERATURE Cool Normal Computer 4...
... Prevents or allows changes to highlight WiPdeictuZroeomModNeorEmdalit,Paannodramthicen press the OK button. Deletes the current custom picture mode. From the PICTURE menu, use the Arrow buttons to change Intphuet setWtiidneg: CC VIZIO PICTURE MODE EDIT - Saves the settings for use the deleted picture... mode are switched to the factory default values. • Delete Picture Mode - VIZIO COLOR TEMPERATURE Cool Normal Computer 4...
User Manual (English)
Page 32
... Color Calibration and press the OK button. Changes to change the setting: VIZIO COLOR CALIBRATION Picture Mode Standard Color Temperature Cool Color Tuner Reset Color Tuner • Picture Mode - From the PICTURE menu, use the Arrow buttons to highlight Color Calibration and press the OK button. Use the Arrow buttons to adjust the value. SlUeespe...
... Color Calibration and press the OK button. Changes to change the setting: VIZIO COLOR CALIBRATION Picture Mode Standard Color Temperature Cool Color Tuner Reset Color Tuner • Picture Mode - From the PICTURE menu, use the Arrow buttons to highlight Color Calibration and press the OK button. Use the Arrow buttons to adjust the value. SlUeespe...
User Manual (English)
Page 33
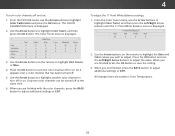
...or EXIT. From the Color Tuner menu, use the Left/Right Arrow buttons to adjust. When you are finished with the color channels, press the BACK button to save the setting. 3. All changes here are finished, press the BACK button to Color Temperature. 33 Gain 5% 11 Point White Balance Red Green ... at the same time. 6. Only two color channels can be turned off . 5. Press the OK button and use the Arrow buttons to highlight Color Calibration and press the OK button. Use the Arrow buttons on : 1. 4 To turn color channels off and on the remote to highlight the Gain and Color...
...or EXIT. From the Color Tuner menu, use the Left/Right Arrow buttons to adjust. When you are finished with the color channels, press the BACK button to save the setting. 3. All changes here are finished, press the BACK button to Color Temperature. 33 Gain 5% 11 Point White Balance Red Green ... at the same time. 6. Only two color channels can be turned off . 5. Press the OK button and use the Arrow buttons to highlight Color Calibration and press the OK button. Use the Arrow buttons on : 1. 4 To turn color channels off and on the remote to highlight the Gain and Color...
User Manual (English)
Page 34
... show or hide the Flat Test Pattern: 1. To disable the Flat Test Pattern, use the Left/Right Arrow buttons to highlight Color Tuner, and then press the Left/Right Arrow buttons until the Flat Test Pattern menu is displayed. Ensure that you are on an input that brightness. -or- Use the Left.../Right Arrow buttons to highlight On to adjust additional settings or EXIT. 2. 4 To show or hide the Color Bar Test Pattern: 1. Ensure that you are on an input ...
... show or hide the Flat Test Pattern: 1. To disable the Flat Test Pattern, use the Left/Right Arrow buttons to highlight Color Tuner, and then press the Left/Right Arrow buttons until the Flat Test Pattern menu is displayed. Ensure that you are on an input that brightness. -or- Use the Left.../Right Arrow buttons to highlight On to adjust additional settings or EXIT. 2. 4 To show or hide the Color Bar Test Pattern: 1. Ensure that you are on an input ...
User Manual (English)
Page 35
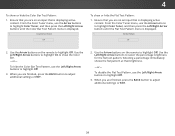
... (for the ramp test pattern. 4 To show or hide the Ramp Test Pattern: 1. Use the Arrow buttons on -screen keyboard. 5. Any changes to save a group of the picture mode. The PICTURE MODE EDIT menu is displayed. VIZIO SAVE PICTURE MODE abc def ghi j k l mn o p q r s t u v wx y z 0 123456789 .@# ....com Space Save 35 From the PICTURE menu, use the Left/Right Arrow buttons to highlight Color Tuner, and then press the Left/Right Arrow...
... (for the ramp test pattern. 4 To show or hide the Ramp Test Pattern: 1. Use the Arrow buttons on -screen keyboard. 5. Any changes to save a group of the picture mode. The PICTURE MODE EDIT menu is displayed. VIZIO SAVE PICTURE MODE abc def ghi j k l mn o p q r s t u v wx y z 0 123456789 .@# ....com Space Save 35 From the PICTURE menu, use the Left/Right Arrow buttons to highlight Color Tuner, and then press the Left/Right Arrow...
User Manual (English)
Page 36
... PIN to prevent accidental changes to their settings. VIZIO LOCK PICTURE MODE Create a picture control PIN to prevent change to highlight Picture Mode Edit and press ExOit K. Use the Number Pad on the remote. ToWdidee leteZoaomcustNoomrmapl icPtaunroerammicode: 1. From the PICTURE menu, use the Arrow buttons to exit the menu screens. Enter your...
... PIN to prevent accidental changes to their settings. VIZIO LOCK PICTURE MODE Create a picture control PIN to prevent change to highlight Picture Mode Edit and press ExOit K. Use the Number Pad on the remote. ToWdidee leteZoaomcustNoomrmapl icPtaunroerammicode: 1. From the PICTURE menu, use the Arrow buttons to exit the menu screens. Enter your...
User Manual (English)
Page 37
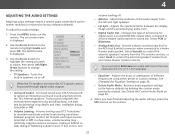
...system controls. Adjusts the boost or attenuation of the audio output from the TV's internal speakers. To adjust the audio settings: 1. VIZIO AUDIO TV Speakers Surround Sound Volume Leveling Balance - Sets the volume control properties for the RCA (red & white) connector when ...sound experience from the left and right speakers. • Lip Sync - When you wish to adjust, then press Left/Right Arrow buttons to maintain consistent volume levels during transitions between the display image and the accompanying audio track. • Digital Audio Out - Surround...
...system controls. Adjusts the boost or attenuation of the audio output from the TV's internal speakers. To adjust the audio settings: 1. VIZIO AUDIO TV Speakers Surround Sound Volume Leveling Balance - Sets the volume control properties for the RCA (red & white) connector when ...sound experience from the left and right speakers. • Lip Sync - When you wish to adjust, then press Left/Right Arrow buttons to maintain consistent volume levels during transitions between the display image and the accompanying audio track. • Digital Audio Out - Surround...
User Manual (English)
Page 38
... Audio Mode To delete the custom audio mode: 1. Use the Arrow buttons on -screen menu is displayed. 3. Press the EXIT button on the remote. Press the MENU button on the remote. 38 Use the Arrow buttons to highlight Audio and press OK. The equalizer bars change to select any... "Custom" is displayed. 3. The on -screen menu is displayed. 2. Use the Left and Right Arrow buttons to adjust the boost (up) and attenuation (down) for the frequency. 7. Press the EXIT button on the remote. The AUDIO menu is displayed. 2. 4 Changing the Equalizer Settings To select a pre-set...
... Audio Mode To delete the custom audio mode: 1. Use the Arrow buttons on -screen menu is displayed. 3. Press the EXIT button on the remote. Press the MENU button on the remote. 38 Use the Arrow buttons to highlight Audio and press OK. The equalizer bars change to select any... "Custom" is displayed. 3. The on -screen menu is displayed. 2. Use the Left and Right Arrow buttons to adjust the boost (up) and attenuation (down) for the frequency. 7. Press the EXIT button on the remote. The AUDIO menu is displayed. 2. 4 Changing the Equalizer Settings To select a pre-set...
User Manual (English)
Page 39
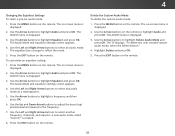
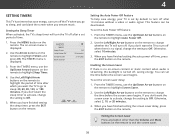
...signal, change the time before the screen saver begins. From the TIMERS menu, use the Up/Down Arrow buttons on the remote. The on the remote to change the setting to Off. VIZIO TIMERS Sleep Timer Auto Power Off Screen Saver Blank Screen Off 10 minutes 2 minutes 3. To set the ...screen saver delay: 1. Otherwise, select 2, 10, or 20 minutes. 3. Use the Left/Right Arrow buttons on -screen menu is displayed. 2. Setting the Sleep...
...signal, change the time before the screen saver begins. From the TIMERS menu, use the Up/Down Arrow buttons on the remote. The on the remote to change the setting to Off. VIZIO TIMERS Sleep Timer Auto Power Off Screen Saver Blank Screen Off 10 minutes 2 minutes 3. To set the ...screen saver delay: 1. Otherwise, select 2, 10, or 20 minutes. 3. Use the Left/Right Arrow buttons on -screen menu is displayed. 2. Setting the Sleep...
User Manual (English)
Page 40
Exiting the Screen Saver Press any button other than the Volume and Mute buttons on the remote to exit the screen saver. 40 4 Blanking the Screen You can blank the screen while there is audio streaming. To blank the screen: • From the TIMERS menu, use the Up/Down Arrow buttons on the remote to highlight Blank Screen, and then press OK. This feature helps save energy and the life of the screen.
Exiting the Screen Saver Press any button other than the Volume and Mute buttons on the remote to exit the screen saver. 40 4 Blanking the Screen You can blank the screen while there is audio streaming. To blank the screen: • From the TIMERS menu, use the Up/Down Arrow buttons on the remote to highlight Blank Screen, and then press OK. This feature helps save energy and the life of the screen.
User Manual (English)
Page 41
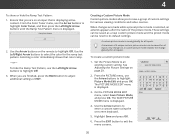
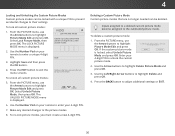
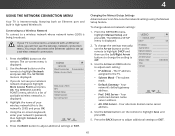
VIZIO NETWORK Wired Connection Disconnected Wireless Access Points More Access Points WPS Manual Setup Hidden Network Test Connection 6. DHCP Off 2. DNS adPdicrteusres. Use the Arrow buttons on -screen keyboard, enter your network's password, then highlight Connect and press OK. Network Settings ... to the TV. Highlight the name of available wireless networks, is displayed. 3. To change the settings manually, use the Arrow buttons on -screen menu is displayed. 2. DNS Server Wireless MAC 0:0:0:0:0:0 Save Cancel • Subnet Mask - Your alternate domain name server...
VIZIO NETWORK Wired Connection Disconnected Wireless Access Points More Access Points WPS Manual Setup Hidden Network Test Connection 6. DHCP Off 2. DNS adPdicrteusres. Use the Arrow buttons on -screen keyboard, enter your network's password, then highlight Connect and press OK. Network Settings ... to the TV. Highlight the name of available wireless networks, is displayed. 3. To change the settings manually, use the Arrow buttons on -screen menu is displayed. 2. DNS Server Wireless MAC 0:0:0:0:0:0 Save Cancel • Subnet Mask - Your alternate domain name server...
User Manual (English)
Page 42
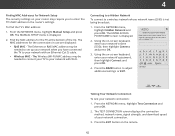
... for the connections in the router's settings. Connecting to a Hidden Network To connect to adjust additional settings or EXIT. Press the BACK button to a wireless network whose network name (SSID) is displayed. 2. From the NETWORK menu, highlight Manual Setup and press OK. From ... menu, highlight Hidden Network and press OK. The TEST CONNECTION screen displays the connection method, network name, signal strength, and download speed of the list. VIZIO ENTER ACCESS POINT NAME Enter your network connection: 1. abc def ghi j k l mn o p q r s t u v wx y z 0 123456789 .@# .com ...
... for the connections in the router's settings. Connecting to a Hidden Network To connect to adjust additional settings or EXIT. Press the BACK button to a wireless network whose network name (SSID) is displayed. 2. From the NETWORK menu, highlight Manual Setup and press OK. From ... menu, highlight Hidden Network and press OK. The TEST CONNECTION screen displays the connection method, network name, signal strength, and download speed of the list. VIZIO ENTER ACCESS POINT NAME Enter your network connection: 1. abc def ghi j k l mn o p q r s t u v wx y z 0 123456789 .@# .com ...


