Download
Page 1
... as Wi-Fi, transmitted through a router. using a wired network connection for the most reliable connection and the best performance. Wireless - However, VIZIO recommends using Ethernet cables to connect the router and Internet-capable devices, or 2. If your network is unsecured, you may be unknowingly sharing your ... best video streaming experience available. Try switching the setting to a lower quality to avoid freezing and re-buffering. Wired - Network Setup - Your VIZIO smart device may be stopping momentarily to set up your Internet Service Provider (ISP).
... as Wi-Fi, transmitted through a router. using a wired network connection for the most reliable connection and the best performance. Wireless - However, VIZIO recommends using Ethernet cables to connect the router and Internet-capable devices, or 2. If your network is unsecured, you may be unknowingly sharing your ... best video streaming experience available. Try switching the setting to a lower quality to avoid freezing and re-buffering. Wired - Network Setup - Your VIZIO smart device may be stopping momentarily to set up your Internet Service Provider (ISP).
Download
Page 7
... ARC 17 Connecting to your Network 18 Connecting to a Wired Network (Best 18 Connecting to a Wireless Network 18 Completing the First-Time Setup 19 Using the On-Screen Menu 21 Navigating the On-Screen Menu 21 Changing the Input Source 22 Changing the Screen Aspect Ratio 22 Adjusting... Sleep Timer 27 Setting the Auto Power Off Feature 28 Using the Network Connection Menu 28 Connecting to a Wireless Network 28 Changing the Manual Setup Settings 29 Connecting to a Hidden Network 29 Testing Your Network Connection 30 Using the Tuner Menu 30 Selecting a Tuner Input 31 Scanning for ...
... ARC 17 Connecting to your Network 18 Connecting to a Wired Network (Best 18 Connecting to a Wireless Network 18 Completing the First-Time Setup 19 Using the On-Screen Menu 21 Navigating the On-Screen Menu 21 Changing the Input Source 22 Changing the Screen Aspect Ratio 22 Adjusting... Sleep Timer 27 Setting the Auto Power Off Feature 28 Using the Network Connection Menu 28 Connecting to a Wireless Network 28 Changing the Manual Setup Settings 29 Connecting to a Hidden Network 29 Testing Your Network Connection 30 Using the Tuner Menu 30 Selecting a Tuner Input 31 Scanning for ...
Download
Page 8
Apps Window Overview 50 Customizing the V.I .A. Apps Window 51 Add an App to the TV 44 Playing USB Media 44 Using VIZIO Internet Apps Plus™ (V.I .A. Apps Window 49 To use the V.I .A. Plus App Dock 48 Using the Hot Keys 48 Using the fullscreen V.I .A. fullscreen apps window ... 40 Using the Reset & Admin Menu 40 Resetting the TV Settings 41 Restoring the TV to Factory Default Settings 41 Using the Guided Setup Menu 42 Using Guided Setup 42 Using the Info Window 43 Using the USB Media Player 44 Using the USB Media Player 44 Connecting a USB Thumb Drive to...
Apps Window Overview 50 Customizing the V.I .A. Apps Window 51 Add an App to the TV 44 Playing USB Media 44 Using VIZIO Internet Apps Plus™ (V.I .A. Apps Window 49 To use the V.I .A. Plus App Dock 48 Using the Hot Keys 48 Using the fullscreen V.I .A. fullscreen apps window ... 40 Using the Reset & Admin Menu 40 Resetting the TV Settings 41 Restoring the TV to Factory Default Settings 41 Using the Guided Setup Menu 42 Using Guided Setup 42 Using the Info Window 43 Using the USB Media Player 44 Using the USB Media Player 44 Connecting a USB Thumb Drive to...
Download
Page 22
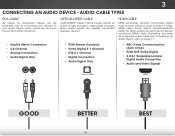
... Signal Only • PCM Stream (Lossless) • Dolby Digital 5.1 Channel • DTS 5.1 Channel • Digital Connection • Audio Signal Only • ARC 2-way Communication (Auto setup) • PCM, DTS, Dolby Digital • 2.0-5.1 Scaleable Lossless Digital Audio Connection • Audio and Video Signals COMPONENT VIDEO L R Optical/SPDIF DIGITAL OPTICAL AUDIO HDMI HDMI...
... Signal Only • PCM Stream (Lossless) • Dolby Digital 5.1 Channel • DTS 5.1 Channel • Digital Connection • Audio Signal Only • ARC 2-way Communication (Auto setup) • PCM, DTS, Dolby Digital • 2.0-5.1 Scaleable Lossless Digital Audio Connection • Audio and Video Signals COMPONENT VIDEO L R Optical/SPDIF DIGITAL OPTICAL AUDIO HDMI HDMI...
Download
Page 23
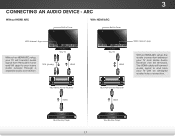
RCA (Audio) Your TV HDMI Your TV HDMI VIZIO Internet Apps With an HDMI ARC setup, the audio connection between your TV with an all-digital audio/video connection. The HDMI cable will transmit audio signal from your TV and Home ...-Ray Player ARC Without HDMI ARC With HDMI ARC Built-in Tuner Built-in tuner and VIA apps to and from the built-in Tuner VIZIO Internet Apps Without an HDMI ARC setup, your TV will transmit audio signal to your home audio receiver through a separate audio connection. 3 Connecting an Audio Device -
RCA (Audio) Your TV HDMI Your TV HDMI VIZIO Internet Apps With an HDMI ARC setup, the audio connection between your TV with an all-digital audio/video connection. The HDMI cable will transmit audio signal from your TV and Home ...-Ray Player ARC Without HDMI ARC With HDMI ARC Built-in Tuner Built-in tuner and VIA apps to and from the built-in Tuner VIZIO Internet Apps Without an HDMI ARC setup, your TV will transmit audio signal to your home audio receiver through a separate audio connection. 3 Connecting an Audio Device -

Download
Page 24
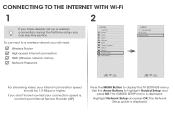
See below. 2. It can be subject to change. Use the Guided Network Setup to a Wireless Network 1. The actual number of the TV. Connecting to configure the TV. Connect an Ethernet cable to your router and to a Wired Network (... your home network with a Wired or Wireless connection. Ethernet Cable BACK OF TV Note: The image shown here is internet-ready. Use the Guided Network Setup to configure the TV. 3 Connecting to your Network Your TV is for illustrative purposes only and may vary, depending on the model. 18 Router / Modem...
See below. 2. It can be subject to change. Use the Guided Network Setup to a Wireless Network 1. The actual number of the TV. Connecting to configure the TV. Connect an Ethernet cable to your router and to a Wired Network (... your home network with a Wired or Wireless connection. Ethernet Cable BACK OF TV Note: The image shown here is internet-ready. Use the Guided Network Setup to configure the TV. 3 Connecting to your Network Your TV is for illustrative purposes only and may vary, depending on the model. 18 Router / Modem...
Download
Page 25
... Arrow Up/ Down buttons on the remote to read and accept the Terms of Service and Privacy Policy for use. To complete the first-time setup: 1. Enter your country. 7. Highlight Next and press OK. 3. Highlight Next and press OK. 19 Select the name of your network with an Ethernet cable,... the TV. Use the Left/Right Arrow buttons on the remote to select your Time Zone and Daylight Savings. Before you begin the first-time setup: • Your TV should be installed and the power cord should be connected to an electrical outlet. • Your devices should be connected. •...
... Arrow Up/ Down buttons on the remote to read and accept the Terms of Service and Privacy Policy for use. To complete the first-time setup: 1. Enter your country. 7. Highlight Next and press OK. 3. Highlight Next and press OK. 19 Select the name of your network with an Ethernet cable,... the TV. Use the Left/Right Arrow buttons on the remote to select your Time Zone and Daylight Savings. Before you begin the first-time setup: • Your TV should be installed and the power cord should be connected to an electrical outlet. • Your devices should be connected. •...

Download
Page 26
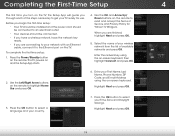
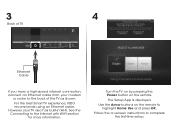
When you have finished the channel scan, highlight Exit to Live TV and press OK. The First-Time Setup is complete. 20 Completing the First-Time Setup 4 8. Answer the on-screen questions about your TV connection using the Arrow and OK buttons on the remote.
When you have finished the channel scan, highlight Exit to Live TV and press OK. The First-Time Setup is complete. 20 Completing the First-Time Setup 4 8. Answer the on-screen questions about your TV connection using the Arrow and OK buttons on the remote.
Download
Page 27
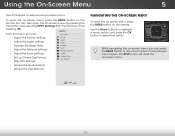
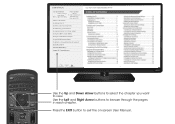
... 2DWhile3nD avigating the on -screen menu. Using the On-Screen Menu 5 Your TV features an easy-to-use on -screen menu, you can: VIZIO TV SETTINGS • Adjust the Picture settings • Adjust the Audio settings Picture Audio Timers • Activate the Sleep Timer • Adjust the... Adjust the Tuner settings Network Tuner CC Closed Captions System • Set up Closed Captioning • Adjust TV Settings Guided Setup User Manual • Access the Guided Setup • Access the User Manual Navigating the On-Screen Menu To open the on-screen menu, press the MENU button on...
... 2DWhile3nD avigating the on -screen menu. Using the On-Screen Menu 5 Your TV features an easy-to-use on -screen menu, you can: VIZIO TV SETTINGS • Adjust the Picture settings • Adjust the Audio settings Picture Audio Timers • Activate the Sleep Timer • Adjust the... Adjust the Tuner settings Network Tuner CC Closed Captions System • Set up Closed Captioning • Adjust TV Settings Guided Setup User Manual • Access the Guided Setup • Access the User Manual Navigating the On-Screen Menu To open the on-screen menu, press the MENU button on...
Download
Page 34
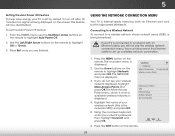
... OK. 5. 5 Setting the Auto Power Off Feature To help save energy, your TV is set up a wireless network connection. 1. VIZIO Network Wired Connection Disconnected Wireless Access Points More Access Points WPS Manual Setup Hidden Network Test Connection 6. To set the Auto Power Off feature: 1. Connecting to a Wireless Network To connect to highlight...
... OK. 5. 5 Setting the Auto Power Off Feature To help save energy, your TV is set up a wireless network connection. 1. VIZIO Network Wired Connection Disconnected Wireless Access Points More Access Points WPS Manual Setup Hidden Network Test Connection 6. To set the Auto Power Off feature: 1. Connecting to a Wireless Network To connect to highlight...
Download
Page 35
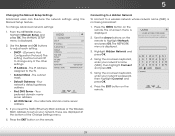
...wireless network whose network name (SSID) is displayed. 2. Using the on the WirdeemoZtoeomto hiNgorhmlaigl hPtaNnoeratmwicork and press OK. The Manual Setup Manual Setup menu is displayed. Use the Arrow and OK buttons to adjust each setting: • DHCP - (Dynamic Host Configuration Protocol... def ghi j k l mn o p q r s t u v wx y z 0 123456789 .@# .com Space Connect 6. From the Network menu, highlight Manual Setup and VIZIO press OK. Your alternate domain name server address. 3. Using the on-sAcBCreen keyboard, enter your access point name. The IP address assigned to set up...
...wireless network whose network name (SSID) is displayed. 2. Using the on the WirdeemoZtoeomto hiNgorhmlaigl hPtaNnoeratmwicork and press OK. The Manual Setup Manual Setup menu is displayed. Use the Arrow and OK buttons to adjust each setting: • DHCP - (Dynamic Host Configuration Protocol... def ghi j k l mn o p q r s t u v wx y z 0 123456789 .@# .com Space Connect 6. From the Network menu, highlight Manual Setup and VIZIO press OK. Your alternate domain name server address. 3. Using the on-sAcBCreen keyboard, enter your access point name. The IP address assigned to set up...
Download
Page 47
... clear all changes you have made to the factory default settings, all account information." 6. Highlight Reset and press OK. 6. The on shortly afterward and the Setup App will begin. 41 Enter your parental control passcode. The TV will turn off. Use the Arrow buttons on the remote. Highlight Reset TV Settings...
... clear all changes you have made to the factory default settings, all account information." 6. Highlight Reset and press OK. 6. The on shortly afterward and the Setup App will begin. 41 Enter your parental control passcode. The TV will turn off. Use the Arrow buttons on the remote. Highlight Reset TV Settings...
Download
Page 48
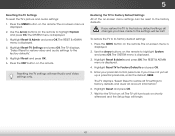
... CC Sleep Timer Picture Audio Network Settings Help 42 5 Using the Guided Setup Menu Using Guided Setup The TV's Setup App can be used to easily set up the TV tuner. • Network Setup - VIZIO Guided Setup Tuner Setup Network Setup 3. Follow the on the remote. Highlight the guided setup you want to access and press OK: • Tuner...
... CC Sleep Timer Picture Audio Network Settings Help 42 5 Using the Guided Setup Menu Using Guided Setup The TV's Setup App can be used to easily set up the TV tuner. • Network Setup - VIZIO Guided Setup Tuner Setup Network Setup 3. Follow the on the remote. Highlight the guided setup you want to access and press OK: • Tuner...

Download
Page 59
We can help with: • New Product Setup • Connecting Your Devices • Technical Problems • And More Phone: (877) 878-4946 (TOLL-FREE) Email: techsupport@VIZIO.com Web: www.VIZIO.com/support Hours of operation: Monday - Friday: 5 am to 8 pm (PST) Saturday - Sunday: 7 am to 4 pm (PST) We speak ... • Se habla Español • Nous parlons Français 53 YOUR PRODUCT INCLUDES FREE LIFETIME TECH SUPPORT The VIZIO support team is highly trained and is based in the United States. LET US HELP! Troubleshooting & Technical Support A do you have questions?
We can help with: • New Product Setup • Connecting Your Devices • Technical Problems • And More Phone: (877) 878-4946 (TOLL-FREE) Email: techsupport@VIZIO.com Web: www.VIZIO.com/support Hours of operation: Monday - Friday: 5 am to 8 pm (PST) Saturday - Sunday: 7 am to 4 pm (PST) We speak ... • Se habla Español • Nous parlons Français 53 YOUR PRODUCT INCLUDES FREE LIFETIME TECH SUPPORT The VIZIO support team is highly trained and is based in the United States. LET US HELP! Troubleshooting & Technical Support A do you have questions?

Download
Page 6
FIRST-TIME SETUP 1 Connect all of your devices first. Choose ONE connection type for each device. Match colored connectors to colored ports.
FIRST-TIME SETUP 1 Connect all of your devices first. Choose ONE connection type for each device. Match colored connectors to colored ports.

Download
Page 8
Plug the power cord into place. Gently slide the battery cover back into an electrical outlet. The flat edge of the connector goes toward the outside of the TV. FIRST-TIME SETUP 1 2 Remove the battery cover by pressing gently on the V logo and sliding away from the remote. Connect the power cord to the back of the TV. Insert the included batteries.
Plug the power cord into place. Gently slide the battery cover back into an electrical outlet. The flat edge of the connector goes toward the outside of the TV. FIRST-TIME SETUP 1 2 Remove the battery cover by pressing gently on the V logo and sliding away from the remote. Connect the power cord to the back of the TV. Insert the included batteries.
Download
Page 9
... Demo" por Demostración de Tienda. For the best Smart TV experience, VIZIO recommends using an Ethernet cable. Use the Arrow buttons on the remote to the back of TV 4 Choose your TV also has built-in Wi-Fi. The Setup App is displayed. Select Store Demo for in -store display. 3 Back... Home Use and press OK. Follow the on the remote. Select Home Use for in -home use. See the Connecting to complete the first-time setup. Turn the TV on by pressing the Power button on -screen instructions to the Internet with Wi-Fi section for more information.
... Demo" por Demostración de Tienda. For the best Smart TV experience, VIZIO recommends using an Ethernet cable. Use the Arrow buttons on the remote to the back of TV 4 Choose your TV also has built-in Wi-Fi. The Setup App is displayed. Select Store Demo for in -store display. 3 Back... Home Use and press OK. Follow the on the remote. Select Home Use for in -home use. See the Connecting to complete the first-time setup. Turn the TV on by pressing the Power button on -screen instructions to the Internet with Wi-Fi section for more information.
Download
Page 10
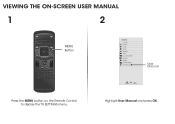
Highlight User Manual and press OK. VIEWING THE ON-SCREEN USER MANUAL 1 2 MENU Button VIZIO TV SETTINGS Picture Audio Timers Network Tuner CC Closed Captions Devices System Guided Setup User Manual Wide Zoom Normal Panoramic Exit 2D 3D ABC User Input Wide CC Manual Sleep Timer Picture Audio Network Settings Help Press the MENU button on the Remote Control to display the TV SETTINGS menu.
Highlight User Manual and press OK. VIEWING THE ON-SCREEN USER MANUAL 1 2 MENU Button VIZIO TV SETTINGS Picture Audio Timers Network Tuner CC Closed Captions Devices System Guided Setup User Manual Wide Zoom Normal Panoramic Exit 2D 3D ABC User Input Wide CC Manual Sleep Timer Picture Audio Network Settings Help Press the MENU button on the Remote Control to display the TV SETTINGS menu.
Download
Page 11
... Installing the TV Controls and Connections Connecting your Devices Completing the First-Time Setup Using the On-Screen Menu Using the USB Media Player Using VIZIO Internet Apps Troubleshooting & Technical Support Specifications Limited Warranty Legal & Compliance LCD HDTV WITH VIZIO INTERNET APPS® Use the Up and Down Arrow buttons to select the...
... Installing the TV Controls and Connections Connecting your Devices Completing the First-Time Setup Using the On-Screen Menu Using the USB Media Player Using VIZIO Internet Apps Troubleshooting & Technical Support Specifications Limited Warranty Legal & Compliance LCD HDTV WITH VIZIO INTERNET APPS® Use the Up and Down Arrow buttons to select the...
Download
Page 12
... will need: Wireless Router High-speed Internet connection SSID (Wireless network name) Network Password VIZIO TV SETTINGS Picture Audio Timers Network Tuner CC Closed Captions Devices System Guided Setup User Manual Wide VIZIO GUIDED SETUP ZoToumner SeNtuoprmal Panoramic Network Setup Exit 2D 3D ABC Input Wide CC Sleep Timer Picture Audio Network Settings Help Wide...
... will need: Wireless Router High-speed Internet connection SSID (Wireless network name) Network Password VIZIO TV SETTINGS Picture Audio Timers Network Tuner CC Closed Captions Devices System Guided Setup User Manual Wide VIZIO GUIDED SETUP ZoToumner SeNtuoprmal Panoramic Network Setup Exit 2D 3D ABC Input Wide CC Sleep Timer Picture Audio Network Settings Help Wide...


