

E240AR User Manual
Page 1
USER GUIDE MOMDODEELLSS // E3D320VX // E3DE42204VX0AR // E3DE43702VX0AR INSTALLING YOUR new TV CONTROLS & CONNECTIONS CONNECTING YOUR DEVICES USING THE ON-SCREEN MENU USING USB photo slideshow TROUBLESHOOTING & SUPPORT SPECs, warranty & LEGAL
USER GUIDE MOMDODEELLSS // E3D320VX // E3DE42204VX0AR // E3DE43702VX0AR INSTALLING YOUR new TV CONTROLS & CONNECTIONS CONNECTING YOUR DEVICES USING THE ON-SCREEN MENU USING USB photo slideshow TROUBLESHOOTING & SUPPORT SPECs, warranty & LEGAL
E240AR User Manual
Page 3
... is designed and manufactured to ensure there are provided for your VIZIO product, visit our website at www.VIZIO.com or call toll free at (877) 878-4946. Important Safety Instructions Your TV is intended to your TV. • Read these instructions. • Keep these instructions in... see this symbol, please read the accompanying helpful tip. Welcome Thank You for Choosing VIZIO And congratulations on your TV. Install in electric shock or fire.To prevent your TV from the apparatus. • Only use attachments/accessories specified by the manufacturer. • Use ...
... is designed and manufactured to ensure there are provided for your VIZIO product, visit our website at www.VIZIO.com or call toll free at (877) 878-4946. Important Safety Instructions Your TV is intended to your TV. • Read these instructions. • Keep these instructions in... see this symbol, please read the accompanying helpful tip. Welcome Thank You for Choosing VIZIO And congratulations on your TV. Install in electric shock or fire.To prevent your TV from the apparatus. • Only use attachments/accessories specified by the manufacturer. • Use ...
E240AR User Manual
Page 4
...sufficient magnitude to constitute a risk of electric shock to avoid causing fire, electric shock, or component damage. • A distance of at your TV and any way, such as a radiator, heater, oven, amplifier etc. Any other hazards. Opening or removing the back cover may cause fire ... should be replaced when using different voltage than the specified voltage may expose you are not blocked or covered. Do not expose your TV cabinet. The manufacturer's warranty does not cover user abuse or improper installations. • The power cord must be operated only from ...
...sufficient magnitude to constitute a risk of electric shock to avoid causing fire, electric shock, or component damage. • A distance of at your TV and any way, such as a radiator, heater, oven, amplifier etc. Any other hazards. Opening or removing the back cover may cause fire ... should be replaced when using different voltage than the specified voltage may expose you are not blocked or covered. Do not expose your TV cabinet. The manufacturer's warranty does not cover user abuse or improper installations. • The power cord must be operated only from ...
E240AR User Manual
Page 5
... device shall remain readily operable. • CAUTION - Liquid sprays or any object drops into your TV is dropped and the housing is used for moving your TV. • When unplugging your TV yourself. • Avoid using dropped or damaged appliances. h• The lightning flash with instructions. Continued...other than that the power cord and any abnormality occurs. If any smoke or odor becomes apparent, unplug the power cord and contact your TV if any other moisture. - Continuous use in this case may result in fire or electric shock. • Do not use...
... device shall remain readily operable. • CAUTION - Liquid sprays or any object drops into your TV is dropped and the housing is used for moving your TV. • When unplugging your TV yourself. • Avoid using dropped or damaged appliances. h• The lightning flash with instructions. Continued...other than that the power cord and any abnormality occurs. If any smoke or odor becomes apparent, unplug the power cord and contact your TV if any other moisture. - Continuous use in this case may result in fire or electric shock. • Do not use...
E240AR User Manual
Page 6
.... Watch your local stations to find out when they will turn off their analog signal and switch to receive over-the-air TV. Analog-only television sets that receive TV programming through an antenna now need a converter box to continue to digital-only broadcasting. No extra converter box is needed. DTV...receive low power, Class A or translator television stations and with a built-in tuner capable of US Television Stations www.high-techproductions.com/usTVstations.htm Your TV comes with cable and satellite TV services, gaming consoles, VCRs, DVD players, and similar products.
.... Watch your local stations to find out when they will turn off their analog signal and switch to receive over-the-air TV. Analog-only television sets that receive TV programming through an antenna now need a converter box to continue to digital-only broadcasting. No extra converter box is needed. DTV...receive low power, Class A or translator television stations and with a built-in tuner capable of US Television Stations www.high-techproductions.com/usTVstations.htm Your TV comes with cable and satellite TV services, gaming consoles, VCRs, DVD players, and similar products.
E240AR User Manual
Page 7
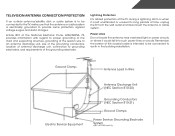
...discharge unit, size of the grounding conductors, location of antenna discharge unit, connection to grounding electrodes, and requirements of time, unplug the TV from the wall outlet and disconnect the antenna or cable system. Article 810 of the National Electrical Code, ANSI/NFPSA 70, provides ...(NEC Section 810-21) Ground Clamps Power Service Grounding Electrode System (NEC ART 250, part H) Lightning Protection For added protection of the TV during a lightning storm or when it could fall into such power lines or circuits. Remember, the screen of the coaxial cable is intended...
...discharge unit, size of the grounding conductors, location of antenna discharge unit, connection to grounding electrodes, and requirements of time, unplug the TV from the wall outlet and disconnect the antenna or cable system. Article 810 of the National Electrical Code, ANSI/NFPSA 70, provides ...(NEC Section 810-21) Ground Clamps Power Service Grounding Electrode System (NEC ART 250, part H) Lightning Protection For added protection of the TV during a lightning storm or when it could fall into such power lines or circuits. Remember, the screen of the coaxial cable is intended...
E240AR User Manual
Page 8
... Contents Installing the TV 3 Inspecting the Package Contents 3 Installing the TV 3 Installing the TV Stand 3 Installing the TV on a Wall 4 Controls and Connections 5 Rear Panel (E240AR 5 Rear Panel (E320AR 6 Side Panel 7 Front Panel 8 Remote Control 9 Replacing the Batteries 10 Connecting Your Devices 11 Connecting A Device (E240AR 11 Connecting A Device (E320AR 12 Connecting A PC (E240AR 13 Connecting A PC...
... Contents Installing the TV 3 Inspecting the Package Contents 3 Installing the TV 3 Installing the TV Stand 3 Installing the TV on a Wall 4 Controls and Connections 5 Rear Panel (E240AR 5 Rear Panel (E320AR 6 Side Panel 7 Front Panel 8 Remote Control 9 Replacing the Batteries 10 Connecting Your Devices 11 Connecting A Device (E240AR 11 Connecting A Device (E320AR 12 Connecting A PC (E240AR 13 Connecting A PC...
E240AR User Manual
Page 9
Resetting the TV Settings 34 Restoring the TV to Factory Default Settings 35 Using Setup Wizard 35 Using the Info Window 36 Using the USB Media Player 37 Using the USB Photo slideshow 37 Connecting a USB Thumb Drive to the TV 37 Playing USB Media 37 Troubleshooting & Technical Support 40 Specifications 43 Limited Warranty 45 Legal & Compliance 46 2
Resetting the TV Settings 34 Restoring the TV to Factory Default Settings 35 Using Setup Wizard 35 Using the Info Window 36 Using the USB Media Player 37 Using the USB Photo slideshow 37 Connecting a USB Thumb Drive to the TV 37 Playing USB Media 37 Troubleshooting & Technical Support 40 Specifications 43 Limited Warranty 45 Legal & Compliance 46 2
E240AR User Manual
Page 10
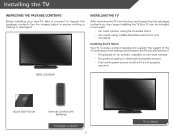
... box and inspecting the package contents you can still fall over . However, the TV can begin installing the TV. Installing the TV After removing the TV from falling over if: • It is placed on Stand Your TV can be installed in two ways: • On a flat surface, using the... a stand designed to inspect the package contents. Use the images below to ensure nothing is not properly secured VIZIO LCD HDTV Quick Start Guide Remote Control with Batteries Package Contents 3 TV on an uneven, unstable, or non-level surface • It is pushed, pulled, or otherwise improperly moved...
... box and inspecting the package contents you can still fall over . However, the TV can begin installing the TV. Installing the TV After removing the TV from falling over if: • It is placed on Stand Your TV can be installed in two ways: • On a flat surface, using the... a stand designed to inspect the package contents. Use the images below to ensure nothing is not properly secured VIZIO LCD HDTV Quick Start Guide Remote Control with Batteries Package Contents 3 TV on an uneven, unstable, or non-level surface • It is pushed, pulled, or otherwise improperly moved...

E240AR User Manual
Page 11
... Disconnect any other objects (walls, etc). For some wall mounts, you have the correct mount for your TV model: E240AR E320AR To install the TV stand: 1. To prevent scratches or damage to use cables with the TV. 3. After you have determined that you may want to the screen, place the... the weight/load of debris that came with attached stand into an upright position and place on a clean, flat, stable surface. Move the TV with your mount. E240AR E320AR Screw Size: Screw Length: Hole Pattern: M4 12mm 100mm (V) x 100mm (H) M6 12mm 200mm (V) x 200mm (H) Be sure the ...
... Disconnect any other objects (walls, etc). For some wall mounts, you have the correct mount for your TV model: E240AR E320AR To install the TV stand: 1. To prevent scratches or damage to use cables with the TV. 3. After you have determined that you may want to the screen, place the... the weight/load of debris that came with attached stand into an upright position and place on a clean, flat, stable surface. Move the TV with your mount. E240AR E320AR Screw Size: Screw Length: Hole Pattern: M4 12mm 100mm (V) x 100mm (H) M6 12mm 200mm (V) x 200mm (H) Be sure the ...
E240AR User Manual
Page 14
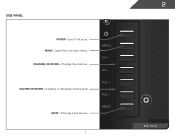
CHANNEL UP/DOWN - INPUT 7 2 Side Panel Turn TV off or on -screen menu. MENU CH + CH - Increase or decrease volume level INPUT - Open the on . Change the channel. Change input source. VOLUME UP/DOWN - Side Panel POWER - MENU -
CHANNEL UP/DOWN - INPUT 7 2 Side Panel Turn TV off or on -screen menu. MENU CH + CH - Increase or decrease volume level INPUT - Open the on . Change the channel. Change input source. VOLUME UP/DOWN - Side Panel POWER - MENU -
E240AR User Manual
Page 16
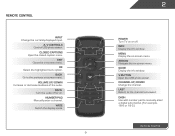
... audio off or on or off. Info Display the info window. Last Return to the channel last viewed. WIDE Switch the display mode. 9 2 Power Turn TV on . Arrow Navigate the on -screen menu. Guide Display the info window. Channel Up/Down Change the channel. Volume Up/Down Increase or decrease loudness...
... audio off or on or off. Info Display the info window. Last Return to the channel last viewed. WIDE Switch the display mode. 9 2 Power Turn TV on . Arrow Navigate the on -screen menu. Guide Display the info window. Channel Up/Down Change the channel. Volume Up/Down Increase or decrease loudness...
E240AR User Manual
Page 18
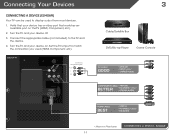
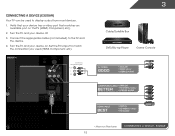
Connecting Your Devices Connecting A Device (E240AR) Your TV can be used (HDMI, Component, etc). Turn the TV and your device on the TV (HDMI, Component, etc). 2. Set the TV's input to match the connection you used to display output from most devices. 1. Verify that your device has a ...video port that matches an available port on . Turn the TV and your device off. 3. BACK OF TV Connect to the TV and the device. 4. Connect the appropriate cable (not included) to component inputs: Y/V L R 3 Cable/Satellite Box ...
Connecting Your Devices Connecting A Device (E240AR) Your TV can be used (HDMI, Component, etc). Turn the TV and your device on the TV (HDMI, Component, etc). 2. Set the TV's input to match the connection you used to display output from most devices. 1. Verify that your device has a ...video port that matches an available port on . Turn the TV and your device off. 3. BACK OF TV Connect to the TV and the device. 4. Connect the appropriate cable (not included) to component inputs: Y/V L R 3 Cable/Satellite Box ...
E240AR User Manual
Page 19
BACK OF TV Connect to the TV and the device. 4. Turn the TV and your device on the TV (HDMI, Component, etc). 2. Set the TV's input to match the connection you used to display output from most devices. 1. E320AR Connect the appropriate cable (not included) to component ... CABLE BEST • DIGITAL • HD VIDEO (1080p)* • HD AUDIO * Maximum Resolution 12 CONNECTING A DEVICE - Connecting A Device (E320AR) Your TV can be used (HDMI, Component, etc). Turn the TV and your device has a video port that matches an available port on . Verify that your device off. 3.
BACK OF TV Connect to the TV and the device. 4. Turn the TV and your device on the TV (HDMI, Component, etc). 2. Set the TV's input to match the connection you used to display output from most devices. 1. E320AR Connect the appropriate cable (not included) to component ... CABLE BEST • DIGITAL • HD VIDEO (1080p)* • HD AUDIO * Maximum Resolution 12 CONNECTING A DEVICE - Connecting A Device (E320AR) Your TV can be used (HDMI, Component, etc). Turn the TV and your device has a video port that matches an available port on . Verify that your device off. 3.
E240AR User Manual
Page 20
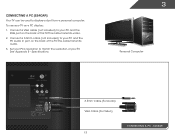
Connect a 3.5mm cable (not included) to your PC and the PC Audio In port on the back of the TV. See Appendix B - Specifications. 3 Personal Computer 3.5mm Cable (For Audio) VGA Cable (For Video) CONNECTING A PC - Connect a VGA cable (not included) to your PC and the RGB port on the back of the TV. To use your TV. This cable transmits audio. 3. E240AR 13 Set your PC's resolution to display output from a personal computer. Connecting A PC (E240AR) Your TV can be used to match the resolution of your TV as a PC display: 1. This cable transmits video. 2.
Connect a 3.5mm cable (not included) to your PC and the PC Audio In port on the back of the TV. See Appendix B - Specifications. 3 Personal Computer 3.5mm Cable (For Audio) VGA Cable (For Video) CONNECTING A PC - Connect a VGA cable (not included) to your PC and the RGB port on the back of the TV. To use your TV. This cable transmits audio. 3. E240AR 13 Set your PC's resolution to display output from a personal computer. Connecting A PC (E240AR) Your TV can be used to match the resolution of your TV as a PC display: 1. This cable transmits video. 2.
E240AR User Manual
Page 21
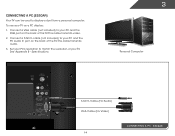
Specifications. 3 Personal Computer 3.5mm Cable (For Audio) VGA Cable (For Video) 14 CONNECTING A PC - Connect a 3.5mm cable (not included) to match the resolution of the TV. Set your PC's resolution to your PC and the PC Audio In port on the back of the TV. To use your TV as a PC display: 1. Connect a VGA cable (not included) to display output from a personal computer. E320AR See Appendix B - This cable transmits audio. 3. Connecting A PC (E320AR) Your TV can be used to your PC and the RGB port on the back of your TV. This cable transmits video. 2.
Specifications. 3 Personal Computer 3.5mm Cable (For Audio) VGA Cable (For Video) 14 CONNECTING A PC - Connect a 3.5mm cable (not included) to match the resolution of the TV. Set your PC's resolution to your PC and the PC Audio In port on the back of the TV. To use your TV as a PC display: 1. Connect a VGA cable (not included) to display output from a personal computer. E320AR See Appendix B - This cable transmits audio. 3. Connecting A PC (E320AR) Your TV can be used to your PC and the RGB port on the back of your TV. This cable transmits video. 2.
E240AR User Manual
Page 22
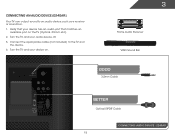
Verify that your device has an audio port that matches an available port on . 3 Home Audio Receiver VIZIO Sound Bar GOOD 3.5mm Cable BETTER Optical/SPDIF Cable CONNECTING AUDIO DEVICE - Turn the TV and your audio device off. 3. E240AR 15 Turn the TV and your device on the TV (Optical, 3.5mm, etc). 2. Connect the appropriate cable (not included) to an audio device, such as a receiver or sound bar. 1. Connecting an audio device (E240AR) Your TV can output sound to the TV and the device. 4.
Verify that your device has an audio port that matches an available port on . 3 Home Audio Receiver VIZIO Sound Bar GOOD 3.5mm Cable BETTER Optical/SPDIF Cable CONNECTING AUDIO DEVICE - Turn the TV and your audio device off. 3. E240AR 15 Turn the TV and your device on the TV (Optical, 3.5mm, etc). 2. Connect the appropriate cable (not included) to an audio device, such as a receiver or sound bar. 1. Connecting an audio device (E240AR) Your TV can output sound to the TV and the device. 4.
E240AR User Manual
Page 23
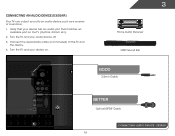
Connecting an audio device (E320AR) Your TV can output sound to the TV and the device. 4. Verify that matches an available port on . 3 Home Audio Receiver VIZIO Sound Bar GOOD 3.5mm Cable BETTER Optical/SPDIF Cable CONNECTING AUDIO DEVICE - Turn the TV and your device has an audio port that your audio device off. 3. Connect the appropriate cable (not included) to an audio device, such as a receiver or sound bar. 1. E320AR 16 Turn the TV and your device on the TV (Optical, 3.5mm, etc). 2.
Connecting an audio device (E320AR) Your TV can output sound to the TV and the device. 4. Verify that matches an available port on . 3 Home Audio Receiver VIZIO Sound Bar GOOD 3.5mm Cable BETTER Optical/SPDIF Cable CONNECTING AUDIO DEVICE - Turn the TV and your device has an audio port that your audio device off. 3. Connect the appropriate cable (not included) to an audio device, such as a receiver or sound bar. 1. E320AR 16 Turn the TV and your device on the TV (Optical, 3.5mm, etc). 2.
E240AR User Manual
Page 24
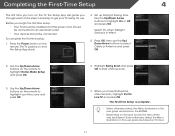
... Setup App will guide you through each of the steps necessary to get your time zone and press OK. 6. The TV powers on the remote to highlight your TV ready for use the Up/ Down Arrow buttons to highlight Home Mode Setup and press OK. 3. Select On when Daylight Saving is complete.... 5. Use the Up/Down Arrow buttons on and the Setup App starts. 4. The First-Time Setup is in this user guide are based on the E240AR. • Depending on the input source, the menu items may be connected. Press the Power button on the remote to select Cable or Antenna and...
... Setup App will guide you through each of the steps necessary to get your time zone and press OK. 6. The TV powers on the remote to highlight your TV ready for use the Up/ Down Arrow buttons to highlight Home Mode Setup and press OK. 3. Select On when Daylight Saving is complete.... 5. Use the Up/Down Arrow buttons on and the Setup App starts. 4. The First-Time Setup is in this user guide are based on the E240AR. • Depending on the input source, the menu items may be connected. Press the Power button on the remote to select Cable or Antenna and...
E240AR User Manual
Page 25
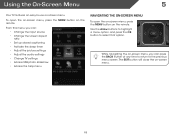
...ratio • Set up closed captioning • Activate the sleep timer • Adjust the picture settings • Adjust the audio settings • Change TV settings • Access USB photo slideshow • Access the help menu Navigating the On-Screen Menu CC To open the on-screen menu, press the... MENU button on the remote. VOL CH 1 2 3 4 5 6 7 8 9 3D 0 18 Using the On-Screen Menu I 5 Your TV features an easy-to select that option. EXIT Use the Arrow buttons to highlight a menu option, and press the OK button to -use on-screen...
...ratio • Set up closed captioning • Activate the sleep timer • Adjust the picture settings • Adjust the audio settings • Change TV settings • Access USB photo slideshow • Access the help menu Navigating the On-Screen Menu CC To open the on-screen menu, press the... MENU button on the remote. VOL CH 1 2 3 4 5 6 7 8 9 3D 0 18 Using the On-Screen Menu I 5 Your TV features an easy-to select that option. EXIT Use the Arrow buttons to highlight a menu option, and press the OK button to -use on-screen...


