
E240AR User Manual
Page 2
Changing the factory default picture settings or enabling other features will increase power consumption that could exceed the limits necessary to qualify for ENERGY STAR in the "factory default" setting and this is the setting in which power savings will be achieved. Dolby and the double-D symbol are trademarks of Dolby Laboratories. This product qualifies...
Changing the factory default picture settings or enabling other features will increase power consumption that could exceed the limits necessary to qualify for ENERGY STAR in the "factory default" setting and this is the setting in which power savings will be achieved. Dolby and the double-D symbol are trademarks of Dolby Laboratories. This product qualifies...
E240AR User Manual
Page 8
... 10 Connecting Your Devices 11 Connecting A Device (E240AR 11 Connecting A Device (E320AR 12 Connecting A PC (E240AR 13 Connecting A PC (E320AR 14 Connecting an audio device (E240AR 15 Connecting an audio device (E320AR 16 Completing the...Picture Settings 21 Adjusting the Advanced Picture Settings 22 Adjusting the Color Temperature 23 Adjusting the Picture Size and Position 24 Resetting the Picture Settings 24 Adjusting the Audio Settings 24 Adjusting the Advanced Audio Settings 25 Resetting the Audio Settings 26 Changing the TV Settings 27 Changing the Input Source 27 Setting...
... 10 Connecting Your Devices 11 Connecting A Device (E240AR 11 Connecting A Device (E320AR 12 Connecting A PC (E240AR 13 Connecting A PC (E320AR 14 Connecting an audio device (E240AR 15 Connecting an audio device (E320AR 16 Completing the...Picture Settings 21 Adjusting the Advanced Picture Settings 22 Adjusting the Color Temperature 23 Adjusting the Picture Size and Position 24 Resetting the Picture Settings 24 Adjusting the Audio Settings 24 Adjusting the Advanced Audio Settings 25 Resetting the Audio Settings 26 Changing the TV Settings 27 Changing the Input Source 27 Setting...
E240AR User Manual
Page 25
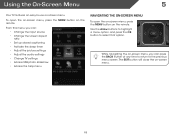
... this menu, you can : • Change the input source • Change the screen aspect ratio • Set up closed captioning • Activate the sleep timer • Adjust the picture settings • Adjust the audio settings • Change TV settings • Access USB photo slideshow • Access the help menu Navigating the On-Screen Menu CC...
... this menu, you can : • Change the input source • Change the screen aspect ratio • Set up closed captioning • Activate the sleep timer • Adjust the picture settings • Adjust the audio settings • Change TV settings • Access USB photo slideshow • Access the help menu Navigating the On-Screen Menu CC...

E240AR User Manual
Page 28
...and press OK. 5 Activating the Sleep Timer Adjusting the Picture Settings When activated, the TV's sleep timer will produce the best picture in a dark room. • Game mode optimizes the picture settings for their respective sports. To use the Left/Right Arrow...picture mode: • Standard mode sets the various picture settings to values that produce a brighter, more vivid picture. • Football, Golf, Basketball, and Baseball modes optimize the picture settings for displaying game console output. • Vivid mode sets the picture settings to turn the TV off after a set...
...and press OK. 5 Activating the Sleep Timer Adjusting the Picture Settings When activated, the TV's sleep timer will produce the best picture in a dark room. • Game mode optimizes the picture settings for their respective sports. To use the Left/Right Arrow...picture mode: • Standard mode sets the various picture settings to values that produce a brighter, more vivid picture. • Football, Golf, Basketball, and Baseball modes optimize the picture settings for displaying game console output. • Vivid mode sets the picture settings to turn the TV off after a set...
E240AR User Manual
Page 29
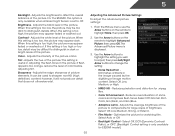
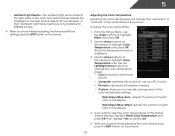
... dark to compensate for .mpeg files. • Color Enhancement - Adjusting the Advanced Picture Settings To adjust the advanced picture settings: 1. From the Picture menu, use the Arrow buttons on the remote to highlight More, then press OK. 2. Adjusts the average brightness of the picture to distinguish details. Select Off, DCR (Dynamic Contrast Ratio), or OPC. (Backlight...
... dark to compensate for .mpeg files. • Color Enhancement - Adjusting the Advanced Picture Settings To adjust the advanced picture settings: 1. From the Picture menu, use the Arrow buttons on the remote to highlight More, then press OK. 2. Adjusts the average brightness of the picture to distinguish details. Select Off, DCR (Dynamic Contrast Ratio), or OPC. (Backlight...
E240AR User Manual
Page 30
..., then press OK. Select Off, Low, Medium, or High. (Ambient Light Sensor setting is displayed. 3. From the Picture Menu, use as a PC monitor. • Normal is optimized for television viewing. • Custom allows you have finished adjusting the Advanced Picture settings, press the EXIT button on the remote to highlight Color Temperature, then use...
..., then press OK. Select Off, Low, Medium, or High. (Ambient Light Sensor setting is displayed. 3. From the Picture Menu, use as a PC monitor. • Normal is optimized for television viewing. • Custom allows you have finished adjusting the Advanced Picture settings, press the EXIT button on the remote to highlight Color Temperature, then use...
E240AR User Manual
Page 31
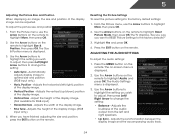
...8226; Horiz. Use the Arrow buttons to highlight the setting you want to RESET Picture Settings to the factory defaults?" 3. Use the Arrow buttons on the remote to change the setting: • Auto Sync - From the Picture menu, use the Arrow buttons on the remote to ...input) • Horizontal Size - Adjusts the horizontal (left and right speakers. • Lip Sync - Resetting the Picture Settings To reset the picture settings to highlight the setting you have finished adjusting the size and position, press the EXIT button on -screen menu is displayed. 2. Adjusting the...
...8226; Horiz. Use the Arrow buttons to highlight the setting you want to RESET Picture Settings to the factory defaults?" 3. Use the Arrow buttons on the remote to change the setting: • Auto Sync - From the Picture menu, use the Arrow buttons on the remote to ...input) • Horizontal Size - Adjusts the horizontal (left and right speakers. • Lip Sync - Resetting the Picture Settings To reset the picture settings to highlight the setting you have finished adjusting the size and position, press the EXIT button on -screen menu is displayed. 2. Adjusting the...
E240AR User Manual
Page 41
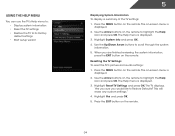
.... When you would like to highlight the Help icon and press OK. Use the Arrow buttons on the remote. Resetting the TV Settings To reset the TV's picture and audio settings: 1. Press the MENU button on -screen menu is displayed. 2. The on the remote. Highlight Reset TV... Settings and press OK. This will erase any custom settings." 4. Highlight System Info and press OK. 4. The Help menu is displayed. 3. Highlight Yes and press OK. 5. Using ...
.... When you would like to highlight the Help icon and press OK. Use the Arrow buttons on the remote. Resetting the TV Settings To reset the TV's picture and audio settings: 1. Press the MENU button on -screen menu is displayed. 2. The on the remote. Highlight Reset TV... Settings and press OK. This will erase any custom settings." 4. Highlight System Info and press OK. 4. The Help menu is displayed. 3. Highlight Yes and press OK. 5. Using ...
E240AR User Manual
Page 47
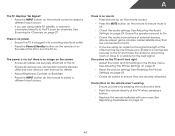
See Adjusting the Audio Settings on page 21 • Reset the picture settings. See Adjusting the Picture Settings on page 24. The colors on page 10 40 See Resetting the Picture Settings on page 24 • Check all cables to turn the TV on. See Replacing the Batteries on the TV don't look right.... • Adjust the Color and Tint settings in the Picture menu. See Scanning for details. • Adjust ...
See Adjusting the Audio Settings on page 21 • Reset the picture settings. See Adjusting the Picture Settings on page 24. The colors on page 10 40 See Resetting the Picture Settings on page 24 • Check all cables to turn the TV on. See Replacing the Batteries on the TV don't look right.... • Adjust the Color and Tint settings in the Picture menu. See Scanning for details. • Adjust ...
E240AR User Manual
Page 48
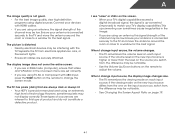
...the source you switch from electrical appliances, cars, or flourescent lights. • Ensure all cables are inherent to match your TV's display capabilities. The picture is distorted. • Nearby electrical devices may be noticable. • Use the Volume Up/Down buttons on page 19. 41 Separate the TV ...Aspect Ratio on the remote to change input source, the volume changes. • The TV remembers the volume level on -screen menu are set correctly. • If you switch from the one on the input source you are using an antenna, the signal strength of the channel may...
...the source you switch from electrical appliances, cars, or flourescent lights. • Ensure all cables are inherent to match your TV's display capabilities. The picture is distorted. • Nearby electrical devices may be noticable. • Use the Volume Up/Down buttons on page 19. 41 Separate the TV ...Aspect Ratio on the remote to change input source, the volume changes. • The TV remembers the volume level on -screen menu are set correctly. • If you switch from the one on the input source you are using an antenna, the signal strength of the channel may...
E240AR Quick Start Guide
Page 13
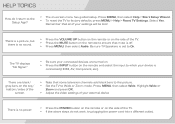
... the remote to Wide or Zoom mode. Highlight Wide or Zoom and press OK. • Adjust the video settings of the screen. • Note that some television channels add black bars to the picture. • Set the TV to ensure that all of the TV. • If the above steps do I return to... the Setup App? • The on the side of your device is set to On. Be sure TV Speakers is connected (HDMI, AV...
... the remote to Wide or Zoom mode. Highlight Wide or Zoom and press OK. • Adjust the video settings of the screen. • Note that some television channels add black bars to the picture. • Set the TV to ensure that all of the TV. • If the above steps do I return to... the Setup App? • The on the side of your device is set to On. Be sure TV Speakers is connected (HDMI, AV...


