
E240AR User Manual
Page 4
...'s warranty does not cover user abuse or improper installations. • The power cord must be used , use caution when moving your TV and easily accessible. • Only power of the marked voltage can result in any objects on the label. If repair is required when the apparatus has been damaged in fire or electric shock. • The wall socket should be operated...
...'s warranty does not cover user abuse or improper installations. • The power cord must be used , use caution when moving your TV and easily accessible. • Only power of the marked voltage can result in any objects on the label. If repair is required when the apparatus has been damaged in fire or electric shock. • The wall socket should be operated...
E240AR User Manual
Page 5
...plug or appliance coupler is used for an extended period of time, unplug the power cord. • To reduce risk of electric shock, do not touch the connector with wet hands. • Insert batteries in accordance with arrowhead symbol within the product's enclosure that contained in the operating instructions unless you are for use by qualified service... or odor becomes apparent, unplug the power cord and contact your TV, hold the AC/DC power adapter, not the cord. To reduce the risk of your TV may cause fire or electric shock. • Do not install your TV. - Do not expose ...
...plug or appliance coupler is used for an extended period of time, unplug the power cord. • To reduce risk of electric shock, do not touch the connector with wet hands. • Insert batteries in accordance with arrowhead symbol within the product's enclosure that contained in the operating instructions unless you are for use by qualified service... or odor becomes apparent, unplug the power cord and contact your TV, hold the AC/DC power adapter, not the cord. To reduce the risk of your TV may cause fire or electric shock. • Do not install your TV. - Do not expose ...
E240AR User Manual
Page 7
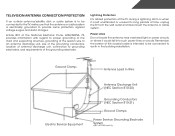
... is left unattended or unused for long periods of antenna discharge unit, connection to earth in wire to an antenna discharge unit, size of the grounding conductors, location of time, unplug the TV from the wall outlet and disconnect the antenna or cable system. Power Lines Do not locate the antenna near overhead light or power circuits, or where it is electrically grounded to...
... is left unattended or unused for long periods of antenna discharge unit, connection to earth in wire to an antenna discharge unit, size of the grounding conductors, location of time, unplug the TV from the wall outlet and disconnect the antenna or cable system. Power Lines Do not locate the antenna near overhead light or power circuits, or where it is electrically grounded to...
E240AR User Manual
Page 8
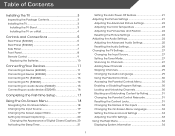
... the Advanced Picture Settings 22 Adjusting the Color Temperature 23 Adjusting the Picture Size and Position 24 Resetting the Picture Settings 24 Adjusting the Audio Settings 24 Adjusting the Advanced Audio Settings 25 Resetting the Audio Settings 26 Changing the TV Settings 27 Changing the Input Source 27 Setting the Tuner Mode 27 Scanning for Channels 27 Adding New Channels 28 Skipping Channels 29 Changing the Audio Language 29 Using the Parental Controls 30 Accessing the Parental Controls Menu 30 Enabling or Disabling Program Ratings 30 Locking and Unlocking Channels 30...
... the Advanced Picture Settings 22 Adjusting the Color Temperature 23 Adjusting the Picture Size and Position 24 Resetting the Picture Settings 24 Adjusting the Audio Settings 24 Adjusting the Advanced Audio Settings 25 Resetting the Audio Settings 26 Changing the TV Settings 27 Changing the Input Source 27 Setting the Tuner Mode 27 Scanning for Channels 27 Adding New Channels 28 Skipping Channels 29 Changing the Audio Language 29 Using the Parental Controls 30 Accessing the Parental Controls Menu 30 Enabling or Disabling Program Ratings 30 Locking and Unlocking Channels 30...
E240AR User Manual
Page 9
Resetting the TV Settings 34 Restoring the TV to Factory Default Settings 35 Using Setup Wizard 35 Using the Info Window 36 Using the USB Media Player 37 Using the USB Photo slideshow 37 Connecting a USB Thumb Drive to the TV 37 Playing USB Media 37 Troubleshooting & Technical Support 40 Specifications 43 Limited Warranty 45 Legal & Compliance 46 2
Resetting the TV Settings 34 Restoring the TV to Factory Default Settings 35 Using Setup Wizard 35 Using the Info Window 36 Using the USB Media Player 37 Using the USB Photo slideshow 37 Connecting a USB Thumb Drive to the TV 37 Playing USB Media 37 Troubleshooting & Technical Support 40 Specifications 43 Limited Warranty 45 Legal & Compliance 46 2

E240AR User Manual
Page 11
... the correct mount for the weight of this TV. For some wall mounts, you choose is clear of the TV. See Appendix B - Place the TV face-down on a wall: 1. Installing a TV on a flat, level, and stable surface. 5. Remove the stand by inserting and tightening the included screws. 4. Align the stand with your TV on a wall, you will need a wall mount. E240AR E320AR Screw Size: Screw Length: Hole Pattern: M4 12mm...
... the correct mount for the weight of this TV. For some wall mounts, you choose is clear of the TV. See Appendix B - Place the TV face-down on a wall: 1. Installing a TV on a flat, level, and stable surface. 5. Remove the stand by inserting and tightening the included screws. 4. Align the stand with your TV on a wall, you will need a wall mount. E240AR E320AR Screw Size: Screw Length: Hole Pattern: M4 12mm...
E240AR User Manual
Page 16
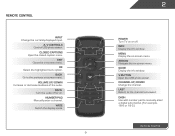
... previous on-screen menu. Menu Display the on -screen menu. V Button Open the USB photo viewer. Last Return to the channel last viewed. Volume Up/Down Increase or decrease loudness of the audio. WIDE Switch the display mode. 9 2 Power Turn TV on or off or on -screen menu. Guide Display the info window. Remote Control Input Change the currently-displayed input. Closed Captions Open the closed caption menu. Arrow Navigate the on -screen menu. A/V Controls Control USB photo viewer. Number Pad Manually enter a channel. Exit Close the on . Mute Turn the audio off .
... previous on-screen menu. Menu Display the on -screen menu. V Button Open the USB photo viewer. Last Return to the channel last viewed. Volume Up/Down Increase or decrease loudness of the audio. WIDE Switch the display mode. 9 2 Power Turn TV on or off or on -screen menu. Guide Display the info window. Remote Control Input Change the currently-displayed input. Closed Captions Open the closed caption menu. Arrow Navigate the on -screen menu. A/V Controls Control USB photo viewer. Number Pad Manually enter a channel. Exit Close the on . Mute Turn the audio off .
E240AR User Manual
Page 18
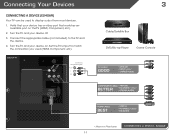
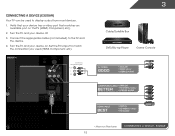
... your device has a video port that matches an available port on . Connect the appropriate cable (not included) to component inputs: Y/V L R 3 Cable/Satellite Box DVD/Blu-ray Player Game Console AV CABLE GOOD • ANALOG • VIDEO (480i)* • STEREO AUDIO COMPONENT CABLE • ANALOG BETTER • HD VIDEO (1080i)* • STEREO AUDIO HDMI CABLE BEST • DIGITAL • HD VIDEO (1080p)* • HD AUDIO * Maximum Resolution 11 CONNECTING A DEVICE - Set the TV's input to match the connection you used to display output from most devices. 1. E240AR
... your device has a video port that matches an available port on . Connect the appropriate cable (not included) to component inputs: Y/V L R 3 Cable/Satellite Box DVD/Blu-ray Player Game Console AV CABLE GOOD • ANALOG • VIDEO (480i)* • STEREO AUDIO COMPONENT CABLE • ANALOG BETTER • HD VIDEO (1080i)* • STEREO AUDIO HDMI CABLE BEST • DIGITAL • HD VIDEO (1080p)* • HD AUDIO * Maximum Resolution 11 CONNECTING A DEVICE - Set the TV's input to match the connection you used to display output from most devices. 1. E240AR
E240AR User Manual
Page 19
...) to component inputs: Y/V L R 3 Cable/Satellite Box DVD/Blu-ray Player Game Console AV CABLE GOOD • ANALOG • VIDEO (480i)* • STEREO AUDIO COMPONENT CABLE • ANALOG BETTER • HD VIDEO (1080i)* • STEREO AUDIO HDMI CABLE BEST • DIGITAL • HD VIDEO (1080p)* • HD AUDIO * Maximum Resolution 12 CONNECTING A DEVICE - Verify that your device off. 3. BACK OF TV Connect to the TV and the device. 4. Set the TV's input to match the connection you used to display output from...
...) to component inputs: Y/V L R 3 Cable/Satellite Box DVD/Blu-ray Player Game Console AV CABLE GOOD • ANALOG • VIDEO (480i)* • STEREO AUDIO COMPONENT CABLE • ANALOG BETTER • HD VIDEO (1080i)* • STEREO AUDIO HDMI CABLE BEST • DIGITAL • HD VIDEO (1080p)* • HD AUDIO * Maximum Resolution 12 CONNECTING A DEVICE - Verify that your device off. 3. BACK OF TV Connect to the TV and the device. 4. Set the TV's input to match the connection you used to display output from...
E240AR User Manual
Page 24
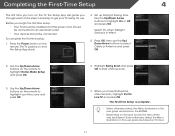
... installed and the power cord should be connected to Live TV and press OK. Set up Daylight Saving time. To complete the first-time setup: 1. Use the Up/Down Arrow buttons to start channel scan. 7. The First-Time Setup is in effect. 5. Unless otherwise stated, the Menu illustrations in this user guide are based on the E240AR. • Depending on TV input. 17 Press OK, then use . The TV powers on the remote...
... installed and the power cord should be connected to Live TV and press OK. Set up Daylight Saving time. To complete the first-time setup: 1. Use the Up/Down Arrow buttons to start channel scan. 7. The First-Time Setup is in effect. 5. Unless otherwise stated, the Menu illustrations in this user guide are based on the E240AR. • Depending on TV input. 17 Press OK, then use . The TV powers on the remote...
E240AR User Manual
Page 26
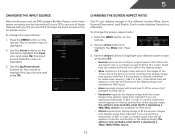
... is displayed. 2. 5 Changing the Input Source External devices such as DVD players, Blu-Ray Players, and video game consoles can display images in the on-screen menu. Use the Arrow buttons on the remote to highlight your TV, you are watching widescreen (1.85:1 or 2.35:1) content, black bars will still appear on the top and bottom of the screen. Each mode displays the picture differently. Use the Arrow buttons to highlight the Input icon...
... is displayed. 2. 5 Changing the Input Source External devices such as DVD players, Blu-Ray Players, and video game consoles can display images in the on-screen menu. Use the Arrow buttons on the remote to highlight your TV, you are watching widescreen (1.85:1 or 2.35:1) content, black bars will still appear on the top and bottom of the screen. Each mode displays the picture differently. Use the Arrow buttons to highlight the Input icon...
E240AR User Manual
Page 29
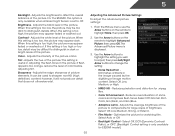
.../Right Arrow buttons to highlight Advanced Picture, then press OK.The Advanced Picture menu is too low, the picture may be too dark to distinguish in the image caused by the digitizing of the picture. Reduces pixelation and distortion for watching film. Select Off, Normal, Rich Color, Grn/Flesh, and Grn/Blue. • Adaptive Luma - 5 Backlight - Adjusts the white level of...
.../Right Arrow buttons to highlight Advanced Picture, then press OK.The Advanced Picture menu is too low, the picture may be too dark to distinguish in the image caused by the digitizing of the picture. Reduces pixelation and distortion for watching film. Select Off, Normal, Rich Color, Grn/Flesh, and Grn/Blue. • Adaptive Luma - 5 Backlight - Adjusts the white level of...
E240AR User Manual
Page 32
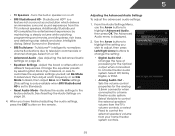
... connected to control the external speakers' volume from the TV's internal speakers. Select Off, Dolby Digital, or PCM. • Analog Audio Out Sets the volume control properties for the Optical output when connected to change the setting: • Digital Audio Out Changes the type of different frequencies. 5 • TV Speakers - When you wish to adjust, then press Left/Right Arrow buttons to a home theater audio system. Select Variable to control the external speakers' volume from the TV's volume controls, or select Fixed...
... connected to control the external speakers' volume from the TV's internal speakers. Select Off, Dolby Digital, or PCM. • Analog Audio Out Sets the volume control properties for the Optical output when connected to change the setting: • Digital Audio Out Changes the type of different frequencies. 5 • TV Speakers - When you wish to adjust, then press Left/Right Arrow buttons to a home theater audio system. Select Variable to control the external speakers' volume from the TV's volume controls, or select Fixed...
E240AR User Manual
Page 34
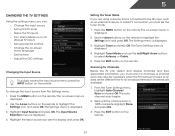
... information, you can: • Change the input source • Set up the TV tuner • Name the TV inputs • Turn Game Mode on or off. (Except TV input) • Set up parental controls • Change the on-screen menu language • Set the time • Adjust the CEC settings Changing the Input Source To quickly access the input source menu, press the INPUT button on -screen menu is displayed. 4. The Input Source Selection menu is connected to select Antenna or Cable. 5. From the Tuner Settings menu, highlight Auto Channel Scan and press OK. Highlight...
... information, you can: • Change the input source • Set up the TV tuner • Name the TV inputs • Turn Game Mode on or off. (Except TV input) • Set up parental controls • Change the on-screen menu language • Set the time • Adjust the CEC settings Changing the Input Source To quickly access the input source menu, press the INPUT button on -screen menu is displayed. 4. The Input Source Selection menu is connected to select Antenna or Cable. 5. From the Tuner Settings menu, highlight Auto Channel Scan and press OK. Highlight...
E240AR User Manual
Page 47
... are connected correctly. Ensure the speakers are set to On. • Check the audio connections of external devices (Blu-ray player, game console, cable/satellite box) that are connected to ensure they are securely attached. See Adjusting the Picture Settings on the TV don't look right. • Adjust the Color and Tint settings in the Picture menu. The buttons on the remote aren't working electrical outlet. • Press the Power/Standby button on the remote or...
... are connected correctly. Ensure the speakers are set to On. • Check the audio connections of external devices (Blu-ray player, game console, cable/satellite box) that are connected to ensure they are securely attached. See Adjusting the Picture Settings on the TV don't look right. • Adjust the Color and Tint settings in the Picture menu. The buttons on the remote aren't working electrical outlet. • Press the Power/Standby button on the remote or...
E240AR User Manual
Page 48
... viewing mode on the remote to a window for the best signal. The display image does not cover the entire screen. • If you are in the image. • If you switch from , the difference may be noticable. • Use the Volume Up/Down buttons on each input source. A The image quality is not good. • For the best image quality, view high-definition programs using an antenna, the signal...
... viewing mode on the remote to a window for the best signal. The display image does not cover the entire screen. • If you are in the image. • If you switch from , the difference may be noticable. • Use the Volume Up/Down buttons on each input source. A The image quality is not good. • For the best image quality, view high-definition programs using an antenna, the signal...
E240AR User Manual
Page 51
... operation, improper voltage supply or power surges, signal issues, damages from the unit before it is serviced, regardless of user data is capable of the limited "ONE YEAR WARRANTY" on the box. 44 PRE-AUTHORIZATION MUST BE OBTAINED BEFORE SENDING ANY PRODUCT TO A VIZIO SERVICE CENTER. VIZIO is not responsible for restoring all personal information from shipping, acts of God, any repairs attempted...
... operation, improper voltage supply or power surges, signal issues, damages from the unit before it is serviced, regardless of user data is capable of the limited "ONE YEAR WARRANTY" on the box. 44 PRE-AUTHORIZATION MUST BE OBTAINED BEFORE SENDING ANY PRODUCT TO A VIZIO SERVICE CENTER. VIZIO is not responsible for restoring all personal information from shipping, acts of God, any repairs attempted...
E240AR Quick Start Guide
Page 2
... cart, stand, tripod, bracket, or table specified by qualified service personnel only. To avoid electric shock, avoid handling the power cord during a lightning storm or when it from the apparatus. • Only use of your TV may cause fire or electric shock. • Do not install your TV and easily accessible. • Only power of important operating and maintenance (servicing) instructions in any...
... cart, stand, tripod, bracket, or table specified by qualified service personnel only. To avoid electric shock, avoid handling the power cord during a lightning storm or when it from the apparatus. • Only use of your TV may cause fire or electric shock. • Do not install your TV and easily accessible. • Only power of important operating and maintenance (servicing) instructions in any...
E240AR Quick Start Guide
Page 13
... off. • Press MENU, then select Audio. Press MENU, then select Wide. HELP TOPICS How do not work, try plugging the power cord into a different outlet. There is a picture, but there is connected (HDMI, AV, Component, etc). The TV displays "No Signal." • Be sure your external device There is set to Wide or Zoom mode. Press MENU, then select Help > Start Setup Wizard. • To reset the TV to which...
... off. • Press MENU, then select Audio. Press MENU, then select Wide. HELP TOPICS How do not work, try plugging the power cord into a different outlet. There is a picture, but there is connected (HDMI, AV, Component, etc). The TV displays "No Signal." • Be sure your external device There is set to Wide or Zoom mode. Press MENU, then select Help > Start Setup Wizard. • To reset the TV to which...
E240AR Quick Start Guide
Page 15
...: cosmetic damage, normal wear and tear, improper operation, improper voltage supply or power surges, signal issues, damages from warranty service or replacement, whichever is determined to the customer. Replacement parts and Products are not covered. THERE ARE NO EXPRESS WARRANTIES OTHER THAN THOSE LISTED OR DESCRIBED ABOVE. VIZIO SHALL NOT BE RESPONSIBLE FOR LOSS OF USE, LOSS OF INFORMATION OR DATA, COMMERCIAL LOSS, LOST...
...: cosmetic damage, normal wear and tear, improper operation, improper voltage supply or power surges, signal issues, damages from warranty service or replacement, whichever is determined to the customer. Replacement parts and Products are not covered. THERE ARE NO EXPRESS WARRANTIES OTHER THAN THOSE LISTED OR DESCRIBED ABOVE. VIZIO SHALL NOT BE RESPONSIBLE FOR LOSS OF USE, LOSS OF INFORMATION OR DATA, COMMERCIAL LOSS, LOST...


