

E190VA Quick Start Guide
Page 3
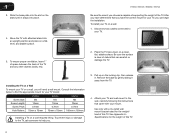
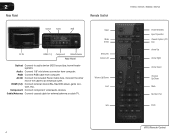
... . Last: Return to view. Press the button that corresponds to the input device you wish to the channel last viewed. With each press of the TV's audio. Press repeatedly to change . Arrow : Navigate the on -screen menu or select highlighted menu option. Menu/OK: Display the on -screen menu ...Number Pad to to manually enter a channel. With each press of the button, the TV will increase or decrease by one. Power/Standby: Turn the TV on or off or on -screen menu. When mute is activated, the TV's audio is turned off. Number Pad: Use the number pad to manually enter a...
... . Last: Return to view. Press the button that corresponds to the input device you wish to the channel last viewed. With each press of the TV's audio. Press repeatedly to change . Arrow : Navigate the on -screen menu or select highlighted menu option. Menu/OK: Display the on -screen menu ...Number Pad to to manually enter a channel. With each press of the button, the TV will increase or decrease by one. Power/Standby: Turn the TV on or off or on -screen menu. When mute is activated, the TV's audio is turned off. Number Pad: Use the number pad to manually enter a...
E190VA Quick Start Guide
Page 4
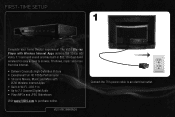
...802.11n dual-band wireless for easy access to movies, TV shows, music and more from the Internet. • Delivers Cinematic High-Definition Picture • Exceptional Full HD 1080p Performance • Streams Movies, Music, and More with VIZIO Wireless Internet Apps • Built-In Wi-Fi - ...802.11n • Up to 7.1 Channel Digital Audio • Plays MP3s and JPEG Slideshows Visit www.VIZIO.com to an electrical outlet. VIZIO RECOMMENDS Connect the TV's power cable to purchase online. FIRST-TIME...
...802.11n dual-band wireless for easy access to movies, TV shows, music and more from the Internet. • Delivers Cinematic High-Definition Picture • Exceptional Full HD 1080p Performance • Streams Movies, Music, and More with VIZIO Wireless Internet Apps • Built-In Wi-Fi - ...802.11n • Up to 7.1 Channel Digital Audio • Plays MP3s and JPEG Slideshows Visit www.VIZIO.com to an electrical outlet. VIZIO RECOMMENDS Connect the TV's power cable to purchase online. FIRST-TIME...
E190VA Quick Start Guide
Page 5
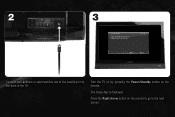
The Setup App is displayed. Welcome Next EXIT Exit Connect your channels. Press the Right Arrow button on the remote to go to the coaxial port on the remote. 2 3 Initial Setup Allow the VIZIO setup Wizard to help you tune your antenna or cable/satellite box to the next screen. Turn the TV on by pressing the Power/Standby button on the back of the TV.
The Setup App is displayed. Welcome Next EXIT Exit Connect your channels. Press the Right Arrow button on the remote to go to the coaxial port on the remote. 2 3 Initial Setup Allow the VIZIO setup Wizard to help you tune your antenna or cable/satellite box to the next screen. Turn the TV on by pressing the Power/Standby button on the back of the TV.
E190VA Quick Start Guide
Page 7
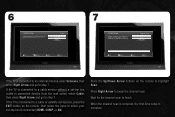
.../Down Arrow buttons on the remote, then select the input to which your cable or antenna to the DTV/TV input Channel Scan Scan Skip Scan Back Select Next EXIT Exit If the TV is connected to an external antenna, select Antenna, then press Right Arrow and go to finish. Wait for... directly from the wall outlet) select Cable, then press Right Arrow and go to a cable service without a set-top box (cable is complete. If the TV is connected to a cable or satellite set-top box, press the EXIT button on the remote to begin the channel scan. 6 Initial Setup Please select...
.../Down Arrow buttons on the remote, then select the input to which your cable or antenna to the DTV/TV input Channel Scan Scan Skip Scan Back Select Next EXIT Exit If the TV is connected to an external antenna, select Antenna, then press Right Arrow and go to finish. Wait for... directly from the wall outlet) select Cable, then press Right Arrow and go to a cable service without a set-top box (cable is complete. If the TV is connected to a cable or satellite set-top box, press the EXIT button on the remote to begin the channel scan. 6 Initial Setup Please select...
E190VA Quick Start Guide
Page 8
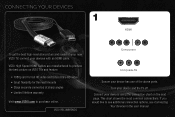
.... Turn your device has one of the above ports. This chart shows the most common connections. VIZIO High Speed HDMI Cables are manufactured to produce the best picture on VIZIO TVs and feature: • 1080p and for full HD video and future Ultra-HD video • Great flexibility for thin wall ... Connecting Your Devices in the user manual. If you would like to purchase online. Connect your devices using the connection chart on your new VIZIO TV, connect your devices with an HDMI cable. CONNECTING YOUR DEVICES 1 HDMI To get the best high-resolution picture and sound on the next page....
.... Turn your device has one of the above ports. This chart shows the most common connections. VIZIO High Speed HDMI Cables are manufactured to produce the best picture on VIZIO TVs and feature: • 1080p and for full HD video and future Ultra-HD video • Great flexibility for thin wall ... Connecting Your Devices in the user manual. If you would like to purchase online. Connect your devices using the connection chart on your new VIZIO TV, connect your devices with an HDMI cable. CONNECTING YOUR DEVICES 1 HDMI To get the best high-resolution picture and sound on the next page....
E190VA Quick Start Guide
Page 10
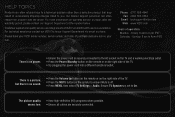
...Press the Volume Up button on the remote or on the right side of VIZIO's commitment to you. Ensure TV Speakers is off. • Press MENU, then select TV Settings > Audio. For technical assistance contact our VIZIO Technical Support Department via email or phone. Sunday: 8 am to On. ...Saturday - Phone: (877) 698-4946 Fax: (949) 585-9563 Email: techsupport@vizio.com Web: www.VIZIO.com Hours of purchase available before your call. Customer support and quality service are integral parts of the TV. • Press the MUTE button on warranty service or repair, after the warranty ...
...Press the Volume Up button on the remote or on the right side of VIZIO's commitment to you. Ensure TV Speakers is off. • Press MENU, then select TV Settings > Audio. For technical assistance contact our VIZIO Technical Support Department via email or phone. Sunday: 8 am to On. ...Saturday - Phone: (877) 698-4946 Fax: (949) 585-9563 Email: techsupport@vizio.com Web: www.VIZIO.com Hours of purchase available before your call. Customer support and quality service are integral parts of the TV. • Press the MUTE button on warranty service or repair, after the warranty ...
E190VA Quick Start Guide
Page 11
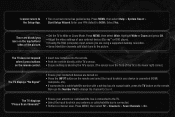
... connected. • Perform a channel scan. Highlight Wide or Zoom and press OK. • Adjust the video settings of the picture. • Set the TV to Wide or Zoom Mode. Press MENU, then select Help > System Reset > the Setup App. Select Yes. Press MENU, then select Wide. Press MENU,... then select TV > Channels > Scan Channels > On. There are using the RGB (computer) input, ensure you are black/gray bars on the top/bottom/ sides of your...
... connected. • Perform a channel scan. Highlight Wide or Zoom and press OK. • Adjust the video settings of the picture. • Set the TV to Wide or Zoom Mode. Press MENU, then select Help > System Reset > the Setup App. Select Yes. Press MENU, then select Wide. Press MENU,... then select TV > Channels > Scan Channels > On. There are using the RGB (computer) input, ensure you are black/gray bars on the top/bottom/ sides of your...

E261VA User Manual
Page 4
... replacement of the obsolete outlet. • Protect the power cord from being damaged, the following safety instructions before connecting other components to your TV. • Read these instructions. • Keep these instructions. • Heed all warnings. • Follow all servicing to qualified service ... or other apparatus (including amplifiers) that may be operated only from the apparatus. • Only use , and maintenance of your TV cabinet. Install in a bookcase or cabinet unless proper ventilation is intended to alert the user to the presence of electric shock to avoid...
... replacement of the obsolete outlet. • Protect the power cord from being damaged, the following safety instructions before connecting other components to your TV. • Read these instructions. • Keep these instructions. • Heed all warnings. • Follow all servicing to qualified service ... or other apparatus (including amplifiers) that may be operated only from the apparatus. • Only use , and maintenance of your TV cabinet. Install in a bookcase or cabinet unless proper ventilation is intended to alert the user to the presence of electric shock to avoid...
E261VA User Manual
Page 5
...electric shock, do so. Incorrect polarities may result in environments with heavy dust or high humidity. Liquid sprays or any way. - Your TV is used as sunshine, fire or the like. • If any abnormality occurs. Ensure that contained in the operating instructions unless you to...expose batteries to qualified service personnel. • WARNING: Keep your dealer for use of time. Unplug the power cord immediately and contact your TV away from damage due to power surges. • Do not attempt to persons. 5 To avoid electric shock, avoid handling the power cord ...
...electric shock, do so. Incorrect polarities may result in environments with heavy dust or high humidity. Liquid sprays or any way. - Your TV is used as sunshine, fire or the like. • If any abnormality occurs. Ensure that contained in the operating instructions unless you to...expose batteries to qualified service personnel. • WARNING: Keep your dealer for use of time. Unplug the power cord immediately and contact your TV away from damage due to power surges. • Do not attempt to persons. 5 To avoid electric shock, avoid handling the power cord ...
E261VA User Manual
Page 6
...the antenna near overhead light or power circuits, or where it is left unattended or unused for long periods of time, unplug the TV from the wall outlet and disconnect the antenna or cable system. Analog-only television sets that the antenna or cable system is electrically ...to receive low power, Class A or translator television stations and with a built-in the building installation. Lightning Protection For added protection of the TV during a lightning storm or when it could fall into such power lines or circuits. For additional information, please contact the parties listed below, as...
...the antenna near overhead light or power circuits, or where it is left unattended or unused for long periods of time, unplug the TV from the wall outlet and disconnect the antenna or cable system. Analog-only television sets that the antenna or cable system is electrically ...to receive low power, Class A or translator television stations and with a built-in the building installation. Lightning Protection For added protection of the TV during a lightning storm or when it could fall into such power lines or circuits. For additional information, please contact the parties listed below, as...
E261VA User Manual
Page 7
... 11 Scanning for New or Additional Channels 11 Scanning for Channels 12 Customizing Channel Names 12 Changing the On-Screen Menu Language 13 Setting the TV's Date and Time 13 Setting the Time Zone 13 Adjusting the Time for Daylight Savings 14 Enabling or Disabling Automatic Date and Time ...Updates 14 Setting the Date and Time 14 Adjusting the TV Settings for Use with A PC 15 Using the Other Menu Settings 16 Navigating the On-Screen Menu 16 Setting the Sleep Timer 16 Viewing a ...
... 11 Scanning for New or Additional Channels 11 Scanning for Channels 12 Customizing Channel Names 12 Changing the On-Screen Menu Language 13 Setting the TV's Date and Time 13 Setting the Time Zone 13 Adjusting the Time for Daylight Savings 14 Enabling or Disabling Automatic Date and Time ...Updates 14 Setting the Date and Time 14 Adjusting the TV Settings for Use with A PC 15 Using the Other Menu Settings 16 Navigating the On-Screen Menu 16 Setting the Sleep Timer 16 Viewing a ...
E261VA User Manual
Page 8
...Parental Control Passcode 27 Resetting the Content Locks 27 Viewing System Info and Resetting to Factory Defaults 28 Displaying System Information 28 Restoring the TV to the Factory Default Settingss 28 Restarting the Setup App 28 Setting Up Closed Captioning 29 Changing the Appearance of Digital Closed Captions 29... Troubleshooting & Technical Support 30 The TV displays "No Signal 30 There is no power 30 The power is on, but there is no image on the screen 30 There ...
...Parental Control Passcode 27 Resetting the Content Locks 27 Viewing System Info and Resetting to Factory Defaults 28 Displaying System Information 28 Restoring the TV to the Factory Default Settingss 28 Restarting the Setup App 28 Setting Up Closed Captioning 29 Changing the Appearance of Digital Closed Captions 29... Troubleshooting & Technical Support 30 The TV displays "No Signal 30 There is no power 30 The power is on, but there is no image on the screen 30 There ...
E261VA User Manual
Page 9
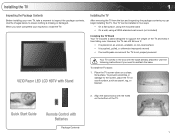
..., or non-level surface • It is pushed, pulled, or otherwise improperly moved • If an earthquake occurs and the TV is not properly secured VIZIO Razor LED LCD HDTV with Stand Your TV comes in two ways: • On a flat surface, using the included stand • On a wall, using a VESA-standard wall...
..., or non-level surface • It is pushed, pulled, or otherwise improperly moved • If an earthquake occurs and the TV is not properly secured VIZIO Razor LED LCD HDTV with Stand Your TV comes in two ways: • On a flat surface, using the included stand • On a wall, using a VESA-standard wall...
E261VA User Manual
Page 10
...stable surface. Use only with attached stand into the slot on the stand until it away from the TV. 4. Installing the TV on a Wall To mount your TV on a wall, you can scratch or damage the TV. Remove the base by gently sliding it snaps into place. 4. See Appendix A Specifications for the ...a wall requires lifting. Consult the information below to help you choose is clear of this TV. After you have the correct mount for your TV. 5. Pull up on a clean, flat, stable surface. Place the TV face-down on the locking clip, then release it. Be sure the surface is capable of...
...stable surface. Use only with attached stand into the slot on the stand until it away from the TV. 4. Installing the TV on a Wall To mount your TV on a wall, you can scratch or damage the TV. Remove the base by gently sliding it snaps into place. 4. See Appendix A Specifications for the ...a wall requires lifting. Consult the information below to help you choose is clear of this TV. After you have the correct mount for your TV. 5. Pull up on a clean, flat, stable surface. Place the TV face-down on the locking clip, then release it. Be sure the surface is capable of...
E261VA User Manual
Page 11
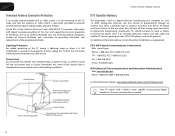
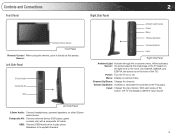
...through the on -screen menu. When activated, Sensor: the sensor adjusts the brightness of the TV based on the light level in the room. (On E220VA, E260VA, and E261VA, the sensor is... on the front of the button, the TV will display a different input source Left Side Panel 3.5mm Audio: Connect headphones, powered speakers, or other... thumb drive to play photo slideshow or to update firmware. 3 With each press of the TV.) Power: Turn the TV on or off. Controls and Connections Front Panel Remote Control Sensor Front Panel Remote Control When...
...through the on -screen menu. When activated, Sensor: the sensor adjusts the brightness of the TV based on the light level in the room. (On E220VA, E260VA, and E261VA, the sensor is... on the front of the button, the TV will display a different input source Left Side Panel 3.5mm Audio: Connect headphones, powered speakers, or other... thumb drive to play photo slideshow or to update firmware. 3 With each press of the TV.) Power: Turn the TV on or off. Controls and Connections Front Panel Remote Control Sensor Front Panel Remote Control When...
E261VA User Manual
Page 12
...(1,2) Component Cable/Antenna Rear Panel Optical: Connect to an electrical outlet. Connect the other end of the cable to audio device (VIZIO sound bar, home theater system). Component: Connect component video/audio devices. Audio: Connect 1/8" mini stereo connector from computer. Cable/...Antenna: Connect coaxial cable for external antenna or cable TV. RGB: Connect RGB cable from computer. HDMI (1,2): Connect external device (Blu-Ray/DVD player, game console, etc). Input Wide Sleep...
...(1,2) Component Cable/Antenna Rear Panel Optical: Connect to an electrical outlet. Connect the other end of the cable to audio device (VIZIO sound bar, home theater system). Component: Connect component video/audio devices. Audio: Connect 1/8" mini stereo connector from computer. Cable/...Antenna: Connect coaxial cable for external antenna or cable TV. RGB: Connect RGB cable from computer. HDMI (1,2): Connect external device (Blu-Ray/DVD player, game console, etc). Input Wide Sleep...
E261VA User Manual
Page 13
...timer's duration will increase or decrease by one. Press repeatedly to change . Dash (-): Use to the channel last viewed. Power/Standby: Turn the TV on or off or on. Up/Down: Channel Change the channel. Replace the battery cover. • Use only good quality batteries. • Inserting... the batteries incorrectly may cause a fire or result in injury. • Dispose of the TV's audio. Input (Specific): Change the input device. Mute: Turn the sound off . When mute is activated, the TV's audio is turned off. Info: Display the Info Window. Number Pad: Use the number pad...
...timer's duration will increase or decrease by one. Press repeatedly to change . Dash (-): Use to the channel last viewed. Power/Standby: Turn the TV on or off or on. Up/Down: Channel Change the channel. Replace the battery cover. • Use only good quality batteries. • Inserting... the batteries incorrectly may cause a fire or result in injury. • Dispose of the TV's audio. Input (Specific): Change the input device. Mute: Turn the sound off . When mute is activated, the TV's audio is turned off. Info: Display the Info Window. Number Pad: Use the number pad...
E261VA User Manual
Page 14
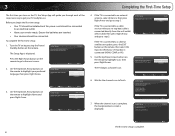
... the channel scan is complete, the Congratulations screen is complete. 6 3 Completing the First-Time Setup The first time you turn on the TV, the Setup App will take a few minutes to complete. Initial Setup Allow the VIZIO setup Wizard to help you through each of the steps necessary to get your... TV ready for the channel scan to an electrical outlet. • Have your language: Language English Español Français 3. ...
... the channel scan is complete, the Congratulations screen is complete. 6 3 Completing the First-Time Setup The first time you turn on the TV, the Setup App will take a few minutes to complete. Initial Setup Allow the VIZIO setup Wizard to help you through each of the steps necessary to get your... TV ready for the channel scan to an electrical outlet. • Have your language: Language English Español Français 3. ...
E261VA User Manual
Page 15
... to match your device on the PC is securely connected. 3. Press OK. 6. For example, if you have the corresponding cable. Turn the TV on by pressing the Power/Standby button on -screen menu. When you have determined the best available connection type on the next page. Use the... AV Required Device Ports 2. Verify that matches the available port. RGB Make sure the desktop resolution on . 5. Ensure you are off. 2. Turn your TV's resolution. (See Appendix A - DVD Player with an HDMI port, be easily connected to an external device: • DVD or Blu-Ray player •...
... to match your device on the PC is securely connected. 3. Press OK. 6. For example, if you have the corresponding cable. Turn the TV on by pressing the Power/Standby button on -screen menu. When you have determined the best available connection type on the next page. Use the... AV Required Device Ports 2. Verify that matches the available port. RGB Make sure the desktop resolution on . 5. Ensure you are off. 2. Turn your TV's resolution. (See Appendix A - DVD Player with an HDMI port, be easily connected to an external device: • DVD or Blu-Ray player •...

E261VA User Manual
Page 16
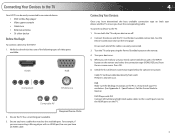
4 Select one of the connection types. BEST BETTER HDMI RF/ COAXIAL RGB COMPONENT GOOD COMPOSITE AV 8 E190VA / E220VA / E260VA / E261VA Select One: OR OR OR OR DIGITAL DIGITAL / ANALOG ANALOG ANALOG ANALOG Device Connection Chart Use the cable(s) shown to connect the TV to your device.
4 Select one of the connection types. BEST BETTER HDMI RF/ COAXIAL RGB COMPONENT GOOD COMPOSITE AV 8 E190VA / E220VA / E260VA / E261VA Select One: OR OR OR OR DIGITAL DIGITAL / ANALOG ANALOG ANALOG ANALOG Device Connection Chart Use the cable(s) shown to connect the TV to your device.


