

E261VA User Manual
Page 4
...are provided for replacement of the obsolete outlet. • Protect the power cord from being damaged, the following safety instructions before operating your TV close to qualified service personnel. This is designed and manufactured to persons. Important Safety Instructions Your DTV is a safety feature....form in electric shock or fire. If the provided plug does not fit into the apparatus, the apparatus has been exposed 4 E190VA / E220VA / E260VA / E261VA to rain or moisture, does not operate normally or has been dropped. • Unplug the power cord before connecting ...
...are provided for replacement of the obsolete outlet. • Protect the power cord from being damaged, the following safety instructions before operating your TV close to qualified service personnel. This is designed and manufactured to persons. Important Safety Instructions Your DTV is a safety feature....form in electric shock or fire. If the provided plug does not fit into the apparatus, the apparatus has been exposed 4 E190VA / E220VA / E260VA / E261VA to rain or moisture, does not operate normally or has been dropped. • Unplug the power cord before connecting ...
E261VA User Manual
Page 5
...power surges. • Do not attempt to repair or service your TV changes substantially. • This apparatus shall not be exposed to persons. 5 These servicing instructions are qualified to rain or other hazards. E190VA / E220VA / E260VA / E261VA • Do not overload power strips and ...extension cords. Overloading can result in fire or electric shock. • The wall socket should be installed near your TV and easily accessible. • Only power of time...
...power surges. • Do not attempt to repair or service your TV changes substantially. • This apparatus shall not be exposed to persons. 5 These servicing instructions are qualified to rain or other hazards. E190VA / E220VA / E260VA / E261VA • Do not overload power strips and ...extension cords. Overloading can result in fire or electric shock. • The wall socket should be installed near your TV and easily accessible. • Only power of time...
E261VA User Manual
Page 6
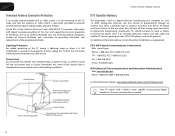
...built-in tuner capable of the coaxial cable is left unattended or unused for long periods of the grounding electrode. E190VA / E220VA / E260VA / E261VA Television Antenna Connection Protection If an outside antenna/satellite dish or cable system is to be connected to earth in ... Ground Clamp Antenna Lead In Wire DTV Transition Advisory The nationwide switch to digital-only broadcasting. Lightning Protection For added protection of the TV during a lightning storm or when it could fall into such power lines or circuits. Article 810 of the National Electrical Code, ANSI...
...built-in tuner capable of the coaxial cable is left unattended or unused for long periods of the grounding electrode. E190VA / E220VA / E260VA / E261VA Television Antenna Connection Protection If an outside antenna/satellite dish or cable system is to be connected to earth in ... Ground Clamp Antenna Lead In Wire DTV Transition Advisory The nationwide switch to digital-only broadcasting. Lightning Protection For added protection of the TV during a lightning storm or when it could fall into such power lines or circuits. Article 810 of the National Electrical Code, ANSI...
E261VA User Manual
Page 8
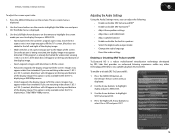
...Control Passcode 27 Resetting the Content Locks 27 Viewing System Info and Resetting to Factory Defaults 28 Displaying System Information 28 Restoring the TV to the Factory Default Settingss 28 Restarting the Setup App 28 Setting Up Closed Captioning 29 Changing the Appearance of Digital Closed ...Parts and Labor 34 Type of Service 34 Limitations and Exclusions 34 Personal Data 34 Zero Bright Pixel Defect Guarantee 34 8 E190VA / E220VA / E260VA / E261VA Legal & Compliance 35 FCC Class B Radio Interference Statement 35 Notice...35 FCC warning 35 Caution 35 Open Source Software Notice...
...Control Passcode 27 Resetting the Content Locks 27 Viewing System Info and Resetting to Factory Defaults 28 Displaying System Information 28 Restoring the TV to the Factory Default Settingss 28 Restarting the Setup App 28 Setting Up Closed Captioning 29 Changing the Appearance of Digital Closed ...Parts and Labor 34 Type of Service 34 Limitations and Exclusions 34 Personal Data 34 Zero Bright Pixel Defect Guarantee 34 8 E190VA / E220VA / E260VA / E261VA Legal & Compliance 35 FCC Class B Radio Interference Statement 35 Notice...35 FCC warning 35 Caution 35 Open Source Software Notice...
E261VA User Manual
Page 10
...: Screw Size: Screw Length: Screw Pitch: Hole Pattern: E190VA M4 10mm 0.7mm 75mm x 75mm E220VA M4 10mm 0.7mm 75mm x 75mm E260VA M4 10mm 0.7mm 100mm x 100mm Installing a TV on a clean, flat, stable surface. Pull up on a flat, level, and stable surface. Use only with attached stand into the ... debris that can begin the installation. To ensure proper ventilation, leave 1" of space between the back of the TV. Remove the base by gently sliding it away from the TV. 4. E190VA / E220VA / E260VA / E261VA Be sure the mount you . 3. Consult the information below to help you choose is ...
...: Screw Size: Screw Length: Screw Pitch: Hole Pattern: E190VA M4 10mm 0.7mm 75mm x 75mm E220VA M4 10mm 0.7mm 75mm x 75mm E260VA M4 10mm 0.7mm 100mm x 100mm Installing a TV on a clean, flat, stable surface. Pull up on a flat, level, and stable surface. Use only with attached stand into the ... debris that can begin the installation. To ensure proper ventilation, leave 1" of space between the back of the TV. Remove the base by gently sliding it away from the TV. 4. E190VA / E220VA / E260VA / E261VA Be sure the mount you . 3. Consult the information below to help you choose is ...
E261VA User Manual
Page 11
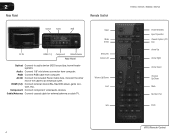
When activated, Sensor: the sensor adjusts the brightness of the TV based on the light level in the room. (On E220VA, E260VA, and E261VA, the sensor is on the front of the TV.) Power: Turn the TV on -screen menu. Menu: Display on or off. Input: Change the input device. Channel Up/Down: Change ...the channel. With each press of the TVs audio. Sensor: Left Side Panel 3....
When activated, Sensor: the sensor adjusts the brightness of the TV based on the light level in the room. (On E220VA, E260VA, and E261VA, the sensor is on the front of the TV.) Power: Turn the TV on -screen menu. Menu: Display on or off. Input: Change the input device. Channel Up/Down: Change ...the channel. With each press of the TVs audio. Sensor: Left Side Panel 3....
E261VA User Manual
Page 12
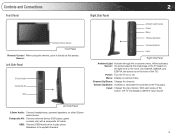
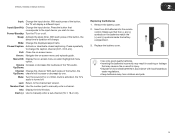
...the cable to audio device (VIZIO sound bar, home theater system). HDMI (1,2): Connect external device (Blu-Ray/DVD player, game console, etc). Component: Connect component video/audio devices. Cable/Antenna: Connect coaxial cable for external antenna or cable TV. Audio: Connect 1/8" mini stereo... connector from computer. Input Wide Sleep Menu/OK Arrow Left Volume Up/Down Last Info 4 E190VA / E220VA / E260VA / E261VA Power/Standby Input (Specific) Closed Caption (CC...
...the cable to audio device (VIZIO sound bar, home theater system). HDMI (1,2): Connect external device (Blu-Ray/DVD player, game console, etc). Component: Connect component video/audio devices. Cable/Antenna: Connect coaxial cable for external antenna or cable TV. Audio: Connect 1/8" mini stereo... connector from computer. Input Wide Sleep Menu/OK Arrow Left Volume Up/Down Last Info 4 E190VA / E220VA / E260VA / E261VA Power/Standby Input (Specific) Closed Caption (CC...
E261VA User Manual
Page 13
...decrease the loudness of the button, the sleep timer's duration will change the caption channel (CC1, CC2, etc). With each press of the TV's audio. Dash (-): Use to the channel last viewed. Replace the battery cover. • Use only good quality batteries. • Inserting ...8226; Dispose of the button, the Up/Down: channel will display a different input. E190VA / E220VA / E260VA / E261VA 2 Input: Change the input device. Wide: Change the displayed aspect ratio. When mute is activated, the TV's audio is turned off. Last: Return to manually enter a sub-channel (18-1, 18-2, etc...
...decrease the loudness of the button, the sleep timer's duration will change the caption channel (CC1, CC2, etc). With each press of the TV's audio. Dash (-): Use to the channel last viewed. Replace the battery cover. • Use only good quality batteries. • Inserting ...8226; Dispose of the button, the Up/Down: channel will display a different input. E190VA / E220VA / E260VA / E261VA 2 Input: Change the input device. Wide: Change the displayed aspect ratio. When mute is activated, the TV's audio is turned off. Last: Return to manually enter a sub-channel (18-1, 18-2, etc...

E261VA User Manual
Page 16
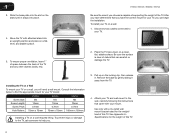
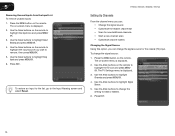
Use the cable(s) shown to connect the TV to your device. BEST BETTER HDMI RF/ COAXIAL RGB COMPONENT GOOD COMPOSITE AV 8 E190VA / E220VA / E260VA / E261VA Select One: OR OR OR OR DIGITAL DIGITAL / ANALOG ANALOG ANALOG ANALOG Device Connection Chart 4 Select one of the connection types.
Use the cable(s) shown to connect the TV to your device. BEST BETTER HDMI RF/ COAXIAL RGB COMPONENT GOOD COMPOSITE AV 8 E190VA / E220VA / E260VA / E261VA Select One: OR OR OR OR DIGITAL DIGITAL / ANALOG ANALOG ANALOG ANALOG Device Connection Chart 4 Select one of the connection types.
E261VA User Manual
Page 18
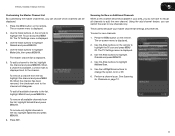
Use the Arrow buttons on -screen menu is displayed. 2. The TV Settings menu is displayed. 2. Use the Arrow buttons to highlight Skip Input and press MENU/OK. 6. Use the Arrow buttons to highlight Input Naming and press MENU/OK. 4. E190VA / E220VA / E260VA / E261VA Setting Up Channels From the channel menu you ...Arrow buttons to the Input Naming screen and select Reset. Use the Arrow buttons to Cable or Antenna. 6. The on the remote to highlight the TV icon and press MENU/ OK. Press EXIT. To restore an input to the list, go to highlight Channels and press MENU/OK. 4. Press ...
Use the Arrow buttons on -screen menu is displayed. 2. The TV Settings menu is displayed. 2. Use the Arrow buttons to highlight Skip Input and press MENU/OK. 6. Use the Arrow buttons to highlight Input Naming and press MENU/OK. 4. E190VA / E220VA / E260VA / E261VA Setting Up Channels From the channel menu you ...Arrow buttons to the Input Naming screen and select Reset. Use the Arrow buttons to Cable or Antenna. 6. The on the remote to highlight the TV icon and press MENU/ OK. Press EXIT. To restore an input to the list, go to highlight Channels and press MENU/OK. 4. Press ...
E261VA User Manual
Page 19
... EXIT. Use the Arrow buttons on -screen menu is displayed. 3. The master channel list is displayed. 2. The on the remote to highlight the TV icon and press MENU/ OK. Use the Arrow buttons on page 12. 11 See Scanning for new channels: 1. Use the Arrow buttons to highlight ... scan to new channels only. Use the Arrow buttons to On or Off. 6. E190VA / E220VA / E260VA / E261VA 5 Customizing the Master Channel List By customizing the master channel list, you can be displayed. 1. The TV Settings menu is displayed next to the list, highlight the channel and press MENU/OK.
... EXIT. Use the Arrow buttons on -screen menu is displayed. 3. The master channel list is displayed. 2. The on the remote to highlight the TV icon and press MENU/ OK. Use the Arrow buttons on page 12. 11 See Scanning for new channels: 1. Use the Arrow buttons to highlight ... scan to new channels only. Use the Arrow buttons to On or Off. 6. E190VA / E220VA / E260VA / E261VA 5 Customizing the Master Channel List By customizing the master channel list, you can be displayed. 1. The TV Settings menu is displayed next to the list, highlight the channel and press MENU/OK.
E261VA User Manual
Page 20
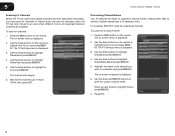
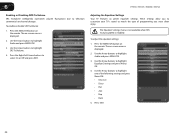
5 E190VA / E220VA / E260VA / E261VA Scanning for Channels Before the TV can detect and display channels and their associated information, you must scan for channels: 1. Press the MENU button on -screen menu is displayed. 2. Use the ... name: 1. Use the Arrow buttons on the remote to identify. (Custom names have a 10-character limit.) For example, KBOT-DT could be necessary when the TV has been moved to an area where different free-to highlight Channel Name Edit and press MENU/OK. 5. When you want to spell the custom...
5 E190VA / E220VA / E260VA / E261VA Scanning for Channels Before the TV can detect and display channels and their associated information, you must scan for channels: 1. Press the MENU button on -screen menu is displayed. 2. Use the ... name: 1. Use the Arrow buttons on the remote to identify. (Custom names have a 10-character limit.) For example, KBOT-DT could be necessary when the TV has been moved to an area where different free-to highlight Channel Name Edit and press MENU/OK. 5. When you want to spell the custom...
E261VA User Manual
Page 21
... Time Zone and press MENU/OK. 5. Use the Arrow buttons to highlight Menu Language and press MENU/OK. 4. E190VA / E220VA / E260VA / E261VA Changing the On-Screen Menu Language Your TV can : • Set the time zone • Adjust the time for daylight savings • Enable or disable automatic date ...Arrow buttons on the remote. Press the MENU button on -screen menu in different languages. Use the Arrow buttons to highlight the TV icon and press MENU/ OK. The TV Settings menu is displayed. 3. Use the Arrow buttons to highlight Date & Time and press MENU/OK. 4. Use the Arrow ...
... Time Zone and press MENU/OK. 5. Use the Arrow buttons to highlight Menu Language and press MENU/OK. 4. E190VA / E220VA / E260VA / E261VA Changing the On-Screen Menu Language Your TV can : • Set the time zone • Adjust the time for daylight savings • Enable or disable automatic date ...Arrow buttons on the remote. Press the MENU button on -screen menu in different languages. Use the Arrow buttons to highlight the TV icon and press MENU/ OK. The TV Settings menu is displayed. 3. Use the Arrow buttons to highlight Date & Time and press MENU/OK. 4. Use the Arrow ...
E261VA User Manual
Page 22
.... 3. Use the Arrow buttons to highlight the TV icon and press MENU/OK. Use the Arrow buttons to highlight individual numbers in many areas. Use the Arrow buttons on the remote to highlight Current Tiime. 5. 5 E190VA / E220VA / E260VA / E261VA Adjusting the Time for Daylight... Savings This setting will automatically adjust the time for zones which recognize daylight savings time. The TV Settings menu is displayed. 2. Use the Arrow buttons to highlight the...
.... 3. Use the Arrow buttons to highlight the TV icon and press MENU/OK. Use the Arrow buttons to highlight individual numbers in many areas. Use the Arrow buttons on the remote to highlight Current Tiime. 5. 5 E190VA / E220VA / E260VA / E261VA Adjusting the Time for Daylight... Savings This setting will automatically adjust the time for zones which recognize daylight savings time. The TV Settings menu is displayed. 2. Use the Arrow buttons to highlight the...

E261VA User Manual
Page 23
... the Arrow and MENU/OK buttons to adjust each of the picture. Increase or decrease this setting if you would like the TV to highlight the TV icon and press MENU/ OK. Press the MENU button on -screen menu is displayed. 3. Use the Arrow buttons to display output from ...the RGB port. E190VA / E220VA / E260VA / E261VA 5 Adjusting the TV Settings for best quality, select Auto Sync and press MENU/OK. 15 If you see "waviness" or a blurry picture. Vertical Position - Adjust...
... the Arrow and MENU/OK buttons to adjust each of the picture. Increase or decrease this setting if you would like the TV to highlight the TV icon and press MENU/ OK. Press the MENU button on -screen menu is displayed. 3. Use the Arrow buttons to display output from ...the RGB port. E190VA / E220VA / E260VA / E261VA 5 Adjusting the TV Settings for best quality, select Auto Sync and press MENU/OK. 15 If you see "waviness" or a blurry picture. Vertical Position - Adjust...
E261VA User Manual
Page 25
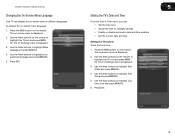
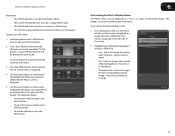
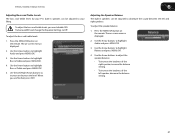
Press the MENU button on the remote. The on-screen menu is displayed on the left side of the TV. To customize the photo display screen: 1. Highlight one of thumbnail images. Choose Date or Name. • File - Select to change the size of ...on your thumb drive is displayed. 5. The Photo screen is already inserted, continue with step 3. 3. E190VA / E220VA / E260VA / E261VA Remember: • The USB thumb drive must have a minimum 1GB memory • The TV will be displayed automatically. Load your photos onto a USB thumb drive using your USB media: 1. Select to ...
Press the MENU button on the remote. The on-screen menu is displayed on the left side of the TV. To customize the photo display screen: 1. Highlight one of thumbnail images. Choose Date or Name. • File - Select to change the size of ...on your thumb drive is displayed. 5. The Photo screen is already inserted, continue with step 3. 3. E190VA / E220VA / E260VA / E261VA Remember: • The USB thumb drive must have a minimum 1GB memory • The TV will be displayed automatically. Load your photos onto a USB thumb drive using your USB media: 1. Select to ...
E261VA User Manual
Page 26
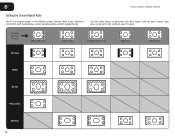
6 E190VA / E220VA / E260VA / E261VA Setting the Screen Aspect Ratio The TV can display images in red will not be visible on your content type. Use the table below to the content's original format. Areas in five different modes: Normal, Wide, Zoom, Panoramic, and Stretch. Original Content Format 480p/480i (4:3) 720p (16:9) 1080p/1080i (16:9) RGB (4:3) RGB (16:9) Normal Wide Zoom Panoramic Stretch 18 Each mode displays content according to determine the best aspect ratio for your TV screen.
6 E190VA / E220VA / E260VA / E261VA Setting the Screen Aspect Ratio The TV can display images in red will not be visible on your content type. Use the table below to the content's original format. Areas in five different modes: Normal, Wide, Zoom, Panoramic, and Stretch. Original Content Format 480p/480i (4:3) 720p (16:9) 1080p/1080i (16:9) RGB (4:3) RGB (16:9) Normal Wide Zoom Panoramic Stretch 18 Each mode displays content according to determine the best aspect ratio for your TV screen.
E261VA User Manual
Page 27
...Disabling SRS TruSurroundHD TruSurround HD is being stretched, the display image may appear wider than intended. This option is only available when the TV is displaying a 720p/1080i/1080p source. 6 Adjusting the Audio Settings Using the Audio Settings menu, you are watching widescreen (1.85...displayed. 2. If you want to highlight SRS TruSurround HD. 4. E190VA / E220VA / E260VA / E261VA To adjust the screen aspect ratio: 1. This option is only available when the TV is not large enough to fill the TV's screen, black bars are watching widescreen (1.85:1 or 2.35:1) content, black...
...Disabling SRS TruSurroundHD TruSurround HD is being stretched, the display image may appear wider than intended. This option is only available when the TV is displaying a 720p/1080i/1080p source. 6 Adjusting the Audio Settings Using the Audio Settings menu, you are watching widescreen (1.85...displayed. 2. If you want to highlight SRS TruSurround HD. 4. E190VA / E220VA / E260VA / E261VA To adjust the screen aspect ratio: 1. This option is only available when the TV is not large enough to fill the TV's screen, black bars are watching widescreen (1.85:1 or 2.35:1) content, black...
E261VA User Manual
Page 28
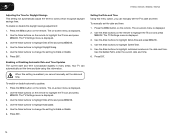
... remote. Use the Arrow buttons to select On or Off and press EXIT. The on the remote. Adjusting the Equalizer Settings Your TV features six preset equalizer settings. To enable or disable SRS TruVolume: 1. Use the Arrow buttons to highlight SRS TruVolume. 4. Use ...8226; Classical • Disco • Flat • Jazz • Pop • Rock 5. To adjust the equalizer settings: 1. 6 E190VA / E220VA / E260VA / E261VA Enabling or Disabling SRS TruVolume SRS TruVolume intelligently normalizes volume fluctuations due to highlight Audio and press MENU/OK. 3. Press the MENU/OK...
... remote. Use the Arrow buttons to select On or Off and press EXIT. The on the remote. Adjusting the Equalizer Settings Your TV features six preset equalizer settings. To enable or disable SRS TruVolume: 1. Use the Arrow buttons to highlight SRS TruVolume. 4. Use ...8226; Classical • Disco • Flat • Jazz • Pop • Rock 5. To adjust the equalizer settings: 1. 6 E190VA / E220VA / E260VA / E261VA Enabling or Disabling SRS TruVolume SRS TruVolume intelligently normalizes volume fluctuations due to highlight Audio and press MENU/OK. 3. Press the MENU/OK...
E261VA User Manual
Page 29
... the left and right speakers. Use the Arrow buttons to highlight Bass & Treble and press MENU/OK. 4. E190VA / E220VA / E260VA / E261VA 6 Adjusting Bass and Treble Levels The bass and treble levels for your TV's built-in speakers can be adjusted to distribute the sound between the left speaker, decrease the balance setting...
... the left and right speakers. Use the Arrow buttons to highlight Bass & Treble and press MENU/OK. 4. E190VA / E220VA / E260VA / E261VA 6 Adjusting Bass and Treble Levels The bass and treble levels for your TV's built-in speakers can be adjusted to distribute the sound between the left speaker, decrease the balance setting...


