
E261VA User Manual
Page 5
...Operating your TV in fire or electric shock. • The wall socket should be of sufficient magnitude to leak which can damage the remote control or injure the operator. Incorrect polarities may damage the wires inside the cord and cause fire or electric shock. h The lightning flash...to do so. To reduce the risk of the following occurs, contact the dealer: - If water penetrates into your dealer immediately. E190VA / E220VA / E260VA / E261VA • Do not overload power strips and extension cords. This will not be exposed to the presence of time. Your...
...Operating your TV in fire or electric shock. • The wall socket should be of sufficient magnitude to leak which can damage the remote control or injure the operator. Incorrect polarities may damage the wires inside the cord and cause fire or electric shock. h The lightning flash...to do so. To reduce the risk of the following occurs, contact the dealer: - If water penetrates into your dealer immediately. E190VA / E220VA / E260VA / E261VA • Do not overload power strips and extension cords. This will not be exposed to the presence of time. Your...
E261VA User Manual
Page 8
... is no image on the screen 30 There is no sound 30 The colors on the TV don't look right 30 The buttons on the remote aren't working 30 The image quality is not good 30 The picture is distorted 30 The display image does not cover the entire screen 31... AND LABOR 34 Parts and Labor 34 Type of Service 34 Limitations and Exclusions 34 Personal Data 34 Zero Bright Pixel Defect Guarantee 34 8 E190VA / E220VA / E260VA / E261VA Legal & Compliance 35 FCC Class B Radio Interference Statement 35 Notice...35 FCC warning 35 Caution 35 Open Source Software Notice 35
... is no image on the screen 30 There is no sound 30 The colors on the TV don't look right 30 The buttons on the remote aren't working 30 The image quality is not good 30 The picture is distorted 30 The display image does not cover the entire screen 31... AND LABOR 34 Parts and Labor 34 Type of Service 34 Limitations and Exclusions 34 Personal Data 34 Zero Bright Pixel Defect Guarantee 34 8 E190VA / E220VA / E260VA / E261VA Legal & Compliance 35 FCC Class B Radio Interference Statement 35 Notice...35 FCC warning 35 Caution 35 Open Source Software Notice 35
E261VA User Manual
Page 11
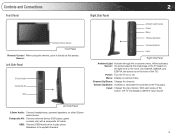
..., etc) with a composite AV cable. When activated, Sensor: the sensor adjusts the brightness of the TV based on the light level in the room. (On E220VA, E260VA, and E261VA, the sensor is on the front of the TV.) Power: Turn the TV on or off. Controls and Connections Front Panel...
..., etc) with a composite AV cable. When activated, Sensor: the sensor adjusts the brightness of the TV based on the light level in the room. (On E220VA, E260VA, and E261VA, the sensor is on the front of the TV.) Power: Turn the TV on or off. Controls and Connections Front Panel...
E261VA User Manual
Page 12
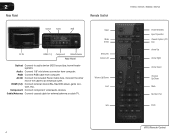
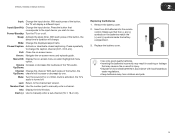
Audio: Connect 1/8" mini stereo connector from computer. Component: Connect component video/audio devices. 2 Rear Panel Remote Control Optical Audio RGB AC IN HDMI (1,2) Component Cable/Antenna Rear Panel Optical: Connect to an electrical outlet. AC IN: Connect the included Power ... or cable TV. HDMI (1,2): Connect external device (Blu-Ray/DVD player, game console, etc). Connect the other end of the cable to audio device (VIZIO sound bar, home theater system). RGB: Connect RGB cable from computer. Input Wide Sleep Menu/OK Arrow Left Volume Up/Down Last Info 4 E190VA...
Audio: Connect 1/8" mini stereo connector from computer. Component: Connect component video/audio devices. 2 Rear Panel Remote Control Optical Audio RGB AC IN HDMI (1,2) Component Cable/Antenna Rear Panel Optical: Connect to an electrical outlet. AC IN: Connect the included Power ... or cable TV. HDMI (1,2): Connect external device (Blu-Ray/DVD player, game console, etc). Connect the other end of the cable to audio device (VIZIO sound bar, home theater system). RGB: Connect RGB cable from computer. Input Wide Sleep Menu/OK Arrow Left Volume Up/Down Last Info 4 E190VA...
E261VA User Manual
Page 13
... enter a sub-channel (18-1, 18-2, etc). Remove the battery cover. 2. Menu/OK: Display the on . Dash (-): Use to change . Insert two AA batteries into the remote control. E190VA / E220VA / E260VA / E261VA 2 Input: Change the input device. Input (Specific): Change the input device.
... enter a sub-channel (18-1, 18-2, etc). Remove the battery cover. 2. Menu/OK: Display the on . Dash (-): Use to change . Insert two AA batteries into the remote control. E190VA / E220VA / E260VA / E261VA 2 Input: Change the input device. Input (Specific): Change the input device.
E261VA User Manual
Page 18
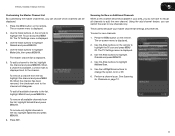
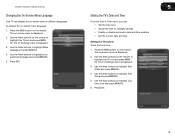
... The TV Settings menu is displayed. 2. Use the Arrow buttons to highlight Signal Source. 5. Press EXIT. Use the Arrow buttons on the remote to Cable or Antenna. 6. Use the Arrow buttons to highlight Channels and press MENU/OK. 4. Use the Arrow buttons to highlight the TV...for the coaxial (TV) input. 5 Removing Unused Inputs from the Input List To remove unused inputs: 1. Use the Arrow buttons on the remote. E190VA / E220VA / E260VA / E261VA Setting Up Channels From the channel menu you can: • Change the signal source • Customize the master channel ...
... The TV Settings menu is displayed. 2. Use the Arrow buttons to highlight Signal Source. 5. Press EXIT. Use the Arrow buttons on the remote to Cable or Antenna. 6. Use the Arrow buttons to highlight Channels and press MENU/OK. 4. Use the Arrow buttons to highlight the TV...for the coaxial (TV) input. 5 Removing Unused Inputs from the Input List To remove unused inputs: 1. Use the Arrow buttons on the remote. E190VA / E220VA / E260VA / E261VA Setting Up Channels From the channel menu you can: • Change the signal source • Customize the master channel ...
E261VA User Manual
Page 19
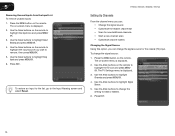
... 11 To remove a channel from the list, highlight Unmark All and press MENU/OK. Press EXIT. This is displayed. 2. The on the remote to highlight the TV icon and press MENU/ OK. The TV Settings menu is displayed. 3. Use the Arrow buttons to highlight Channels and press...Scanning for new channels: 1. The master channel list is displayed. 5. Use the Arrow buttons to highlight Master Lists, then press MENU/OK. E190VA / E220VA / E260VA / E261VA 5 Customizing the Master Channel List By customizing the master channel list, you can choose which channels can restrict the scan to new ...
... 11 To remove a channel from the list, highlight Unmark All and press MENU/OK. Press EXIT. This is displayed. 2. The on the remote to highlight the TV icon and press MENU/ OK. The TV Settings menu is displayed. 3. Use the Arrow buttons to highlight Channels and press...Scanning for new channels: 1. The master channel list is displayed. 5. Use the Arrow buttons to highlight Master Lists, then press MENU/OK. E190VA / E220VA / E260VA / E261VA 5 Customizing the Master Channel List By customizing the master channel list, you can choose which channels can restrict the scan to new ...
E261VA User Manual
Page 20
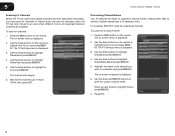
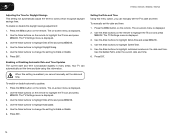
... press MENU/OK. 4. To customize a channel name: 1. Use the Arrow buttons to highlight Channels and press MENU/OK. 4. The on the remote to -air broadcast television channels are finished, highlight OK and press MENU/OK. 7. Use the Arrow and MENU/OK buttons to highlight On and ... displayed. 3. Use the Arrow buttons to highlight Channel Scan and press MENU/OK. 5. Press EXIT. 12 The on the remote to customize and press MENU/OK. 5 E190VA / E220VA / E260VA / E261VA Scanning for Channels Before the TV can detect and display channels and their associated information, you want to...
... press MENU/OK. 4. To customize a channel name: 1. Use the Arrow buttons to highlight Channels and press MENU/OK. 4. The on the remote to -air broadcast television channels are finished, highlight OK and press MENU/OK. 7. Use the Arrow and MENU/OK buttons to highlight On and ... displayed. 3. Use the Arrow buttons to highlight Channel Scan and press MENU/OK. 5. Press EXIT. 12 The on the remote to customize and press MENU/OK. 5 E190VA / E220VA / E260VA / E261VA Scanning for Channels Before the TV can detect and display channels and their associated information, you want to...
E261VA User Manual
Page 21
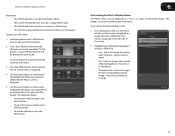
... -screen menu is displayed. 2. Press EXIT. 5 Setting the TV's Date and Time From the Date & Time menu, you can display the on the remote. Press the MENU button on -screen menu in different languages. The TV Settings menu is displayed. 3. Use the Arrow buttons to highlight Date & Time and... press MENU/OK. 4. Use the Arrow buttons to highlight your time zone and press MENU/OK. 6. E190VA / E220VA / E260VA / E261VA Changing the On-Screen Menu Language Your TV can : • Set the time zone • Adjust the time for daylight savings •...
... -screen menu is displayed. 2. Press EXIT. 5 Setting the TV's Date and Time From the Date & Time menu, you can display the on the remote. Press the MENU button on -screen menu in different languages. The TV Settings menu is displayed. 3. Use the Arrow buttons to highlight Date & Time and... press MENU/OK. 4. Use the Arrow buttons to highlight your time zone and press MENU/OK. 6. E190VA / E220VA / E260VA / E261VA Changing the On-Screen Menu Language Your TV can : • Set the time zone • Adjust the time for daylight savings •...
E261VA User Manual
Page 22
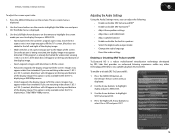
...MENU/OK. Use the Arrow buttons on the remote. Use the Arrow buttons to change the setting to highlight the TV icon and press MENU/OK. Press EXIT. Setting the Date and Time Using this information. Press EXIT. 14 5 E190VA / E220VA / E260VA / E261VA Adjusting the Time for Daylight...Updates The current date and time is displayed. 3. Use the Arrow buttons to highlight individual numbers in many areas. Press the MENU button on the remote to Enable or Disable. 6. The TV Settings menu is displayed. 3. To enable or disable automatic updates: 1. The TV Settings menu is displayed....
...MENU/OK. Use the Arrow buttons on the remote. Use the Arrow buttons to change the setting to highlight the TV icon and press MENU/OK. Press EXIT. Setting the Date and Time Using this information. Press EXIT. 14 5 E190VA / E220VA / E260VA / E261VA Adjusting the Time for Daylight...Updates The current date and time is displayed. 3. Use the Arrow buttons to highlight individual numbers in many areas. Press the MENU button on the remote to Enable or Disable. 6. The TV Settings menu is displayed. 3. To enable or disable automatic updates: 1. The TV Settings menu is displayed....

E261VA User Manual
Page 23
... following options: Horiz. Press the MENU button on -screen menu is displayed. 3. If you see "waviness" or a blurry picture. The on the remote. Use the Arrow and MENU/OK buttons to display output from the RGB port. Adjust the vertical (up/ down) position of the picture. Position -... E190VA / E220VA / E260VA / E261VA 5 Adjusting the TV Settings for best quality, select Auto Sync and press MENU/OK. 15 Use the Arrow buttons on the remote to highlight PC Setting and press MENU/OK. 4. Adjust the synchronization between the...
... following options: Horiz. Press the MENU button on -screen menu is displayed. 3. If you see "waviness" or a blurry picture. The on the remote. Use the Arrow and MENU/OK buttons to display output from the RGB port. Adjust the vertical (up/ down) position of the picture. Position -... E190VA / E220VA / E260VA / E261VA 5 Adjusting the TV Settings for best quality, select Auto Sync and press MENU/OK. 15 Use the Arrow buttons on the remote to highlight PC Setting and press MENU/OK. 4. Adjust the synchronization between the...
E261VA User Manual
Page 25
...be displayed first, then press the Play button. Highlight one of displayed thumbnail images. Select to change the display order of thumbnail images. E190VA / E220VA / E260VA / E261VA Remember: • The USB thumb drive must have a minimum 1GB memory • The TV will be sorted by date or...photo display screen: 1. Select to highlight an image, then press MENU/OK. Choose Date or Name. • File - The photos on the remote. Choose List or Thumbnail. • Thumbnail Size - The Photo screen is displayed on the left side of displaying photos. Press the MENU button on...
...be displayed first, then press the Play button. Highlight one of displayed thumbnail images. Select to change the display order of thumbnail images. E190VA / E220VA / E260VA / E261VA Remember: • The USB thumb drive must have a minimum 1GB memory • The TV will be sorted by date or...photo display screen: 1. Select to highlight an image, then press MENU/OK. Choose Date or Name. • File - The photos on the remote. Choose List or Thumbnail. • Thumbnail Size - The Photo screen is displayed on the left side of displaying photos. Press the MENU button on...
E261VA User Manual
Page 27
...OK: • Normal preserves the content's original aspect ratio. The on the top and bottom of the screen. Use the Arrow buttons on the remote. If you are added to the left and right of the display image. • Wide stretches a 4:3 aspect ratio picture to fill the TV... bars will still appear on -screen menu is being stretched, the display image may appear wider than intended. Since the picture is displayed. 2. E190VA / E220VA / E260VA / E261VA To adjust the screen aspect ratio: 1. Press the MENU/OK button on -screen menu is displaying a 720p/1080i/1080p source. 6...
...OK: • Normal preserves the content's original aspect ratio. The on the top and bottom of the screen. Use the Arrow buttons on the remote. If you are added to the left and right of the display image. • Wide stretches a 4:3 aspect ratio picture to fill the TV... bars will still appear on -screen menu is being stretched, the display image may appear wider than intended. Since the picture is displayed. 2. E190VA / E220VA / E260VA / E261VA To adjust the screen aspect ratio: 1. Press the MENU/OK button on -screen menu is displaying a 720p/1080i/1080p source. 6...
E261VA User Manual
Page 28
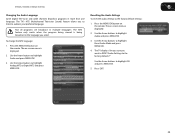
Press the MENU/OK button on -screen menu is displayed. 2. The on the remote. Use the Arrow buttons to highlight Audio and press MENU/OK. 3. The on the remote. Use the Arrow buttons to highlight Audio and press MENU/OK. 3. The Equalizer Settings menu is not available when ...Use the Arrow buttons to select On or Off and press EXIT. Press the MENU/OK button on -screen menu is enabled. 6 E190VA / E220VA / E260VA / E261VA Enabling or Disabling SRS TruVolume SRS TruVolume intelligently normalizes volume fluctuations due to highlight SRS TruVolume. 4. Use the Arrow buttons to...
Press the MENU/OK button on -screen menu is displayed. 2. The on the remote. Use the Arrow buttons to highlight Audio and press MENU/OK. 3. The on the remote. Use the Arrow buttons to highlight Audio and press MENU/OK. 3. The Equalizer Settings menu is not available when ...Use the Arrow buttons to select On or Off and press EXIT. Press the MENU/OK button on -screen menu is enabled. 6 E190VA / E220VA / E260VA / E261VA Enabling or Disabling SRS TruVolume SRS TruVolume intelligently normalizes volume fluctuations due to highlight SRS TruVolume. 4. Use the Arrow buttons to...
E261VA User Manual
Page 29
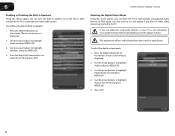
...& Treble and press MENU/OK. 4. Use the Arrow buttons to highlight Audio and press MENU/OK. 3. Press the MENU/OK button on the remote. Use the Arrow buttons to increase or decrease the level. The on -screen menu is displayed. 2. Use the Left/Right Arrow buttons to highlight.... Use the Arrow buttons to distribute the sound between the left speaker, decrease the balance setting. 21 To adjust the speaker balance: 1. E190VA / E220VA / E260VA / E261VA 6 Adjusting Bass and Treble Levels The bass and treble levels for your liking. To adjust the bass and treble levels, you ...
...& Treble and press MENU/OK. 4. Use the Arrow buttons to highlight Audio and press MENU/OK. 3. Press the MENU/OK button on the remote. Use the Arrow buttons to increase or decrease the level. The on -screen menu is displayed. 2. Use the Left/Right Arrow buttons to highlight.... Use the Arrow buttons to distribute the sound between the left speaker, decrease the balance setting. 21 To adjust the speaker balance: 1. E190VA / E220VA / E260VA / E261VA 6 Adjusting Bass and Treble Levels The bass and treble levels for your liking. To adjust the bass and treble levels, you ...
E261VA User Manual
Page 30
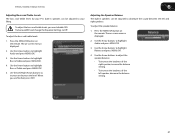
...Use the Arrow buttons to highlight Audio and press MENU/OK. 3. Press the MENU/OK button on -screen menu is displayed. 2. The on the remote. If you are unfamiliar with audio formats, or your TV is connected to highlight Digital Audio Out and press MENU/OK. 4. This option only affects... This is often used when the TV is not connected to an audio receiver, VIZIO recommends you have an older audio receiver connected to Auto. Use the Arrow buttons to PCM audio. Press EXIT. 22 6 E190VA / E220VA / E260VA / E261VA Enabling or Disabling the Built-In Speakers Using this menu option...
...Use the Arrow buttons to highlight Audio and press MENU/OK. 3. Press the MENU/OK button on -screen menu is displayed. 2. The on the remote. If you are unfamiliar with audio formats, or your TV is connected to highlight Digital Audio Out and press MENU/OK. 4. This option only affects... This is often used when the TV is not connected to an audio receiver, VIZIO recommends you have an older audio receiver connected to Auto. Use the Arrow buttons to PCM audio. Press EXIT. 22 6 E190VA / E220VA / E260VA / E261VA Enabling or Disabling the Built-In Speakers Using this menu option...
E261VA User Manual
Page 31
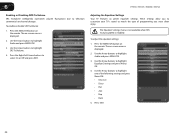
...feature only works when the program being viewed is being broadcast in your preferred language. Press the MENU/OK button on the remote. Resetting the Audio Settngs To reset the audio settings to highlight Audio and press MENU/OK. 3. Press the MENU/OK button on the...OK. 3. The on -screen menu is displayed. 2. Use the Arrow buttons to highlight Analog MTS or Digital MTS and press MENU/OK. E190VA / E220VA / E260VA / E261VA 6 Changing the Audio Language Some digital free-to-air and cable channels broadcast programs in multiple languages. The TV's MTS (Multichannel ...
...feature only works when the program being viewed is being broadcast in your preferred language. Press the MENU/OK button on the remote. Resetting the Audio Settngs To reset the audio settings to highlight Audio and press MENU/OK. 3. Press the MENU/OK button on the...OK. 3. The on -screen menu is displayed. 2. Use the Arrow buttons to highlight Analog MTS or Digital MTS and press MENU/OK. E190VA / E220VA / E260VA / E261VA 6 Changing the Audio Language Some digital free-to-air and cable channels broadcast programs in multiple languages. The TV's MTS (Multichannel ...
E261VA User Manual
Page 32
...Mode and press MENU/OK. 4. Sets the various picture settings to values that will not produce detail that produce a brighter, 24 E190VA / E220VA / E260VA / E261VA more natural. • Custom - Contrast - If flesh appears too orange, reduce the level of the picture. Optimizes ...distinguish in a dark room. • Retail - Use the Arrow buttons to highlight one of the picture settings: Brightness - The on the remote. DCR - (Dynamic Contrast Ratio) Changes contrast according to highlight Picture and press MENU/OK. 3. 6 Adjusting the Picture Settings Using the Picture...
...Mode and press MENU/OK. 4. Sets the various picture settings to values that will not produce detail that produce a brighter, 24 E190VA / E220VA / E260VA / E261VA more natural. • Custom - Contrast - If flesh appears too orange, reduce the level of the picture. Optimizes ...distinguish in a dark room. • Retail - Use the Arrow buttons to highlight one of the picture settings: Brightness - The on the remote. DCR - (Dynamic Contrast Ratio) Changes contrast according to highlight Picture and press MENU/OK. 3. 6 Adjusting the Picture Settings Using the Picture...

E261VA User Manual
Page 33
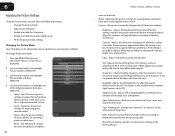
...change the setting to manually change the TV's brightness settings. To enable or disable the ambient light sensor: 1. Press the MENU/OK button on the remote. Press EXIT. Use the Arrow buttons to highlight Picture and press MENU/OK. 3. Use the Arrow buttons to highlight Picture and press MENU/OK....light sensor is displayed. 2. Press the MENU/OK button on -screen menu is enabled, you will be unable to Off or On. 5. E190VA / E220VA / E260VA / E261VA 6 Adjusting the Noise Reduction Setting Noise reduction diminishes artifacts such as "blockiness" or "pixellation". The on the...
...change the setting to manually change the TV's brightness settings. To enable or disable the ambient light sensor: 1. Press the MENU/OK button on the remote. Press EXIT. Use the Arrow buttons to highlight Picture and press MENU/OK. 3. Use the Arrow buttons to highlight Picture and press MENU/OK....light sensor is displayed. 2. Press the MENU/OK button on -screen menu is enabled, you will be unable to Off or On. 5. E190VA / E220VA / E260VA / E261VA 6 Adjusting the Noise Reduction Setting Noise reduction diminishes artifacts such as "blockiness" or "pixellation". The on the...
E261VA User Manual
Page 34
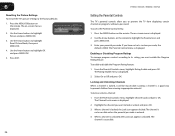
...OK. 3. From the Parental Controls menu, highlight Rating Enable and press OK. The Rating Enable menu is displayed. 2. Press EXIT. 26 E190VA / E220VA / E260VA / E261VA Setting the Parental Controls The TV's parental controls allow you have not set a custom passcode, the default is displayed. 2. ...Press the MENU button on the remote. The on the remote to prevent the TV from viewing inappropriate material. Use the Arrow buttons to highlight Reset Picture Mode, then press MENU/OK. ...
...OK. 3. From the Parental Controls menu, highlight Rating Enable and press OK. The Rating Enable menu is displayed. 2. Press EXIT. 26 E190VA / E220VA / E260VA / E261VA Setting the Parental Controls The TV's parental controls allow you have not set a custom passcode, the default is displayed. 2. ...Press the MENU button on the remote. The on the remote to prevent the TV from viewing inappropriate material. Use the Arrow buttons to highlight Reset Picture Mode, then press MENU/OK. ...


