
User Manual
Page 2
...operate normally, or has been dropped. • Unplug the power cord before cleaning your TV. your VIZIO product, visit our website at www.VIZIO.com or call toll free at your TV. • When moving the cart/apparatus combination to avoid injury • When connected to qualified service personnel. shock. Install...any heat source, such as power-supply cord or plug is damaged, liquid has been spilled or objects have fallen into your dealer. To get the most out of electric shock or component damage, switch off the power before turning on -site extended warranty service plans....
...operate normally, or has been dropped. • Unplug the power cord before cleaning your TV. your VIZIO product, visit our website at www.VIZIO.com or call toll free at your TV. • When moving the cart/apparatus combination to avoid injury • When connected to qualified service personnel. shock. Install...any heat source, such as power-supply cord or plug is damaged, liquid has been spilled or objects have fallen into your dealer. To get the most out of electric shock or component damage, switch off the power before turning on -site extended warranty service plans....
User Manual
Page 3
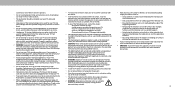
... heavy dust or • Install the TV where it will not be - To avoid electric shock, avoid handling the power cord during lightning. If repair is used for an extended period of time. humidity. Operating your TV in this apparatus must be located between the television set and the supporting furniture. • Do not attempt to qualified service personnel. • WARNING: Keep...
... heavy dust or • Install the TV where it will not be - To avoid electric shock, avoid handling the power cord during lightning. If repair is used for an extended period of time. humidity. Operating your TV in this apparatus must be located between the television set and the supporting furniture. • Do not attempt to qualified service personnel. • WARNING: Keep...
User Manual
Page 4
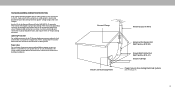
... and supporting structure, grounding of time, unplug the TV from the wall outlet and disconnect the antenna or cable system. Ground Clamp Antenna Lead In Wire Electric Service Equipment Antenna Discharge Unit (NEC Section 810-20) Grounding Conductors (NEC Section 810-21) Ground Clamps Power Service Grounding Electrode System (NEC ART 250, part H) iv Power Lines Do not locate the antenna near overhead light or power...
... and supporting structure, grounding of time, unplug the TV from the wall outlet and disconnect the antenna or cable system. Ground Clamp Antenna Lead In Wire Electric Service Equipment Antenna Discharge Unit (NEC Section 810-20) Grounding Conductors (NEC Section 810-21) Ground Clamps Power Service Grounding Electrode System (NEC ART 250, part H) iv Power Lines Do not locate the antenna near overhead light or power...
User Manual
Page 6
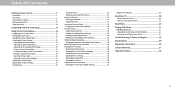
...Front Panel 7 Rear Panel 9 Connecting your devices 11 Wall-mounting the TV 13 Using the remote 14 Completing The First-Time Setup 15 Using the On-Screen Menu 16 Navigating the On-Screen Menu 16 Changing the Input Source 16 Changing the Screen Aspect Ratio 17 Adjusting the Picture Settings 18 Adjusting More Picture Settings 18 Adjusting the Color Temperature 19 Adjusting the Picture Mode Edit Settings 19 Saving a Custom Picture Mode 19 Locking/Unlocking a Custom Picture Mode 20 Deleting a Custom Picture Mode 20 Resetting a Picture Mode 20 Adjusting the Color Tuner Settings 21...
...Front Panel 7 Rear Panel 9 Connecting your devices 11 Wall-mounting the TV 13 Using the remote 14 Completing The First-Time Setup 15 Using the On-Screen Menu 16 Navigating the On-Screen Menu 16 Changing the Input Source 16 Changing the Screen Aspect Ratio 17 Adjusting the Picture Settings 18 Adjusting More Picture Settings 18 Adjusting the Color Temperature 19 Adjusting the Picture Mode Edit Settings 19 Saving a Custom Picture Mode 19 Locking/Unlocking a Custom Picture Mode 20 Deleting a Custom Picture Mode 20 Resetting a Picture Mode 20 Adjusting the Color Tuner Settings 21...

User Manual
Page 9
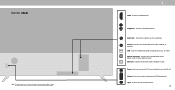
... optical/SPDIF audio device, such as sound bar. Coaxial - Power - Input - REAR PANEL - The actual number of ports and their locations may be subject to access the input menu 9 Audio Out - Connect to turn the TV off. Component/Composite - Connect a USB thumb drive to an RCA device, such as home audio receiver. Connect to play photo, music, or video. Connect a component or composite. Press and hold to a coaxial cable from cable, satellite, or antenna. Connect an HDMI device. Connect to turn on the model. 1 HDMI...
... optical/SPDIF audio device, such as sound bar. Coaxial - Power - Input - REAR PANEL - The actual number of ports and their locations may be subject to access the input menu 9 Audio Out - Connect to turn the TV off. Component/Composite - Connect a USB thumb drive to an RCA device, such as home audio receiver. Connect to play photo, music, or video. Connect a component or composite. Press and hold to a coaxial cable from cable, satellite, or antenna. Connect an HDMI device. Connect to turn on the model. 1 HDMI...
User Manual
Page 10
... to access the input menu. 10 Press to play photo, music, or video. The actual number of ports and their locations may be subject to a device, such as home audio receiver. Connect to modem/ router. Optical Audio Out - Press to an optical/SPDIF audio device, such as sound bar. INPUT Input - Connect an HDMI device. Audio Out - Connect to turn the TV off. Power - VOL Volume - Ethernet - Connect an Ethernet cable to a coaxial cable from cable, satellite, or antenna. D65x-G4 Note...
... to access the input menu. 10 Press to play photo, music, or video. The actual number of ports and their locations may be subject to a device, such as home audio receiver. Connect to modem/ router. Optical Audio Out - Press to an optical/SPDIF audio device, such as sound bar. INPUT Input - Connect an HDMI device. Audio Out - Connect to turn the TV off. Power - VOL Volume - Ethernet - Connect an Ethernet cable to a coaxial cable from cable, satellite, or antenna. D65x-G4 Note...

User Manual
Page 11
... TV model. 11 AUDIO & VIDEO CABLE TYPES Your TV can be used (HDMI-1, HDMI-2, etc.). Connect the appropriate cable (not included) to display output from most devices. 1. HDMI CABLE HDMI COMPONENT CABLE* R L Pr/Cr Pb/Cb Y COMPOSITE (AV) CABLE (Shared with Component input) Y L R 1 COAXIAL CABLE Coaxial Note: The actual ports and *Not applicable to D65x-G4 their locations may vary, depending on the TV (HDMI, Component, etc.). 2. Connecting Your Devices CONNECTING A DEVICE - Set the TV's input to match the connection you used to...
... TV model. 11 AUDIO & VIDEO CABLE TYPES Your TV can be used (HDMI-1, HDMI-2, etc.). Connect the appropriate cable (not included) to display output from most devices. 1. HDMI CABLE HDMI COMPONENT CABLE* R L Pr/Cr Pb/Cb Y COMPOSITE (AV) CABLE (Shared with Component input) Y L R 1 COAXIAL CABLE Coaxial Note: The actual ports and *Not applicable to D65x-G4 their locations may vary, depending on the TV (HDMI, Component, etc.). 2. Connecting Your Devices CONNECTING A DEVICE - Set the TV's input to match the connection you used to...

User Manual
Page 13
... the instructions that came with a UL-listed wall mount bracket rated for illustrative purposes only and may vary, depending on this TV. To install your TV. Consult the information on the model. Screw Size: Hole Depth: Hole Pattern: Weight w/o Stand: 1 Note: The image shown here is capable of supporting the weight of debris that you choose is for the weight/load of ports and their locations may...
... the instructions that came with a UL-listed wall mount bracket rated for illustrative purposes only and may vary, depending on this TV. To install your TV. Consult the information on the model. Screw Size: Hole Depth: Hole Pattern: Weight w/o Stand: 1 Note: The image shown here is capable of supporting the weight of debris that you choose is for the weight/load of ports and their locations may...

User Manual
Page 14
Display the settings menu 6. Back - Closed Caption - Open the closed caption menu 12. Cycle through the different picture setting modes 14. Channel Up/Down- Turn the audio on or off 3. Manually enter a channel 18. Insert two batteries into the remote control. Replace only with number pad to manually enter a digital sub-channel. (For example, 18-4 or 18-5) 1 Replacing the Batteries 1. App Launcher - Last - Use with batteries of the correct type. Replace the battery cover. Exit - Select the highlighted...
Display the settings menu 6. Back - Closed Caption - Open the closed caption menu 12. Cycle through the different picture setting modes 14. Channel Up/Down- Turn the audio on or off 3. Manually enter a channel 18. Insert two batteries into the remote control. Replace only with number pad to manually enter a digital sub-channel. (For example, 18-4 or 18-5) 1 Replacing the Batteries 1. App Launcher - Last - Use with batteries of the correct type. Replace the battery cover. Exit - Select the highlighted...
User Manual
Page 15
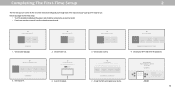
.... Where is properly connected to get your TV ready for use . To search for channels. Choose your Wi-Fi and enter the password. Scan for local broadcast channels, make sure the cable from the antenna, wall or cable box is you have a wireless network, have the network password ready. Let's set ! 15 USA Mexico Canada Choose a Wi-Fi Network. 3. Congratulations! Home Use Store Demo 2. Let's seCt uhpoolosceaal cWhia-FninNelest.work.
.... Where is properly connected to get your TV ready for use . To search for channels. Choose your Wi-Fi and enter the password. Scan for local broadcast channels, make sure the cable from the antenna, wall or cable box is you have a wireless network, have the network password ready. Let's set ! 15 USA Mexico Canada Choose a Wi-Fi Network. 3. Congratulations! Home Use Store Demo 2. Let's seCt uhpoolosceaal cWhia-FninNelest.work.
User Manual
Page 16
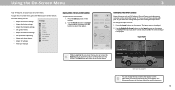
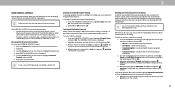
... Captioning • Name and adjust Inputs • Adjust TV settings TV Settings Picture Audio Network Timers Channels Closed Captions Input Settings System User Manual • View user manual NAVIGATING THE ON-SCREEN MENU To open the on-screen menu, press the Menu button on -screen menu, you can change the input sources: 1. From this menu, you can be connected to your devices easy to the previous menu screen. Press the Menu button on -screenPICmenu. INPUT EXIT 1MENU 2 OK CHANGING THE INPUT SOURCE External devices such as DVD players, Blu-ray Players, and video game...
... Captioning • Name and adjust Inputs • Adjust TV settings TV Settings Picture Audio Network Timers Channels Closed Captions Input Settings System User Manual • View user manual NAVIGATING THE ON-SCREEN MENU To open the on-screen menu, press the Menu button on -screen menu, you can change the input sources: 1. From this menu, you can be connected to your devices easy to the previous menu screen. Press the Menu button on -screenPICmenu. INPUT EXIT 1MENU 2 OK CHANGING THE INPUT SOURCE External devices such as DVD players, Blu-ray Players, and video game...

User Manual
Page 18
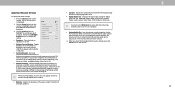
... the remote to compensate for watching film. To manually change each of the picture to highlight that produce a brighter, more picture settings: 1. Backlight cannot be used to adjust the setting: • Backlight - Adjusts the black level of picture elements. When this setting is displayed. 2. Back Calibrated 90 50 50 50 0 20 • Color - Adjusting More Picture Settings To adjust more vivid picture. • Game mode reduces throughput delays and optimizes the picture settings for displaying game console output...
... the remote to compensate for watching film. To manually change each of the picture to highlight that produce a brighter, more picture settings: 1. Backlight cannot be used to adjust the setting: • Backlight - Adjusts the black level of picture elements. When this setting is displayed. 2. Back Calibrated 90 50 50 50 0 20 • Color - Adjusting More Picture Settings To adjust more vivid picture. • Game mode reduces throughput delays and optimizes the picture settings for displaying game console output...
User Manual
Page 23
... noises. Turns the built-in speakers On or Off. Select On or Off. • Volume Leveling - Adjusts the loudness of processing for digital audio out and HDMI ARC output when connected to a home theater audio system. Changes the type of the audio output from the TV's internal speakers. You must select Bitstream for audio with the TV's volume controls, or select Fixed if an external audio device (sound bar or AV receiver) will control the volume. 4.
... noises. Turns the built-in speakers On or Off. Select On or Off. • Volume Leveling - Adjusts the loudness of processing for digital audio out and HDMI ARC output when connected to a home theater audio system. Changes the type of the audio output from the TV's internal speakers. You must select Bitstream for audio with the TV's volume controls, or select Fixed if an external audio device (sound bar or AV receiver) will control the volume. 4.

User Manual
Page 27
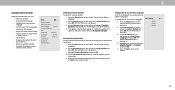
... CHANNELS menu, highlight Skip Channel, and press OK. 3 SETTING UP CHANNELS You can use the TV's Channels menu to: • Find Channels • Select channels to skip • Select Analog Audio mode • Select the language for Digital Audio • Set Parental Controls Channels Find Channels Skip Channels Analog Audio Digital Audio Parental Control Back Stereo English Scanning for Channels The TV may also be viewed if the channel is entered using an antenna) and cable channels from being viewed, use the Up/Down Arrow buttons on the remote...
... CHANNELS menu, highlight Skip Channel, and press OK. 3 SETTING UP CHANNELS You can use the TV's Channels menu to: • Find Channels • Select channels to skip • Select Analog Audio mode • Select the language for Digital Audio • Set Parental Controls Channels Find Channels Skip Channels Analog Audio Digital Audio Parental Control Back Stereo English Scanning for Channels The TV may also be viewed if the channel is entered using an antenna) and cable channels from being viewed, use the Up/Down Arrow buttons on the remote...
User Manual
Page 29
... content based on the remote to highlight the rating type and press OK. 3. Other devices have a device connected using an antenna for Over-the-Air signals or when connected to cable TV directly from viewing inappropriate material. To enable or disable the Program Rating feature: 1. The channel is displayed. 2. USA television program broadcasts. • USA Movie - USA movie broadcasts. • Canadian English - Accessing the Parental Controls Menu To access the PARENTAL CONTROLS menu: 1. Enter...
... content based on the remote to highlight the rating type and press OK. 3. Other devices have a device connected using an antenna for Over-the-Air signals or when connected to cable TV directly from viewing inappropriate material. To enable or disable the Program Rating feature: 1. The channel is displayed. 2. USA television program broadcasts. • USA Movie - USA movie broadcasts. • Canadian English - Accessing the Parental Controls Menu To access the PARENTAL CONTROLS menu: 1. Enter...
User Manual
Page 33
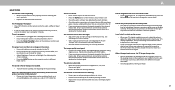
... • Adjust accessibility settings • Reset the TV settings & setup administrative controls System Back Check for Updates System Information Menu Language English Time & Local Settings CEC Power Mode Quick Start Aspect Ratio Normal TV Name Office TV Mobile Devices Accessibility Reset and Admin Checking for System Updates Changing the On-Screen Menu Language To check for Updates and press OK. Highlight your TV and network connection: 1. The on -screen menu is displayed. 2. If no update is found...
... • Adjust accessibility settings • Reset the TV settings & setup administrative controls System Back Check for Updates System Information Menu Language English Time & Local Settings CEC Power Mode Quick Start Aspect Ratio Normal TV Name Office TV Mobile Devices Accessibility Reset and Admin Checking for System Updates Changing the On-Screen Menu Language To check for Updates and press OK. Highlight your TV and network connection: 1. The on -screen menu is displayed. 2. If no update is found...

User Manual
Page 37
... more relevant entertainment based on -screen menu is displayed. 3. Viewing Data is also used to confirm. To create a PIN. 1. Enter and confirm your broadcast, cable, or satellite television provider, and the television programs and commercials viewed (including time, date, channel, and whether you might find useful, both on the remote to lock content and picture modes as well as "Viewing Data." Using the USB Power Feature The USB port can be used for this TV...
... more relevant entertainment based on -screen menu is displayed. 3. Viewing Data is also used to confirm. To create a PIN. 1. Enter and confirm your broadcast, cable, or satellite television provider, and the television programs and commercials viewed (including time, date, channel, and whether you might find useful, both on the remote to lock content and picture modes as well as "Viewing Data." Using the USB Power Feature The USB port can be used for this TV...
User Manual
Page 47
.... • For the best image quality, view high-definition programs using digital sources. See Scanning for the best signal. See Adjusting the Picture Settings. • Select a pre-set picture mode. Where do not constitute a defective product. See Replacing the Batteries. A HELP TOPICS The remote is precision-manufactured using an extremely high level of technology. See Adjusting the Audio Settings. • Check the audio connections of external devices (Blu-ray player, game console, cable/satellite box) that are always dark...
.... • For the best image quality, view high-definition programs using digital sources. See Scanning for the best signal. See Adjusting the Picture Settings. • Select a pre-set picture mode. Where do not constitute a defective product. See Replacing the Batteries. A HELP TOPICS The remote is precision-manufactured using an extremely high level of technology. See Adjusting the Audio Settings. • Check the audio connections of external devices (Blu-ray player, game console, cable/satellite box) that are always dark...

User Manual
Page 48
... demo mode. How do I watch Cable/Antenna TV channels? • If you subscribe to cable or satellite, simply connect an HDMI cable (not included) to the receiver. • If you use external antennas to watch local broadcast channels, use a coaxial cable to connect to connecto to the. How do I exit Demo Mode • Press and hold the Input button on your Wi-Fi network from the list, enter the Wi-Fi password, and tap Connect...
... demo mode. How do I watch Cable/Antenna TV channels? • If you subscribe to cable or satellite, simply connect an HDMI cable (not included) to the receiver. • If you use external antennas to watch local broadcast channels, use a coaxial cable to connect to connecto to the. How do I exit Demo Mode • Press and hold the Input button on your Wi-Fi network from the list, enter the Wi-Fi password, and tap Connect...
User Manual
Page 51
... THIS WARRANTY, DO NOT USE THE VIZIO PRODUCT AND, degree of user data and downloaded applications is serviced, regardless of original purchase. (at the time of the warranty on the terms set data and downloaded applications. Replacement parts may determine. The arbitrator will not award consequential damages, and any arbitration under this warranty, you resided at 877 MY VIZIO (877-698-4946). VIZIO Technical Support will...
... THIS WARRANTY, DO NOT USE THE VIZIO PRODUCT AND, degree of user data and downloaded applications is serviced, regardless of original purchase. (at the time of the warranty on the terms set data and downloaded applications. Replacement parts may determine. The arbitrator will not award consequential damages, and any arbitration under this warranty, you resided at 877 MY VIZIO (877-698-4946). VIZIO Technical Support will...


