User Manual English
Page 2
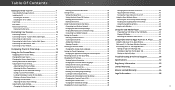
... Changing the Appearance of Your TV 46 Inspecting the Package Contents 7 Setting Timers 33 Adjusting the CEC Settings 46 Installing the TV 8 Installing the TV Stand 8 Setting the Sleep Timer 33 Setting the Auto Power Off Feature 33 Turning the Power Indicator On or Off 46 Using the Reset & Admin Menu... Your TV 7 Deleting the Custom Audio Mode 32 Changing the DLNA Name of Digital Closed Captions 39 Deleting an App from the TV 49 Using VIZIO Internet Apps Plus® (V.I .A.
... Changing the Appearance of Your TV 46 Inspecting the Package Contents 7 Setting Timers 33 Adjusting the CEC Settings 46 Installing the TV 8 Installing the TV Stand 8 Setting the Sleep Timer 33 Setting the Auto Power Off Feature 33 Turning the Power Indicator On or Off 46 Using the Reset & Admin Menu... Your TV 7 Deleting the Custom Audio Mode 32 Changing the DLNA Name of Digital Closed Captions 39 Deleting an App from the TV 49 Using VIZIO Internet Apps Plus® (V.I .A.
User Manual English
Page 3
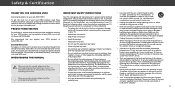
...time. • Refer all instructions. • Do not use attachments/accessories specified by the manufacturer. • Use only with the cart, stand, tripod, bracket, or table specified by the manufacturer, or sold with the apparatus. iii Keep these instructions. • Heed all warnings. ... at least three feet should be sure these instructions before operating your safety. To purchase an extended warranty service plan, visit www.VIZIO.com. When you are not sure of the type of power supplied to avoid causing fire, electric shock, or component damage....
...time. • Refer all instructions. • Do not use attachments/accessories specified by the manufacturer. • Use only with the cart, stand, tripod, bracket, or table specified by the manufacturer, or sold with the apparatus. iii Keep these instructions. • Heed all warnings. ... at least three feet should be sure these instructions before operating your safety. To purchase an extended warranty service plan, visit www.VIZIO.com. When you are not sure of the type of power supplied to avoid causing fire, electric shock, or component damage....
User Manual English
Page 7
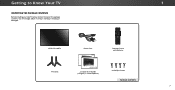
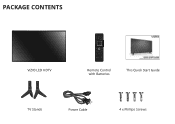
VIZIO LED UHDTV Power Cord Remote Control with Batteries TV Stands 2 x Quick Start Guides (1 English, 1 French-Spanish) 4 x Phillips Screws PACKAGE CONTENTS 7 Use the images below to inspect the package contents. Getting to Know Your TV 1 INSPECTING THE PACKAGE CONTENTS Before installing your new TV, take a moment to ensure nothing is missing or damaged.
VIZIO LED UHDTV Power Cord Remote Control with Batteries TV Stands 2 x Quick Start Guides (1 English, 1 French-Spanish) 4 x Phillips Screws PACKAGE CONTENTS 7 Use the images below to inspect the package contents. Getting to Know Your TV 1 INSPECTING THE PACKAGE CONTENTS Before installing your new TV, take a moment to ensure nothing is missing or damaged.
User Manual English
Page 8
... surface • It is pushed, pulled, or otherwise improperly moved • If an earthquake occurs and the TV is not properly secured To install the stands: It is for illustrative purposes only and may vary, depending on a soft surface, such as carpet, rug, or blanket. 1. However, the TV can ...of the TV and tighten them using a VESA-standard wall mount (not included) Installing the TV Stand Your TV includes a stand designed to the screen, place the TV on the model. 8 Insert the stands into the back of the TV and keep it from the box and inspecting the package contents you...
... surface • It is pushed, pulled, or otherwise improperly moved • If an earthquake occurs and the TV is not properly secured To install the stands: It is for illustrative purposes only and may vary, depending on a soft surface, such as carpet, rug, or blanket. 1. However, the TV can ...of the TV and tighten them using a VESA-standard wall mount (not included) Installing the TV Stand Your TV includes a stand designed to the screen, place the TV on the model. 8 Insert the stands into the back of the TV and keep it from the box and inspecting the package contents you...
User Manual English
Page 9
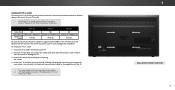
... TV. 2. This allows the TV to rest closer to the wall, carefully following the instructions that can begin the installation. D43-D2 D55-D2 D65-D2 Screw Size: M6 Hole Pattern: 200mm (V) x 200mm (H) Weight w/o Stand: 17.64 lbs M6 200mm (V) x 200mm (H) 30.42 lbs M6 400mm (V) x 400mm (H) 49.60 lbs Be ...wall mount to the wall. 1 WALL-MOUNT SCREW LOCATIONS 9 Be sure the surface is capable of supporting the weight of the TV. Remove the stands by loosening and removing the screws. 4. Use only with a UL-listed wall mount bracket rated for your TV on a wall requires lifting. ...
... TV. 2. This allows the TV to rest closer to the wall, carefully following the instructions that can begin the installation. D43-D2 D55-D2 D65-D2 Screw Size: M6 Hole Pattern: 200mm (V) x 200mm (H) Weight w/o Stand: 17.64 lbs M6 200mm (V) x 200mm (H) 30.42 lbs M6 400mm (V) x 400mm (H) 49.60 lbs Be ...wall mount to the wall. 1 WALL-MOUNT SCREW LOCATIONS 9 Be sure the surface is capable of supporting the weight of the TV. Remove the stands by loosening and removing the screws. 4. Use only with a UL-listed wall mount bracket rated for your TV on a wall requires lifting. ...

User Manual English
Page 62
...Dimensions w/ Stand: w/o Stand: Weight w/ Stand: w/o Stand: LCD Backlight: Active LED Zones: Refresh Rate: Clear Action: Maximum Resolution: Dynamic Contrast Ratio: Pixel Pitch: Viewing Angle: HDMI Inputs: Component Video Inputs: Composite Inputs: RF Antenna Input: USB Port: Ethernet: Audio Outputs: OSD Language: Ambient Light Sensor: D43-D2 43"..., Spanish Yes Remote Control Model: Certifications: Voltage Range: Power Consumption: Standby Power: Zero Bright Pixel Guarantee: B D43-D2 XRT122 UL, cUL, FCC ID Class B, ICES-003, BETs-7, ATSC, ES 7.0, NRCan, Dolby Digital Plus 120 V @ 60 Hz 27.30 W
...Dimensions w/ Stand: w/o Stand: Weight w/ Stand: w/o Stand: LCD Backlight: Active LED Zones: Refresh Rate: Clear Action: Maximum Resolution: Dynamic Contrast Ratio: Pixel Pitch: Viewing Angle: HDMI Inputs: Component Video Inputs: Composite Inputs: RF Antenna Input: USB Port: Ethernet: Audio Outputs: OSD Language: Ambient Light Sensor: D43-D2 43"..., Spanish Yes Remote Control Model: Certifications: Voltage Range: Power Consumption: Standby Power: Zero Bright Pixel Guarantee: B D43-D2 XRT122 UL, cUL, FCC ID Class B, ICES-003, BETs-7, ATSC, ES 7.0, NRCan, Dolby Digital Plus 120 V @ 60 Hz 27.30 W

User Manual English
Page 63
...Dimensions w/ Stand: w/o Stand: Weight w/ Stand: w/o Stand: LCD Backlight: Active LED Zones: Refresh Rate: Clear Action: Maximum Resolution: Dynamic Contrast Ratio: Pixel Pitch: Viewing Angle: HDMI Inputs: Component Video Inputs: Composite Inputs: RF Antenna Input: USB Port: Ethernet: Audio Outputs: OSD Language: Ambient Light Sensor: D55-D2 55"..., Spanish Yes Remote Control Model: Certifications: Voltage Range: Power Consumption: Standby Power: Zero Bright Pixel Guarantee: B D55-D2 XRT122 UL, cUL, FCC ID Class B, ICES-003, BETs-7, ATSC, ES 7.0, NRCan, Dolby Digital Plus 120 V @ 60 Hz 40.32W
...Dimensions w/ Stand: w/o Stand: Weight w/ Stand: w/o Stand: LCD Backlight: Active LED Zones: Refresh Rate: Clear Action: Maximum Resolution: Dynamic Contrast Ratio: Pixel Pitch: Viewing Angle: HDMI Inputs: Component Video Inputs: Composite Inputs: RF Antenna Input: USB Port: Ethernet: Audio Outputs: OSD Language: Ambient Light Sensor: D55-D2 55"..., Spanish Yes Remote Control Model: Certifications: Voltage Range: Power Consumption: Standby Power: Zero Bright Pixel Guarantee: B D55-D2 XRT122 UL, cUL, FCC ID Class B, ICES-003, BETs-7, ATSC, ES 7.0, NRCan, Dolby Digital Plus 120 V @ 60 Hz 40.32W

User Manual English
Page 64
...Dimensions w/ Stand: w/o Stand: Weight w/ Stand: w/o Stand: LCD Backlight: Active LED Zones: Refresh Rate: Clear Action: Maximum Resolution: Dynamic Contrast Ratio: Pixel Pitch: Viewing Angle: HDMI Inputs: Component Video Inputs: Composite Inputs: RF Antenna Input: USB Port: Ethernet: Audio Outputs: OSD Language: Ambient Light Sensor: D65-D2 65"..., Spanish Yes Remote Control Model: Certifications: Voltage Range: Power Consumption: Standby Power: Zero Bright Pixel Guarantee: B D65-D2 XRT122 UL, cUL, FCC ID Class B, ICES-003, BETs-7, ATSC, ES 7.0, NRCan, Dolby Digital Plus 120 V @ 60 Hz 40.99 W
...Dimensions w/ Stand: w/o Stand: Weight w/ Stand: w/o Stand: LCD Backlight: Active LED Zones: Refresh Rate: Clear Action: Maximum Resolution: Dynamic Contrast Ratio: Pixel Pitch: Viewing Angle: HDMI Inputs: Component Video Inputs: Composite Inputs: RF Antenna Input: USB Port: Ethernet: Audio Outputs: OSD Language: Ambient Light Sensor: D65-D2 65"..., Spanish Yes Remote Control Model: Certifications: Voltage Range: Power Consumption: Standby Power: Zero Bright Pixel Guarantee: B D65-D2 XRT122 UL, cUL, FCC ID Class B, ICES-003, BETs-7, ATSC, ES 7.0, NRCan, Dolby Digital Plus 120 V @ 60 Hz 40.99 W

Quickstart Guide English
Page 2
... damaged appliances. Unplug the power cord immediately and contact your TV. Continued use attachments/accessories specified by the manufacturer. • Use only with the cart, stand, tripod, bracket, or table specified by qualified service personnel only. Operating your TV in electric shock or fire. If the provided plug does not fit...
... damaged appliances. Unplug the power cord immediately and contact your TV. Continued use attachments/accessories specified by the manufacturer. • Use only with the cart, stand, tripod, bracket, or table specified by qualified service personnel only. Operating your TV in electric shock or fire. If the provided plug does not fit...
Quickstart Guide English
Page 6
PACKAGE CONTENTS VIZIO LED HDTV Remote Control with Batteries This Quick Start Guide TV Stands Power Cable 4 x Phillips Screws
PACKAGE CONTENTS VIZIO LED HDTV Remote Control with Batteries This Quick Start Guide TV Stands Power Cable 4 x Phillips Screws
Quickstart Guide English
Page 8
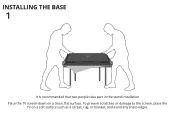
To prevent scratches or damage to the screen, place the TV on a clean, flat surface. INSTALLING THE BASE 1 It is recommended that two people take part in the stand installation Place the TV screen-down on a soft surface such as a carpet, rug, or blanket, and avoid any sharp edges.
To prevent scratches or damage to the screen, place the TV on a clean, flat surface. INSTALLING THE BASE 1 It is recommended that two people take part in the stand installation Place the TV screen-down on a soft surface such as a carpet, rug, or blanket, and avoid any sharp edges.
Quickstart Guide English
Page 9
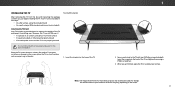
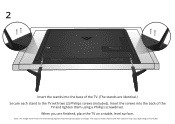
The actual number of ports and their locations may be subject to the TV with two (2) Phillips screws (included). 2 Insert the stands into the back of the TV and tighten them using a Phillips screwdriver. Insert the screws into the base of the TV. (The stands are finished, place the TV on the model. Note: The image shown here is for illustrative purposes only and may vary, depending on a stable, level surface. When you are identical.) Secure each stand to change.
The actual number of ports and their locations may be subject to the TV with two (2) Phillips screws (included). 2 Insert the stands into the back of the TV and tighten them using a Phillips screwdriver. Insert the screws into the base of the TV. (The stands are finished, place the TV on the model. Note: The image shown here is for illustrative purposes only and may vary, depending on a stable, level surface. When you are identical.) Secure each stand to change.
Quickstart Guide English
Page 21
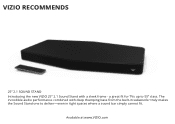
VIZIO RECOMMENDS 25" 2.1 SOUND STAND Introducing the new VIZIO 25" 2.1 Sound Stand with deep thumping bass from the built-in tight spaces where a sound bar simply cannot fit. The incredible audio performance combined with a sleek frame - Available at www.VIZIO.com a great fit for TVs up to deliver-even in subwoofer truly makes the Sound Stand one to 55" class.
VIZIO RECOMMENDS 25" 2.1 SOUND STAND Introducing the new VIZIO 25" 2.1 Sound Stand with deep thumping bass from the built-in tight spaces where a sound bar simply cannot fit. The incredible audio performance combined with a sleek frame - Available at www.VIZIO.com a great fit for TVs up to deliver-even in subwoofer truly makes the Sound Stand one to 55" class.


