User Manual
Page 2
... Reset & Admin Menu 34 Resetting a Picture Mode 17 Restoring the TV to Factory Default Settings 34 Adjusting the Color Tuner Settings 18 Using the Guided Setup Menu 35 Adjusting the Audio Settings 20 Using the Info Window 35 Changing the Equalizer Settings 20 Deleting the Custom Audio Mode 21 Setting Timers 22 Setting the Sleep Timer 22 Setting the Auto Power Off Feature 22 Setting Up Channels 23 Using the USB Media Player 36 Preparing Your USB Drive to Play USB Media 36 Displaying USB Media 36 Removing the USB Drive from the TV 36 Troubleshooting & Technical Support...
... Reset & Admin Menu 34 Resetting a Picture Mode 17 Restoring the TV to Factory Default Settings 34 Adjusting the Color Tuner Settings 18 Using the Guided Setup Menu 35 Adjusting the Audio Settings 20 Using the Info Window 35 Changing the Equalizer Settings 20 Deleting the Custom Audio Mode 21 Setting Timers 22 Setting the Sleep Timer 22 Setting the Auto Power Off Feature 22 Setting Up Channels 23 Using the USB Media Player 36 Preparing Your USB Drive to Play USB Media 36 Displaying USB Media 36 Removing the USB Drive from the TV 36 Troubleshooting & Technical Support...

User Manual
Page 3
..., or has been dropped. • Unplug the power cord before using your investment beyond the standard warranty, VIZIO offers on-site extended warranty service plans. A polarized plug has two blades with the manufacturer's instructions. • Do not install near water. • Clean only with the apparatus. Wait before operating your TV close to smoke or moisture may form in any objects on...
..., or has been dropped. • Unplug the power cord before using your investment beyond the standard warranty, VIZIO offers on-site extended warranty service plans. A polarized plug has two blades with the manufacturer's instructions. • Do not install near water. • Clean only with the apparatus. Wait before operating your TV close to smoke or moisture may form in any objects on...
User Manual
Page 4
...; The wall socket should be installed near your TV if any of time. Unplug the power that may • Do not use by • The power cord must be used as the compromise the integrity of age. The performance of electric shock to persons. moving your TV. Overloading can damage the remote control or injure the operator. Opening or removing the back...
...; The wall socket should be installed near your TV if any of time. Unplug the power that may • Do not use by • The power cord must be used as the compromise the integrity of age. The performance of electric shock to persons. moving your TV. Overloading can damage the remote control or injure the operator. Opening or removing the back...

User Manual
Page 5
..., connection to grounding electrodes, and requirements of time, unplug the TV from the wall outlet and disconnect the antenna or cable system. Ground Clamp Antenna Lead In Wire Electric Service Equipment Antenna Discharge Unit (NEC Section 810-20) Grounding Conductors (NEC Section 810-21) Ground Clamps Power Service Grounding Electrode System (NEC ART 250, part H) v Power Lines Do not locate the antenna near overhead light...
..., connection to grounding electrodes, and requirements of time, unplug the TV from the wall outlet and disconnect the antenna or cable system. Ground Clamp Antenna Lead In Wire Electric Service Equipment Antenna Discharge Unit (NEC Section 810-20) Grounding Conductors (NEC Section 810-21) Ground Clamps Power Service Grounding Electrode System (NEC ART 250, part H) v Power Lines Do not locate the antenna near overhead light...
User Manual
Page 9
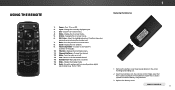
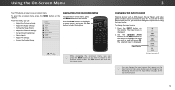
... -screen menu. 8. Close the on or off. 13. Back - Replace the battery cover. Input - V Button - Mute - Turn the audio on -screen menu. 4. Number Pad - Remove the battery cover by pressing down on the batteries match the (+) and (-) symbols inside the battery compartment. 3. Insert two batteries into the remote control. REMOTE CONTROL 9 Change the currently displayed input. 3. Wide - Guide - Increase or decrease the loudness of the audio. 10. Return to manually enter a digital sub-channel...
... -screen menu. 8. Close the on or off. 13. Back - Replace the battery cover. Input - V Button - Mute - Turn the audio on -screen menu. 4. Number Pad - Remove the battery cover by pressing down on the batteries match the (+) and (-) symbols inside the battery compartment. 3. Insert two batteries into the remote control. REMOTE CONTROL 9 Change the currently displayed input. 3. Wide - Guide - Increase or decrease the loudness of the audio. 10. Return to manually enter a digital sub-channel...
User Manual
Page 12
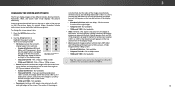
... 1 2 4 5 7 8 WIDE 0 MENU GUIDE CH CH 3 6 9 - Sleep Timer Picture Audio Network Settings Help While navigating the on the remote. The EXIT button will close the on page 28 for more information. 12 See Renaming Devices on the Input Menu on -screen menu. Use the Arrow buttons to view and press OK. To use on the remote. The selected input is TV displayed. 2. CHANGING THE INPUT SOURCE External devices such as DVD players, Blu-ray Players, and video game consoles can change the input names that...
... 1 2 4 5 7 8 WIDE 0 MENU GUIDE CH CH 3 6 9 - Sleep Timer Picture Audio Network Settings Help While navigating the on the remote. The EXIT button will close the on page 28 for more information. 12 See Renaming Devices on the Input Menu on -screen menu. Use the Arrow buttons to view and press OK. To use on the remote. The selected input is TV displayed. 2. CHANGING THE INPUT SOURCE External devices such as DVD players, Blu-ray Players, and video game consoles can change the input names that...
User Manual
Page 13
... the program is already formatted for any video content on HDMI-5. 3 13 Each mode displays the picture differently. Some programs have black bars on the remote. 2. Press the WIDE button on the top or sides of the picture so that the picture keeps its original shape. The center of the image is cut off by Input source. • 720p and 720i HD - Fills the screen from...
... the program is already formatted for any video content on HDMI-5. 3 13 Each mode displays the picture differently. Some programs have black bars on the remote. 2. Press the WIDE button on the top or sides of the picture so that the picture keeps its original shape. The center of the image is cut off by Input source. • 720p and 720i HD - Fills the screen from...

User Manual
Page 14
... manually change the picture mode: • Standard mode sets the picture settings to the default settings. • Calibrated mode sets the picture settings to values ideal for watching TV in a brightly-lit room. • Calibrated Dark mode sets the picture settings to values ideal for the best picture. The auto brightness control detects the light levels in dark or bright areas of the picture. Adjusts the black level of tAhBCe picture. When this setting is displayed. 3. Adjusts the hue of color before adjusting tint...
... manually change the picture mode: • Standard mode sets the picture settings to the default settings. • Calibrated mode sets the picture settings to values ideal for watching TV in a brightly-lit room. • Calibrated Dark mode sets the picture settings to values ideal for the best picture. The auto brightness control detects the light levels in dark or bright areas of the picture. Adjusts the black level of tAhBCe picture. When this setting is displayed. 3. Adjusts the hue of color before adjusting tint...
User Manual
Page 16
...8226; Reset Picture Mode† - VIZIO SAVE PICTURE MODE Custom1_ abc def ghi j k l mn o p q r s t u v wx y z 0 123456789 .@# .cäoêmí Space Save NEextiwt ork S2eDttings 3HDelp ABC Input Wide CC Sleep Timer Picture Audio Locking/Unlocking a Custom Picture Mode Custom picture modes can be set to Calibrated picture mode. (Available after a custom picture mode is displayed. 2. NeUtwsoerkthSeetNtinugsmbHeerlpPad on your remote to enter your custom picture mode. 3. The PICTURE MODE EDIT menu is locked) • Delete Picture Mode - Allow changes to custom...
...8226; Reset Picture Mode† - VIZIO SAVE PICTURE MODE Custom1_ abc def ghi j k l mn o p q r s t u v wx y z 0 123456789 .@# .cäoêmí Space Save NEextiwt ork S2eDttings 3HDelp ABC Input Wide CC Sleep Timer Picture Audio Locking/Unlocking a Custom Picture Mode Custom picture modes can be set to Calibrated picture mode. (Available after a custom picture mode is displayed. 2. NeUtwsoerkthSeetNtinugsmbHeerlpPad on your remote to enter your custom picture mode. 3. The PICTURE MODE EDIT menu is locked) • Delete Picture Mode - Allow changes to custom...

User Manual
Page 18
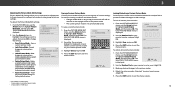
... be turned off . 4. To turn color channels off and on . 3 Adjusting the Color Tuner Settings The Color Tuner settings allow technicians to manually calibrate the TV. Calibration requires specialized training, an input with the color channels, press the EXIT button. The Color Tuner menu is displayed. Press the OK button. 3. Gain 5% 11 Point White Balance Red Green 0 0 Blue 0 2. When you are finished, press the OK button to save the setting. 4. When you are finished adjusting the color tuner settings, press the EXIT button. Use...
... be turned off . 4. To turn color channels off and on . 3 Adjusting the Color Tuner Settings The Color Tuner settings allow technicians to manually calibrate the TV. Calibration requires specialized training, an input with the color channels, press the EXIT button. The Color Tuner menu is displayed. Press the OK button. 3. Gain 5% 11 Point White Balance Red Green 0 0 Blue 0 2. When you are finished, press the OK button to save the setting. 4. When you are finished adjusting the color tuner settings, press the EXIT button. Use...

User Manual
Page 20
... Fixed When the TV speakers are controlling the volume with more than two channels (3.0, 5.0, or 5.1, for example). •Exit Ana2lDog Au3dDio Out - If this occurs, turn volume leveling off. • Balance - Wide ZYooomu muNosrtmsalelePacntoBraimtisctream for digital audio out and HDMI ARC output when connected to a home theater audio system. Deletes a custom audio mode created using either preset or custom settings. The Audio Mode and equalizer settings screen appears. 4. Press the MENU button on the remote...
... Fixed When the TV speakers are controlling the volume with more than two channels (3.0, 5.0, or 5.1, for example). •Exit Ana2lDog Au3dDio Out - If this occurs, turn volume leveling off. • Balance - Wide ZYooomu muNosrtmsalelePacntoBraimtisctream for digital audio out and HDMI ARC output when connected to a home theater audio system. Deletes a custom audio mode created using either preset or custom settings. The Audio Mode and equalizer settings screen appears. 4. Press the MENU button on the remote...
User Manual
Page 23
...using an antenna) and cable channels from an out-of-theAB-Cwall connection (without a cable box). Use the Number Pad on the remote to enter the channel.) 5. The partial channel search begins. 6. Input Wide CC Sleep Timer Sleep Timer Picture Audio Picture Audio Network Settings Help Network Settings Help 23 3 SETTING UP CHANNELS You can use the TV's Channels menu to: • Select a Channel Source • Find Channels • Perform a Partial Channel Scan • Manually Add Channels • Select channels to skip VIZIO CHANNELS Channels not searched Channel Source...
...using an antenna) and cable channels from an out-of-theAB-Cwall connection (without a cable box). Use the Number Pad on the remote to enter the channel.) 5. The partial channel search begins. 6. Input Wide CC Sleep Timer Sleep Timer Picture Audio Picture Audio Network Settings Help Network Settings Help 23 3 SETTING UP CHANNELS You can use the TV's Channels menu to: • Select a Channel Source • Find Channels • Perform a Partial Channel Scan • Manually Add Channels • Select channels to skip VIZIO CHANNELS Channels not searched Channel Source...

User Manual
Page 24
... is2Dentere3dD using the Number Pad. The TV scans for the channel, press the EXIT button on the remote. There may find that have selected all of the channel you do not want to watch comfortably. Wide Zoom Normal Panoramic Exit 2D 3D ABC Input Wide CC Sleep Timer Picture Audio Network Settings Help 3 24 Input Wide CC To remove a channel: 1. Highlight Enter Channel # and use the parentalAcBoC ntrols. From the CHANNELS menu...
... is2Dentere3dD using the Number Pad. The TV scans for the channel, press the EXIT button on the remote. There may find that have selected all of the channel you do not want to watch comfortably. Wide Zoom Normal Panoramic Exit 2D 3D ABC Input Wide CC Sleep Timer Picture Audio Network Settings Help 3 24 Input Wide CC To remove a channel: 1. Highlight Enter Channel # and use the parentalAcBoC ntrols. From the CHANNELS menu...

User Manual
Page 26
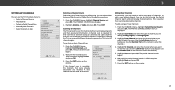
... of digital closed captioning box. • Window Opacity - To change each Input settWinidge. VIZIO DIGITAL STYLE Caption Style Text Style Text Size Text Color Text Opacity Text Edges Custom As Broadcast Large Green As Broadcast As Broadcast 3. Exit 2D 3D ABC Input Wide CC Sleep Timer Picture Audio Network Settings Help 26 Change the opacity of the text, such as shown. Use the Left/Right Arrow buttons on -screen menu is not being broadcast with closed captions...
... of digital closed captioning box. • Window Opacity - To change each Input settWinidge. VIZIO DIGITAL STYLE Caption Style Text Style Text Size Text Color Text Opacity Text Edges Custom As Broadcast Large Green As Broadcast As Broadcast 3. Exit 2D 3D ABC Input Wide CC Sleep Timer Picture Audio Network Settings Help 26 Change the opacity of the text, such as shown. Use the Left/Right Arrow buttons on -screen menu is not being broadcast with closed captions...

User Manual
Page 30
... the INFO button, set a PIN, enter the default, 0000. When a channel is displayed. 5. The on -screen menu is locked, it is locked, the Lock icon appears locked. The TIME ZONE menu is unlocked, the Lock icon appears unlocked. If you to highlight Parental Controls and press OK. 4. Use the Arrow buttons on the remote to prevent the TV from displaying certain channels or programs without a password. Input Wide CC Accessing the Parental Controls Menu To Salececpess Timer the Parental Picture Audio Controls menu: 1. The menu headed by...
... the INFO button, set a PIN, enter the default, 0000. When a channel is displayed. 5. The on -screen menu is locked, it is locked, the Lock icon appears locked. The TIME ZONE menu is unlocked, the Lock icon appears unlocked. If you to highlight Parental Controls and press OK. 4. Use the Arrow buttons on the remote to prevent the TV from displaying certain channels or programs without a password. Input Wide CC Accessing the Parental Controls Menu To Salececpess Timer the Parental Picture Audio Controls menu: 1. The menu headed by...
User Manual
Page 32
.... • Standard Definition (480i and 480p) - 3 Changing the View Mode Settings You can display images in five different modes: Normal, Stretch, Panoramic, Wide, and Zoom. The on the remote. Press the EXIT button on -screen menu is already formatted for any video content on the top and bottom of the menu. • Overlay - Some programs have black bars on the top and bottom of the...
.... • Standard Definition (480i and 480p) - 3 Changing the View Mode Settings You can display images in five different modes: Normal, Stretch, Panoramic, Wide, and Zoom. The on the remote. Press the EXIT button on -screen menu is already formatted for any video content on the top and bottom of the menu. • Overlay - Some programs have black bars on the top and bottom of the...

User Manual
Page 35
...; Channel Setup - VIZIO GUIDED SETUP Channel Setup 3. Set up one time to display channel, input, and display information. • Press the INFO or GUIDE button two times to use guided setup: 1. In this hour-long holiday special, Oliver goes on the remote. The on the remote. When finished, press the EXIT button on -screen menu is displayed. 2. Who knows what he'll encounter on the remote: • Press the INFO or GUIDE button one morning only to connect the...
...; Channel Setup - VIZIO GUIDED SETUP Channel Setup 3. Set up one time to display channel, input, and display information. • Press the INFO or GUIDE button two times to use guided setup: 1. In this hour-long holiday special, Oliver goes on the remote. The on the remote. When finished, press the EXIT button on -screen menu is displayed. 2. Who knows what he'll encounter on the remote: • Press the INFO or GUIDE button one morning only to connect the...

User Manual
Page 40
... audio connections of external devices (Blu-ray player, game console, cable/satellite box) that are using an antenna, the signal strength of the channel may be low. See Replacing the Batteries on page 22. • Select a pre-set picture mode. Connect your antenna is connected securely to the TV and move the antenna around the room or close to change the screen mode. See Adjusting the Picture Settings on page 22. • Press the INPUT button on the remote control...
... audio connections of external devices (Blu-ray player, game console, cable/satellite box) that are using an antenna, the signal strength of the channel may be low. See Replacing the Batteries on page 22. • Select a pre-set picture mode. Connect your antenna is connected securely to the TV and move the antenna around the room or close to change the screen mode. See Adjusting the Picture Settings on page 22. • Press the INPUT button on the remote control...

User Manual
Page 44
... is not available. PLEASE READ THIS WARRANTY CAREFULLY. VIZIO Technical Support will COURT OR HAVE OPTED OUT AS DESCRIBED BELOW, ANY CONTROVERSY Except where restricted by a VIZIO authorized service center; Class Action Waiver (U.S. ALL USER DATA AND DOWNLOADED APPLICATIONS STORED ON A attempt to resolve the issue informally with unreadable or removed serial numbers; (k) products This warranty contains a binding arbitration agreement and a class...
... is not available. PLEASE READ THIS WARRANTY CAREFULLY. VIZIO Technical Support will COURT OR HAVE OPTED OUT AS DESCRIBED BELOW, ANY CONTROVERSY Except where restricted by a VIZIO authorized service center; Class Action Waiver (U.S. ALL USER DATA AND DOWNLOADED APPLICATIONS STORED ON A attempt to resolve the issue informally with unreadable or removed serial numbers; (k) products This warranty contains a binding arbitration agreement and a class...

User Manual
Page 46
... or power surges; (e) signal issues; (f) damage from warranty service, whichever is subject to the VIZIO acts of the warranty on the terms set -up, or repairs attempted by a VIZIO authorized service center; (j) products with VIZIO's user guides and manuals. You will cover return shipping to Get Service VIZIO WILL NOT BE RESPONSIBLE FOR LOSS OF USE, LOSS OF Before obtaining warranty service, you always clear all applicable user data and downloaded applications...
... or power surges; (e) signal issues; (f) damage from warranty service, whichever is subject to the VIZIO acts of the warranty on the terms set -up, or repairs attempted by a VIZIO authorized service center; (j) products with VIZIO's user guides and manuals. You will cover return shipping to Get Service VIZIO WILL NOT BE RESPONSIBLE FOR LOSS OF USE, LOSS OF Before obtaining warranty service, you always clear all applicable user data and downloaded applications...


