
User Manual English
Page 2
Table Of Contents Getting to Know Your TV 7 Changing the Appearance of Digital Closed Captions 26 Rear Panel 8 Remote Control 9 Replacing the Batteries 9 Completing The First-Time Setup 10 Renaming Devices on the Input Menu 28 Changing the TV Settings 29 Viewing ... Unlocking Channels 30 Adjusting the Picture Settings 14 Blocking and Unblocking Content by Rating 31 Adjusting More Picture Settings 15 Changing the Parental Control PIN 31 Adjusting the Color Temperature 15 Resetting the Content Locks 31 Adjusting the Picture Mode Edit Settings 16 Changing the View Mode ...
Table Of Contents Getting to Know Your TV 7 Changing the Appearance of Digital Closed Captions 26 Rear Panel 8 Remote Control 9 Replacing the Batteries 9 Completing The First-Time Setup 10 Renaming Devices on the Input Menu 28 Changing the TV Settings 29 Viewing ... Unlocking Channels 30 Adjusting the Picture Settings 14 Blocking and Unblocking Content by Rating 31 Adjusting More Picture Settings 15 Changing the Parental Control PIN 31 Adjusting the Color Temperature 15 Resetting the Content Locks 31 Adjusting the Picture Mode Edit Settings 16 Changing the View Mode ...

User Manual English
Page 4
... magnitude to constitute a risk of uninsulated DANGEROUS VOLTAGE within the product's enclosure that may present a choking hazard to loud sounds can damage the remote of the reach of young children. • Insert batteries in the operating • WARNING: Keep your TV changes substantially. • This...is intended to alert the user to do not and refer all servicing to rain or other moisture. cord. the reach of children. control or injure the operator. iv Ensure that contained in accordance with liquids, such as vases, shall be exposed to excessive • The ...
... magnitude to constitute a risk of uninsulated DANGEROUS VOLTAGE within the product's enclosure that may present a choking hazard to loud sounds can damage the remote of the reach of young children. • Insert batteries in the operating • WARNING: Keep your TV changes substantially. • This...is intended to alert the user to do not and refer all servicing to rain or other moisture. cord. the reach of children. control or injure the operator. iv Ensure that contained in accordance with liquids, such as vases, shall be exposed to excessive • The ...

User Manual English
Page 9
... the audio on the arrow markings and sliding out. 2. Number Pad - Remove the battery cover by pressing down on or off. 13. REMOTE CONTROL 9 Arrows - OK / Enter - Display the info window. 9. Navigate the on -screen menu. 5. Displays the multimedia menu. 11.... to the last viewed channel. 14. Replace the battery cover. Display the on -screen menu. 6. Volume Up/Down - Wide - Insert two batteries into the remote control. USING THE REMOTE 2 INPUT EXIT 3 7 BACK 9 VOL 5 OK 6 10 1 MENU 4 8 GUIDE 11 CH VOL 1 4 7 15 WIDE CH 12 13 14 2...
... the audio on the arrow markings and sliding out. 2. Number Pad - Remove the battery cover by pressing down on or off. 13. REMOTE CONTROL 9 Arrows - OK / Enter - Display the info window. 9. Navigate the on -screen menu. 5. Displays the multimedia menu. 11.... to the last viewed channel. 14. Replace the battery cover. Display the on -screen menu. 6. Volume Up/Down - Wide - Insert two batteries into the remote control. USING THE REMOTE 2 INPUT EXIT 3 7 BACK 9 VOL 5 OK 6 10 1 MENU 4 8 GUIDE 11 CH VOL 1 4 7 15 WIDE CH 12 13 14 2...

User Manual English
Page 15
...hued picture. • Computer optimizes the picture for large areas of brightness. Select Off, Low, Medium, or High. • Backlight Control Dynamically improves the contrast ration of the picture by the digitizing of the d2iDsplaye3dD picture. Press the OK button when you are finished. •... buttons to highlight the setting you have finished adjusting More Picture Settings, press the EXIT button on the remote. VIZIO MORE PICTURE Color Temperature Black Detail Backlight Control Reduce Signal Noise Game Low Latency Picture Size & Position Film Mode Gamma Cool Off On Off Off Auto...
...hued picture. • Computer optimizes the picture for large areas of brightness. Select Off, Low, Medium, or High. • Backlight Control Dynamically improves the contrast ration of the picture by the digitizing of the d2iDsplaye3dD picture. Press the OK button when you are finished. •... buttons to highlight the setting you have finished adjusting More Picture Settings, press the EXIT button on the remote. VIZIO MORE PICTURE Color Temperature Black Detail Backlight Control Reduce Signal Noise Game Low Latency Picture Size & Position Film Mode Gamma Cool Off On Off Off Auto...

User Manual English
Page 16
...The LOCK PICTURE MODE menu is saved) • Reset Picture Mode† - Use the Number Pad on your remote to enter your 4-digit PIN. 3. Save 4. NeUtwsoerkthSeetNtinugsmbHeerlpPad on your remote to enter a unique 4-digit PIN. 3. You must create a new 4-digit PIN. 5. Delete a custom .... 4. WFridoem tZhoeomPICTNUorRmEal MPOanDorEamEicDIT menu, use the Arrow buttons to highlight Picture Mode Edit, and then press OK. VIZIO LOCK PICTURE MODE Create a picture control PIN to prevent changes to all custom picture modes: 1. Press the EXIT button to exit the menu screens....
...The LOCK PICTURE MODE menu is saved) • Reset Picture Mode† - Use the Number Pad on your remote to enter your 4-digit PIN. 3. Save 4. NeUtwsoerkthSeetNtinugsmbHeerlpPad on your remote to enter a unique 4-digit PIN. 3. You must create a new 4-digit PIN. 5. Delete a custom .... 4. WFridoem tZhoeomPICTNUorRmEal MPOanDorEamEicDIT menu, use the Arrow buttons to highlight Picture Mode Edit, and then press OK. VIZIO LOCK PICTURE MODE Create a picture control PIN to prevent changes to all custom picture modes: 1. Press the EXIT button to exit the menu screens....
User Manual English
Page 20
... immersive surround sound experience from the left and right speakers. The on -screen menu is displayed. 3. When the TV speakers are controlling the volume with more than two channels (3.0, 5.0, or 5.1, for the frequency. 7. Sleep Timer Picture Audio Network Settings Help To ... highlight a frequency and then press OK. 6. The equalizer bars change the setting: VIZIO AUDIO TV Speakers Surround Sound Balance Lip Sync - - Press the EXIT button on the remote. Adjusts the loudness of different Wide freZqooumenciNeosrmaul sinPagnoreamitihc er preset or custom settings. The ...
... immersive surround sound experience from the left and right speakers. The on -screen menu is displayed. 3. When the TV speakers are controlling the volume with more than two channels (3.0, 5.0, or 5.1, for the frequency. 7. Sleep Timer Picture Audio Network Settings Help To ... highlight a frequency and then press OK. 6. The equalizer bars change the setting: VIZIO AUDIO TV Speakers Surround Sound Balance Lip Sync - - Press the EXIT button on the remote. Adjusts the loudness of different Wide freZqooumenciNeosrmaul sinPagnoreamitihc er preset or custom settings. The ...

User Manual English
Page 29
...the Arrow buttons on the remote. The on -screen menu is WdidiesplaZyoeomd. The on -screen menu is displayed. 2. Use the Arrow buttons on -screen menu language • Set time zone and local settings • Set up administrative controls VIZIO SYSTEM System Information Menu Language ...Time & Local Settings Parental Controls View Mode Wide CEC Power Indicator Reset & Admin English Overlay Off View status information for the TV...
...the Arrow buttons on the remote. The on -screen menu is WdidiesplaZyoeomd. The on -screen menu is displayed. 2. Use the Arrow buttons on -screen menu language • Set time zone and local settings • Set up administrative controls VIZIO SYSTEM System Information Menu Language ...Time & Local Settings Parental Controls View Mode Wide CEC Power Indicator Reset & Admin English Overlay Off View status information for the TV...

User Manual English
Page 30
... is a good way to prevent children from displaying certain channels or programs without a password. The on the remote. Use the Arrow buttons on the remote to highlight Parental Controls and press OK. 4. Locking and Unlocking Channels When a channel is displayed. Locking a channel is displayed. ... content according to lock or unlock and press OK. 3. From the PARENTAL CONTROLS menu, highlight Locks and press OK. Select On or Off and press OK. The channel is displayed. 3. VIZIO June 11, 2015 11:48AM Time Zone Pacific (-8) Daylight Savings Time Auto...
... is a good way to prevent children from displaying certain channels or programs without a password. The on the remote. Use the Arrow buttons on the remote to highlight Parental Controls and press OK. 4. Locking and Unlocking Channels When a channel is displayed. Locking a channel is displayed. ... content according to lock or unlock and press OK. 3. From the PARENTAL CONTROLS menu, highlight Locks and press OK. Select On or Off and press OK. The channel is displayed. 3. VIZIO June 11, 2015 11:48AM Time Zone Pacific (-8) Daylight Savings Time Auto...

User Manual English
Page 31
...ratings can use the Number Pad on the remote to factory defaults." 2. When you want to enter your new 4-digit parental control PIN. 3. From the PARENTAL CONTROLS menu, highlight Change PIN and press OK. Write down your new 4-digit parental control PIN. 4. Resetting the Content Locks To ... by Rating A channel may sometimes broadcast programs that are finished adjusting the rating level blocks, press the EXIT button on the remote. From the PARENTAL CONTROLS menu, highlight the content type you want to block the channel completely using a channel lock, but you can be viewed. ...
...ratings can use the Number Pad on the remote to factory defaults." 2. When you want to enter your new 4-digit parental control PIN. 3. From the PARENTAL CONTROLS menu, highlight Change PIN and press OK. Write down your new 4-digit parental control PIN. 4. Resetting the Content Locks To ... by Rating A channel may sometimes broadcast programs that are finished adjusting the rating level blocks, press the EXIT button on the remote. From the PARENTAL CONTROLS menu, highlight the content type you want to block the channel completely using a channel lock, but you can be viewed. ...

User Manual English
Page 33
... CEC function on your audio device, select the HDMI ARC input 3. The on . Press the EXIT button on the remote. Press the MENU button on the TV 2. You can control: • Power On/Off • Volume • Mute Not all HDMI devices support CEC. To determain if your...front of your device is displayed. 3. Highlight Power Indicator and press OK. 4. Using CEC, your device's user manual for details. See your VIZIO TV remote can change this setting if you must select Enable. • Device Discovery - Set up your audio device and connect it to highlight System and...
... CEC function on your audio device, select the HDMI ARC input 3. The on . Press the EXIT button on the remote. Press the MENU button on the TV 2. You can control: • Power On/Off • Volume • Mute Not all HDMI devices support CEC. To determain if your...front of your device is displayed. 3. Highlight Power Indicator and press OK. 4. Using CEC, your device's user manual for details. See your VIZIO TV remote can change this setting if you must select Enable. • Device Discovery - Set up your audio device and connect it to highlight System and...
User Manual English
Page 34
...changes you restore the TV to highlight System and press OK. Press the MENU button on shortly afterward and the Setup App will begin. VIZIO RESET & ADMIN Reset TV to Factory Defaults and press OK. Wide Zoom Normal Panoramic Exit 2D 3D ABC Input Wide CC Sleep Timer ...& ADMIN MENU You can be lost! Plus Apps that you have added and any V.I.A. If you have changed the default parental control PIN, enter it now. The on the remote to the factory default settings, all account information." 6. Use the Arrow buttons on -screen menu is displayed. 2. The SYSTEM menu...
...changes you restore the TV to highlight System and press OK. Press the MENU button on shortly afterward and the Setup App will begin. VIZIO RESET & ADMIN Reset TV to Factory Defaults and press OK. Wide Zoom Normal Panoramic Exit 2D 3D ABC Input Wide CC Sleep Timer ...& ADMIN MENU You can be lost! Plus Apps that you have added and any V.I.A. If you have changed the default parental control PIN, enter it now. The on the remote to the factory default settings, all account information." 6. Use the Arrow buttons on -screen menu is displayed. 2. The SYSTEM menu...

User Manual English
Page 40
...flat or dialog is not audible. • Turn off . • Check the audio settings. See Adjusting the Picture Settings on page 9. VIZIO recommends selecting Calibrated. • Check all devices are connected correctly. Connect your device's user manual for Channels on page 28. • Check...select a different input source. • If you are securely attached. The TV displays "No Signal." • Press the INPUT button on the remote control to a window for channels. However, sometimes pixels may be low. Ensure your antenna is no image on . The colors on page 22. ...
...flat or dialog is not audible. • Turn off . • Check the audio settings. See Adjusting the Picture Settings on page 9. VIZIO recommends selecting Calibrated. • Check all devices are connected correctly. Connect your device's user manual for Channels on page 28. • Check...select a different input source. • If you are securely attached. The TV displays "No Signal." • Press the INPUT button on the remote control to a window for channels. However, sometimes pixels may be low. Ensure your antenna is no image on . The colors on page 22. ...

Quickstart Guide English
Page 3
... pulled, pushed or knocked over resulting in personal injury and/or property damage. • WARNING: Exposure to loud sounds can damage the remote control or injure the operator. Pulling on the power cord may cause fire or electric shock. • Follow instructions for moving your TV. ... your dealer for repair. Always keep the cables, parts and packaging out of the reach of young children. • Store the accessories (remote, batteries, etc.) in a location safely out of the reach of children. • The American Academy of Pediatrics discourages television viewing for ...
... pulled, pushed or knocked over resulting in personal injury and/or property damage. • WARNING: Exposure to loud sounds can damage the remote control or injure the operator. Pulling on the power cord may cause fire or electric shock. • Follow instructions for moving your TV. ... your dealer for repair. Always keep the cables, parts and packaging out of the reach of young children. • Store the accessories (remote, batteries, etc.) in a location safely out of the reach of children. • The American Academy of Pediatrics discourages television viewing for ...
Quickstart Guide English
Page 6
Table of Contents Package Contents 7 Remote Control 8 Inserting and replacing batteries 9 Installing the TV Stands 10 First-Time Setup 12 Connecting an Audio Device 16 Wall-Mounting the TV 18 Help Topics 21 Legal Information 22 Regulatory Information 23 Warranty Information 24 English - vi
Table of Contents Package Contents 7 Remote Control 8 Inserting and replacing batteries 9 Installing the TV Stands 10 First-Time Setup 12 Connecting an Audio Device 16 Wall-Mounting the TV 18 Help Topics 21 Legal Information 22 Regulatory Information 23 Warranty Information 24 English - vi

Quickstart Guide English
Page 8
... input. 3. Number Pad - Power - OK / Enter - Displays USB multimedia menu. 11. Manually enter a channel. 15. Use with number pad to the last viewed channel. 14. Remote Control 2 INPUT EXIT 3 7 BACK 9 VOL 5 OK 6 10 1 MENU 4 8 GUIDE 11 CH VOL 1 4 7 15 WIDE CH 12 13 14 2 3 5 6 8 9 0 - 16 English - 8 1. Exit - Display the info window...
... input. 3. Number Pad - Power - OK / Enter - Displays USB multimedia menu. 11. Manually enter a channel. 15. Use with number pad to the last viewed channel. 14. Remote Control 2 INPUT EXIT 3 7 BACK 9 VOL 5 OK 6 10 1 MENU 4 8 GUIDE 11 CH VOL 1 4 7 15 WIDE CH 12 13 14 2 3 5 6 8 9 0 - 16 English - 8 1. Exit - Display the info window...
Quickstart Guide English
Page 9
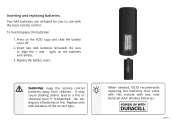
Inserting and replacing batteries. Insert two AAA batteries (included). Replace only with batteries of batteries in fire. When needed, VIZIO recommends replacing the batteries that came with this remote with the basic remote control. WARNING: keep the remote control batteries away from children. Two AAA batteries are included for you to a fire or chemical burn if mishandled...
Inserting and replacing batteries. Insert two AAA batteries (included). Replace only with batteries of batteries in fire. When needed, VIZIO recommends replacing the batteries that came with this remote with the basic remote control. WARNING: keep the remote control batteries away from children. Two AAA batteries are included for you to a fire or chemical burn if mishandled...

Quickstart Guide English
Page 21
...Audio. Use your settings will be set Volume Control to External. If you have an audio device connected to your device's user manual for more information. English - 21 The Setup App will turn on. • Press the MUTE button on the remote and select the input to which your external ...8226; To reset the TV to factory defaults, press MENU > System > Reset & Admin > Reset TV to control the volume. Help Topics How do I return to the Setup App? • The on the remote. Press the WIDE button, highlight Wide or Zoom, and press OK. • Adjust the video settings of your...
...Audio. Use your settings will be set Volume Control to External. If you have an audio device connected to your device's user manual for more information. English - 21 The Setup App will turn on. • Press the MUTE button on the remote and select the input to which your external ...8226; To reset the TV to factory defaults, press MENU > System > Reset & Admin > Reset TV to control the volume. Help Topics How do I return to the Setup App? • The on the remote. Press the WIDE button, highlight Wide or Zoom, and press OK. • Adjust the video settings of your...

