User Manual English
Page 3
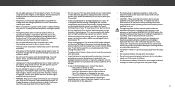
...dealer for children younger than contact your TV away from damage due to power surges. • Do not attempt to loud sounds can damage the remote control or injure the operator. moving your TV. components may • Do not use by • The power cord must be used as ...your dealer and refer all servicing to dripping or splashing and no objects filled with wet hands. Pulling on the apparatus. • Store the accessories (remote, batteries, etc.) in fire or electric shock. • The wall socket should be installed near your TV during lightning. Do not expose your ...
...dealer for children younger than contact your TV away from damage due to power surges. • Do not attempt to loud sounds can damage the remote control or injure the operator. moving your TV. components may • Do not use by • The power cord must be used as ...your dealer and refer all servicing to dripping or splashing and no objects filled with wet hands. Pulling on the apparatus. • Store the accessories (remote, batteries, etc.) in fire or electric shock. • The wall socket should be installed near your TV during lightning. Do not expose your ...

User Manual English
Page 6
... 35 Renaming Devices on a Wall 5 Front Panel 6 Rear Panel 7 Scanning for Channels 32 Adding New Channels 32 Skipping Channels 33 Specifications 52 Regulatory Information 53 Remote Control Front 8 Replacing the Batteries 8 Connecting Your Devices 14 Connecting A Device 14 Connecting A Device - Audio Cable Types 17 Connecting an Audio Device -
... 35 Renaming Devices on a Wall 5 Front Panel 6 Rear Panel 7 Scanning for Channels 32 Adding New Channels 32 Skipping Channels 33 Specifications 52 Regulatory Information 53 Remote Control Front 8 Replacing the Batteries 8 Connecting Your Devices 14 Connecting A Device 14 Connecting A Device - Audio Cable Types 17 Connecting an Audio Device -

User Manual English
Page 7
Getting to Know Your TV INSPECTING THE PACKAGE CONTENTS Before installing your new TV, take a moment to ensure nothing is missing or damaged. Use the images below to inspect the package contents. VIZIO LED HDTV Power Cord INPUT EXIT BACK OK VOL VOL 1 2 4 5 7 8 WIDE 0 MENU GUIDE CH CH 3 6 9 - Remote Control with Batteries (for D32hn-D0) Remote Control with Batteries (for D39hn-D0) TV Stands (Left and Right) 2 x Quick Start Guides (1 English, 1 French-Spanish) 4 x M4 Phillips Screws PACKAGE CONTENTS 1 7
Getting to Know Your TV INSPECTING THE PACKAGE CONTENTS Before installing your new TV, take a moment to ensure nothing is missing or damaged. Use the images below to inspect the package contents. VIZIO LED HDTV Power Cord INPUT EXIT BACK OK VOL VOL 1 2 4 5 7 8 WIDE 0 MENU GUIDE CH CH 3 6 9 - Remote Control with Batteries (for D32hn-D0) Remote Control with Batteries (for D39hn-D0) TV Stands (Left and Right) 2 x Quick Start Guides (1 English, 1 French-Spanish) 4 x M4 Phillips Screws PACKAGE CONTENTS 1 7
User Manual English
Page 10
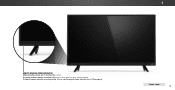
1 REMOTE SENSOR & POWER INDICATOR When using the remote, aim it directly at this sensor. FRONT PANEL 10 To keep the power indicator on as long as the TV is on, see Turning the Power Indicator On or Off on , then goes out after several seconds. The power indicator flashes on when the TV turns on page 46.
1 REMOTE SENSOR & POWER INDICATOR When using the remote, aim it directly at this sensor. FRONT PANEL 10 To keep the power indicator on as long as the TV is on, see Turning the Power Indicator On or Off on , then goes out after several seconds. The power indicator flashes on when the TV turns on page 46.
User Manual English
Page 12
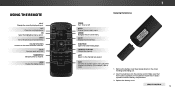
... the on . GUIDE Display the info window. LAST Return to manually enter a digital sub-channel. (For example, 18-4 or 18-5.) 1. REMOTE CONTROL 12 VOLUME UP/DOWN Increase or decrease the audio loudness. NUMBER PAD Manually enter a channel. WIDE Change the display mode. 1 Replacing the... Batteries INPUT EXIT BACK OK VOL VOL 1 2 4 5 7 8 WIDE 0 MENU GUIDE CH CH 3 6 9 - Insert two batteries into the remote control. BACK Go to the previous on -screen menu. ARROW Navigate the on -screen menu. V BUTTON Open the USB media player. Replace the battery cover...
... the on . GUIDE Display the info window. LAST Return to manually enter a digital sub-channel. (For example, 18-4 or 18-5.) 1. REMOTE CONTROL 12 VOLUME UP/DOWN Increase or decrease the audio loudness. NUMBER PAD Manually enter a channel. WIDE Change the display mode. 1 Replacing the... Batteries INPUT EXIT BACK OK VOL VOL 1 2 4 5 7 8 WIDE 0 MENU GUIDE CH CH 3 6 9 - Insert two batteries into the remote control. BACK Go to the previous on -screen menu. ARROW Navigate the on -screen menu. V BUTTON Open the USB media player. Replace the battery cover...

User Manual English
Page 13
... number pad to manually enter a digital sub-channel. (For example, 18-4 or 18-5.) 1. Replace the battery cover. 13 USING THE REMOTE INPUT Change the currently-displayed input. OK Select the highlighted menu option. Remove the battery cover by pressing down on the batteries match the ...(+) and (-) symbols inside the battery compartment. Insert two batteries into the remote control. Make sure that the (+) and (-) symbols on the arrow markings and sliding out. 2. VOLUME UP/DOWN Increase or decrease loudness of...
... number pad to manually enter a digital sub-channel. (For example, 18-4 or 18-5.) 1. Replace the battery cover. 13 USING THE REMOTE INPUT Change the currently-displayed input. OK Select the highlighted menu option. Remove the battery cover by pressing down on the batteries match the ...(+) and (-) symbols inside the battery compartment. Insert two batteries into the remote control. Make sure that the (+) and (-) symbols on the arrow markings and sliding out. 2. VOLUME UP/DOWN Increase or decrease loudness of...

User Manual English
Page 19
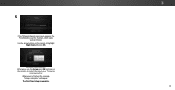
...;n en la Tienda. To complete the first-time setup: 1 INPUT EXIT BACK OK MENU GUIDE VOL CH VOL CH Press the Power button on the remote to highlight Home Use and press OK. The TV powers on a1nd the2Setup A3pp starts. 4 5 6 7 8 9 WIDE 0 - 3 Use the Arrow buttons on the... remote to highlight your language of the steps necessary to get your TV ready for use . Select Store Demo for in -store display. Before you begin ...
...;n en la Tienda. To complete the first-time setup: 1 INPUT EXIT BACK OK MENU GUIDE VOL CH VOL CH Press the Power button on the remote to highlight Home Use and press OK. The TV powers on a1nd the2Setup A3pp starts. 4 5 6 7 8 9 WIDE 0 - 3 Use the Arrow buttons on the... remote to highlight your language of the steps necessary to get your TV ready for use . Select Store Demo for in -store display. Before you begin ...
User Manual English
Page 20
Use the arrow buttons on the remote to . Otherwise, use the Arrow and OK buttons on the remote to scan for channels, which takes several minutes. 5 If the TV Signal channel scan screen appears, the TV will appear. When you are finished, the message "Setup is connected to select the input your TV source is complete." The First-Time Setup is complete. 3 20 will need to highlight Begin Scan and press OK. Note: Number of ports may differ by TV.
Use the arrow buttons on the remote to . Otherwise, use the Arrow and OK buttons on the remote to scan for channels, which takes several minutes. 5 If the TV Signal channel scan screen appears, the TV will appear. When you are finished, the message "Setup is connected to select the input your TV source is complete." The First-Time Setup is complete. 3 20 will need to highlight Begin Scan and press OK. Note: Number of ports may differ by TV.

User Manual English
Page 21
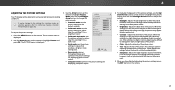
...on-screen menu. HDMI-1 HDMI-2 Input Name COMP Network Settings Help While navigating the on the remote. You can : • Adjust the Picture settings • Adjust the Audio settings •... Set up Closed Captioning • Name Inputs • Adjust TV settings • Access the Guided Setup VIZIO TV SETTINGS Picture Audio Timers Channels CC Closed Captions Devices System Guided Setup To open the on-screen menu,...To change the input source: 1. The EXIT button will close the on the remote. Press the INPUT button on -screen menu. The Input menu is displayed. See Renaming Devices on the...
...on-screen menu. HDMI-1 HDMI-2 Input Name COMP Network Settings Help While navigating the on the remote. You can : • Adjust the Picture settings • Adjust the Audio settings •... Set up Closed Captioning • Name Inputs • Adjust TV settings • Access the Guided Setup VIZIO TV SETTINGS Picture Audio Timers Channels CC Closed Captions Devices System Guided Setup To open the on-screen menu,...To change the input source: 1. The EXIT button will close the on the remote. Press the INPUT button on -screen menu. The Input menu is displayed. See Renaming Devices on the...

User Manual English
Page 22
... is cut off by Input source. • 720p and 720i HD - Not available. • 720p and 720i HD - Some programs have black bars on the remote. 2. Normal Panoramic Normal Stretch Wide Wide Zoom Zoom Note: Aspect ratio settings may appear distorted-figures appear short and fat. Not available. • 720p and...
... is cut off by Input source. • 720p and 720i HD - Not available. • 720p and 720i HD - Some programs have black bars on the remote. 2. Normal Panoramic Normal Stretch Wide Wide Zoom Zoom Note: Aspect ratio settings may appear distorted-figures appear short and fat. Not available. • 720p and...
User Manual English
Page 23
To adjust the picture settings: 1. Use the Arrow buttons on the remote. 23 VIZIO PICTURE Picture Mode Backlight - Contrast - Adjusts the LED brightness to sharpen non-HD (high definition) content; Backlight cannot be used to affect the overall brilliance ...; Calibrated mode sets the picture settings to values ideal for a picture mode, an asterisks appears after its name (see Saving a Custom Picture Mode on the remote. Adjusts the white level of the picture colors. • Tint - Adjusts the hue of the picture. however, it will not produce detail that produce a brighter...
To adjust the picture settings: 1. Use the Arrow buttons on the remote. 23 VIZIO PICTURE Picture Mode Backlight - Contrast - Adjusts the LED brightness to sharpen non-HD (high definition) content; Backlight cannot be used to affect the overall brilliance ...; Calibrated mode sets the picture settings to values ideal for a picture mode, an asterisks appears after its name (see Saving a Custom Picture Mode on the remote. Adjusts the white level of the picture colors. • Tint - Adjusts the hue of the picture. however, it will not produce detail that produce a brighter...
User Manual English
Page 24
VIZIO MORE PICTURE Color Temperature Black Detail Backlight Control Reduce Signal Noise Reduce Block Noise Game Low... STlim eeepr valuPicetsurewheAnudiito's dark. 3. Press the OK bAuBtCton when you have finished adusting the color temperature, press the EXIT button on the remote to adjust the horizontal size of the displayed picture. C • Gamma - 4 Adjusting More Picture Settings To adjust more picture settings:...; • Wide Exit Picture Size: Increase or decrease the vertical and horizontal size of the displayed picture. VIZIO COLOR TEMPERATURE Normal Cool Computer 2.
VIZIO MORE PICTURE Color Temperature Black Detail Backlight Control Reduce Signal Noise Reduce Block Noise Game Low... STlim eeepr valuPicetsurewheAnudiito's dark. 3. Press the OK bAuBtCton when you have finished adusting the color temperature, press the EXIT button on the remote to adjust the horizontal size of the displayed picture. C • Gamma - 4 Adjusting More Picture Settings To adjust more picture settings:...; • Wide Exit Picture Size: Increase or decrease the vertical and horizontal size of the displayed picture. VIZIO COLOR TEMPERATURE Normal Cool Computer 2.
User Manual English
Page 25
...custom picture modes. (Available after a custom picture mode is saved) • Reset Picture Mode† - MyMode Save Picture Mode Unlock Picture Mode Delete Picture Mode - VIZIO SAVE PICTURE MODE Custom1_ abc def ghi j k l mn o p q r s t u v wx y z 0 123456789 .@# .cäoêmí Space ... adjust the Picture Mode Edit settings: 1. Delete a custom picture mode. VIZIO PICTURE MODE EDIT - Save 4. ABC To uInnpulot ck aWlildceustoCmC picture modes: Create a 4 digit passcode using the number keys on your remote to highlight Lock Picture Mode, and then press OK. You must create...
...custom picture modes. (Available after a custom picture mode is saved) • Reset Picture Mode† - MyMode Save Picture Mode Unlock Picture Mode Delete Picture Mode - VIZIO SAVE PICTURE MODE Custom1_ abc def ghi j k l mn o p q r s t u v wx y z 0 123456789 .@# .cäoêmí Space ... adjust the Picture Mode Edit settings: 1. Delete a custom picture mode. VIZIO PICTURE MODE EDIT - Save 4. ABC To uInnpulot ck aWlildceustoCmC picture modes: Create a 4 digit passcode using the number keys on your remote to highlight Lock Picture Mode, and then press OK. You must create...
User Manual English
Page 27
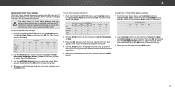
.... To adjust the 11 Point White Balance settings: 1. To adjust the HSB color settings: 1. Use the Arrow buttons on the remote to highlight Red, Green, or Blue. 3. The Color Tuner, 11 Point White Balance, and test patterns allow you are finished ...Magenta Yellow Hue 0 0 0 0 25 -14 Saturation -1 5 -4 0 -2 0 Brightness -24 0 -22 0 0 0 Offset 0 0 0 Gain 0 0 0 2. Use the Arrow buttons on the remote to highlight the Gain and Color values you are finished adjusting the color tuner settings, press the EXIT button. Use the Arrow buttons to highlight...
.... To adjust the 11 Point White Balance settings: 1. To adjust the HSB color settings: 1. Use the Arrow buttons on the remote to highlight Red, Green, or Blue. 3. The Color Tuner, 11 Point White Balance, and test patterns allow you are finished ...Magenta Yellow Hue 0 0 0 0 25 -14 Saturation -1 5 -4 0 -2 0 Brightness -24 0 -22 0 0 0 Offset 0 0 0 Gain 0 0 0 2. Use the Arrow buttons on the remote to highlight the Gain and Color values you are finished adjusting the color tuner settings, press the EXIT button. Use the Arrow buttons to highlight...

User Manual English
Page 28
... the EXIT button. 2. To hide the SMPTE Test Pattern, use the Left/Right Arrow buttons to highlight Off. 3. Use the Arrow buttons on the remote to highlight Off. Selecting a color immediately shows that brightness. -or- Use the Left/Right Arrow buttons to highlight Off. Flat Test Pattern Off To show... buttons until the Flat Test Pattern menu is displayed. When you are finished, press the EXIT button. 2. Use the Arrow buttons on the remote to select the color for the flat test pattern. To disable the Flat Test Pattern, use the Arrow buttons to show or hide the Flat...
... the EXIT button. 2. To hide the SMPTE Test Pattern, use the Left/Right Arrow buttons to highlight Off. 3. Use the Arrow buttons on the remote to highlight Off. Selecting a color immediately shows that brightness. -or- Use the Left/Right Arrow buttons to highlight Off. Flat Test Pattern Off To show... buttons until the Flat Test Pattern menu is displayed. When you are finished, press the EXIT button. 2. Use the Arrow buttons on the remote to select the color for the flat test pattern. To disable the Flat Test Pattern, use the Arrow buttons to show or hide the Flat...
User Manual English
Page 29
...if desired, and adjust it. 8. Press the EXIT button on the remote. The on -screen menu is displayed. 2. VIZIO AUDIO TV Speakers Surround Sound Balance - See Deleting the Custom Audio Mode on the remote. The Audio Mode and equalizer settings screen appears. 4. Press the EXIT...press OK. Changing the Equalizer Settings The graphic equalizer has several pre-set audio mode: 1. Use the Arrow buttons on the remote. The AUDIO menu is displayed. 3. TruSurround completes the entertainment experience by providing deep, rich bass and by delivering crisp details and...
...if desired, and adjust it. 8. Press the EXIT button on the remote. The on -screen menu is displayed. 2. VIZIO AUDIO TV Speakers Surround Sound Balance - See Deleting the Custom Audio Mode on the remote. The Audio Mode and equalizer settings screen appears. 4. Press the EXIT...press OK. Changing the Equalizer Settings The graphic equalizer has several pre-set audio mode: 1. Use the Arrow buttons on the remote. The AUDIO menu is displayed. 3. TruSurround completes the entertainment experience by providing deep, rich bass and by delivering crisp details and...
User Manual English
Page 30
The TV displays, "To delete the user created custom audio mode, select the Delete button." 4. Use the Arrow buttons to highlight Audio and press OK. Use the Arrow buttons on -screen menu is displayed. 3. The on the remote to highlight Delete Audio Mode and press OK. The AUDIO menu is displayed. 2. Highlight Delete and press OK. 5. Press the MENU button on the remote. 4 30 Press the EXIT button on the remote. Deleting the Custom Audio Mode To delete the custom audio mode that has been created: 1.
The TV displays, "To delete the user created custom audio mode, select the Delete button." 4. Use the Arrow buttons to highlight Audio and press OK. Use the Arrow buttons on -screen menu is displayed. 3. The on the remote to highlight Delete Audio Mode and press OK. The AUDIO menu is displayed. 2. Highlight Delete and press OK. 5. Press the MENU button on the remote. 4 30 Press the EXIT button on the remote. Deleting the Custom Audio Mode To delete the custom audio mode that has been created: 1.
User Manual English
Page 31
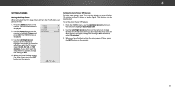
...screen menu is displayed. The TIMERS menu is displayed. 2. This feature can be deactivated. WUidsee thZoeom Left/NRorimgahl t PAarnroroawmicbuttons on the remote. VIZIO TIMERS Sleep Timer Auto Power Off Off 10 minutes 3. ABC Input Wide CC Sleep Timer Picture Audio Network Settings Help 4 31 Press ...When you have finished setting the auto power off time, press the EXIT button on the remote. If you have finished setting the sleep timer, press the EXIT button on the remote. SETTING TIMERS Setting the Sleep Timer When activated, the TV's sleep timer will turn off....
...screen menu is displayed. The TIMERS menu is displayed. 2. This feature can be deactivated. WUidsee thZoeom Left/NRorimgahl t PAarnroroawmicbuttons on the remote. VIZIO TIMERS Sleep Timer Auto Power Off Off 10 minutes 3. ABC Input Wide CC Sleep Timer Picture Audio Network Settings Help 4 31 Press ...When you have finished setting the auto power off time, press the EXIT button on the remote. If you have finished setting the sleep timer, press the EXIT button on the remote. SETTING TIMERS Setting the Sleep Timer When activated, the TV's sleep timer will turn off....
User Manual English
Page 32
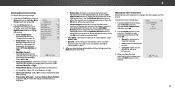
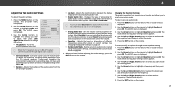
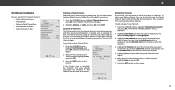
... it can display programs Exit 2D 3D and their associated information. The partial channel search begins. 6. IPnpruetss thWeideEXIT ACbBCuC tton on the remote. Press EXIT. 4 SETTING UP CHANNELS You can use the TV's Channels menu to: • Select a Channel Source •... Find Channels • Perform a Partial Channel Scan • Manually Add Channels • Select channels to skip VIZIO CHANNELS Channels not searched Channel Source Find Channel Partial Channel Search Add Analog Channel Skip Channel Analog Audio Digital Language Cable Stereo English ...
... it can display programs Exit 2D 3D and their associated information. The partial channel search begins. 6. IPnpruetss thWeideEXIT ACbBCuC tton on the remote. Press EXIT. 4 SETTING UP CHANNELS You can use the TV's Channels menu to: • Select a Channel Source •... Find Channels • Perform a Partial Channel Scan • Manually Add Channels • Select channels to skip VIZIO CHANNELS Channels not searched Channel Source Find Channel Partial Channel Search Add Analog Channel Skip Channel Analog Audio Digital Language Cable Stereo English ...
User Manual English
Page 33
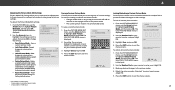
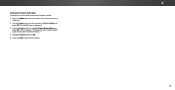
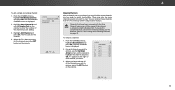
...of each channel you do not want to the right of the channels you select. VIZIO SKIP CHANNEL 1 Test 0 1 Test 1 P 1-2 Test 2 P 2 Test 3 2-2 Test 4 P 2-3 Test 5 3. VIZIO ADD ANALOG CHANNEL Enter Channel Add Channel Skipping Channels After a channel scan is done... scanning for the channel. 4. For each channel you wish to remove, press the EXIT button on the remote to completely block a channel from being viewed, use the ...
...of each channel you do not want to the right of the channels you select. VIZIO SKIP CHANNEL 1 Test 0 1 Test 1 P 1-2 Test 2 P 2 Test 3 2-2 Test 4 P 2-3 Test 5 3. VIZIO ADD ANALOG CHANNEL Enter Channel Add Channel Skipping Channels After a channel scan is done... scanning for the channel. 4. For each channel you wish to remove, press the EXIT button on the remote to completely block a channel from being viewed, use the ...


