Quickstart Guide English
Page 2
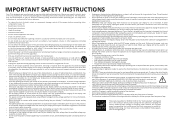
... power is always flowing into your display. • Your display is exposed to rain or other voltage than the other components to your TV. • Read these instructions. • Keep these instructions in any objects on your display cabinet. Keep these instructions. • Heed...high voltages, electric shock, and other than the voltage specified. This may result in any ventilation openings. IMPORTANT SAFETY INSTRUCTIONS Your TV is required, contact your dealer and refer all servicing to qualified service personnel. • WARNING: Keep your display away from ...
... power is always flowing into your display. • Your display is exposed to rain or other voltage than the other components to your TV. • Read these instructions. • Keep these instructions in any objects on your display cabinet. Keep these instructions. • Heed...high voltages, electric shock, and other than the voltage specified. This may result in any ventilation openings. IMPORTANT SAFETY INSTRUCTIONS Your TV is required, contact your dealer and refer all servicing to qualified service personnel. • WARNING: Keep your display away from ...
Quickstart Guide English
Page 3
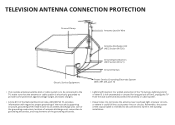
... Electrode System (NEC ART 250, part H) • If an outside antenna/satellite dish or cable system is to be connected to the TV, make sure that the antenna or cable system is electrically grounded to provide some protection against voltage surges and static charges. • Article ... discharge unit, connection to grounding electrodes, and requirements of the grounding electrode. • Lightning Protection: For added protection of time, unplug the TV from the wall outlet and disconnect the antenna or cable system. • Power Lines: Do not locate the antenna near overhead light or power...
... Electrode System (NEC ART 250, part H) • If an outside antenna/satellite dish or cable system is to be connected to the TV, make sure that the antenna or cable system is electrically grounded to provide some protection against voltage surges and static charges. • Article ... discharge unit, connection to grounding electrodes, and requirements of the grounding electrode. • Lightning Protection: For added protection of time, unplug the TV from the wall outlet and disconnect the antenna or cable system. • Power Lines: Do not locate the antenna near overhead light or power...
Quickstart Guide English
Page 6
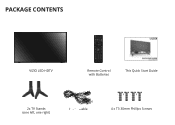
PACKAGE CONTENTS VIZIO LED HDTV Remote Control with Batteries This Quick Start Guide 2x TV Stands (one left, one right) Power Cable 4 x T3 30mm Phillips Screws
PACKAGE CONTENTS VIZIO LED HDTV Remote Control with Batteries This Quick Start Guide 2x TV Stands (one left, one right) Power Cable 4 x T3 30mm Phillips Screws
Quickstart Guide English
Page 7
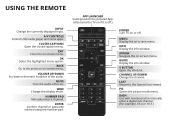
... pad to the channel last viewed. EXIT Close the on -screen menu. APP LAUNCHER Quickly launch the pictured App. (Also turns the TV on if it is off.) POWER Turn TV on or off or on. INFO Display the info window. ARROW Navigate the on -screen menu. V BUTTON Open the VIA dock...
... pad to the channel last viewed. EXIT Close the on -screen menu. APP LAUNCHER Quickly launch the pictured App. (Also turns the TV on if it is off.) POWER Turn TV on or off or on. INFO Display the info window. ARROW Navigate the on -screen menu. V BUTTON Open the VIA dock...

Quickstart Guide English
Page 8
To prevent scratches or damage to the screen, place the TV on a clean, flat surface. INSTALLING THE BASE 1 It is recommended that two people take part in the stand installation Place the TV screen-down on a soft surface such as a carpet, rug, or blanket, and avoid any sharp edges.
To prevent scratches or damage to the screen, place the TV on a clean, flat surface. INSTALLING THE BASE 1 It is recommended that two people take part in the stand installation Place the TV screen-down on a soft surface such as a carpet, rug, or blanket, and avoid any sharp edges.
Quickstart Guide English
Page 9
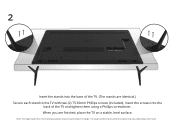
The actual number of ports and their locations may be subject to the TV with two (2) T3 30mm Phillips screws (included). When you are identical.) Secure each stand to change. 2 Insert the stands into the back of the TV and tighten them using a Phillips screwdriver. Insert the screws into the base of the TV. (The stands are finished, place the TV on the model. Note: The image shown here is for illustrative purposes only and may vary, depending on a stable, level surface.
The actual number of ports and their locations may be subject to the TV with two (2) T3 30mm Phillips screws (included). When you are identical.) Secure each stand to change. 2 Insert the stands into the back of the TV and tighten them using a Phillips screwdriver. Insert the screws into the base of the TV. (The stands are finished, place the TV on the model. Note: The image shown here is for illustrative purposes only and may vary, depending on a stable, level surface.
Quickstart Guide English
Page 10
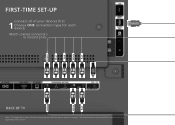
BACK OF TV Note: The image shown here is for each device. The actual number of your devices first. 1 Choose ONE connection type for illustrative purposes only and may vary, depending on the model. Green Blue Red White Red CFIORNSTN-TEICMTIENSGETY-OUUPR DEVICES Connect all of ports and their locations may be subject to colored ports. Match colored connectors to change. Yellow White Red
BACK OF TV Note: The image shown here is for each device. The actual number of your devices first. 1 Choose ONE connection type for illustrative purposes only and may vary, depending on the model. Green Blue Red White Red CFIORNSTN-TEICMTIENSGETY-OUUPR DEVICES Connect all of ports and their locations may be subject to colored ports. Match colored connectors to change. Yellow White Red
Quickstart Guide English
Page 12
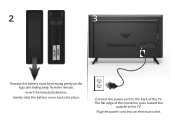
The flat edge of the connector goes toward the outside of the TV. Connect the power cord to the back of the TV. Plug the power cord into place. Insert the included batteries. 2 3 Remove the battery cover by pressing gently on the logo and sliding away from the remote. Gently slide the battery cover back into an electrical outlet.
The flat edge of the connector goes toward the outside of the TV. Connect the power cord to the back of the TV. Plug the power cord into place. Insert the included batteries. 2 3 Remove the battery cover by pressing gently on the logo and sliding away from the remote. Gently slide the battery cover back into an electrical outlet.
Quickstart Guide English
Page 13
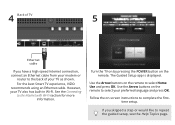
For the best Smart TV experience, VIZIO recommends using an Ethernet cable. However, your preferred language and press OK. Turn the TV on by pressing the POWER button on the remote to the Internet with Wi-Fi section for more information. Use the Arrow buttons on -screen ... Help Topics page. 4 Back of your modem or router to select Home Use and press OK. Follow the on the remote to the back of TV 5 Ethernet cable If you skipped a step or would like to complete the firsttime setup. If you have a high-speed Internet connection, connect an Ethernet cable...
For the best Smart TV experience, VIZIO recommends using an Ethernet cable. However, your preferred language and press OK. Turn the TV on by pressing the POWER button on the remote to the Internet with Wi-Fi section for more information. Use the Arrow buttons on -screen ... Help Topics page. 4 Back of your modem or router to select Home Use and press OK. Follow the on the remote to the back of TV 5 Ethernet cable If you skipped a step or would like to complete the firsttime setup. If you have a high-speed Internet connection, connect an Ethernet cable...
Quickstart Guide English
Page 14
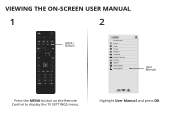
VIEWING THE ON-SCREEN USER MANUAL 1 2 MENU Button TV SETTINGS Picture Audio Timers Network Channels CC Closed Captions Devices System Guided Setup User Manual User Manual Press the MENU button on the Remote Control to display the TV SETTINGS menu. Highlight User Manual and press OK.
VIEWING THE ON-SCREEN USER MANUAL 1 2 MENU Button TV SETTINGS Picture Audio Timers Network Channels CC Closed Captions Devices System Guided Setup User Manual User Manual Press the MENU button on the Remote Control to display the TV SETTINGS menu. Highlight User Manual and press OK.

Quickstart Guide English
Page 15
... to return to the Table of Contents Installing the TV Controls and Connections Connecting your Devices Completing the First-Time Setup Using the On-Screen Menu Using the USB Media Player Using VIZIO Internet Apps Specifications Limited Warranty Legal & Compliance LED HDTV WITH VIZIO INTERNET APPS PLUS® E50-C1 and E55-C1... Right Arrow buttons to exit the on-screen User Manual. Table of Contents Page. USER MANUAL USE YOUR REMOTE Previous Page Next Page Menu Open TV Menu PAGE NUMBER 1 OF 53 To skip to view.
... to return to the Table of Contents Installing the TV Controls and Connections Connecting your Devices Completing the First-Time Setup Using the On-Screen Menu Using the USB Media Player Using VIZIO Internet Apps Specifications Limited Warranty Legal & Compliance LED HDTV WITH VIZIO INTERNET APPS PLUS® E50-C1 and E55-C1... Right Arrow buttons to exit the on-screen User Manual. Table of Contents Page. USER MANUAL USE YOUR REMOTE Previous Page Next Page Menu Open TV Menu PAGE NUMBER 1 OF 53 To skip to view.
Quickstart Guide English
Page 16
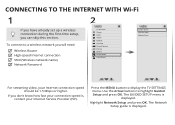
...a wireless connection during the first-time setup, you will need: Wireless Router High-speed Internet connection SSID (Wireless network name) Network Password TV SETTINGS Picture Audio Timers Network Channels CC Closed Captions Devices System Guided Setup User Manual GUIDED SETUP Channel Setup Network Setup For streaming video, your... MENU button to highlight Guided Setup and press OK. Highlight Network Setup and press OK. Use the Arrow buttons to display the TV SETTINGS menu. If you don't know how fast your Internet Service Provider (ISP). The Network Setup guide is displayed.
...a wireless connection during the first-time setup, you will need: Wireless Router High-speed Internet connection SSID (Wireless network name) Network Password TV SETTINGS Picture Audio Timers Network Channels CC Closed Captions Devices System Guided Setup User Manual GUIDED SETUP Channel Setup Network Setup For streaming video, your... MENU button to highlight Guided Setup and press OK. Highlight Network Setup and press OK. Use the Arrow buttons to display the TV SETTINGS menu. If you don't know how fast your Internet Service Provider (ISP). The Network Setup guide is displayed.
Quickstart Guide English
Page 17
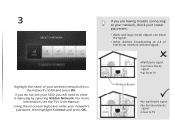
If you will need to enter it manually by selecting Hidden Network. If you do not see the TV's User Manual. O • Wall blocks signal • Furniture blocks signal • Far from TV Wireless Router P • No wall blocks signal • No furniture blocks signal • Close ...to your network, check your SSID, you are having trouble connecting to TV Using the on-screen keyboard, enter your wireless network (this is the network's SSID) and press OK. For more information, see your router placement...
If you will need to enter it manually by selecting Hidden Network. If you do not see the TV's User Manual. O • Wall blocks signal • Furniture blocks signal • Far from TV Wireless Router P • No wall blocks signal • No furniture blocks signal • Close ...to your network, check your SSID, you are having trouble connecting to TV Using the on-screen keyboard, enter your wireless network (this is the network's SSID) and press OK. For more information, see your router placement...

Quickstart Guide English
Page 18
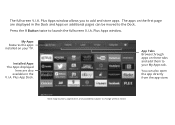
... the dock.) Press the V Button to launch the fullscreen V.I .A. Plus App Dock Press the OK button to your TV. Press the V Button twice to display the V.I.A. GETTING STARTED WITH VIZIO INTERNET APPS PLUS® VIZIO Internet Apps Plus® (V.I .A. Plus Apps window. V.I .A. Plus) delivers popular online content to launch an App. A high-speed...
... the dock.) Press the V Button to launch the fullscreen V.I .A. Plus App Dock Press the OK button to your TV. Press the V Button twice to display the V.I.A. GETTING STARTED WITH VIZIO INTERNET APPS PLUS® VIZIO Internet Apps Plus® (V.I .A. Plus Apps window. V.I .A. Plus) delivers popular online content to launch an App. A high-speed...
Quickstart Guide English
Page 19
... here are also available in the Dock and Apps on the first page are displayed in the V.I .A. The fullscreen V.I .A. Press the V Button twice to your TV. App Tabs Browse through apps on your My Apps tab. The apps on additional pages can also open the app directly from the app store...
... here are also available in the Dock and Apps on the first page are displayed in the V.I .A. The fullscreen V.I .A. Press the V Button twice to your TV. App Tabs Browse through apps on your My Apps tab. The apps on additional pages can also open the app directly from the app store...
Quickstart Guide English
Page 20
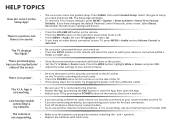
... UP button on the remote. • Press the MUTE button on the remote and select the input to which your settings will begin. The TV displays "No Signal." • Be sure your connected devices are connecting wirelessly, try plugging the power cord into a different outlet. Press the WIDE... button, highlight Wide or Zoom, and press OK. Be sure TV Speakers is not responding. • Make sure the batteries are using an Ethernet cable, ensure it now. The remote is set Volume Control to...
... UP button on the remote. • Press the MUTE button on the remote and select the input to which your settings will begin. The TV displays "No Signal." • Be sure your connected devices are connecting wirelessly, try plugging the power cord into a different outlet. Press the WIDE... button, highlight Wide or Zoom, and press OK. Be sure TV Speakers is not responding. • Make sure the batteries are using an Ethernet cable, ensure it now. The remote is set Volume Control to...
Quickstart Guide English
Page 21
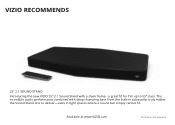
a great fit for TVs up to deliver-even in subwoofer truly makes the Sound Stand one to 55" class. The incredible audio performance combined with a sleek frame - VIZIO RECOMMENDS 25" 2.1 SOUND STAND Introducing the new VIZIO 25" 2.1 Sound Stand with deep thumping bass from the built-in tight spaces where a sound bar simply cannot fit. Available at www.VIZIO.com This Product Sold Separately
a great fit for TVs up to deliver-even in subwoofer truly makes the Sound Stand one to 55" class. The incredible audio performance combined with a sleek frame - VIZIO RECOMMENDS 25" 2.1 SOUND STAND Introducing the new VIZIO 25" 2.1 Sound Stand with deep thumping bass from the built-in tight spaces where a sound bar simply cannot fit. Available at www.VIZIO.com This Product Sold Separately

Quickstart Guide English
Page 23
... cas où l'utilisateur cherche à obtenir de la protection des autres services de radio fonctionnant sur les mêmes bandes TV, aucune license est requise. Shielded interface cables and AC power cord, if any interference received, including interference that interference will not occur ...norme NMB-003 du Canada. This device complies with Canadian ICES-003. This equipment generates, uses and can be used in the same TV bands, a radio license is no deseada. Industry Canada Class B emission compliance statement Notice The changes or modifications not expressly approved by the...
... cas où l'utilisateur cherche à obtenir de la protection des autres services de radio fonctionnant sur les mêmes bandes TV, aucune license est requise. Shielded interface cables and AC power cord, if any interference received, including interference that interference will not occur ...norme NMB-003 du Canada. This device complies with Canadian ICES-003. This equipment generates, uses and can be used in the same TV bands, a radio license is no deseada. Industry Canada Class B emission compliance statement Notice The changes or modifications not expressly approved by the...


