
User Manual (English)
Page 5
... operating instructions unless you are unplugged before moving your TV, hold the AC/DC power adapter, not the cord. Do not expose batteries to persons. Your TV is intended to alert the user to do so. To reduce the risk of uninsulated DANGEROUS VOLTAGE within an equilateral triangle is exposed to leak which can damage the remote control...
... operating instructions unless you are unplugged before moving your TV, hold the AC/DC power adapter, not the cord. Do not expose batteries to persons. Your TV is intended to alert the user to do so. To reduce the risk of uninsulated DANGEROUS VOLTAGE within an equilateral triangle is exposed to leak which can damage the remote control...
User Manual (English)
Page 6
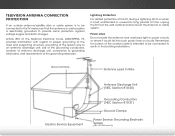
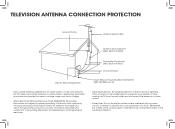
..., size of the grounding conductors, location of antenna discharge unit, connection to grounding electrodes, and requirements of time, unplug the TV from the wall outlet and disconnect the antenna or cable system. Remember, the screen of the TV during a lightning storm or when it could fall into such power lines or circuits. TELEVISION ANTENNA CONNECTION PROTECTION If an outside antenna/satellite dish or cable...
..., size of the grounding conductors, location of antenna discharge unit, connection to grounding electrodes, and requirements of time, unplug the TV from the wall outlet and disconnect the antenna or cable system. Remember, the screen of the TV during a lightning storm or when it could fall into such power lines or circuits. TELEVISION ANTENNA CONNECTION PROTECTION If an outside antenna/satellite dish or cable...
User Manual (English)
Page 7
...Custom Picture Mode 26 Adjusting the Audio Settings 27 Resetting the Audio Settings 28 Activating the Sleep Timer 28 Setting the Auto Power Off Feature 29 Setting Up the Tuner 29 Selecting a Tuner Input 30 Scanning for Channels 30 Adding New Channels 30 Skipping Channels 31 Changing the Audio Language 32 Setting Up Closed Captioning 33 Changing the Appearance of Contents Installing the TV 3 Inspecting the Package Contents 3 Installing the TV 3 Installing the TV Stand 3 Installing the TV on a Wall 5 Controls and Connections 6 Rear Panel 6 Side Panel 7 Front Panel 8 Remote...
...Custom Picture Mode 26 Adjusting the Audio Settings 27 Resetting the Audio Settings 28 Activating the Sleep Timer 28 Setting the Auto Power Off Feature 29 Setting Up the Tuner 29 Selecting a Tuner Input 30 Scanning for Channels 30 Adding New Channels 30 Skipping Channels 31 Changing the Audio Language 32 Setting Up Closed Captioning 33 Changing the Appearance of Contents Installing the TV 3 Inspecting the Package Contents 3 Installing the TV 3 Installing the TV Stand 3 Installing the TV on a Wall 5 Controls and Connections 6 Rear Panel 6 Side Panel 7 Front Panel 8 Remote...
User Manual (English)
Page 8
Setting the Time Zone 39 Adjusting the CEC Settings 40 Turning the Power Indicator On or Off 40 Using the Reset & Admin Menu 41 Restoring the TV to Factory Default Settings 41 Using the Guided Setup Menu 42 Using Guided Setup 42 Using the Info Window 43 Using the USB Media Player 44 Using the USB Media Player 44 Connecting a USB Thumb Drive to the TV 44 Playing USB Media 44 Troubleshooting & Technical Support 46 Specifications 49 Limited Warranty 51 Legal & Compliance 52 2
Setting the Time Zone 39 Adjusting the CEC Settings 40 Turning the Power Indicator On or Off 40 Using the Reset & Admin Menu 41 Restoring the TV to Factory Default Settings 41 Using the Guided Setup Menu 42 Using Guided Setup 42 Using the Info Window 43 Using the USB Media Player 44 Using the USB Media Player 44 Connecting a USB Thumb Drive to the TV 44 Playing USB Media 44 Troubleshooting & Technical Support 46 Specifications 49 Limited Warranty 51 Legal & Compliance 52 2
User Manual (English)
Page 11
... instructions that can begin the installation. Disconnect any cables connected to find the appropriate mount for your mount. Attach your TV model: Installing a TV on a clean, flat, stable surface. Place the TV face-down on a wall requires lifting. Use only with your TV, you choose is clear of debris that came with a UL-listed wall mount bracket rated for the weight/load of the TV. Screw Size: Hole Pattern: Weight w/o Stand: D390-B0...
... instructions that can begin the installation. Disconnect any cables connected to find the appropriate mount for your mount. Attach your TV model: Installing a TV on a clean, flat, stable surface. Place the TV face-down on a wall requires lifting. Use only with your TV, you choose is clear of debris that came with a UL-listed wall mount bracket rated for the weight/load of the TV. Screw Size: Hole Pattern: Weight w/o Stand: D390-B0...
User Manual (English)
Page 23
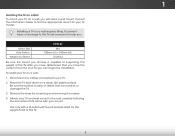
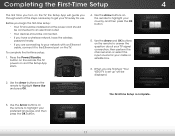
... the Setup App INPUT starts. The TV powers on the remote to an electrical outlet. • Your devices should be displayed. EXIT MENU OK BACK GUIDE 2. Select Store Demo for your mode. The First-Time Setup is set up" will be connected. • If you have a wireless network, have the wireless password ready. • If you are connecting to your network with an Ethernet cable, connect it to the Ethernet port on...
... the Setup App INPUT starts. The TV powers on the remote to an electrical outlet. • Your devices should be displayed. EXIT MENU OK BACK GUIDE 2. Select Store Demo for your mode. The First-Time Setup is set up" will be connected. • If you have a wireless network, have the wireless password ready. • If you are connecting to your network with an Ethernet cable, connect it to the Ethernet port on...
User Manual (English)
Page 25
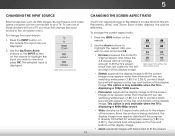
... formatted for widescreen viewing (1.85:1 or 2.35:1), then black bars will still appear on the top and bottom of the display image. Use the Arrow buttons to highlight the aspect ratio you must first change the screen aspect ratio: 1. 5 CHANGING THE INPUT SOURCE CHANGING THE SCREEN ASPECT RATIO External devices such as DVD players, Blu-ray Players, and video game consoles can display images in the on-screen menu. TV COMP HDMI-1 HDMI-2 Note: Inputs...
... formatted for widescreen viewing (1.85:1 or 2.35:1), then black bars will still appear on the top and bottom of the display image. Use the Arrow buttons to highlight the aspect ratio you must first change the screen aspect ratio: 1. 5 CHANGING THE INPUT SOURCE CHANGING THE SCREEN ASPECT RATIO External devices such as DVD players, Blu-ray Players, and video game consoles can display images in the on-screen menu. TV COMP HDMI-1 HDMI-2 Note: Inputs...
User Manual (English)
Page 26
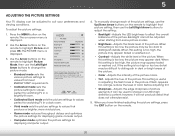
... the picture. VIZIO PICTURE Picture Mode Backlight - When you have finished adjusting the picture settings, press the EXIT button on the remote to values that does not otherwise exist. 5. To reduce video delay (lag) when gaming, use Calibrated mode. When this setting is too high, the picture may appear dark. Color - When this setting is too high, the Exit pic2tDure ma3Dy appear faded or washed out. • Contrast - Sleep • Timer...
... the picture. VIZIO PICTURE Picture Mode Backlight - When you have finished adjusting the picture settings, press the EXIT button on the remote to values that does not otherwise exist. 5. To reduce video delay (lag) when gaming, use Calibrated mode. When this setting is too high, the picture may appear dark. Color - When this setting is too high, the Exit pic2tDure ma3Dy appear faded or washed out. • Contrast - Sleep • Timer...
User Manual (English)
Page 28
... PICTURE menu, use the Arrow buttons to change the setting: VIZIO PROFESSIONAL PICTURE Color Tuner Rename Picture Mode Create Picture Mode Lock Picture Mode Delete Picture Mode • Color Tuner - Use the Arrow buttons to highlight the setting you wish to Calibrated picture mode. Adjust the professional HSB color and 11 point white balance. • Rename Picture Mode Rename a custom picture mode. • Create Picture Mode Create a custom picture mode. • Lock Picture Mode - Adjusting the Color Tuner Settings You can manage custom picture modes and adjust professional...
... PICTURE menu, use the Arrow buttons to change the setting: VIZIO PROFESSIONAL PICTURE Color Tuner Rename Picture Mode Create Picture Mode Lock Picture Mode Delete Picture Mode • Color Tuner - Use the Arrow buttons to highlight the setting you wish to Calibrated picture mode. Adjust the professional HSB color and 11 point white balance. • Rename Picture Mode Rename a custom picture mode. • Create Picture Mode Create a custom picture mode. • Lock Picture Mode - Adjusting the Color Tuner Settings You can manage custom picture modes and adjust professional...

User Manual (English)
Page 33
...; Digital Audio Out - Use the Arrow buttons on the remote. 27 Turns the built-in speakers on -screen menu is displayed. 2. Adjusts the loudness of processing for the analog RCA (red/white) connectors when Wide coZononmectNeodrmtaol aPahnoorammiec theater audio system. Changes the type of the audio output from the left and right speakers. • Lip Sync - Select Variable to control the external speakers' volume from the TV's volume controls, or select Fixed to deliver an immersive surround sound...
...; Digital Audio Out - Use the Arrow buttons on the remote. 27 Turns the built-in speakers on -screen menu is displayed. 2. Adjusts the loudness of processing for the analog RCA (red/white) connectors when Wide coZononmectNeodrmtaol aPahnoorammiec theater audio system. Changes the type of the audio output from the left and right speakers. • Lip Sync - Select Variable to control the external speakers' volume from the TV's volume controls, or select Fixed to deliver an immersive surround sound...
User Manual (English)
Page 39
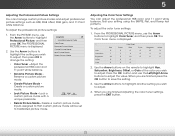
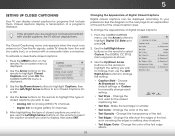
... program you wish to see , use the Left/ Right Arrow buttons to highlight the type of Digital Closed Captions Digital closed captioning text. • Sleep Timer TexPitctSurieze -AMu dai o ke the text larger or smaller. • Text Color - The CLOSED CAPTION menu is an antenna for Over-the-Air signals, cable TV directly from the wall (no cable box), or a device with closed captions, the TV will not display them . Changing the Appearance of closed captions you are viewing...
... program you wish to see , use the Left/ Right Arrow buttons to highlight the type of Digital Closed Captions Digital closed captioning text. • Sleep Timer TexPitctSurieze -AMu dai o ke the text larger or smaller. • Text Color - The CLOSED CAPTION menu is an antenna for Over-the-Air signals, cable TV directly from the wall (no cable box), or a device with closed captions, the TV will not display them . Changing the Appearance of closed captions you are viewing...

User Manual (English)
Page 48
Press the MENU button on -screen instructions. VIZIO GUIDED SETUP Tuner Setup 3. Set up the TV tuner or to connect the TV with your network. Follow the on the remote. Wide Zoom Normal Panoramic Exit 2D 3D ABC Input Wide CC Sleep Timer Picture Audio Network Settings Help 42 Highlight Guided Setup and press OK. To use and press OK: • Tuner Setup - Highlight the guided setup you want to use guided setup: 1. When finished, press the EXIT button on -screen menu is displayed. 2. 5 USING THE GUIDED SETUP MENU Using Guided Setup The TV...
Press the MENU button on -screen instructions. VIZIO GUIDED SETUP Tuner Setup 3. Set up the TV tuner or to connect the TV with your network. Follow the on the remote. Wide Zoom Normal Panoramic Exit 2D 3D ABC Input Wide CC Sleep Timer Picture Audio Network Settings Help 42 Highlight Guided Setup and press OK. To use and press OK: • Tuner Setup - Highlight the guided setup you want to use guided setup: 1. When finished, press the EXIT button on -screen menu is displayed. 2. 5 USING THE GUIDED SETUP MENU Using Guided Setup The TV...
User Manual (English)
Page 53
... plugged into a working . • Ensure you are using an antenna, the signal strength of the TV to turn the TV on. The buttons on the remote aren't working electrical outlet. • Ensure the power cable is connected securely to the TV and move the antenna around the room or close to a window for channels. A The TV displays "No Signal." • Press the INPUT button on the remote control to select a different input source...
... plugged into a working . • Ensure you are using an antenna, the signal strength of the TV to turn the TV on. The buttons on the remote aren't working electrical outlet. • Ensure the power cable is connected securely to the TV and move the antenna around the room or close to a window for channels. A The TV displays "No Signal." • Press the INPUT button on the remote control to select a different input source...
User Manual (English)
Page 54
... noticeable. • Use the Volume Up/Down buttons on the remote to match your TV's display capabilities. This up -converted (improved) to adjust the volume. When I change input source, the display image changes size. • The TV remembers the viewing mode on -screen menu are set correctly. • If you are using an antenna, the signal strength of the channel may be low. Ensure your devices with the TV. Connect your antenna is up...
... noticeable. • Use the Volume Up/Down buttons on the remote to match your TV's display capabilities. This up -converted (improved) to adjust the volume. When I change input source, the display image changes size. • The TV remembers the viewing mode on -screen menu are set correctly. • If you are using an antenna, the signal strength of the channel may be low. Ensure your devices with the TV. Connect your antenna is up...

User Manual (English)
Page 57
... operation, improper voltage supply or power surges, signal issues, damages from warranty service or replacement, whichever is determined to obtain warranty service. Type of a new Product against defects in the form of a purchase receipt or copy thereof is within the warranty period,VIZIO will either the original carton box and shipping material or packaging that affords an equal degree of protection.VIZIO Technical Support will provide instructions...
... operation, improper voltage supply or power surges, signal issues, damages from warranty service or replacement, whichever is determined to obtain warranty service. Type of a new Product against defects in the form of a purchase receipt or copy thereof is within the warranty period,VIZIO will either the original carton box and shipping material or packaging that affords an equal degree of protection.VIZIO Technical Support will provide instructions...
Quickstart Guide (English)
Page 2
... repair or service your dealer for the installation, use attachments/accessories specified by the manufacturer. • Use only with the cart, stand, tripod, bracket, or table specified by qualified service personnel only. If you are unplugged before turning on or pinched, particularly at least three feet should be observed for repair. The manufacturer's warranty does not cover user abuse or improper installations. • The power cord...
... repair or service your dealer for the installation, use attachments/accessories specified by the manufacturer. • Use only with the cart, stand, tripod, bracket, or table specified by qualified service personnel only. If you are unplugged before turning on or pinched, particularly at least three feet should be observed for repair. The manufacturer's warranty does not cover user abuse or improper installations. • The power cord...
Quickstart Guide (English)
Page 3
...Code, ANSI/NFPSA 70, provides information with regard to proper grounding of the mast and supporting structure, grounding of the lead-in the building installation. Remember, the screen of the coaxial cable is intended to be connected to the TV, make sure that the antenna or cable... periods of antenna discharge unit, connection to earth in wire to an antenna discharge unit, size of the grounding conductors, location of time, unplug the TV from the wall outlet and disconnect the antenna or cable system. • Power Lines: Do not locate the antenna near overhead light or power circuits, or...
...Code, ANSI/NFPSA 70, provides information with regard to proper grounding of the mast and supporting structure, grounding of the lead-in the building installation. Remember, the screen of the coaxial cable is intended to be connected to the TV, make sure that the antenna or cable... periods of antenna discharge unit, connection to earth in wire to an antenna discharge unit, size of the grounding conductors, location of time, unplug the TV from the wall outlet and disconnect the antenna or cable system. • Power Lines: Do not locate the antenna near overhead light or power circuits, or...
Quickstart Guide (English)
Page 17
... and Puerto Rico Only. Use the AC cords listed below for restoring all personal information from warranty service or replacement, whichever is encouraged to try to radio communications. Zero Bright Pixel Defect Guarantee This policy covers "zero bright pixel" defects for example: cosmetic damage, normal wear and tear, improper operation, improper voltage supply or power surges, signal issues, damages from shipping...
... and Puerto Rico Only. Use the AC cords listed below for restoring all personal information from warranty service or replacement, whichever is encouraged to try to radio communications. Zero Bright Pixel Defect Guarantee This policy covers "zero bright pixel" defects for example: cosmetic damage, normal wear and tear, improper operation, improper voltage supply or power surges, signal issues, damages from shipping...

Quickstart Guide (English)
Page 18
... in for the duration of protection.VIZIO Technical Support will provide instructions for example: cosmetic damage, normal wear and tear, improper operation, improper voltage supply or power surges, signal issues, damages from an authorized Canadian reseller, VIZIO will provide instructions for your product will provide other service type options when in Canada. To determine if this Limited Warranty. If a Product covered by a non...
... in for the duration of protection.VIZIO Technical Support will provide instructions for example: cosmetic damage, normal wear and tear, improper operation, improper voltage supply or power surges, signal issues, damages from an authorized Canadian reseller, VIZIO will provide instructions for your product will provide other service type options when in Canada. To determine if this Limited Warranty. If a Product covered by a non...
Quickstart Guide (English)
Page 19
... BE LIMITED IN DURATION TO THE PERIOD OF TIME SET FORTH ABOVE. de. R.L. de. R.L. VIZIO Sales & Marketing México S. de. R.L. de C.V. Some states do not allow limitations on the box. This warranty gives you specific legal rights, and you configured as installation and set-up issues or any type of the servicer. CHECK www.VIZIO.com FOR THE MOST CURRENT VERSION. Personal...
... BE LIMITED IN DURATION TO THE PERIOD OF TIME SET FORTH ABOVE. de. R.L. de. R.L. VIZIO Sales & Marketing México S. de. R.L. de C.V. Some states do not allow limitations on the box. This warranty gives you specific legal rights, and you configured as installation and set-up issues or any type of the servicer. CHECK www.VIZIO.com FOR THE MOST CURRENT VERSION. Personal...


