User Manual English
Page 2
...Install in accordance with the apparatus. To ensure reliable operation of your investment beyond the standard warranty, VIZIO offers on-site extended warranty service plans. IMPORTANT SAFETY INSTRUCTIONS Your TV is required when the apparatus has been damaged in any heat source, such as a radiator, heater...two blades and a third grounding prong. Wait before turning on your safety. ii Safety & Certification THANK YOU FOR CHOOSING VIZIO And congratulations on your TV close to smoke or moisture may cause fire or electric shock. • Slots and openings in the back and bottom...
...Install in accordance with the apparatus. To ensure reliable operation of your investment beyond the standard warranty, VIZIO offers on-site extended warranty service plans. IMPORTANT SAFETY INSTRUCTIONS Your TV is required when the apparatus has been damaged in any heat source, such as a radiator, heater...two blades and a third grounding prong. Wait before turning on your safety. ii Safety & Certification THANK YOU FOR CHOOSING VIZIO And congratulations on your TV close to smoke or moisture may cause fire or electric shock. • Slots and openings in the back and bottom...
User Manual English
Page 3
... attempt to persons. To totally disconnect power, unplug the power cord. inside the cord and cause fire or electric shock. moving your TV during lightning. buzzing in any abnormality occurs. Opening or removing the back cover may cause fire or electric shock. • Follow instructions...on the power cord may result in an area with instructions. iii • Do not apply pressure or throw objects at your TV qualified service personnel only. The manufacturer's or odor becomes apparent, unplug the power cord and disconnect device, the disconnect device shall...
... attempt to persons. To totally disconnect power, unplug the power cord. inside the cord and cause fire or electric shock. moving your TV during lightning. buzzing in any abnormality occurs. Opening or removing the back cover may cause fire or electric shock. • Follow instructions...on the power cord may result in an area with instructions. iii • Do not apply pressure or throw objects at your TV qualified service personnel only. The manufacturer's or odor becomes apparent, unplug the power cord and disconnect device, the disconnect device shall...

User Manual English
Page 4
Remember, the screen of the coaxial cable is intended to be connected to the TV, make sure that the antenna or cable system is electrically grounded to provide some protection against voltage surges and static charges. Ground Clamp Antenna Lead ... circuits, or where it is left unattended or unused for long periods of time, unplug the TV from the wall outlet and disconnect the antenna or cable system. Lightning Protection For added protection of the TV during a lightning storm or when it could fall into such power lines or circuits. Article 810...
Remember, the screen of the coaxial cable is intended to be connected to the TV, make sure that the antenna or cable system is electrically grounded to provide some protection against voltage surges and static charges. Ground Clamp Antenna Lead ... circuits, or where it is left unattended or unused for long periods of time, unplug the TV from the wall outlet and disconnect the antenna or cable system. Lightning Protection For added protection of the TV during a lightning storm or when it could fall into such power lines or circuits. Article 810...

User Manual English
Page 6
...Audio Language 34 Setting Up Closed Captioning 35 Changing the Appearance of Digital Closed Captions 35 Renaming Devices on the Input Menu 37 Changing the TV Settings 38 Viewing System Information 38 Changing the On-Screen Menu Language 38 Setting the Time and Local Settings 39 Limited Warranty 54 Mexico ... Aspect Ratio 41 Adjusting the CEC Settings 42 Turning the Power Indicator On or Off 42 Using the Reset & Admin Menu 43 Restoring the TV to Factory Default Settings 43 Using the Guided Setup Menu 44 Using the Info Window 44 Using the USB Media Player 45 Deleting the Custom...
...Audio Language 34 Setting Up Closed Captioning 35 Changing the Appearance of Digital Closed Captions 35 Renaming Devices on the Input Menu 37 Changing the TV Settings 38 Viewing System Information 38 Changing the On-Screen Menu Language 38 Setting the Time and Local Settings 39 Limited Warranty 54 Mexico ... Aspect Ratio 41 Adjusting the CEC Settings 42 Turning the Power Indicator On or Off 42 Using the Reset & Admin Menu 43 Restoring the TV to Factory Default Settings 43 Using the Guided Setup Menu 44 Using the Info Window 44 Using the USB Media Player 45 Deleting the Custom...

User Manual English
Page 7
Use the images below to inspect the package contents. Getting to Know Your TV INSPECTING THE PACKAGE CONTENTS Before installing your new TV, take a moment to ensure nothing is missing or damaged. Remote Control with Batteries (for D32hn-D0) Remote Control with Batteries (for D39hn-D0) TV Stands (Left and Right) 2 x Quick Start Guides (1 English, 1 French-Spanish) 4 x M4 Phillips Screws PACKAGE CONTENTS 1 7 VIZIO LED HDTV Power Cord INPUT EXIT BACK OK VOL VOL 1 2 4 5 7 8 WIDE 0 MENU GUIDE CH CH 3 6 9 -
Use the images below to inspect the package contents. Getting to Know Your TV INSPECTING THE PACKAGE CONTENTS Before installing your new TV, take a moment to ensure nothing is missing or damaged. Remote Control with Batteries (for D32hn-D0) Remote Control with Batteries (for D39hn-D0) TV Stands (Left and Right) 2 x Quick Start Guides (1 English, 1 French-Spanish) 4 x M4 Phillips Screws PACKAGE CONTENTS 1 7 VIZIO LED HDTV Power Cord INPUT EXIT BACK OK VOL VOL 1 2 4 5 7 8 WIDE 0 MENU GUIDE CH CH 3 6 9 -

User Manual English
Page 8
...inspecting the package contents you are identical). 2. To install the stand: 1. However, the TV can still fall over . Insert the screws into the base of the TV (the stands are finished, place the TV on a stable, level surface. When you can be subject to support the weight of ...• On a wall, using a Phillips screwdriver. Your TV can begin installing the TV. Insert the left and right stands into the back of the TV and tighten them using a VESA-standard wall mount (not included) Installing the TV Stand Your TV includes a stand designed to change. Note: The image shown...
...inspecting the package contents you are identical). 2. To install the stand: 1. However, the TV can still fall over . Insert the screws into the base of the TV (the stands are finished, place the TV on a stable, level surface. When you can be subject to support the weight of ...• On a wall, using a Phillips screwdriver. Your TV can begin installing the TV. Insert the left and right stands into the back of the TV and tighten them using a VESA-standard wall mount (not included) Installing the TV Stand Your TV includes a stand designed to change. Note: The image shown...

User Manual English
Page 9
... debris that came with right-angle connectors. Use only with a UL-listed wall mount bracket rated for the weight/load of the TV. For some wall mounts, you . D32hn-D0 D39hn-D0 Screw Size: M4 M4 Hole Pattern: 100mm (V) x 100mm (H) 100mm (V) x 100mm (H) Weight w/o Stand: 9.48 lbs 13....67 lbs Be sure the mount you have the correct mount for your TV. 2. To install your TV, you will need a wall mount. Place the TV face-down on a...
... debris that came with right-angle connectors. Use only with a UL-listed wall mount bracket rated for the weight/load of the TV. For some wall mounts, you . D32hn-D0 D39hn-D0 Screw Size: M4 M4 Hole Pattern: 100mm (V) x 100mm (H) 100mm (V) x 100mm (H) Weight w/o Stand: 9.48 lbs 13....67 lbs Be sure the mount you have the correct mount for your TV. 2. To install your TV, you will need a wall mount. Place the TV face-down on a...
User Manual English
Page 10
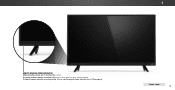
FRONT PANEL 10 To keep the power indicator on as long as the TV is on, see Turning the Power Indicator On or Off on , then goes out after several seconds. 1 REMOTE SENSOR & POWER INDICATOR When using the remote, aim it directly at this sensor. The power indicator flashes on when the TV turns on page 46.
FRONT PANEL 10 To keep the power indicator on as long as the TV is on, see Turning the Power Indicator On or Off on , then goes out after several seconds. 1 REMOTE SENSOR & POWER INDICATOR When using the remote, aim it directly at this sensor. The power indicator flashes on when the TV turns on page 46.
User Manual English
Page 11
... to access the input menu. Press once to turn on the model. Stereo Audio Out- Power - Input - Connect a USB thumb drive to turn the TV off. Connect a coaxial cable from cable, satellite, or antenna. Press to play music and view photos. 1 USB - Connect an RCA audio device, such... as home audio receiver. Note: The image shown here is for illustrative purposes only and may vary, depending on the TV. The actual number of ports and their locations may be subject to change. Component/Composite - REAR PANEL 11 HDMI - HDMI - Connect an ...
... to access the input menu. Press once to turn on the model. Stereo Audio Out- Power - Input - Connect a USB thumb drive to turn the TV off. Connect a coaxial cable from cable, satellite, or antenna. Press to play music and view photos. 1 USB - Connect an RCA audio device, such... as home audio receiver. Note: The image shown here is for illustrative purposes only and may vary, depending on the TV. The actual number of ports and their locations may be subject to change. Component/Composite - REAR PANEL 11 HDMI - HDMI - Connect an ...
User Manual English
Page 12
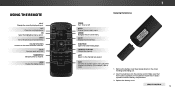
POWER Turn TV on or off or on. CHANNEL UP/DOWN Change the channel. VOLUME UP/DOWN Increase or decrease the audio loudness. NUMBER PAD Manually enter a channel. ...
POWER Turn TV on or off or on. CHANNEL UP/DOWN Change the channel. VOLUME UP/DOWN Increase or decrease the audio loudness. NUMBER PAD Manually enter a channel. ...

User Manual English
Page 13
... (+) and (-) symbols on the arrow markings and sliding out. 2. A/V CONTROLS Control USB photo player. WIDE Switch the display mode. 1 Replacing the Batteries POWER Turn the TV on or off or on. INFO Display the info window. Remove the battery cover by pressing down on the batteries match the (+) and (-) symbols inside...
... (+) and (-) symbols on the arrow markings and sliding out. 2. A/V CONTROLS Control USB photo player. WIDE Switch the display mode. 1 Replacing the Batteries POWER Turn the TV on or off or on. INFO Display the info window. Remove the battery cover by pressing down on the batteries match the (+) and (-) symbols inside...
User Manual English
Page 14
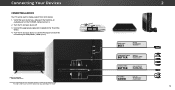
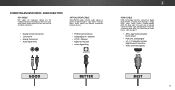
... number of ports and their locations may be used (HDMI-1, HDMI-2, etc.). Set the TV's input to the TV and the device. 4. Connecting Your Devices CONNECTING A DEVICE Your TV can be subject to change. Turn the TV and your device has a video port that your device on the model. 2 HDMI (HDMI... HD VIDEO (1080i)1 • STEREO/HD AUDIO AV CABLE GOOD • ANALOG • SD VIDEO (480i)1 • STEREO AUDIO 14 Turn the TV and your device off. 3. Connect the appropriate cable (not included) to match the connection you used to display output from most devices. 1. Cables not ...
... number of ports and their locations may be used (HDMI-1, HDMI-2, etc.). Set the TV's input to the TV and the device. 4. Connecting Your Devices CONNECTING A DEVICE Your TV can be subject to change. Turn the TV and your device has a video port that your device on the model. 2 HDMI (HDMI... HD VIDEO (1080i)1 • STEREO/HD AUDIO AV CABLE GOOD • ANALOG • SD VIDEO (480i)1 • STEREO AUDIO 14 Turn the TV and your device off. 3. Connect the appropriate cable (not included) to match the connection you used to display output from most devices. 1. Cables not ...
User Manual English
Page 15
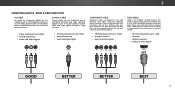
...- AUDIO & VIDEO CABLE TYPES AV CABLE AV cables (or Composite cables) are the traditional way of connecting your devices to your TV. Coaxial cables carry both dazzling quality and unmatched ease of use. COAXIAL CABLE Coaxial cables are the traditional way of connecting antennas and... cable television signals to your TV. HDMI-connected devices have the ability to automatically adjust themselves for video (separated into Red, Blue and Green signals) and the ...
...- AUDIO & VIDEO CABLE TYPES AV CABLE AV cables (or Composite cables) are the traditional way of connecting your devices to your TV. Coaxial cables carry both dazzling quality and unmatched ease of use. COAXIAL CABLE Coaxial cables are the traditional way of connecting antennas and... cable television signals to your TV. HDMI-connected devices have the ability to automatically adjust themselves for video (separated into Red, Blue and Green signals) and the ...

User Manual English
Page 16
... the device. 4. Turn the TV and your audio device off. 3. Connect the appropriate cable (not included) to change. Verify that your device has an audio port that matches an available port on the model. Home Audio Receiver 2 VIZIO Sound Bar * Cables not included Note: The image shown here... is for illustrative purposes only and may vary, depending on the TV (Optical, RCA, or HDMI). 2. CONNECTING AN AUDIO DEVICE Your TV can output sound to an audio device, such as...
... the device. 4. Turn the TV and your audio device off. 3. Connect the appropriate cable (not included) to change. Verify that your device has an audio port that matches an available port on the model. Home Audio Receiver 2 VIZIO Sound Bar * Cables not included Note: The image shown here... is for illustrative purposes only and may vary, depending on the TV (Optical, RCA, or HDMI). 2. CONNECTING AN AUDIO DEVICE Your TV can output sound to an audio device, such as...
User Manual English
Page 17
... OPTICAL AUDIO 2 HDMI CABLE HDMI technology transmits crystal-clear digital multi-channel surround audio through a cable made of plastic fibers. Audio Return Channel-enabled (ARC) TVs allow audio to your devices to be sent over the red and white connectors. CONNECTING AN AUDIO DEVICE - ARC on page 17. • ARC 2-way...
... OPTICAL AUDIO 2 HDMI CABLE HDMI technology transmits crystal-clear digital multi-channel surround audio through a cable made of plastic fibers. Audio Return Channel-enabled (ARC) TVs allow audio to your devices to be sent over the red and white connectors. CONNECTING AN AUDIO DEVICE - ARC on page 17. • ARC 2-way...
User Manual English
Page 18
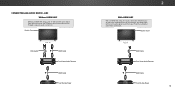
CONNECTING AN AUDIO DEVICE - Built-In Tuner Your TV RCA (Audio) HDMI Cable Your Home Audio Receiver HDMI Cable Your Blu-Ray Player 2 With HDMI ARC With an HDMI ARC setup, the audio connection .... The HDMI cable will transmit audio signal from the built-in tuner and VIA apps to and from your TV with an all-digital audio/video connection. Built-In Tuner Your TV HDMI Cable Your Home Audio Receiver HDMI Cable Your Blu-Ray Player 18 ARC Without HDMI ARC Without an HDMI...
CONNECTING AN AUDIO DEVICE - Built-In Tuner Your TV RCA (Audio) HDMI Cable Your Home Audio Receiver HDMI Cable Your Blu-Ray Player 2 With HDMI ARC With an HDMI ARC setup, the audio connection .... The HDMI cable will transmit audio signal from the built-in tuner and VIA apps to and from your TV with an all-digital audio/video connection. Built-In Tuner Your TV HDMI Cable Your Home Audio Receiver HDMI Cable Your Blu-Ray Player 18 ARC Without HDMI ARC Without an HDMI...

User Manual English
Page 19
... button on the remote to highlight your mode. Select Store Demo for in -store display. Store Demo Home Use Use the Arrow buttons on the TV, the Setup App will guide you through each of preference and press OK. 3 4 Use the Arrow buttons on the remote. Completing The First-Time .... Choisissez "Home Use" pour le Mode Domicile ou "Store Demo" pour la Démo en Magasin. Before you begin the first-time setup: • Your TV should be installed and the power cord should be connected to an electrical outlet. • Your devices should be connected. • If you have a wireless...
... button on the remote to highlight your mode. Select Store Demo for in -store display. Store Demo Home Use Use the Arrow buttons on the TV, the Setup App will guide you through each of preference and press OK. 3 4 Use the Arrow buttons on the remote. Completing The First-Time .... Choisissez "Home Use" pour le Mode Domicile ou "Store Demo" pour la Démo en Magasin. Before you begin the first-time setup: • Your TV should be installed and the power cord should be connected to an electrical outlet. • Your devices should be connected. • If you have a wireless...
User Manual English
Page 20
will need to scan for channels, which takes several minutes. When you are finished, the message "Setup is complete. 3 20 Otherwise, use the Arrow and OK buttons on the remote to . Note: Number of ports may differ by TV. The First-Time Setup is complete." Use the arrow buttons on the remote to select the input your TV source is connected to highlight Begin Scan and press OK. 5 If the TV Signal channel scan screen appears, the TV will appear.
will need to scan for channels, which takes several minutes. When you are finished, the message "Setup is complete. 3 20 Otherwise, use the Arrow and OK buttons on the remote to . Note: Number of ports may differ by TV. The First-Time Setup is complete." Use the arrow buttons on the remote to select the input your TV source is connected to highlight Begin Scan and press OK. 5 If the TV Signal channel scan screen appears, the TV will appear.

User Manual English
Page 21
...the Sleep Timers • Adjust the Channel settings • Set up Closed Captioning • Name Inputs • Adjust TV settings • Access the Guided Setup VIZIO TV SETTINGS Picture Audio Timers Channels CC Closed Captions Devices System Guided Setup To open the on-screen menu, press the MENU button... on the Input menu to make your TV. Use the Arrow buttons to recognize. HDMI-1 HDMI-2 Input Name...
...the Sleep Timers • Adjust the Channel settings • Set up Closed Captioning • Name Inputs • Adjust TV settings • Access the Guided Setup VIZIO TV SETTINGS Picture Audio Timers Channels CC Closed Captions Devices System Guided Setup To open the on-screen menu, press the MENU button... on the Input menu to make your TV. Use the Arrow buttons to recognize. HDMI-1 HDMI-2 Input Name...

User Manual English
Page 22
...the edges of the picture so that the picture keeps its original shape. A 720p image will fill the screen. CHANGING THE SCREEN ASPECT RATIO The TV can display images in all directions (33% taller and 33% wider) with black bars on the top and bottom, the black bars will still appear... to the left to view and press OK. • Normal preserves the content's original aspect ratio and size. • Standard Definition (480i and 480p-old TV programs) - If you wish to right edges. • 720p and 720i - Not available. • 1080p and 1080i - Examples include wide-screen movies and older ...
...the edges of the picture so that the picture keeps its original shape. A 720p image will fill the screen. CHANGING THE SCREEN ASPECT RATIO The TV can display images in all directions (33% taller and 33% wider) with black bars on the top and bottom, the black bars will still appear... to the left to view and press OK. • Normal preserves the content's original aspect ratio and size. • Standard Definition (480i and 480p-old TV programs) - If you wish to right edges. • 720p and 720i - Not available. • 1080p and 1080i - Examples include wide-screen movies and older ...


