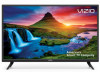
Quickstart Guide / Guide de Demarrage Rapide
Page 1
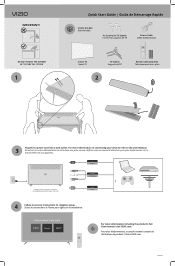
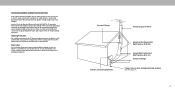
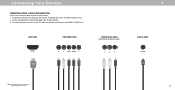
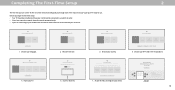
...;cran pour effectuer la installation. Non inclus. Choose a Language for TV Stands 4 x Vis Pour supports de TV Power Cable Câble d'alimentation Smart TV Smart TV TV Stands Supports de TV 2 Remote with Batteries Télécommande avec piles $ Watch Now... HDRMCRIACTAoT3o 3 RSCtAaSntTadona3drdard OStpOatnipcdtaiacl ardl SaStealtleitlelite SatellitHeDHMDIMI Plug the tv power cord into a wall outlet. Watch Now VIZIO ...
...;cran pour effectuer la installation. Non inclus. Choose a Language for TV Stands 4 x Vis Pour supports de TV Power Cable Câble d'alimentation Smart TV Smart TV TV Stands Supports de TV 2 Remote with Batteries Télécommande avec piles $ Watch Now... HDRMCRIACTAoT3o 3 RSCtAaSntTadona3drdard OStpOatnipcdtaiacl ardl SaStealtleitlelite SatellitHeDHMDIMI Plug the tv power cord into a wall outlet. Watch Now VIZIO ...
Manuel de l Utilisateur
Page 16
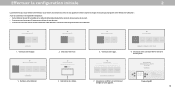
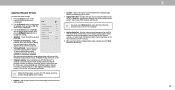
...Play. Skip For Now Accept All TWerhmicsWh&hroeCrooCemnhisdoisioytiosyoouenusaVr.IlVZaInOZgIuTOaVTglVeocfLoaortceyadot?eudr ?TV. You can turn your VIZIO TV. By pressing "Accept All", you VIZIO TV located? 5. GoMogalestPerrivacy GoBoegdleroToemrms & Policy Conditons Game Room Skip For...VIZIO TV. VIZIO Terms & Conditions VIZIO Privacy Policy Google Privacy Policy Google Terms & Conditons Encrypted 4. The VIZIO SmartCastTM App brings together TV Shows, movies, and more from multiple apps into the ultimate remote. The VIZIO SmartCastTM App brings together TV...
...Play. Skip For Now Accept All TWerhmicsWh&hroeCrooCemnhisdoisioytiosyoouenusaVr.IlVZaInOZgIuTOaVTglVeocfLoaortceyadot?eudr ?TV. You can turn your VIZIO TV. By pressing "Accept All", you VIZIO TV located? 5. GoMogalestPerrivacy GoBoegdleroToemrms & Policy Conditons Game Room Skip For...VIZIO TV. VIZIO Terms & Conditions VIZIO Privacy Policy Google Privacy Policy Google Terms & Conditons Encrypted 4. The VIZIO SmartCastTM App brings together TV Shows, movies, and more from multiple apps into the ultimate remote. The VIZIO SmartCastTM App brings together TV...
User Manual
Page 2
...contents to smoke. Wait before using different voltage than the other apparatus (including amplifiers) that you register your VIZIO product at your TV. Do not install your TV close to qualified service personnel. We recommend that produce heat. • Do not defeat the safety purpose of... voltage within an equilateral specified by the manufacturer. Safety & Certification THANK YOU FOR CHOOSING VIZIO IMPORTANT SAFETY INSTRUCTIONS or objects have fallen into the slots and openings on your TV cabinet. To get the most out of electric shock to alert you see this symbol,...
...contents to smoke. Wait before using different voltage than the other apparatus (including amplifiers) that you register your VIZIO product at your TV. Do not install your TV close to qualified service personnel. We recommend that produce heat. • Do not defeat the safety purpose of... voltage within an equilateral specified by the manufacturer. Safety & Certification THANK YOU FOR CHOOSING VIZIO IMPORTANT SAFETY INSTRUCTIONS or objects have fallen into the slots and openings on your TV cabinet. To get the most out of electric shock to alert you see this symbol,...

User Manual
Page 3
... about the dangers of climbing on furniture to reach the television set or its controls. • If your existing television set . Your TV is exposed to hearing without anchoring both the furniture and the television set to a suitable support. • Not placing the television set ...may cause fire or electric shock. • Follow instructions for an extended period of the following occurs, contact the dealer: - Operating your TV. Incorrect polarities • Using cabinets or stands recommended by taking simple precautions such as sunshine, fire or the like. • Only using...
... about the dangers of climbing on furniture to reach the television set or its controls. • If your existing television set . Your TV is exposed to hearing without anchoring both the furniture and the television set to a suitable support. • Not placing the television set ...may cause fire or electric shock. • Follow instructions for an extended period of the following occurs, contact the dealer: - Operating your TV. Incorrect polarities • Using cabinets or stands recommended by taking simple precautions such as sunshine, fire or the like. • Only using...
User Manual
Page 4
... grounded to provide some protection against voltage surges and static charges. Remember, the screen of the coaxial cable is intended to be connected to the TV, make sure that the antenna or cable system is left unattended or unused for long periods of time, unplug the... TV from the wall outlet and disconnect the antenna or cable system. TELEVISION ANTENNA CONNECTION PROTECTION If an outside antenna/satellite dish or cable system is ...
... grounded to provide some protection against voltage surges and static charges. Remember, the screen of the coaxial cable is intended to be connected to the TV, make sure that the antenna or cable system is left unattended or unused for long periods of time, unplug the... TV from the wall outlet and disconnect the antenna or cable system. TELEVISION ANTENNA CONNECTION PROTECTION If an outside antenna/satellite dish or cable system is ...

User Manual
Page 6
...by Rating 30 Setting Up Closed Captioning 31 Changing the Appearance of Digital Closed Captions 31 Renaming Devices on the Input Menu 33 Changing the TV Settings 34 Viewing System Information 34 Changing the On-Screen Menu Language 34 Setting the Time and Local Settings 35 Adjusting the CEC Settings ...35 Changing the TV Name 36 Using the Reset & Admin Menu 37 Restoring the TV to Factory Default Settings 37 Turning the Power Indicator On or Off 37 Using the Info Window 39 SmartCast ...
...by Rating 30 Setting Up Closed Captioning 31 Changing the Appearance of Digital Closed Captions 31 Renaming Devices on the Input Menu 33 Changing the TV Settings 34 Viewing System Information 34 Changing the On-Screen Menu Language 34 Setting the Time and Local Settings 35 Adjusting the CEC Settings ...35 Changing the TV Name 36 Using the Reset & Admin Menu 37 Restoring the TV to Factory Default Settings 37 Turning the Power Indicator On or Off 37 Using the Info Window 39 SmartCast ...

User Manual
Page 7
To keep the power indicator on as long as the TV is on , then goes out after several seconds. The power indicator flashes on when the TV turns on , see Turning the Power Indicator On or Off. 7 Getting to Know Your TV 1 FRONT PANEL Remote Sensor and Power Indicator When using the remote, aim it directly at this sensor.
To keep the power indicator on as long as the TV is on , then goes out after several seconds. The power indicator flashes on when the TV turns on , see Turning the Power Indicator On or Off. 7 Getting to Know Your TV 1 FRONT PANEL Remote Sensor and Power Indicator When using the remote, aim it directly at this sensor.
User Manual
Page 8
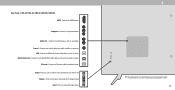
...the input menu. Stereo Audio Out - USB - Press and hold to increase or decrease the TV volume level. Press to change. Connect an HDMI device. Video/ L/R Coaxial - Optical Audio Out - Connect to turn the TV off. Volume - Composite - INPUT 1 Note: The image shown here is for illustrative purposes ...only and may vary, depending on the TV. Connect a USB thumb drive to a coaxial cable from cable, satellite, or antenna. Connect to play photo, music, or video. Press to an...
...the input menu. Stereo Audio Out - USB - Press and hold to increase or decrease the TV volume level. Press to change. Connect an HDMI device. Video/ L/R Coaxial - Optical Audio Out - Connect to turn the TV off. Volume - Composite - INPUT 1 Note: The image shown here is for illustrative purposes ...only and may vary, depending on the TV. Connect a USB thumb drive to a coaxial cable from cable, satellite, or antenna. Connect to play photo, music, or video. Press to an...
User Manual
Page 9
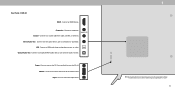
...D40f-G9 HDMI - Audio Out - USB - Connect to modem/ router. Connect an Ethernet cable to an optical/SPDIF audio device, such as sound bar. The actual number of ports and their locations may be subject to increase or decrease the TV volume level. Connect a component or composite. Connect to turn the TV off....HDMI device. Coaxial - Component/Composite - VOL Input - INPUT 1 Note: The image shown here is for illustrative purposes only and may vary, depending on the TV. Press to turn on the model. 9 Power - Press and hold to access the input menu.
...D40f-G9 HDMI - Audio Out - USB - Connect to modem/ router. Connect an Ethernet cable to an optical/SPDIF audio device, such as sound bar. The actual number of ports and their locations may be subject to increase or decrease the TV volume level. Connect a component or composite. Connect to turn the TV off....HDMI device. Coaxial - Component/Composite - VOL Input - INPUT 1 Note: The image shown here is for illustrative purposes only and may vary, depending on the TV. Press to turn on the model. 9 Power - Press and hold to access the input menu.
User Manual
Page 10
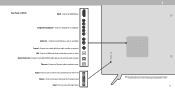
... Ethernet - Press to an optical/SPDIF audio device, such as sound bar. Volume - Rear Panel - Coaxial - Connect to turn the TV off. Press to access the input menu. The actual number of ports and their locations may be subject to an RCA device, such as... here is for illustrative purposes only and may vary, depending on the TV. Connect to change. Power - Press to increase or decrease the TV volume level. Connect to play photo, music, or video. D32h-G9, D50x-G9, V405-G9, V505-G9 & V655-G9 HDMI - Connect a composite device. Connect a USB thumb drive to ...
... Ethernet - Press to an optical/SPDIF audio device, such as sound bar. Volume - Rear Panel - Coaxial - Connect to turn the TV off. Press to access the input menu. The actual number of ports and their locations may be subject to an RCA device, such as... here is for illustrative purposes only and may vary, depending on the TV. Connect to change. Power - Press to increase or decrease the TV volume level. Connect to play photo, music, or video. D32h-G9, D50x-G9, V405-G9, V505-G9 & V655-G9 HDMI - Connect a composite device. Connect a USB thumb drive to ...
User Manual
Page 11
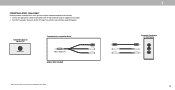
... Component input) Y L R 1 COAXIAL CABLE Coaxial Note: The actual ports and their locations may vary, depending on the TV (HDMI, Component, etc.). 2. Connecting Your Devices CONNECTING A DEVICE - Verify that your device on. Turn the TV and your device has a video port that matches an available port on the... TV model. 11 AUDIO & VIDEO CABLE TYPES Your TV can be used to match the connection you used (HDMI-1, HDMI-2, etc.). Set the TV's input to display output from most ...
... Component input) Y L R 1 COAXIAL CABLE Coaxial Note: The actual ports and their locations may vary, depending on the TV (HDMI, Component, etc.). 2. Connecting Your Devices CONNECTING A DEVICE - Verify that your device on. Turn the TV and your device has a video port that matches an available port on the... TV model. 11 AUDIO & VIDEO CABLE TYPES Your TV can be used to match the connection you used (HDMI-1, HDMI-2, etc.). Set the TV's input to display output from most ...
User Manual
Page 12
D24h-G9 ONLY D24h-G9 includes a Composite In / AV In port that requires additional adapters (not included). 1. Composite input on back of TV* Video/ L/R Connecting to a composite device Video / Audio L/R Adapter (Not Included) *The actual ports and their locations may vary, depending on the TV model. 1 Composite Connection on . Connect the appropriate cable (not included) to match the connection you used (Composite). Set the TV's input to the TV and the device using an adapter (not included). 2. Turn the TV and your device on Your Device 12 CONNECTING A DEVICE -
D24h-G9 ONLY D24h-G9 includes a Composite In / AV In port that requires additional adapters (not included). 1. Composite input on back of TV* Video/ L/R Connecting to a composite device Video / Audio L/R Adapter (Not Included) *The actual ports and their locations may vary, depending on the TV model. 1 Composite Connection on . Connect the appropriate cable (not included) to match the connection you used (Composite). Set the TV's input to the TV and the device using an adapter (not included). 2. Turn the TV and your device on Your Device 12 CONNECTING A DEVICE -
User Manual
Page 13
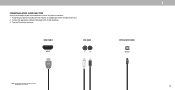
Turn the TV and your device has audio port that matches an available port on the TV (Optical, RCA, etc). 2. HDMI CABLE HDMI RCA CABLE L R 1 OPTICAL/SPDIF CABLE Optical Note: The actual ports and their locations may vary, depending on . CONNECTING A DEVICE - Verify that your device on the TV model. 13 Connect the appropriate cable (not included) to an audio device, such as a receiver or sound bar. 1. AUDIO CABLE TYPES Your TV can be output sound to the TV and the device. 3.
Turn the TV and your device has audio port that matches an available port on the TV (Optical, RCA, etc). 2. HDMI CABLE HDMI RCA CABLE L R 1 OPTICAL/SPDIF CABLE Optical Note: The actual ports and their locations may vary, depending on . CONNECTING A DEVICE - Verify that your device on the TV model. 13 Connect the appropriate cable (not included) to an audio device, such as a receiver or sound bar. 1. AUDIO CABLE TYPES Your TV can be output sound to the TV and the device. 3.
User Manual
Page 14
... attached, remove the stands by loosening and removing the screws. 4. The actual number of this page to your TV on a wall: 1. WALL-MOUNTING THE TV To mount your TV on a wall, you . 1 Note: The image shown here is for illustrative purposes only and may vary, depending on the ...your TV, you choose is capable of supporting the weight of debris that came with a UL-listed wall mount bracket rated for the weight/load of ports and their locations may be subject to help you will need a wall mount. D24h-G9 D32h-G9 D40f-G9 D50x-G9 V405-G9 V505-G9 V655-G9 Screw ...
... attached, remove the stands by loosening and removing the screws. 4. The actual number of this page to your TV on a wall: 1. WALL-MOUNTING THE TV To mount your TV on a wall, you . 1 Note: The image shown here is for illustrative purposes only and may vary, depending on the ...your TV, you choose is capable of supporting the weight of debris that came with a UL-listed wall mount bracket rated for the weight/load of ports and their locations may be subject to help you will need a wall mount. D24h-G9 D32h-G9 D40f-G9 D50x-G9 V405-G9 V505-G9 V655-G9 Screw ...
User Manual
Page 16
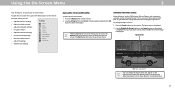
...your Wi-Fi and enter the password. ChooHsoewaaWrei-yFoi uNuestwinogrky.our TV? Choose your TV. To search for your TV. Next Skip 6. Congratulations! You can turn on the TV, the on the TV. The VIZIO SmartCastTM App brings together TV Shows, movies, and more from the antenna, wall or ... Home Use Store Demo 2. Choose home use . Download now from the antenna, wall or cable box is properly connected to your VIZIO TV. Next Skip Public Wi-Fi John's Network Ana's Network Encrypted Rescan Networks Hotten Netwok Help Skip 4. Name your country. Scan for ...
...your Wi-Fi and enter the password. ChooHsoewaaWrei-yFoi uNuestwinogrky.our TV? Choose your TV. To search for your TV. Next Skip 6. Congratulations! You can turn on the TV, the on the TV. The VIZIO SmartCastTM App brings together TV Shows, movies, and more from the antenna, wall or ... Home Use Store Demo 2. Choose home use . Download now from the antenna, wall or cable box is properly connected to your VIZIO TV. Next Skip Public Wi-Fi John's Network Ana's Network Encrypted Rescan Networks Hotten Netwok Help Skip 4. Name your country. Scan for ...
User Manual
Page 17
... • Set up the Timers • Adjust the Channel settings • Set up Closed Captioning • Name and adjust Inputs • Adjust TV settings TV Settings Picture Audio Network Timers Channels Closed Captions Input Settings System User Manual • View the User Manual NAVIGATING THE ON-SCREEN MENU To open... menu. To open the on -screen menu. Use the Arrow buttons to highlight a menu option, and press the OK button to make your TV. To use on -screen menu, you can press the Back button at any time to return to the previous menu screen. Input Name Change ...
... • Set up the Timers • Adjust the Channel settings • Set up Closed Captioning • Name and adjust Inputs • Adjust TV settings TV Settings Picture Audio Network Timers Channels Closed Captions Input Settings System User Manual • View the User Manual NAVIGATING THE ON-SCREEN MENU To open... menu. To open the on -screen menu. Use the Arrow buttons to highlight a menu option, and press the OK button to make your TV. To use on -screen menu, you can press the Back button at any time to return to the previous menu screen. Input Name Change ...

User Manual
Page 18
...may vary by 14%. • Panoramic* - Expands image both horizontally and vertically by input source. Examples include widescreen movies and older television programs. Your TV can display images in different modes: Normal, Stretch, Wide, Zoom, and Panoramic. • Normal (default) - If a 16:9 image, adds ...and right, stretches to top and bottom. • Zoom - Normal Stretch Wide Zoom Tip: The aspect ratio cannot be changed for standard definition TV (480i/480p). 3 18 Stretches a 4:3 image to aspect ratio. • Stretch - Some programs have black bars on the top or sides...
...may vary by 14%. • Panoramic* - Expands image both horizontally and vertically by input source. Examples include widescreen movies and older television programs. Your TV can display images in different modes: Normal, Stretch, Wide, Zoom, and Panoramic. • Normal (default) - If a 16:9 image, adds ...and right, stretches to top and bottom. • Zoom - Normal Stretch Wide Zoom Tip: The aspect ratio cannot be changed for standard definition TV (480i/480p). 3 18 Stretches a 4:3 image to aspect ratio. • Stretch - Some programs have black bars on the top or sides...
User Manual
Page 19
The on the remote. * Not applicable to D24h-G9 **Applicable models: D50x-G9, V505-G9, V405-G9 and V655-G9 19 Adjusts the LED brightness to affect the overall brilliance of the picture. This setting is displayed. 2. When you have finished adjusting the picture ..., then use the Left/Right Arrow buttons to adjust the setting: • Backlight - Select Off, Low, Medium, or High. - 3 ADJUSTING THE PICTURE SETTINGS Your TV can be used to sharpen non-HD (high definition) content; Use the Arrow buttons to highlight Backlight Control On the setting you save changes to...
The on the remote. * Not applicable to D24h-G9 **Applicable models: D50x-G9, V505-G9, V405-G9 and V655-G9 19 Adjusts the LED brightness to affect the overall brilliance of the picture. This setting is displayed. 2. When you have finished adjusting the picture ..., then use the Left/Right Arrow buttons to adjust the setting: • Backlight - Select Off, Low, Medium, or High. - 3 ADJUSTING THE PICTURE SETTINGS Your TV can be used to sharpen non-HD (high definition) content; Use the Arrow buttons to highlight Backlight Control On the setting you save changes to...
User Manual
Page 22
... the Arrow buttons on the remote to adjust the value. 3 Adjusting the Color Tuner Settings The Color Tuner settings allow technicians to manually calibrate the TV. The Color Tuner, 11 Point White Balance, and test patterns allow you are finished, press the OK button to highlight the Hue, Saturation, Brightness, Offset...
... the Arrow buttons on the remote to adjust the value. 3 Adjusting the Color Tuner Settings The Color Tuner settings allow technicians to manually calibrate the TV. The Color Tuner, 11 Point White Balance, and test patterns allow you are finished, press the OK button to highlight the Hue, Saturation, Brightness, Offset...
User Manual
Page 24
..., DTS signals cannot be passed through digital audio outputs. • Lip Sync - When the TV speakers are controlling the volume with more than two channels (3.0, 5.0, or 5.1, for audio with the TV's volume controls, or select Fixed if an external audio device (sound bar or AV receiver)... is displayed. The Volume Control Display On Audio menu is adjusted. • Surround Sound - Changes the type of the audio output from the TV's internal speakers. Audio Back 2. The on the remote. • Balance - Sets the volume control properties for digital audio out and HDMI ARC...
..., DTS signals cannot be passed through digital audio outputs. • Lip Sync - When the TV speakers are controlling the volume with more than two channels (3.0, 5.0, or 5.1, for audio with the TV's volume controls, or select Fixed if an external audio device (sound bar or AV receiver)... is displayed. The Volume Control Display On Audio menu is adjusted. • Surround Sound - Changes the type of the audio output from the TV's internal speakers. Audio Back 2. The on the remote. • Balance - Sets the volume control properties for digital audio out and HDMI ARC...


