
User Manual
Page 2
... fire or electric shock. Servicing is designed and manufactured to protect your investment beyond the standard warranty, VIZIO offers on the top of your TV. PRODUCT REGISTRATION Your TV is required when the apparatus has been damaged in electric shock or fire. It is used, use caution... be operated only from the apparatus. • Only use , and maintenance of your TV. Install in a safe place for long periods of the TV. To ensure reliable operation of your new VIZIO TV. Doing • Do not defeat the safety purpose of power source indicated on your...
... fire or electric shock. Servicing is designed and manufactured to protect your investment beyond the standard warranty, VIZIO offers on the top of your TV. PRODUCT REGISTRATION Your TV is required when the apparatus has been damaged in electric shock or fire. It is used, use caution... be operated only from the apparatus. • Only use , and maintenance of your TV. Install in a safe place for long periods of the TV. To ensure reliable operation of your new VIZIO TV. Doing • Do not defeat the safety purpose of power source indicated on your...
User Manual
Page 3
... is used for long period of sufficient magnitude to constitute a risk to reach the television set or its controls. • If your TV from moisture. humidity. Overloading wet hands. simple precautions such as the disconnect device, the disconnect device shall remain readily operable. •.... polarities may cause fire or electric shock. • WARNING: Exposure to persons. If any servicing other materials that can damage your TV during lightning. To reduce the risk of electric shock, do so. • The lightning flash with the installation instructions. • ...
... is used for long period of sufficient magnitude to constitute a risk to reach the television set or its controls. • If your TV from moisture. humidity. Overloading wet hands. simple precautions such as the disconnect device, the disconnect device shall remain readily operable. •.... polarities may cause fire or electric shock. • WARNING: Exposure to persons. If any servicing other materials that can damage your TV during lightning. To reduce the risk of electric shock, do so. • The lightning flash with the installation instructions. • ...
User Manual
Page 4
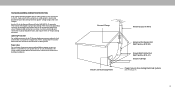
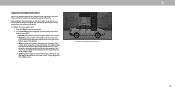
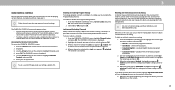
... sure that the antenna or cable system is left unattended or unused for long periods of time, unplug the TV from the wall outlet and disconnect the antenna or cable system. Ground Clamp Antenna Lead In Wire Electric Service Equipment Antenna Discharge Unit (NEC Section .../satellite dish or cable system is to be connected to grounding electrodes, and requirements of the grounding electrode. Lightning Protection For added protection of the TV during a lightning storm or when it could fall into such power lines or circuits.
... sure that the antenna or cable system is left unattended or unused for long periods of time, unplug the TV from the wall outlet and disconnect the antenna or cable system. Ground Clamp Antenna Lead In Wire Electric Service Equipment Antenna Discharge Unit (NEC Section .../satellite dish or cable system is to be connected to grounding electrodes, and requirements of the grounding electrode. Lightning Protection For added protection of the TV during a lightning storm or when it could fall into such power lines or circuits.
User Manual
Page 6
... Rating 26 Setting Up Closed Captioning 27 Changing the Appearance of Digital Closed Captions 27 Renaming Devices on the Input Menu 29 Changing the TV Settings 30 Viewing System Information 30 Changing the On-Screen Menu Language 30 Setting the Time and Local Settings 31 Adjusting the CEC Settings ...31 Using the Reset & Admin Menu 32 Restoring the TV to Factory Default Settings 32 Setting a System Pin 32 Using the Info Window 33 Playing USB Media 34 Displaying USB Media 34 Removing the ...
... Rating 26 Setting Up Closed Captioning 27 Changing the Appearance of Digital Closed Captions 27 Renaming Devices on the Input Menu 29 Changing the TV Settings 30 Viewing System Information 30 Changing the On-Screen Menu Language 30 Setting the Time and Local Settings 31 Adjusting the CEC Settings ...31 Using the Reset & Admin Menu 32 Restoring the TV to Factory Default Settings 32 Setting a System Pin 32 Using the Info Window 33 Playing USB Media 34 Displaying USB Media 34 Removing the ...
User Manual
Page 7
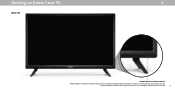
Getting to Know Your TV 1 FRONT PANEL Remote Sensor and Power Indicator When using the remote, aim it directly at this sensor. To keep the power indicator on as long as the TV is on , then goes out after several seconds. The power indicator flashes on when the TV turns on , see Turning the Power Indicator On or Off. 7
Getting to Know Your TV 1 FRONT PANEL Remote Sensor and Power Indicator When using the remote, aim it directly at this sensor. To keep the power indicator on as long as the TV is on , then goes out after several seconds. The power indicator flashes on when the TV turns on , see Turning the Power Indicator On or Off. 7
User Manual
Page 8
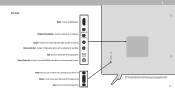
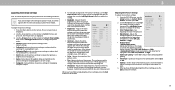
... Component/Composite - Connect to a coaxial cable from cable, satellite, or antenna. The actual number of ports and their locations may be subject to turn the TV off. Rear Panel HDMI - Connect an HDMI device. Connect to an optical/SPDIF audio device, such as a headset or sound bar. Power - Connect ... 3.5mm audio device, such as home audio receiver. Press to change. VOL Input - Connect a USB thumb drive to increase or decrease the TV volume level. Press to play photo. Press to turn on the model. 8 Press and hold to access the input menu. Optical Audio Out -
... Component/Composite - Connect to a coaxial cable from cable, satellite, or antenna. The actual number of ports and their locations may be subject to turn the TV off. Rear Panel HDMI - Connect an HDMI device. Connect to an optical/SPDIF audio device, such as a headset or sound bar. Power - Connect ... 3.5mm audio device, such as home audio receiver. Press to change. VOL Input - Connect a USB thumb drive to increase or decrease the TV volume level. Press to play photo. Press to turn on the model. 8 Press and hold to access the input menu. Optical Audio Out -
User Manual
Page 9
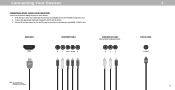
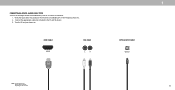
... your device has a video port that matches an available port on the TV (HDMI, Component, etc.). 2. AUDIO & VIDEO CABLE TYPES Your TV can be used (HDMI-1, HDMI-2, etc.). Verify that your device on the TV model. 9 Connecting Your Devices CONNECTING A DEVICE - HDMI CABLE HDMI COMPONENT CABLE R L Pr/Cr Pb/Cb Y COMPOSITE (AV) CABLE...
... your device has a video port that matches an available port on the TV (HDMI, Component, etc.). 2. AUDIO & VIDEO CABLE TYPES Your TV can be used (HDMI-1, HDMI-2, etc.). Verify that your device on the TV model. 9 Connecting Your Devices CONNECTING A DEVICE - HDMI CABLE HDMI COMPONENT CABLE R L Pr/Cr Pb/Cb Y COMPOSITE (AV) CABLE...
User Manual
Page 10
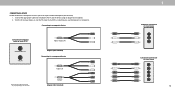
... (not included). 2. Video / Audio L/R Adapter (Not Included) Connecting to match the connection you used (Component or Composite). Set the TV's input to a component device Audio L/R Y/Pb/Pr Adapter (Not Included) 1 Composite Connection on Your Device Component Connection on Your Device ... appropriate cable (not included) to a composite device Component/Composite input on back of TV* Video/Audio L/R Y/Pb/Pr *The actual ports and their locations may vary, depending on . CONNECTING A DEVICE D24hn-G9 includes a Component In/ AV In port that requires additional adapters (not included). ...
... (not included). 2. Video / Audio L/R Adapter (Not Included) Connecting to match the connection you used (Component or Composite). Set the TV's input to a component device Audio L/R Y/Pb/Pr Adapter (Not Included) 1 Composite Connection on Your Device Component Connection on Your Device ... appropriate cable (not included) to a composite device Component/Composite input on back of TV* Video/Audio L/R Y/Pb/Pr *The actual ports and their locations may vary, depending on . CONNECTING A DEVICE D24hn-G9 includes a Component In/ AV In port that requires additional adapters (not included). ...
User Manual
Page 11
Connect the appropriate cable (not included) to an audio device, such as a receiver or sound bar. 1. Turn the TV and your device has audio port that matches an available port on the TV (Optical, RCA, etc). 2. CONNECTING A DEVICE - AUDIO CABLE TYPES Your TV can be output sound to the TV and the device. 3. Verify that your device on the TV model. 11 HDMI CABLE HDMI RCA CABLE L R 1 OPTICAL/SPDIF CABLE Optical Note: The actual ports and their locations may vary, depending on .
Connect the appropriate cable (not included) to an audio device, such as a receiver or sound bar. 1. Turn the TV and your device has audio port that matches an available port on the TV (Optical, RCA, etc). 2. CONNECTING A DEVICE - AUDIO CABLE TYPES Your TV can be output sound to the TV and the device. 3. Verify that your device on the TV model. 11 HDMI CABLE HDMI RCA CABLE L R 1 OPTICAL/SPDIF CABLE Optical Note: The actual ports and their locations may vary, depending on .
User Manual
Page 12
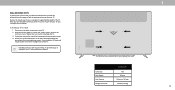
... the surface is clear of ports and their locations may be subject to help you have the correct mount for the weight/load of the TV. D24hn-G9 Screw Size: Hole Depth: M4 8.5 mm Hole Pattern: 100 mm x 100 mm Weight w/o Stand: 5.95 lbs (2.70 kg) 12 To prevent injury or damage ...to the TV, ask someone to change. Consult the information on this TV. If attached, remove the stands by loosening and removing the screws. 4. Be sure the mount you will need a wall mount. ...
... the surface is clear of ports and their locations may be subject to help you have the correct mount for the weight/load of the TV. D24hn-G9 Screw Size: Hole Depth: M4 8.5 mm Hole Pattern: 100 mm x 100 mm Weight w/o Stand: 5.95 lbs (2.70 kg) 12 To prevent injury or damage ...to the TV, ask someone to change. Consult the information on this TV. If attached, remove the stands by loosening and removing the screws. 4. Be sure the mount you will need a wall mount. ...
User Manual
Page 14
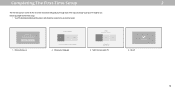
... set! 14 Select Home Use for in -home use : Before you begin the first-time setup: • Your TV should be installed and the power cord should be connected to an electrical outlet. SELECT A LANGUAGE English Español Français Press OK ...to use . Select Store demo for in -store display. Completing The First-Time Setup 2 The first time you turn on the TV, the on-screen instructions will guide you through each of the steps necessary to get your mode.
... set! 14 Select Home Use for in -home use : Before you begin the first-time setup: • Your TV should be installed and the power cord should be connected to an electrical outlet. SELECT A LANGUAGE English Español Français Press OK ...to use . Select Store demo for in -store display. Completing The First-Time Setup 2 The first time you turn on the TV, the on-screen instructions will guide you through each of the steps necessary to get your mode.
User Manual
Page 15
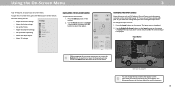
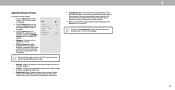
...; Set up the Timers • Adjust the Channel settings • Set up Closed Captioning • Name and adjust Inputs • Adjust TV settings TV Settings Picture Audio Timers Channels Closed Captions Devices System NAVIGATING THE ON-SCREEN MENU To open the on-screen menu, press the Menu button on... change the input names that option. Press the Input button on -screen menu. 4 5 6 7 8 9 ENT 0 Input Name COMP HDMI-1 HDMI-2 TV Note: Inputs may vary by TV. Use the Right/Left Arrow buttons or the Input button on the Input menu to th1e previo2us menu3 screen. You can press the...
...; Set up the Timers • Adjust the Channel settings • Set up Closed Captioning • Name and adjust Inputs • Adjust TV settings TV Settings Picture Audio Timers Channels Closed Captions Devices System NAVIGATING THE ON-SCREEN MENU To open the on-screen menu, press the Menu button on... change the input names that option. Press the Input button on -screen menu. 4 5 6 7 8 9 ENT 0 Input Name COMP HDMI-1 HDMI-2 TV Note: Inputs may vary by TV. Use the Right/Left Arrow buttons or the Input button on the Input menu to th1e previo2us menu3 screen. You can press the...
User Manual
Page 16
CHANGING THE SCREEN ASPECT RATIO The TV can display images in all directions (33% taller and 33% wider) with black bars to fit the screen. If the program is being stretched, the ...
CHANGING THE SCREEN ASPECT RATIO The TV can display images in all directions (33% taller and 33% wider) with black bars to fit the screen. If the program is being stretched, the ...
User Manual
Page 17
3 ADJUSTING THE PICTURE SETTINGS Your TV can be too dark to reduce video delay (lag) when gaming. • Film Mode - Use the Arrow buttons on the remote to highlight Picture Mode, ... to the default settings. • Calibrated mode sets the picture settings to values ideal for watching TV in a brightly-lit room. • Calibrated Dark mode sets the picture settings to values ideal for watching TV in dark or bright areas of the picture. Backlight cannot be adjusted to values that produce a brighter...
3 ADJUSTING THE PICTURE SETTINGS Your TV can be too dark to reduce video delay (lag) when gaming. • Film Mode - Use the Arrow buttons on the remote to highlight Picture Mode, ... to the default settings. • Calibrated mode sets the picture settings to values ideal for watching TV in a brightly-lit room. • Calibrated Dark mode sets the picture settings to values ideal for watching TV in dark or bright areas of the picture. Backlight cannot be adjusted to values that produce a brighter...

User Manual
Page 20
... Point White Balance, and test patterns allow you have finished, press the Exit button. 2. Use the Arrow buttons on the remote to manually calibrate the TV. To hide the SMPTE Test Pattern, use the Arrow buttons to adjust. From the COLOR CALIBRATION menu, use the Left/Right Arrow buttons to show...
... Point White Balance, and test patterns allow you have finished, press the Exit button. 2. Use the Arrow buttons on the remote to manually calibrate the TV. To hide the SMPTE Test Pattern, use the Arrow buttons to adjust. From the COLOR CALIBRATION menu, use the Left/Right Arrow buttons to show...
User Manual
Page 22
...display the Equalizer slider. Audio Speakers DTS TruSurround Balance Lip Sync Digital Audio Out Analog Audio Back Auto On 0 0 Auto Out Fixed When the TV speakers are controlling the volume with more than two channels (3.0, 5.0, or 5.1, for example). 3 22 Adjusts the synchronization between On or Off to...OK. Toggle between the display image and the accompanying audio track. • Digital Audio Out - You must select Bitstream for audio with the TV's volume controls, or select Fixed if an external audio device (sound bar or AV receiver) will control the volume. 4. ADJUSTING THE AUDIO ...
...display the Equalizer slider. Audio Speakers DTS TruSurround Balance Lip Sync Digital Audio Out Analog Audio Back Auto On 0 0 Auto Out Fixed When the TV speakers are controlling the volume with more than two channels (3.0, 5.0, or 5.1, for example). 3 22 Adjusts the synchronization between On or Off to...OK. Toggle between the display image and the accompanying audio track. • Digital Audio Out - You must select Bitstream for audio with the TV's volume controls, or select Fixed if an external audio device (sound bar or AV receiver) will control the volume. 4. ADJUSTING THE AUDIO ...
User Manual
Page 23
... 2. Sleep Timer Auto Power Off Off 10 Minutes 3. When you have finished setting the auto power off . SETTING TIMERS Setting the Timer When activated, the TV's timer will turn off time, press the Exit button on the remote. 3 23 The on-screen menu is displayed. When you have finished setting the... sleep timer, press the Exit button on the remote. If you don't want the TV to go to sleep: 30, 60, 90, 120, or 180 minutes. Otherwise, select 10 minutes. 3. This feature can be deactivated. From the TIMERS menu, ...
... 2. Sleep Timer Auto Power Off Off 10 Minutes 3. When you have finished setting the auto power off . SETTING TIMERS Setting the Timer When activated, the TV's timer will turn off time, press the Exit button on the remote. 3 23 The on-screen menu is displayed. When you have finished setting the... sleep timer, press the Exit button on the remote. If you don't want the TV to go to sleep: 30, 60, 90, 120, or 180 minutes. Otherwise, select 10 minutes. 3. This feature can be deactivated. From the TIMERS menu, ...
User Manual
Page 24
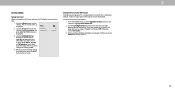
...be viewed if the channel is required for channels before it can display programs and their associated information. 3 SETTING UP CHANNELS You can use the TV's Channels menu to: • Find Channels • Select channels to skip • Select Analog Audio mode • Select the language for ...Digital Audio Channels Channel Source Find Channels Skip Channels Analog Audio Digital Audio Back Antenna Stereo English Scanning for Channels The TV may need to scan for free over-the-air channels (using the Number Pad. Highlight Done and press OK. For each channel you...
...be viewed if the channel is required for channels before it can display programs and their associated information. 3 SETTING UP CHANNELS You can use the TV's Channels menu to: • Find Channels • Select channels to skip • Select Analog Audio mode • Select the language for ...Digital Audio Channels Channel Source Find Channels Skip Channels Analog Audio Digital Audio Back Antenna Stereo English Scanning for Channels The TV may need to scan for free over-the-air channels (using the Number Pad. Highlight Done and press OK. For each channel you...
User Manual
Page 25
... use the Analog Audio feature: 1. Press OK. 3. Select your preferred language: English, Spanish/Video Description, French. Select Stereo, SAP (secondary audio programming), or Mono. The TV's Analog Audio feature allows you to listen to audio in SAP. Press the Exit button on the remote. Not all programs are broadcast in an...
... use the Analog Audio feature: 1. Press OK. 3. Select your preferred language: English, Spanish/Video Description, French. Select Stereo, SAP (secondary audio programming), or Mono. The TV's Analog Audio feature allows you to listen to audio in SAP. Press the Exit button on the remote. Not all programs are broadcast in an...
User Manual
Page 26
...appears when: • You are using the tuner to receive your set a custom PIN passcode, see Setting a System Pin. press OK. Enter your TV signals, such as a VCR, satellite or cable box, or DVR. To lock or unlock a channel: 1. The channel is unblocked, the Lock icon... OK. From the PARENTAL CONTROLS menu, highlight Channel Locks and press OK. Highlight the channel you want to adjust and press OK: • USA TV - USA movie broadcasts. • Canadian English - The LOCKS menu is displayed. 5. The CHANNEL LOCKS menu is unlocked, the Lock icon appears unlocked...
...appears when: • You are using the tuner to receive your set a custom PIN passcode, see Setting a System Pin. press OK. Enter your TV signals, such as a VCR, satellite or cable box, or DVR. To lock or unlock a channel: 1. The channel is unblocked, the Lock icon... OK. From the PARENTAL CONTROLS menu, highlight Channel Locks and press OK. Highlight the channel you want to adjust and press OK: • USA TV - USA movie broadcasts. • Canadian English - The LOCKS menu is displayed. 5. The CHANNEL LOCKS menu is unlocked, the Lock icon appears unlocked...


