DVR 920 Camera Manual
Page 1
All rights reserved. All other trademarks are registered trademarks of their respective companies. DVR 920HD Digital Video Camera User Manual © 2010 Sakar International, Inc. Windows and the Windows logo are the property of Microsoft Corporation.
All rights reserved. All other trademarks are registered trademarks of their respective companies. DVR 920HD Digital Video Camera User Manual © 2010 Sakar International, Inc. Windows and the Windows logo are the property of Microsoft Corporation.
DVR 920 Camera Manual
Page 2
.../OFF ...8 Using Your Camera ...9 Video Capture Mode ...11 Video Playback Mode...18 Photo Capture Mode ...23 Photo Playback Mode ...34 Setup Mode...39 Connecting the Camera to a TV ...45 Installing the Software ...46 Connecting the Camera to the Computer ...49 Getting Photos and Videos from Your Camera to Your Computer 49 Get started! ...51 Transfer media from my camera to my computer manually (Using Windows 52 Transfer media from my camera to my computer manually (Using Macintosh 52 Camera Maintenance ...53 Sakar Warranty Card...54 Technical Support...55 Troubleshooting...56 1 Windows...
.../OFF ...8 Using Your Camera ...9 Video Capture Mode ...11 Video Playback Mode...18 Photo Capture Mode ...23 Photo Playback Mode ...34 Setup Mode...39 Connecting the Camera to a TV ...45 Installing the Software ...46 Connecting the Camera to the Computer ...49 Getting Photos and Videos from Your Camera to Your Computer 49 Get started! ...51 Transfer media from my camera to my computer manually (Using Windows 52 Transfer media from my camera to my computer manually (Using Macintosh 52 Camera Maintenance ...53 Sakar Warranty Card...54 Technical Support...55 Troubleshooting...56 1 Windows...
DVR 920 Camera Manual
Page 3
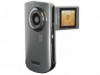
... normal use. What Your Camera Includes Digital Camera Vivitar Experience Image Manager software Installation CD USB cable TV Cable Easy Guide Strap Warranty Certificate 2 Note: Your camera needs an SD Memory card (up to 32GB) for purchasing this manual carefully first in order to get the most out of your camera. SD Memory cards are not included and need to take quality digital photos and videos is...
... normal use. What Your Camera Includes Digital Camera Vivitar Experience Image Manager software Installation CD USB cable TV Cable Easy Guide Strap Warranty Certificate 2 Note: Your camera needs an SD Memory card (up to 32GB) for purchasing this manual carefully first in order to get the most out of your camera. SD Memory cards are not included and need to take quality digital photos and videos is...
DVR 920 Camera Manual
Page 4
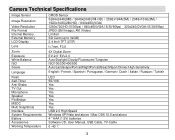
Camera Technical Specifications Image Sensor Image Resolution Video Resolution File Format Internal Memory External Memory LCD Display Lens Zoom Exposure White Balance ISO Scene Language Flash Self-Timer Anti-Shake TV Out Microphone Speaker PictBridge MSDC Multi SnapShots Interface System Requirements Battery Accessories Working Temperature CMOS Sensor 3264x2448(8M) / 3648x2048(7M-HD) / 2592x1944(5M) / 2048x1536(3M) / 1920x1080(2M-HD) / 640x480(VGA) 1280x720(HD:15/30fps) / 640x480(VGA:15/30/...
Camera Technical Specifications Image Sensor Image Resolution Video Resolution File Format Internal Memory External Memory LCD Display Lens Zoom Exposure White Balance ISO Scene Language Flash Self-Timer Anti-Shake TV Out Microphone Speaker PictBridge MSDC Multi SnapShots Interface System Requirements Battery Accessories Working Temperature CMOS Sensor 3264x2448(8M) / 3648x2048(7M-HD) / 2592x1944(5M) / 2048x1536(3M) / 1920x1080(2M-HD) / 640x480(VGA) 1280x720(HD:15/30fps) / 640x480(VGA:15/30/...
DVR 920 Camera Manual
Page 7
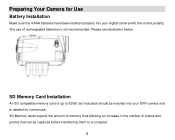
SD Memory cards expand the amount of memory thus allowing an increase in the number of videos and photos that can be inserted into your DVR camera and is not recommended. SD Memory Card Installation An SD compatible memory card of up to 32GB (not included) should be captured before transferring them to a computer. 6 The use . Please see illustration below. Preparing Your Camera for normal use of rechargeable batteries is needed for Use Battery Installation Make sure the 4 AAA batteries have been inserted properly into your digital camera with the correct polarity.
SD Memory cards expand the amount of memory thus allowing an increase in the number of videos and photos that can be inserted into your DVR camera and is not recommended. SD Memory Card Installation An SD compatible memory card of up to 32GB (not included) should be captured before transferring them to a computer. 6 The use . Please see illustration below. Preparing Your Camera for normal use of rechargeable batteries is needed for Use Battery Installation Make sure the 4 AAA batteries have been inserted properly into your digital camera with the correct polarity.
DVR 920 Camera Manual
Page 9
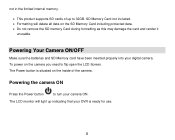
... data. Do not remove the SD memory Card during formatting as this may damage the card and render it unusable. The Power button is ready for use. 8 The LCD monitor will delete all data on the camera you need to turn your digital camera. Powering Your Camera ON/OFF Make sure the batteries and SD Memory card have been inserted properly into your camera ON. Powering the camera ON Press the Power button to flip open the LCD Screen...
... data. Do not remove the SD memory Card during formatting as this may damage the card and render it unusable. The Power button is ready for use. 8 The LCD monitor will delete all data on the camera you need to turn your digital camera. Powering Your Camera ON/OFF Make sure the batteries and SD Memory card have been inserted properly into your camera ON. Powering the camera ON Press the Power button to flip open the LCD Screen...
DVR 920 Camera Manual
Page 10
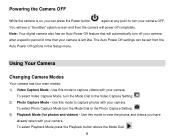
... specific period of time that your camera is on, you have already taken with your camera. Using Your Camera Changing Camera Modes Your camera has four main modes: 1) Video Capture Mode - Use this mode to the Photo Capture Setting: 3) Playback Mode (for photos and videos) - To select Video Capture Mode, turn the Mode Dial to capture videos with your camera. The Auto Power Off settings can press the Power button again at any point to the Video Capture Setting: 2) Photo Capture Mode - To select Photo Capture Mode turn the Mode Dial to turn off completely. Use this mode to view...
... specific period of time that your camera is on, you have already taken with your camera. Using Your Camera Changing Camera Modes Your camera has four main modes: 1) Video Capture Mode - Use this mode to the Photo Capture Setting: 3) Playback Mode (for photos and videos) - To select Video Capture Mode, turn the Mode Dial to capture videos with your camera. The Auto Power Off settings can press the Power button again at any point to the Video Capture Setting: 2) Photo Capture Mode - To select Photo Capture Mode turn the Mode Dial to turn off completely. Use this mode to view...
DVR 920 Camera Manual
Page 12
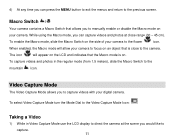
... manually enable or disable the Macro mode on your digital camera. To capture videos and photos in Video Capture Mode use the LCD display to direct the camera at close to capture. 11 Video Capture Mode The Video Capture Mode allows you to the mountain icon. When enabled, the Macro mode will appear on the LCD and indicates that the Macro mode is close range (30 - 45 cm). To select Video Capture Mode turn the Mode Dial to the Video Capture Mode Icon: Taking a Video...
... manually enable or disable the Macro mode on your digital camera. To capture videos and photos in Video Capture Mode use the LCD display to direct the camera at close to capture. 11 Video Capture Mode The Video Capture Mode allows you to the mountain icon. When enabled, the Macro mode will appear on the LCD and indicates that the Macro mode is close range (30 - 45 cm). To select Video Capture Mode turn the Mode Dial to the Video Capture Mode Icon: Taking a Video...

DVR 920 Camera Manual
Page 13
... T/Zoom In and W/Zoom Out to the internal camera memory or SD Memory card. Video Capture Mode Quick Function Buttons Button Function UP (on the control joystick) Light Exposure + DOWN (on the control joystick) OK/LED (on the control joystick) Light Exposure Turns the LED Flash On / Off 12 Note: The actual shape of these buttons may vary per camera model. 3) Press the red Video Record button in the middle of the Mode Dial to start the video capture. 4) You will see a red blinking...
... T/Zoom In and W/Zoom Out to the internal camera memory or SD Memory card. Video Capture Mode Quick Function Buttons Button Function UP (on the control joystick) Light Exposure + DOWN (on the control joystick) OK/LED (on the control joystick) Light Exposure Turns the LED Flash On / Off 12 Note: The actual shape of these buttons may vary per camera model. 3) Press the red Video Record button in the middle of the Mode Dial to start the video capture. 4) You will see a red blinking...
DVR 920 Camera Manual
Page 14
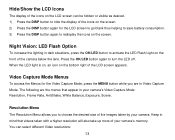
... the LCD screen to go blank thus helping to save battery consumption. 3) Press the DISP button again to hide the display of the camera below the lens. Keep in mind that appear in dark situations, press the OK/LED button to activate the LED Flash Light on the front of the icons on the screen. 2) Press the DISP button again for the Video Capture Mode, press the MENU button...
... the LCD screen to go blank thus helping to save battery consumption. 3) Press the DISP button again to hide the display of the camera below the lens. Keep in mind that appear in dark situations, press the OK/LED button to activate the LED Flash Light on the front of the icons on the screen. 2) Press the DISP button again for the Video Capture Mode, press the MENU button...

DVR 920 Camera Manual
Page 17
... the amount of light allowed into the lens by using the negative count) to the Video Capture Mode. Exposure Menu The Exposure setting helps you control the amount of light allowed into the lens by your camera. When the environment has more light than normal. You can select from the following White Balance options: Auto, Daylight, Cloudy, Fluorescent, Tungsten 1) Press the MENU button to enter the Video Capture Menus. 2) Press the...
... the amount of light allowed into the lens by using the negative count) to the Video Capture Mode. Exposure Menu The Exposure setting helps you control the amount of light allowed into the lens by your camera. When the environment has more light than normal. You can select from the following White Balance options: Auto, Daylight, Cloudy, Fluorescent, Tungsten 1) Press the MENU button to enter the Video Capture Menus. 2) Press the...
DVR 920 Camera Manual
Page 19
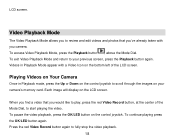
... to scroll through the images on your previous screen, press the Playback button again. Each image will display on the control joystick. To exit Video Playback Mode and return to start playing the video. Playing Videos on the bottom left of the Mode Dial, to your camera‟s memory card. To continue playing press the OK/LED button again. Video Playback Mode The Video Playback Mode allows you to review and edit videos and photos that you ‟ve...
... to scroll through the images on your previous screen, press the Playback button again. Each image will display on the control joystick. To exit Video Playback Mode and return to start playing the video. Playing Videos on the bottom left of the Mode Dial, to your camera‟s memory card. To continue playing press the OK/LED button again. Video Playback Mode The Video Playback Mode allows you to review and edit videos and photos that you ‟ve...
DVR 920 Camera Manual
Page 24
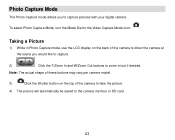
... like to capture. 2) Click the T/Zoom In and W/Zoom Out buttons to capture pictures with your digital camera. To select Photo Capture Mode, turn the Mode Dial to the Video Capture Mode Icon: Taking a Picture 1) While in /out if desired. Note: The actual shape of these buttons may vary per camera model. 3) Click the Shutter button on the top of the camera to direct the camera at the scene you to zoom in Photo Capture mode, use the LCD display on the...
... like to capture. 2) Click the T/Zoom In and W/Zoom Out buttons to capture pictures with your digital camera. To select Photo Capture Mode, turn the Mode Dial to the Video Capture Mode Icon: Taking a Picture 1) While in /out if desired. Note: The actual shape of these buttons may vary per camera model. 3) Click the Shutter button on the top of the camera to direct the camera at the scene you to zoom in Photo Capture mode, use the LCD display on the...
DVR 920 Camera Manual
Page 25
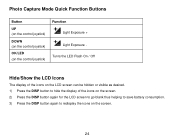
Photo Capture Mode Quick Function Buttons Button UP (on the control joystick) DOWN (on the control joystick) OK/LED (on the screen. 24 Turns the LED Flash On / Off Hide/Show the LCD Icons The display of the icons on the LCD screen can be hidden or visible as desired. 1) Press the DISP button to hide the display of the icons on the screen. 2) Press the DISP button again for the LCD screen to go blank thus helping to save battery consumption. 3) Press the DISP button again to redisplay the icons on the control joystick) Function Light Exposure + Light Exposure -
Photo Capture Mode Quick Function Buttons Button UP (on the control joystick) DOWN (on the control joystick) OK/LED (on the screen. 24 Turns the LED Flash On / Off Hide/Show the LCD Icons The display of the icons on the LCD screen can be hidden or visible as desired. 1) Press the DISP button to hide the display of the icons on the screen. 2) Press the DISP button again for the LCD screen to go blank thus helping to save battery consumption. 3) Press the DISP button again to redisplay the icons on the control joystick) Function Light Exposure + Light Exposure -
DVR 920 Camera Manual
Page 28
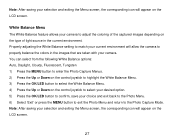
... the White Balance Menu. 3) Press the OK/LED button to select the White Balance Menu. 4) Press the Up or Down on the type of light source in the images that are taken with your camera. Note: After saving your selection and exiting the Menu screen, the corresponding icon will appear on the LCD screen. Properly adjusting the White Balance setting to match your current environment will allow the camera to the Photo Capture Mode...
... the White Balance Menu. 3) Press the OK/LED button to select the White Balance Menu. 4) Press the Up or Down on the type of light source in the images that are taken with your camera. Note: After saving your selection and exiting the Menu screen, the corresponding icon will appear on the LCD screen. Properly adjusting the White Balance setting to match your current environment will allow the camera to the Photo Capture Mode...
DVR 920 Camera Manual
Page 36
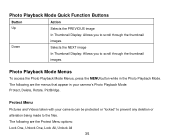
Photo Playback Mode Quick Function Buttons Button Up Action Selects the PREVIOUS image In Thumbnail Display: Allows you to the files. The following are the menus that appear in the Photo Playback Mode. Selects the NEXT image In Thumbnail Display: Allows you to scroll through the thumbnail images. Photo Playback Mode Menus To access the Photo Playback Mode Menus, press the MENU button while in your camera can be protected or "locked" to prevent any deletion or alteration...
Photo Playback Mode Quick Function Buttons Button Up Action Selects the PREVIOUS image In Thumbnail Display: Allows you to the files. The following are the menus that appear in the Photo Playback Mode. Selects the NEXT image In Thumbnail Display: Allows you to scroll through the thumbnail images. Photo Playback Mode Menus To access the Photo Playback Mode Menus, press the MENU button while in your camera can be protected or "locked" to prevent any deletion or alteration...
DVR 920 Camera Manual
Page 39
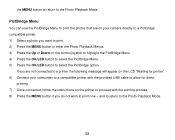
... following message will appear on the LCD "Waiting for direct printing. 7) Once connected, follow the instructions on the printer to proceed with the printing process. 8) Press the MENU button if you want to print. 2) Press the MENU button to enter the Photo Playback Menus. 3) Press the Up or Down on your camcorder to a compatible printer with the provided USB cable to allow for printer". 6) Connect your camera directly...
... following message will appear on the LCD "Waiting for direct printing. 7) Once connected, follow the instructions on the printer to proceed with the printing process. 8) Press the MENU button if you want to print. 2) Press the MENU button to enter the Photo Playback Menus. 3) Press the Up or Down on your camcorder to a compatible printer with the provided USB cable to allow for printer". 6) Connect your camera directly...
DVR 920 Camera Manual
Page 46
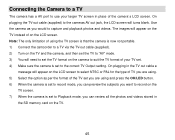
... camera`s LCD screen. The images will turns blank. Connecting the Camera to a TV The camera has a AV port to use your TV set. 4) Make sure the camera is set to the correct TV Output setting. On plugging the TV-out cable (supplied) to Playback mode, you would to capture and playback photos and videos. Use the camera as per the format of the TV set you are using and press the OK/LED button. 6) When the camera is set to record mode...
... camera`s LCD screen. The images will turns blank. Connecting the Camera to a TV The camera has a AV port to use your TV set. 4) Make sure the camera is set to the correct TV Output setting. On plugging the TV-out cable (supplied) to Playback mode, you would to capture and playback photos and videos. Use the camera as per the format of the TV set you are using and press the OK/LED button. 6) When the camera is set to record mode...
DVR 920 Camera Manual
Page 48
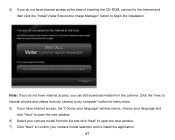
... access, you can still download media from the list and click "Next" to open the next window. 6) Select your camera model selection and to install the application. 47 Note: If you have internet access at the time of inserting the CD-ROM, connect to the internet and then click the "Install Vivitar Experience Image Manager" button to confirm your camera model from the camera. Click the "How to transfer photos and videos...
... access, you can still download media from the list and click "Next" to open the next window. 6) Select your camera model selection and to install the application. 47 Note: If you have internet access at the time of inserting the CD-ROM, connect to the internet and then click the "Install Vivitar Experience Image Manager" button to confirm your camera model from the camera. Click the "How to transfer photos and videos...
DVR 920 Camera Manual
Page 54
...;s Edit menu. Doing so will cancel the transfer of any files on the device icon and open the DCIM folder and the folder inside to view the media files. 5) Select the files and drag them into the Movies folder. 7) Do not disconnect the cable during transfer. Please handle your camera to heat sources. Do not use you copy the images into the Pictures folder and the videos into...
...;s Edit menu. Doing so will cancel the transfer of any files on the device icon and open the DCIM folder and the folder inside to view the media files. 5) Select the files and drag them into the Movies folder. 7) Do not disconnect the cable during transfer. Please handle your camera to heat sources. Do not use you copy the images into the Pictures folder and the videos into...


