Warranty
Page 1
...and tear/cosmetic damage and defects resulting from other extraneous causes such as unauthorised disassembly, repair or modification. During the period, Vivitar will repair or replace the product at no charge for any incidental or consequential damages arising from the purchase, use or ...The time period of this product even if Vivitar has been advised of such damages. Limited One Year Warranty Vivitar warrants this product which result from accident, abuse, misuse, failure to operate the product in accordance with relevant instructions, neglect, immersion in material and workmanship ...
...and tear/cosmetic damage and defects resulting from other extraneous causes such as unauthorised disassembly, repair or modification. During the period, Vivitar will repair or replace the product at no charge for any incidental or consequential damages arising from the purchase, use or ...The time period of this product even if Vivitar has been advised of such damages. Limited One Year Warranty Vivitar warrants this product which result from accident, abuse, misuse, failure to operate the product in accordance with relevant instructions, neglect, immersion in material and workmanship ...

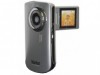
Camera Manual
Page 51
... with the printing process. 9) Select the "Cancel" option to exit the menu and return to the previous mode. 50 the printer. 8) Once connected, follow the instructions on the selected item. 6) Press the LEFT or RIGHT button to select the next menu item. 7) Press the MODE button to exit the menu and...
... with the printing process. 9) Select the "Cancel" option to exit the menu and return to the previous mode. 50 the printer. 8) Once connected, follow the instructions on the selected item. 6) Press the LEFT or RIGHT button to select the next menu item. 7) Press the MODE button to exit the menu and...

Camera Manual
Page 54
... Push the USB lever on the side of this license agreement" and then click "Next" to continue. 10) On PC only: Let the "Vivitar Experience Image Manager" installer create the folder to where the program will be installed, and then click "Install". 11) Please wait while the application continues... button when the installation is complete. Click the "How to transfer photos and videos from my camera to my computer" button for instructions. 5) If you can run the Vivitar Experience Image Manager from the Programs (PC) or Applications (Mac) menu on your computer. Note: If you do not have internet...
... Push the USB lever on the side of this license agreement" and then click "Next" to continue. 10) On PC only: Let the "Vivitar Experience Image Manager" installer create the folder to where the program will be installed, and then click "Install". 11) Please wait while the application continues... button when the installation is complete. Click the "How to transfer photos and videos from my camera to my computer" button for instructions. 5) If you can run the Vivitar Experience Image Manager from the Programs (PC) or Applications (Mac) menu on your computer. Note: If you do not have internet...