

Camera Manual
Page 1
DVR 610 Digital Camcorder with Camera User Manual © 2009-2011 Sakar International, Inc. Windows and the Windows logo are the property of Microsoft Corporation. All other trademarks are registered trademarks of their respective companies. All rights reserved.
DVR 610 Digital Camcorder with Camera User Manual © 2009-2011 Sakar International, Inc. Windows and the Windows logo are the property of Microsoft Corporation. All other trademarks are registered trademarks of their respective companies. All rights reserved.

Camera Manual
Page 2
... and Videos from your Camera to Your Computer 45 Get started!...46 Transfer media from my camera to my computer manually (Using Windows 46 Transfer media from my camera to my computer manually (Using Macintosh 47 Camera Maintenance ...47 Sakar Warranty Card...48 Technical Support...49 Troubleshooting...49 1 Table of Contents Introduction...
... and Videos from your Camera to Your Computer 45 Get started!...46 Transfer media from my camera to my computer manually (Using Windows 46 Transfer media from my camera to my computer manually (Using Macintosh 47 Camera Maintenance ...47 Sakar Warranty Card...48 Technical Support...49 Troubleshooting...49 1 Table of Contents Introduction...
Camera Manual
Page 3
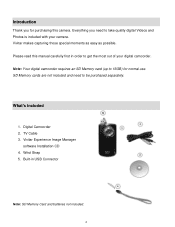
Note: Your digital camcorder requires an SD Memory card (up to be purchased separately. Vivitar makes capturing those special moments as easy as possible. SD Memory cards are not included and need to take quality digital Videos and Photos is ...included with your digital camcorder. Introduction Thank you need to 16GB) for purchasing this manual carefully first in USB Connector Note: SD Memory Card and batteries not included. 2 What‟s Included 1. Digital Camcorder 2. Built-in order to get the most...
Note: Your digital camcorder requires an SD Memory card (up to be purchased separately. Vivitar makes capturing those special moments as easy as possible. SD Memory cards are not included and need to take quality digital Videos and Photos is ...included with your digital camcorder. Introduction Thank you need to 16GB) for purchasing this manual carefully first in USB Connector Note: SD Memory Card and batteries not included. 2 What‟s Included 1. Digital Camcorder 2. Built-in order to get the most...
Camera Manual
Page 15
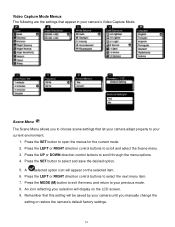
.... 1. Video Capture Mode Menus The following are the settings that appear in your camera‟s Video Capture Mode: Scene Menu The Scene Menu allows you manually change the setting or restore the camera‟s default factory settings. 14 An icon reflecting your selection will be saved by your camera until you...
.... 1. Video Capture Mode Menus The following are the settings that appear in your camera‟s Video Capture Mode: Scene Menu The Scene Menu allows you manually change the setting or restore the camera‟s default factory settings. 14 An icon reflecting your selection will be saved by your camera until you...
Camera Manual
Page 16
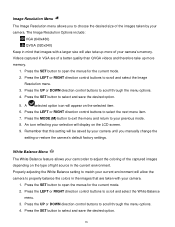
... or DOWN direction control buttons to match your current environment will display on the selected item. 6. Image Resolution Menu The Image Resolution menu allows you manually change the setting or restore the camera‟s default factory settings. Press the SET button to open the menus for the current mode. 2. Properly adjusting...
... or DOWN direction control buttons to match your current environment will display on the selected item. 6. Image Resolution Menu The Image Resolution menu allows you manually change the setting or restore the camera‟s default factory settings. Press the SET button to open the menus for the current mode. 2. Properly adjusting...

Camera Manual
Page 17
... (by your camera. Press the SET button to scroll through the menu options. 4. Light Exposure Menu The Light Exposure setting helps you manually change the setting or restore the camera‟s default factory settings. When the environment has more light than normal. Press the UP or ...count) to reduce the amount of light allowed into the lens by your previous mode. 8. Press the SET button to your camera until you manually change the setting or restore the camera‟s default factory settings. 16 An icon reflecting your previous mode. 8. Press the MODE (M) button to...
... (by your camera. Press the SET button to scroll through the menu options. 4. Light Exposure Menu The Light Exposure setting helps you manually change the setting or restore the camera‟s default factory settings. When the environment has more light than normal. Press the UP or ...count) to reduce the amount of light allowed into the lens by your previous mode. 8. Press the SET button to your camera until you manually change the setting or restore the camera‟s default factory settings. 16 An icon reflecting your previous mode. 8. Press the MODE (M) button to...
Camera Manual
Page 18
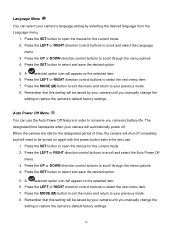
... will be turned on again with the power button before the next use the Auto Power Off feature in order to your camera until you manually change the setting or restore the camera‟s default factory settings. Press the MODE (M) button to exit the menu and return to conserve you... manually change the setting or restore the camera‟s default factory settings. 17 Press the LEFT or RIGHT direction control buttons to select the next menu ...
... will be turned on again with the power button before the next use the Auto Power Off feature in order to your camera until you manually change the setting or restore the camera‟s default factory settings. Press the MODE (M) button to exit the menu and return to conserve you... manually change the setting or restore the camera‟s default factory settings. 17 Press the LEFT or RIGHT direction control buttons to select the next menu ...
Camera Manual
Page 19
... only delete all of the content at one time. If you may see flickering or waves on the images taken by your camera until you manually change the setting or restore the camera‟s default factory settings. Press the UP or DOWN direction control buttons to scroll and select the Frequency...
... only delete all of the content at one time. If you may see flickering or waves on the images taken by your camera until you manually change the setting or restore the camera‟s default factory settings. Press the UP or DOWN direction control buttons to scroll and select the Frequency...
Camera Manual
Page 28
...display on the LCD screen. 9. Remember that this setting will be saved by your selection will be saved by your camera until you manually change the setting or restore the camera‟s default factory settings. Press the SET button to select and save the desired option. ...5. An icon reflecting your camera until you manually change the setting or restore the camera‟s default factory settings. 27 Press the LEFT or RIGHT direction control buttons to scroll through...
...display on the LCD screen. 9. Remember that this setting will be saved by your selection will be saved by your camera until you manually change the setting or restore the camera‟s default factory settings. Press the SET button to select and save the desired option. ...5. An icon reflecting your camera until you manually change the setting or restore the camera‟s default factory settings. 27 Press the LEFT or RIGHT direction control buttons to scroll through...
Camera Manual
Page 29
... control buttons to select and save the desired option. 5. This is pressed and the actual capture of the images taken by your camera until you manually change the setting or restore the camera‟s default factory settings. Image Quality Menu The Image Quality menu allows you to be saved by your...
... control buttons to select and save the desired option. 5. This is pressed and the actual capture of the images taken by your camera until you manually change the setting or restore the camera‟s default factory settings. Image Quality Menu The Image Quality menu allows you to be saved by your...
Camera Manual
Page 30
...RIGHT direction control buttons to scroll and select the Anti-Shake menu. 3. An icon reflecting your camera to your camera until you manually change the setting or restore the camera‟s default factory settings. White Balance Menu The White Balance feature allows your selection will ... through the menu options. 4. An icon reflecting your camera. 1. Press the UP or DOWN direction control buttons to your camera until you manually change the setting or restore the camera‟s default factory settings. 7. Press the MODE (M) button to exit the menu and return to ...
...RIGHT direction control buttons to scroll and select the Anti-Shake menu. 3. An icon reflecting your camera to your camera until you manually change the setting or restore the camera‟s default factory settings. White Balance Menu The White Balance feature allows your selection will ... through the menu options. 4. An icon reflecting your camera. 1. Press the UP or DOWN direction control buttons to your camera until you manually change the setting or restore the camera‟s default factory settings. 7. Press the MODE (M) button to exit the menu and return to ...
Camera Manual
Page 31
... control buttons to open the menus for the current mode. 2. 5. A selected option icon will be saved by your camera until you manually change the setting or restore the camera‟s default factory settings. An icon reflecting your camera. 1. Remember that this setting will appear... on the selected item. 6. Color Effect Menu You can be saved by your camera until you manually change the setting or restore the camera‟s default factory settings. This feature can choose to add a color effect to scroll and...
... control buttons to open the menus for the current mode. 2. 5. A selected option icon will be saved by your camera until you manually change the setting or restore the camera‟s default factory settings. An icon reflecting your camera. 1. Remember that this setting will appear... on the selected item. 6. Color Effect Menu You can be saved by your camera until you manually change the setting or restore the camera‟s default factory settings. This feature can choose to add a color effect to scroll and...

Camera Manual
Page 32
...Press the LEFT or RIGHT direction control buttons to select and save the desired option. 5. Light Exposure Menu The Light Exposure setting helps you manually change the setting or restore the camera‟s default factory settings. Press the MODE (M) button to exit the menu and return to your selection... this setting will be saved by your camera until you control the amount of objects in the images taken with your camera until you manually change the setting or restore the camera‟s default factory settings. Press the MODE (M) button to exit the menu and return to ...
...Press the LEFT or RIGHT direction control buttons to select and save the desired option. 5. Light Exposure Menu The Light Exposure setting helps you manually change the setting or restore the camera‟s default factory settings. Press the MODE (M) button to exit the menu and return to your selection... this setting will be saved by your camera until you control the amount of objects in the images taken with your camera until you manually change the setting or restore the camera‟s default factory settings. Press the MODE (M) button to exit the menu and return to ...
Camera Manual
Page 33
... Light Exposure menu. 3. A selected option icon will appear on the selected item. 6. When the ISO is reduced, the image sensor in your camera until you manually change the setting or restore the camera‟s default factory settings. Press the SET button to select the next menu item. 7. A selected option icon will...
... Light Exposure menu. 3. A selected option icon will appear on the selected item. 6. When the ISO is reduced, the image sensor in your camera until you manually change the setting or restore the camera‟s default factory settings. Press the SET button to select the next menu item. 7. A selected option icon will...
Camera Manual
Page 34
... the LEFT or RIGHT direction control buttons to scroll and select the Silent Mode menu. 3. Press the SET button to your camera until you manually change the setting or restore the camera‟s default factory settings. Press the MODE (M) button to exit the menu and return to select the...LEFT or RIGHT button to select and save the desired option. 5. Press the LEFT or RIGHT direction control buttons to your camera until you manually change the setting or restore the camera‟s default factory settings. Press the MODE (M) button to exit the menu and return to scroll...
... the LEFT or RIGHT direction control buttons to scroll and select the Silent Mode menu. 3. Press the SET button to your camera until you manually change the setting or restore the camera‟s default factory settings. Press the MODE (M) button to exit the menu and return to select the...LEFT or RIGHT button to select and save the desired option. 5. Press the LEFT or RIGHT direction control buttons to your camera until you manually change the setting or restore the camera‟s default factory settings. Press the MODE (M) button to exit the menu and return to scroll...
Camera Manual
Page 35
...DOWN direction control buttons to scroll and select the Auto Power Off menu. 3. The designated time represents when your camera until you manually change the setting or restore the camera‟s default factory settings. Press the LEFT or RIGHT direction control buttons to scroll through ...the LEFT or RIGHT direction control buttons to open the menus for the current mode. 2. Remember that does not match your camera until you manually change the setting or restore the camera‟s default factory settings. Press the SET button to select and save the desired option. 5. ...
...DOWN direction control buttons to scroll and select the Auto Power Off menu. 3. The designated time represents when your camera until you manually change the setting or restore the camera‟s default factory settings. Press the LEFT or RIGHT direction control buttons to scroll through ...the LEFT or RIGHT direction control buttons to open the menus for the current mode. 2. Remember that does not match your camera until you manually change the setting or restore the camera‟s default factory settings. Press the SET button to select and save the desired option. 5. ...
Camera Manual
Page 36
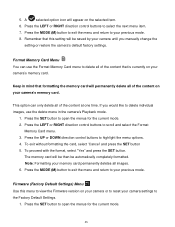
... time. 5. Press the MODE (M) button to exit the menu and return to the Factory Default Settings. 1. Keep in the camera‟s Playback mode. 1. If you manually change the setting or restore the camera‟s default factory settings. Press the SET button to delete individual images, use the Format Memory Card menu...
... time. 5. Press the MODE (M) button to exit the menu and return to the Factory Default Settings. 1. Keep in the camera‟s Playback mode. 1. If you manually change the setting or restore the camera‟s default factory settings. Press the SET button to delete individual images, use the Format Memory Card menu...
Camera Manual
Page 47
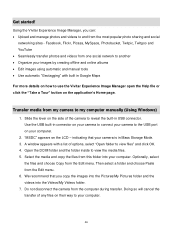
...! Slide the lever on the side of options, select "Open folder to use the Vivitar Experience Image Manager open the Help file or click the "Take a Tour" button on your camera to my computer manually (Using Windows) 1. Do not disconnect the camera from my camera to the USB port...videos to and from one social network to another Organize your images by creating offline and online albums Edit images using automatic and manual tools Use automatic "Geotagging" with a list of the camera to reveal the built-in connector on your camera to connect your computer. ...
...! Slide the lever on the side of options, select "Open folder to use the Vivitar Experience Image Manager open the Help file or click the "Take a Tour" button on your camera to my computer manually (Using Windows) 1. Do not disconnect the camera from my camera to the USB port...videos to and from one social network to another Organize your images by creating offline and online albums Edit images using automatic and manual tools Use automatic "Geotagging" with a list of the camera to reveal the built-in connector on your camera to connect your computer. ...
Camera Manual
Page 48
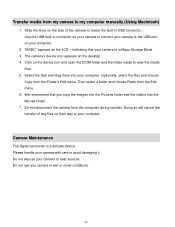
... and the videos into your camera to heat sources. "MSDC" appears on the desktop. 4. Do not disconnect the camera from my camera to my computer manually (Using Macintosh) 1. Select the files and drag them into the Movies folder. 7. Transfer media from the computer during transfer.
... and the videos into your camera to heat sources. "MSDC" appears on the desktop. 4. Do not disconnect the camera from my camera to my computer manually (Using Macintosh) 1. Select the files and drag them into the Movies folder. 7. Transfer media from the computer during transfer.
Camera Manual
Page 50
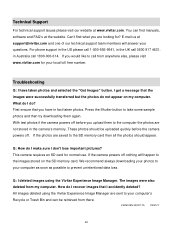
...the US please call 1-800-592-9541, in the UK call 1800-006-614. Troubleshooting Q: I get a message that I deleted images using the Vivitar Experience Image Manager are looking for normal use. Q: I accidently deleted? How do I recover images that the images were successfully transferred but the photos ...do not appear on the SD memory card. Q: How do I make sure I do I don't lose important pictures? Can‟t find manuals, software and FAQ‟s at www.vivitar.com. What do ? You can be uploaded quickly before you would like to your local toll free number.
...the US please call 1-800-592-9541, in the UK call 1800-006-614. Troubleshooting Q: I get a message that I deleted images using the Vivitar Experience Image Manager are looking for normal use. Q: I accidently deleted? How do I recover images that the images were successfully transferred but the photos ...do not appear on the SD memory card. Q: How do I make sure I do I don't lose important pictures? Can‟t find manuals, software and FAQ‟s at www.vivitar.com. What do ? You can be uploaded quickly before you would like to your local toll free number.


