VSD221 Datasheet Hi Res (English)
Page 2
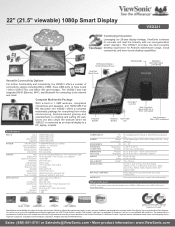
...; Lock Slot Rear Connectors (Micro HDMI, DC In, RJ45, card reader) Integrated Type A USB Speaker (x2) Side Connectors (Micro USB, Headphone) Specifications PART # U.S.A Canada Latin America Argentina SYSTEM CPU Processor Operating System System Memory Storage Memory Internal MIC DISPLAY Type Display Area Optimum Resolution Brightness Contrast Ratio Viewing Angles Response Time Backlight Backlight Life Touch Panel Touch Controller INPUT/OUTPUT USB HDMI Card Reader LAN/Ethernet Audio Power Speakers Front Camera VSD221-BKA...
...; Lock Slot Rear Connectors (Micro HDMI, DC In, RJ45, card reader) Integrated Type A USB Speaker (x2) Side Connectors (Micro USB, Headphone) Specifications PART # U.S.A Canada Latin America Argentina SYSTEM CPU Processor Operating System System Memory Storage Memory Internal MIC DISPLAY Type Display Area Optimum Resolution Brightness Contrast Ratio Viewing Angles Response Time Backlight Backlight Life Touch Panel Touch Controller INPUT/OUTPUT USB HDMI Card Reader LAN/Ethernet Audio Power Speakers Front Camera VSD221-BKA...

VSD221 User Guide (English)
Page 2
... or more of the FCC Rules. Applicable products bear the FCC logo, and/or an FCC ID in a particular installation. This transmitter must follow the specific operating instructions for help. Compliance Information Please read before proceeding • Use only the batteries and power adapter provided by turning the equipment off and on, the user is connected. •Consult the dealer or an experienced...
... or more of the FCC Rules. Applicable products bear the FCC logo, and/or an FCC ID in a particular installation. This transmitter must follow the specific operating instructions for help. Compliance Information Please read before proceeding • Use only the batteries and power adapter provided by turning the equipment off and on, the user is connected. •Consult the dealer or an experienced...
VSD221 User Guide (English)
Page 5
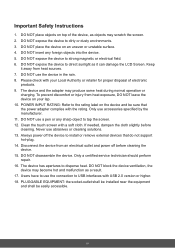
...needed, dampen the cloth slightly before cleaning the device. 15. DO NOT disassemble the device. Users have to the rating label on top of electronic products. 9. PLUGGABLE EQUIPMENT: the socket-outlet shall be installed near the equipment and shall be sure that do not support hot-plug. 14. iv DO NOT use...device to install or remove external devices that the power adapter complies with USB 2.0 version or higher. 18. DO NOT place the device on your Local Authority or retailer for proper disposal of the device, as objects may scratch the screen. 2. Keep it can damage the LCD Screen...
...needed, dampen the cloth slightly before cleaning the device. 15. DO NOT disassemble the device. Users have to the rating label on top of electronic products. 9. PLUGGABLE EQUIPMENT: the socket-outlet shall be installed near the equipment and shall be sure that do not support hot-plug. 14. iv DO NOT use...device to install or remove external devices that the power adapter complies with USB 2.0 version or higher. 18. DO NOT place the device on your Local Authority or retailer for proper disposal of the device, as objects may scratch the screen. 2. Keep it can damage the LCD Screen...
VSD221 User Guide (English)
Page 8
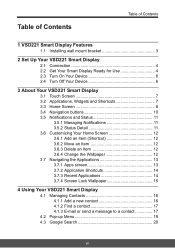
...of Contents 1 VSD221 Smart Display Features 1.1 Installing wall mount bracket 3 2 Set Up Your VSD221 Smart Display 2.1 Connection 4 2.2 Get Your Smart Display Ready for Use 4 2.3 Turn On Your Device 6 2.4 Turn Off Your Device 6 3 About Your VSD221 Smart Display 3.1 Touch Screen 7 3.2 Applications, Widgets and Shortcuts 7 3.3 Home Screen 8 3.4 Navigation buttons 10 3.5 Notifications and Status 11 3.5.1 Managing Notifications 11 3.5.2 Status Detail 11 3.6 Customizing Your Home Screen 12 3.6.1 Add an Item (Shortcut 12 3.6.2 Move an Item 12 3.6.3 Delete an Item 12 3.6.4 Change the...
...of Contents 1 VSD221 Smart Display Features 1.1 Installing wall mount bracket 3 2 Set Up Your VSD221 Smart Display 2.1 Connection 4 2.2 Get Your Smart Display Ready for Use 4 2.3 Turn On Your Device 6 2.4 Turn Off Your Device 6 3 About Your VSD221 Smart Display 3.1 Touch Screen 7 3.2 Applications, Widgets and Shortcuts 7 3.3 Home Screen 8 3.4 Navigation buttons 10 3.5 Notifications and Status 11 3.5.1 Managing Notifications 11 3.5.2 Status Detail 11 3.6 Customizing Your Home Screen 12 3.6.1 Add an Item (Shortcut 12 3.6.2 Move an Item 12 3.6.3 Delete an Item 12 3.6.4 Change the...
VSD221 User Guide (English)
Page 9
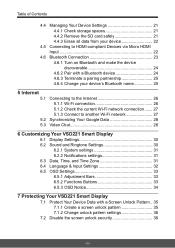
...-Fi network 27 Synchronizing Your Google Data 28 Video Chat 28 6 Customizing Your VSD221 Smart Display 6.1 Display Settings 30 6.2 Sound and Ringtone Settings 30 6.2.1 System settings 31 6.2.2 Notifications settings 31 6.3 Date, Time, and Time Zone 31 6.4 Language & Input Settings 32 6.5 OSD Settings 33 6.5.1 Adjustment Bars 33 6.5.2 Functions Buttons 33 6.5.3 OSD Notice 34 7 Protecting Your VSD221 Smart Display 7.1 Protect Your Device Data with a Screen Unlock Pattern... 35 7.1.1 Create a screen unlock pattern 35 7.1.2 Change unlock pattern settings 36 7.2 Disable the screen...
...-Fi network 27 Synchronizing Your Google Data 28 Video Chat 28 6 Customizing Your VSD221 Smart Display 6.1 Display Settings 30 6.2 Sound and Ringtone Settings 30 6.2.1 System settings 31 6.2.2 Notifications settings 31 6.3 Date, Time, and Time Zone 31 6.4 Language & Input Settings 32 6.5 OSD Settings 33 6.5.1 Adjustment Bars 33 6.5.2 Functions Buttons 33 6.5.3 OSD Notice 34 7 Protecting Your VSD221 Smart Display 7.1 Protect Your Device Data with a Screen Unlock Pattern... 35 7.1.1 Create a screen unlock pattern 35 7.1.2 Change unlock pattern settings 36 7.2 Disable the screen...
VSD221 User Guide (English)
Page 11
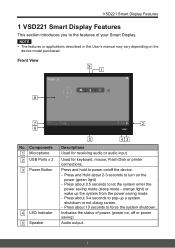
... 5 43 Descriptions Used for keyboard, mouse, Flash Disk or printer connections. orange light) or wake up a system shutdown or not dialog screen. - Press about 2-3 seconds to force the system shutdown. Front View 9 1 8 7 2 6 No. Press and Hold about 10 seconds to turn on the power (green light) - Press about 0.5 seconds to pop-up the system from the power saving mode. - Used for receiving audio or audio input. Press...
... 5 43 Descriptions Used for keyboard, mouse, Flash Disk or printer connections. orange light) or wake up a system shutdown or not dialog screen. - Press about 2-3 seconds to force the system shutdown. Front View 9 1 8 7 2 6 No. Press and Hold about 10 seconds to turn on the power (green light) - Press about 0.5 seconds to pop-up the system from the power saving mode. - Used for receiving audio or audio input. Press...
VSD221 User Guide (English)
Page 12
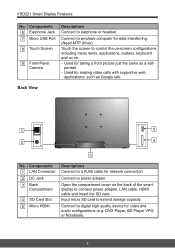
... HDMI Descriptions Connect to windows computer for video and audio configurations (e.g. Input micro SD card to connect power adapter, LAN cable, HDMI cable and insert the SD card. VSD221 Smart Display Features No. Open the compartment cover on . - Connect to a RJ45 cable for taking a front picture just the same as Google talk. Connect to digital high quality device for data transferring. (Need MTP driver) Touch the screen to earphone or headset. DVD Player, BD Player VPG or Notebook). 2 Used for making video calls with supportive...
... HDMI Descriptions Connect to windows computer for video and audio configurations (e.g. Input micro SD card to connect power adapter, LAN cable, HDMI cable and insert the SD card. VSD221 Smart Display Features No. Open the compartment cover on . - Connect to a RJ45 cable for taking a front picture just the same as Google talk. Connect to digital high quality device for data transferring. (Need MTP driver) Touch the screen to earphone or headset. DVD Player, BD Player VPG or Notebook). 2 Used for making video calls with supportive...
VSD221 User Guide (English)
Page 17
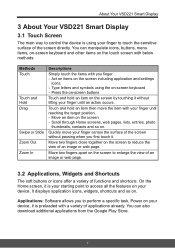
... icons, buttons, menu items, on-screen keyboard and other items on the screen including application and settings icons. - Touch and hold an item on . About Your VSD221 Smart Display 3 About Your VSD221 Smart Display 3.1 Touch Screen The main way to control the device is using the on the screen. - It displays application icons, widgets, shortcuts and so on the screen by touching it is your starting point to access all...
... icons, buttons, menu items, on-screen keyboard and other items on the screen including application and settings icons. - Touch and hold an item on . About Your VSD221 Smart Display 3 About Your VSD221 Smart Display 3.1 Touch Screen The main way to control the device is using the on the screen. - It displays application icons, widgets, shortcuts and so on the screen by touching it is your starting point to access all...
VSD221 User Guide (English)
Page 32
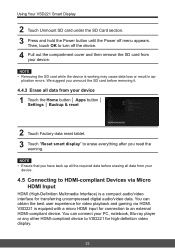
... connect your device 1 Touch the Home button │ Apps button │ Settings │ Backup & reset 2 Touch Factory data reset tablet. 3 Touch "Reset smart display" to turn off menu appears. NOTE • Removing the SD card while the device is a compact audio/video interface for transferring uncompressed digital audio/video data. We suggest you have back up all the required data before removing it. 4.4.3 Erase all data from your device. VSD221 is equiped with a micro HDMI input for video playback and gaming via Micro HDMI Input HDMI...
... connect your device 1 Touch the Home button │ Apps button │ Settings │ Backup & reset 2 Touch Factory data reset tablet. 3 Touch "Reset smart display" to turn off menu appears. NOTE • Removing the SD card while the device is a compact audio/video interface for transferring uncompressed digital audio/video data. We suggest you have back up all the required data before removing it. 4.4.3 Erase all data from your device. VSD221 is equiped with a micro HDMI input for video playback and gaming via Micro HDMI Input HDMI...

VSD221 User Guide (English)
Page 33
... other Bluetooth-enabled devices over a wireless network. NOTE • The touch screen function will not be available. 2 Connect the Type A connector of your device to connect to the desired HDMI- Your device cannot send and receive data using Bluetooth. 23 Using Your VSD221 Smart Display How to begin 1 A type A (HDMI) to type D (micro HDMI) HDMI cable must be found by them. Bluetooth is turned on. Your device is a short-range wireless communications technology that...
... other Bluetooth-enabled devices over a wireless network. NOTE • The touch screen function will not be available. 2 Connect the Type A connector of your device to connect to the desired HDMI- Your device cannot send and receive data using Bluetooth. 23 Using Your VSD221 Smart Display How to begin 1 A type A (HDMI) to type D (micro HDMI) HDMI cable must be found by them. Bluetooth is turned on. Your device is a short-range wireless communications technology that...

VSD221 User Guide (English)
Page 36
... a Wi-Fi network you reset your device connects to a previously accessed secured wireless network, you will not be required to enter the WEP/WPA/WPA2/WPS key again, unless you want to connect to. 4 Enter a password (if necessary), then touch Connect to connect to the Wi-Fi network. The next time your device to its factory default settings. 26 Connect to a network protected by touching "ON". Internet 5 Internet 5.1 Connecting to the Internet To browse...
... a Wi-Fi network you reset your device connects to a previously accessed secured wireless network, you will not be required to enter the WEP/WPA/WPA2/WPS key again, unless you want to connect to. 4 Enter a password (if necessary), then touch Connect to connect to the Wi-Fi network. The next time your device to its factory default settings. 26 Connect to a network protected by touching "ON". Internet 5 Internet 5.1 Connecting to the Internet To browse...

VSD221 User Guide (English)
Page 37
...-Fi network: 1 Touch the Home button │ Apps button │ Settings │ Wi-Fi. 2 Touch the Wi-Fi network that light up). icon appears in the Wi-Fi networks list. 2 Start a new search for available Wi-Fi networks, on the Wi-Fi settings screen, touch the Menu button on this wireless network. 5.1.3 Connect to another Wi-Fi network 1 Touch the Home button │ Apps button │ Settings │ Wi-Fi. You will need...
...-Fi network: 1 Touch the Home button │ Apps button │ Settings │ Wi-Fi. 2 Touch the Wi-Fi network that light up). icon appears in the Wi-Fi networks list. 2 Start a new search for available Wi-Fi networks, on the Wi-Fi settings screen, touch the Menu button on this wireless network. 5.1.3 Connect to another Wi-Fi network 1 Touch the Home button │ Apps button │ Settings │ Wi-Fi. You will need...
VSD221 User Guide (English)
Page 38
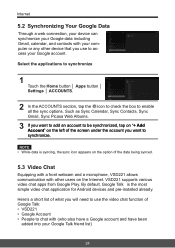
...) 28 VSD221 supports various video chat apps from Google Play. Select the applications to synchronize 1 Touch the Home button │ Apps button │ Settings │ ACCOUNTS. 2 In the ACCOUNTS section, tap the icon to check the box to synchronize. NOTE • While data is the most simple video chat application for Android devices and pre-installed already. Here's a short list of the screen under...
...) 28 VSD221 supports various video chat apps from Google Play. Select the applications to synchronize 1 Touch the Home button │ Apps button │ Settings │ ACCOUNTS. 2 In the ACCOUNTS section, tap the icon to check the box to synchronize. NOTE • While data is the most simple video chat application for Android devices and pre-installed already. Here's a short list of the screen under...

VSD221 User Guide (English)
Page 40
... to your device using the options available in the Settings application. 6.1 Display Settings Change the display settings: 1 Touch the Home button │ Apps button │ Settings │ Display 2 You can also touch an area on the Home screen to open the Wallpaper configuration screen. 3 Enable a setting, touch the setting option to clear the check box. 30 to disable a setting, touch the setting option to select the check box. Customizing Your VSD221 Smart Display 6 Customizing Your VSD221 Smart Display You can...
... to your device using the options available in the Settings application. 6.1 Display Settings Change the display settings: 1 Touch the Home button │ Apps button │ Settings │ Display 2 You can also touch an area on the Home screen to open the Wallpaper configuration screen. 3 Enable a setting, touch the setting option to clear the check box. 30 to disable a setting, touch the setting option to select the check box. Customizing Your VSD221 Smart Display 6 Customizing Your VSD221 Smart Display You can...

VSD221 User Guide (English)
Page 41
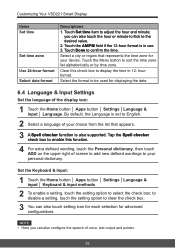
... locked and unlocked. Touch OK to confirm the selection. 6.3 Date, Time, and Time Zone Manually set to automatic date & time, please select the Automatic date & time check box. Touch Set date item to enable the touch sounds. Items Automatic date & time Set date Descriptions Use network-provide time zone automatically. 1. Customizing Your VSD221 Smart Display 6.2.1 System settings Items Touch Sounds Screen lock sound Descriptions Select this check box is set the date, time and time zone: 1 Touch the Home button...
... locked and unlocked. Touch OK to confirm the selection. 6.3 Date, Time, and Time Zone Manually set to automatic date & time, please select the Automatic date & time check box. Touch Set date item to enable the touch sounds. Items Automatic date & time Set date Descriptions Use network-provide time zone automatically. 1. Customizing Your VSD221 Smart Display 6.2.1 System settings Items Touch Sounds Screen lock sound Descriptions Select this check box is set the date, time and time zone: 1 Touch the Home button...
VSD221 User Guide (English)
Page 42
... also supported. Touch Set time item to clear the check box. 3 You can also configure the speech of screen to add new defined wordings to the desired value. 2. Set the Keyboard & Input: 1 Touch the Home button │ Apps button │ Settings │Language & input │ Keyboard & input methods 2 To enable a setting, touch the setting option to display the time in use. 3. Customizing Your VSD221 Smart Display Items Set time Set time zone Use 24-hour format Select date format...
... also supported. Touch Set time item to clear the check box. 3 You can also configure the speech of screen to add new defined wordings to the desired value. 2. Set the Keyboard & Input: 1 Touch the Home button │ Apps button │ Settings │Language & input │ Keyboard & input methods 2 To enable a setting, touch the setting option to display the time in use. 3. Customizing Your VSD221 Smart Display Items Set time Set time zone Use 24-hour format Select date format...

VSD221 User Guide (English)
Page 45
..., horizontal and/or diagonal direction. Protecting Your VSD221 Smart Display 7 Protecting Your VSD221 Smart Display 7.1 Protect Your Device Data with a Screen Unlock Pattern You can protect your device data against unauthorized access by connecting at least four dots in to the Google website using your Google account name and password. 3 Draw a new screen unlock pattern. 7.1.1 Create a screen unlock pattern 1 Touch the Home button │ Apps button │ Settings │ Security. 2 Touch Screen Lock section → Pattern. 3 Read...
..., horizontal and/or diagonal direction. Protecting Your VSD221 Smart Display 7 Protecting Your VSD221 Smart Display 7.1 Protect Your Device Data with a Screen Unlock Pattern You can protect your device data against unauthorized access by connecting at least four dots in to the Google website using your Google account name and password. 3 Draw a new screen unlock pattern. 7.1.1 Create a screen unlock pattern 1 Touch the Home button │ Apps button │ Settings │ Security. 2 Touch Screen Lock section → Pattern. 3 Read...

VSD221 User Guide (English)
Page 47
... Your VSD221 Smart Display 6 Touch OK. 7.3.1 Disable or change PIN 1 Touch the Home button │ Apps button │ Settings │ Security. 2 Touch Screen Lock section. 3 Enter the PIN code you have configured, and then touch Continue. 4 Select None secured to confirm. 6 Touch OK. 7.4.1 Disable or change PIN code. 7.4 Protect Your Device Data with a Password 1 Touch the Home button │ Apps button │ Settings │ Security. 2 Touch Screen Lock section → Password. 3 On the Choose your password screen...
... Your VSD221 Smart Display 6 Touch OK. 7.3.1 Disable or change PIN 1 Touch the Home button │ Apps button │ Settings │ Security. 2 Touch Screen Lock section. 3 Enter the PIN code you have configured, and then touch Continue. 4 Select None secured to confirm. 6 Touch OK. 7.4.1 Disable or change PIN code. 7.4 Protect Your Device Data with a Password 1 Touch the Home button │ Apps button │ Settings │ Security. 2 Touch Screen Lock section → Password. 3 On the Choose your password screen...

VSD221 User Guide (English)
Page 51
Size Resolution White Luminance Contrast Ratio Response time Viewing Angle 54.6 cm (21.5") 1920x1080 250/200 (Max./typ) 1000/700 (typ/min.) 5ms (typ) 170/160 (horizontal/vertical) Appendix System Operating System CPU System Memory Storage WLAN/Bluetooth Camera Microphone LED Indicator Power Switch I/O ports Touch screen Touch controller Speakers Adapter (DC) Power Consumption Power Save Stand VESA® mount Dimension Weight Android...
Size Resolution White Luminance Contrast Ratio Response time Viewing Angle 54.6 cm (21.5") 1920x1080 250/200 (Max./typ) 1000/700 (typ/min.) 5ms (typ) 170/160 (horizontal/vertical) Appendix System Operating System CPU System Memory Storage WLAN/Bluetooth Camera Microphone LED Indicator Power Switch I/O ports Touch screen Touch controller Speakers Adapter (DC) Power Consumption Power Save Stand VESA® mount Dimension Weight Android...
VSD221 User Guide (English)
Page 54
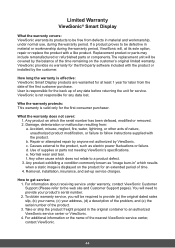
... authorized ViewSonic service center or ViewSonic. 4. Who the warranty protects: This warranty is effective: ViewSonic Smart Display products are warranted for service. Repair or attempted repair by anyone not authorized by the customer. Use of the nearest ViewSonic service center, contact ViewSonic. 44 Removal, installation, insurance, and set-up of any data lost. If a product proves to be required to provide (a) the original dated sales slip, (b) your name, (c) your product's serial number...
... authorized ViewSonic service center or ViewSonic. 4. Who the warranty protects: This warranty is effective: ViewSonic Smart Display products are warranted for service. Repair or attempted repair by anyone not authorized by the customer. Use of the nearest ViewSonic service center, contact ViewSonic. 44 Removal, installation, insurance, and set-up of any data lost. If a product proves to be required to provide (a) the original dated sales slip, (b) your name, (c) your product's serial number...


