
User Guide
Page 3
These limits are included with the equipment or specified. This equipment generates, uses, and can be determined by turning the equipment off and on, the user is encouraged to try to correct the interference by 93/68/EEC Art.13 with regard to "Electromagnetic .../23/EEC as amended by 92/31/EEC and 93/68/EEC Art.5 with regard to provide reasonable protection against harmful interference in a residential installation. ViewSonic VG710b/VG710s 1 FCC Warning To assure continued FCC compliance, the user must use grounded power supply cord and the cables which are designed to "Safety." CE...
These limits are included with the equipment or specified. This equipment generates, uses, and can be determined by turning the equipment off and on, the user is encouraged to try to correct the interference by 93/68/EEC Art.13 with regard to "Electromagnetic .../23/EEC as amended by 92/31/EEC and 93/68/EEC Art.5 with regard to provide reasonable protection against harmful interference in a residential installation. ViewSonic VG710b/VG710s 1 FCC Warning To assure continued FCC compliance, the user must use grounded power supply cord and the cables which are designed to "Safety." CE...
User Guide
Page 7
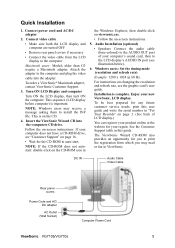
...Power Code and AC/ DC adapter AC Outlet (Wall Socket) Computer Power Cord ViewSonic VG710b/VG710s 5 Attach the adapter to the computer Macintosh users: Models older than G3 require a Macintosh adapter. If your new ViewSonic, LCD display. For instructions on page 16. • Wait for you to print the...needs: print this guide. Connect video cable • Make sure both the LCD display and computer are turned OFF • Remove rear panel covers if necessary • Connect the video cable from the LCD display to the computer and plug the video cable into the computers CD drive....
...Power Code and AC/ DC adapter AC Outlet (Wall Socket) Computer Power Cord ViewSonic VG710b/VG710s 5 Attach the adapter to the computer Macintosh users: Models older than G3 require a Macintosh adapter. If your new ViewSonic, LCD display. For instructions on page 16. • Wait for you to print the...needs: print this guide. Connect video cable • Make sure both the LCD display and computer are turned OFF • Remove rear panel covers if necessary • Connect the video cable from the LCD display to the computer and plug the video cable into the computers CD drive....
User Guide
Page 9
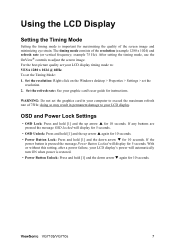
...Press and hold [1] and the up arrow S for 10 seconds. ViewSonic VG710b/VG710s 7 Set the refresh rate: See your LCD display. The timing mode consists of 75Hz; doing so may result in your LCD display's power will automatically turn ON when power is important for maximizing the quality of the screen image...To set the graphics card in permanent damage to : VESA 1280 x 1024 @ 60Hz. WARNING: Do not set the Timing Mode: 1. Using the LCD Display Setting the Timing Mode Setting the timing mode is restored. • Power Button Unlock: Press and hold [1] and the down arrow T for...
...Press and hold [1] and the up arrow S for 10 seconds. ViewSonic VG710b/VG710s 7 Set the refresh rate: See your LCD display. The timing mode consists of 75Hz; doing so may result in your LCD display's power will automatically turn ON when power is important for maximizing the quality of the screen image...To set the graphics card in permanent damage to : VESA 1280 x 1024 @ 60Hz. WARNING: Do not set the Timing Mode: 1. Using the LCD Display Setting the Timing Mode Setting the timing mode is restored. • Power Button Unlock: Press and hold [1] and the down arrow T for...

User Guide
Page 10
...digital connection. Also toggles between two controls on the screen. Power light Green = ON Orange = Power Saving Standby Power On/Off ViewSonic VG710b/VG710s 8 Also a shortcut to display the Contrast adjustment control screen. Adjusting the Screen Image Use the buttons on the front control panel ...to display and adjust the OnView® controls which display on some screens. Decreases or increases volume Audio Mute button turns the ...
...digital connection. Also toggles between two controls on the screen. Power light Green = ON Orange = Power Saving Standby Power On/Off ViewSonic VG710b/VG710s 8 Also a shortcut to display the Contrast adjustment control screen. Adjusting the Screen Image Use the buttons on the front control panel ...to display and adjust the OnView® controls which display on some screens. Decreases or increases volume Audio Mute button turns the ...
User Guide
Page 15
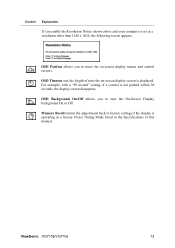
... than 1280 x 1024, the following screen appears. OSD Timeout sets the length of this manual. OSD Position allows you to turn the On-Screen Display background On or Off. ViewSonic VG710b/VG710s 13 OSD Background On/Off allows you to factory settings if the display is operating in a factory Preset Timing Mode listed...
... than 1280 x 1024, the following screen appears. OSD Timeout sets the length of this manual. OSD Position allows you to turn the On-Screen Display background On or Off. ViewSonic VG710b/VG710s 13 OSD Background On/Off allows you to factory settings if the display is operating in a factory Preset Timing Mode listed...

User Guide
Page 19
... of any ammonia or alcoholbased cleaners. Cleaning the LCD Display • MAKE SURE THE LCD DISPLAY IS TURNED OFF. • NEVER SPRAY OR POUR ANY LIQUID DIRECTLY ONTO THE SCREEN OR CASE. abrasive detergent onto a clean, soft, lint-free cloth, then wipe the surface. ViewSonic VG710b/VG710s 17 If still not clean, apply a small amount of...
... of any ammonia or alcoholbased cleaners. Cleaning the LCD Display • MAKE SURE THE LCD DISPLAY IS TURNED OFF. • NEVER SPRAY OR POUR ANY LIQUID DIRECTLY ONTO THE SCREEN OR CASE. abrasive detergent onto a clean, soft, lint-free cloth, then wipe the surface. ViewSonic VG710b/VG710s 17 If still not clean, apply a small amount of...


