
User Guide
Page 10
... controls Front Control Panel shown below in "Main Menu Controls" on page 10. Power light Green = ON Orange = Power Saving Standby Power On/Off ViewSonic VG710b/VG710s 8 Also a shortcut to display the Contrast adjustment control screen. Adjusting the Screen Image Use the buttons on the front control panel to display and adjust the OnView®...
... controls Front Control Panel shown below in "Main Menu Controls" on page 10. Power light Green = ON Orange = Power Saving Standby Power On/Off ViewSonic VG710b/VG710s 8 Also a shortcut to display the Contrast adjustment control screen. Adjusting the Screen Image Use the buttons on the front control panel to display and adjust the OnView®...
User Guide
Page 12
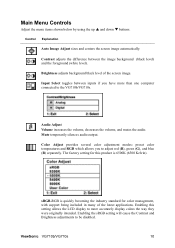
...with support being included in many of the screen image. Control Explanation Auto Image Adjust sizes and centers the screen image automatically. The factory setting for this setting allows the LCD display to more than one computer connected to the VG710b/VG710s. sRGB-RGB is 6500K (6500 Kelvin... colors the way they were originally intended. Input Select toggles between the image background (black level) and the foreground (white level). ViewSonic VG710b/VG710s 10 Main Menu Controls Adjust the menu items shown below by using the up S and down T buttons. Mute temporarily silences ...
...with support being included in many of the screen image. Control Explanation Auto Image Adjust sizes and centers the screen image automatically. The factory setting for this setting allows the LCD display to more than one computer connected to the VG710b/VG710s. sRGB-RGB is 6500K (6500 Kelvin... colors the way they were originally intended. Input Select toggles between the image background (black level) and the foreground (white level). ViewSonic VG710b/VG710s 10 Main Menu Controls Adjust the menu items shown below by using the up S and down T buttons. Mute temporarily silences ...
User Guide
Page 13
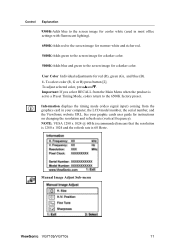
... displays the timing mode (video signal input) coming from the Main Menu when the product is 60 Hertz. Manual Image Adjust Sub-menu ViewSonic VG710b/VG710s 11 NOTE: VESA 1280 x 1024 @ 60Hz (recommended) means that the resolution is 1280 x 1024 and the refresh rate is ...Adds blue to the screen image for cooler white (used in your graphic cards user guide for a darker color. See your computer, the LCD model number, the serial number, and the ViewSonic website URL. To adjust selected color, pressSandT. User Color Individual adjustments for red (R), green (G), and blue (B)....
... displays the timing mode (video signal input) coming from the Main Menu when the product is 60 Hertz. Manual Image Adjust Sub-menu ViewSonic VG710b/VG710s 11 NOTE: VESA 1280 x 1024 @ 60Hz (recommended) means that the resolution is 1280 x 1024 and the refresh rate is ...Adds blue to the screen image for cooler white (used in your graphic cards user guide for a darker color. See your computer, the LCD model number, the serial number, and the ViewSonic website URL. To adjust selected color, pressSandT. User Color Individual adjustments for red (R), green (G), and blue (B)....
User Guide
Page 17
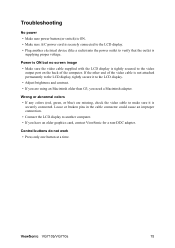
ViewSonic VG710b/VG710s 15 Troubleshooting No power • Make sure power button (or switch) is ON. • Make sure A/C power cord is securely connected to the LCD display. • Plug another computer. • If you have an older graphics card, contact ViewSonic for a non-DDC adapter. Control ...into the power outlet to the LCD display. • Adjust brightness and contrast. • If you need a Macintosh adapter. If the other end of the computer. Power is ON but no screen image • Make sure the video cable supplied with the LCD display is securely connected.
ViewSonic VG710b/VG710s 15 Troubleshooting No power • Make sure power button (or switch) is ON. • Make sure A/C power cord is securely connected to the LCD display. • Plug another computer. • If you have an older graphics card, contact ViewSonic for a non-DDC adapter. Control ...into the power outlet to the LCD display. • Adjust brightness and contrast. • If you need a Macintosh adapter. If the other end of the computer. Power is ON but no screen image • Make sure the video cable supplied with the LCD display is securely connected.


