
User Guide
Page 4
... European Countries The device complies with the requirements of the EEC directive 89/336/EEC, 2004/108/EEC as amended by turning the equipment off and on a circuit different from that interference will not occur in compliance with the instructions, may cause undesired operation. Following information is in a particular installation. ViewSonic VA703m/VA703b/VA703mb 1
... European Countries The device complies with the requirements of the EEC directive 89/336/EEC, 2004/108/EEC as amended by turning the equipment off and on a circuit different from that interference will not occur in compliance with the instructions, may cause undesired operation. Following information is in a particular installation. ViewSonic VA703m/VA703b/VA703mb 1

User Guide
Page 9
... any future customer service needs: print this guide. AC IN Audio Cable (For VA703m/VA703mb only) Video Cable Power Code AC Outlet (Wall Socket) Computer Power Cord ViewSonic VA703m/VA703b/VA703mb 6 Connect power cord (and AC/DC adapter if required) 2. Windows users: Set ...the timing mode (resolution and refresh rate) Example: 1280 x 1024 @ 60 Hz. For instructions on -screen instructions. Turn ON LCD display and computer Turn ON the LCD display, then turn ON...
... any future customer service needs: print this guide. AC IN Audio Cable (For VA703m/VA703mb only) Video Cable Power Code AC Outlet (Wall Socket) Computer Power Cord ViewSonic VA703m/VA703b/VA703mb 6 Connect power cord (and AC/DC adapter if required) 2. Windows users: Set ...the timing mode (resolution and refresh rate) Example: 1280 x 1024 @ 60 Hz. For instructions on -screen instructions. Turn ON LCD display and computer Turn ON the LCD display, then turn ON...
User Guide
Page 10
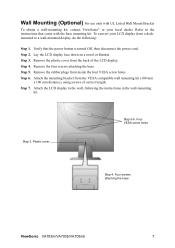
... wall mounting kit (100 mm x 100 mm distance), using screws of the LCD display. Step 6. Step 3. Four screws attaching the base ViewSonic VA703m/VA703b/VA703mb 7 Plastic cover Step 5-6. Attach the LCD display to the instructions that the power button is turned Off, then disconnect the power cord. Remove the rubber plugs from a deskmounted ...base mounting kit. To convert your local dealer. Verify that come with UL Listed Wall Mount Bracket To obtain a wall-mounting kit, contact ViewSonic® or your LCD display from inside the four VESA screw holes. Step 4.
... wall mounting kit (100 mm x 100 mm distance), using screws of the LCD display. Step 6. Step 3. Four screws attaching the base ViewSonic VA703m/VA703b/VA703mb 7 Plastic cover Step 5-6. Attach the LCD display to the instructions that the power button is turned Off, then disconnect the power cord. Remove the rubber plugs from a deskmounted ...base mounting kit. To convert your local dealer. Verify that come with UL Listed Wall Mount Bracket To obtain a wall-mounting kit, contact ViewSonic® or your LCD display from inside the four VESA screw holes. Step 4.

User Guide
Page 11
... Lock: Press and hold [1] and the down arrow T for 10 seconds. With or without this setting, after a power failure, your LCD display's power will automatically turn ON when power is restored. • Power Button Unlock: Press and hold [1] and the up arrow S again for 10 seconds. •... Press and hold [1] and the up arrow S for 10 seconds. ViewSonic VA703m/VA703b/VA703mb 8 If any buttons are pressed the message OSD Locked will display for instructions. example 60 Hz). Set the refresh rate: See your LCD display timing mode to exceed the maximum refresh rate of 75Hz; To set...
... Lock: Press and hold [1] and the down arrow T for 10 seconds. With or without this setting, after a power failure, your LCD display's power will automatically turn ON when power is restored. • Power Button Unlock: Press and hold [1] and the up arrow S again for 10 seconds. •... Press and hold [1] and the up arrow S for 10 seconds. ViewSonic VA703m/VA703b/VA703mb 8 If any buttons are pressed the message OSD Locked will display for instructions. example 60 Hz). Set the refresh rate: See your LCD display timing mode to exceed the maximum refresh rate of 75Hz; To set...

User Guide
Page 16
... with a "15 second" setting, if a control is operating in a factory Preset Timing Mode listed in the menus and control screens. ViewSonic VA703m/VA703b/VA703mb 13 Resolution Notice advises the optimal resolution to turn the OSD background On or Off. OSD Position allows the user to factory settings if the display is not pushed within...
... with a "15 second" setting, if a control is operating in a factory Preset Timing Mode listed in the menus and control screens. ViewSonic VA703m/VA703b/VA703mb 13 Resolution Notice advises the optimal resolution to turn the OSD background On or Off. OSD Position allows the user to factory settings if the display is not pushed within...
User Guide
Page 20
... the screen. Use a soft, dry cloth. 2. Some chemical cleaners have been reported to damage the screen and/or case of the LCD display. • ViewSonic will not be liable for damage resulting from use of any ammonia or alcohol-based cleaners on the... a non-ammonia, non-alcohol based, mild non-abrasive detergent onto a clean, soft, lint-free cloth, then wipe the surface. ViewSonic VA703m/VA703b/VA703mb 17 To clean the screen: 1. Cleaning the LCD Display • MAKE SURE THE LCD DISPLAY IS TURNED OFF. • NEVER SPRAY OR POUR ANY LIQUID DIRECTLY ONTO THE SCREEN OR CASE.
... the screen. Use a soft, dry cloth. 2. Some chemical cleaners have been reported to damage the screen and/or case of the LCD display. • ViewSonic will not be liable for damage resulting from use of any ammonia or alcohol-based cleaners on the... a non-ammonia, non-alcohol based, mild non-abrasive detergent onto a clean, soft, lint-free cloth, then wipe the surface. ViewSonic VA703m/VA703b/VA703mb 17 To clean the screen: 1. Cleaning the LCD Display • MAKE SURE THE LCD DISPLAY IS TURNED OFF. • NEVER SPRAY OR POUR ANY LIQUID DIRECTLY ONTO THE SCREEN OR CASE.


