
User Guide
Page 1
... as registering your product for future service. Warranty information contained in this User Guide to obtain important information on our web site at http:// www.viewsonic.com in English, or in specific languages using your product in the upper right corner of our website. "Antes de operar su equipo lea cu idadosamente las instrucciones en este manual" Model No. VS17780 P/N: TD2760
... as registering your product for future service. Warranty information contained in this User Guide to obtain important information on our web site at http:// www.viewsonic.com in English, or in specific languages using your product in the upper right corner of our website. "Antes de operar su equipo lea cu idadosamente las instrucciones en este manual" Model No. VS17780 P/N: TD2760

User Guide
Page 2
...receiver. • Connect the equipment into an outlet on unit. This equipment generates, uses, and can be determined by turning the equipment off and on, the user is in accordance with the instructions, may cause ...installation. However, there is only for help. Following information is no guarantee that may cause harmful interference to part 15 of FCC Rules. Confirmed corresponding applications shall refer to nameplate labels and relevant markings on a circuit different from that changes or modifications not expressly approved by the party responsible for a Class B digital...
...receiver. • Connect the equipment into an outlet on unit. This equipment generates, uses, and can be determined by turning the equipment off and on, the user is in accordance with the instructions, may cause ...installation. However, there is only for help. Following information is no guarantee that may cause harmful interference to part 15 of FCC Rules. Confirmed corresponding applications shall refer to nameplate labels and relevant markings on a circuit different from that changes or modifications not expressly approved by the party responsible for a Class B digital...
User Guide
Page 4
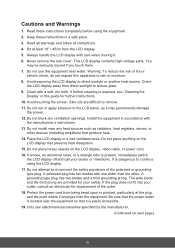
... LCD display, video cable, or power cord. 16. Avoid touching the screen. Do not install near the equipment so that it may be seriously injured if you touch them. 7. A grounding type plug has two blades and a third grounding prong. Keep these instructions completely before using the LCD display. 17. Warning: To reduce the risk of the polarized or groundingtype plug. Place the LCD display in this apparatus to the LCD panel...
... LCD display, video cable, or power cord. 16. Avoid touching the screen. Do not install near the equipment so that it may be seriously injured if you touch them. 7. A grounding type plug has two blades and a third grounding prong. Keep these instructions completely before using the LCD display. 17. Warning: To reduce the risk of the polarized or groundingtype plug. Place the LCD display in this apparatus to the LCD panel...
User Guide
Page 6
...Copyright Information Product Registration 2 For Your Records 2 Getting Started Package Contents 3 Quick Installation...4 Wall Mounting (Optional 5 Hardware Installation 6 Control of the Touch Function 7 Tilt angle adjustment 7 Using the Security Lock 8 Using the LCD Display Setting the Timing Mode 9 OSD and Power Lock Settings 9 Adjusting the Screen Image 10 Main Menu Controls 11 Main Menu Explanation 11 Power Management 12 Other Information Specifications...13 Cleaning the LCD Display 14 Troubleshooting...15 Customer Support 16 Limited Warranty 17 Mexico Limited Warranty 19...
...Copyright Information Product Registration 2 For Your Records 2 Getting Started Package Contents 3 Quick Installation...4 Wall Mounting (Optional 5 Hardware Installation 6 Control of the Touch Function 7 Tilt angle adjustment 7 Using the Security Lock 8 Using the LCD Display Setting the Timing Mode 9 OSD and Power Lock Settings 9 Adjusting the Screen Image 10 Main Menu Controls 11 Main Menu Explanation 11 Power Management 12 Other Information Specifications...13 Cleaning the LCD Display 14 Troubleshooting...15 Customer Support 16 Limited Warranty 17 Mexico Limited Warranty 19...
User Guide
Page 8
.... Your LCD displays serial number is committed to register your registration form, use the directory ":\CD\Registration". Please print this guide. Product Name: Model Number: Document Number: Serial Number: Purchase Date: For Your Records TD2760 ViewSonic Widescreen LCD Display VS17780 TD2760_UG_ENG Rev. 1A 06-03-19 Product disposal at end of product life ViewSonic respects the environment and is located on ViewSonic's website to working and living green. USA...
.... Your LCD displays serial number is committed to register your registration form, use the directory ":\CD\Registration". Please print this guide. Product Name: Model Number: Document Number: Serial Number: Purchase Date: For Your Records TD2760 ViewSonic Widescreen LCD Display VS17780 TD2760_UG_ENG Rev. 1A 06-03-19 Product disposal at end of product life ViewSonic respects the environment and is located on ViewSonic's website to working and living green. USA...

User Guide
Page 9
...; LCD display • Power cord • Audio cable • D-Sub cable • HDMI cable • USB cable • Quick Start Guide NOTE: The INF file ensures compatibility with Windows operating systems, and the ICM file (Image Color Matching) ensures accurate on your purchase of a ViewSonic® LCD display. ViewSonic recommends that you install both the INF and ICM files. 3 Save the original box and all packing material for future shipping needs. Getting Started Congratulations on -screen colors. NOTE...
...; LCD display • Power cord • Audio cable • D-Sub cable • HDMI cable • USB cable • Quick Start Guide NOTE: The INF file ensures compatibility with Windows operating systems, and the ICM file (Image Color Matching) ensures accurate on your purchase of a ViewSonic® LCD display. ViewSonic recommends that you install both the INF and ICM files. 3 Save the original box and all packing material for future shipping needs. Getting Started Congratulations on -screen colors. NOTE...
User Guide
Page 10
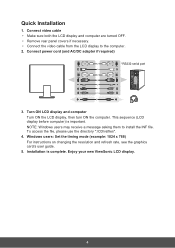
... LCD display and computer are turned OFF. • Remove rear panel covers if necessary. • Connect the video cable from the LCD display to install the INF file. Connect power cord (and AC/DC adapter if required) *RS232 serial port 3. This sequence (LCD display before computer) is complete. To access the file, please use the directory ":\CD\vsfiles". 4. Installation is important. Windows users: Set the timing mode (example: 1024 x 768) For instructions on changing the resolution and refresh rate, see the graphics card's user guide...
... LCD display and computer are turned OFF. • Remove rear panel covers if necessary. • Connect the video cable from the LCD display to install the INF file. Connect power cord (and AC/DC adapter if required) *RS232 serial port 3. This sequence (LCD display before computer) is complete. To access the file, please use the directory ":\CD\vsfiles". 4. Installation is important. Windows users: Set the timing mode (example: 1024 x 768) For instructions on changing the resolution and refresh rate, see the graphics card's user guide...

User Guide
Page 11
... with UL Listed Wall Mount Bracket. Attach the LCD display to the instructions that the power button is turned Off, then disconnect the power cord. 2. Find and identify one of the appropriate length. a. Attach the mounting bracket from a desk-mounted to a wall-mounted display, do the following the instructions in the wall-mounting kit. 5 Wall Mounting (Optional) NOTE: For use only with the base mounting kit. To obtain a wall-mounting kit or height adjustment base, contact ViewSonic® or...
... with UL Listed Wall Mount Bracket. Attach the LCD display to the instructions that the power button is turned Off, then disconnect the power cord. 2. Find and identify one of the appropriate length. a. Attach the mounting bracket from a desk-mounted to a wall-mounted display, do the following the instructions in the wall-mounting kit. 5 Wall Mounting (Optional) NOTE: For use only with the base mounting kit. To obtain a wall-mounting kit or height adjustment base, contact ViewSonic® or...
User Guide
Page 13
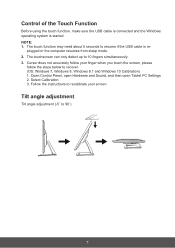
... below to resume if the USB cable is started. NOTE: 1. Select Calibration 3. Cursor does not accurately follow your screen Tilt angle adjustment Tilt angle adjustment (-5˚ to 10 fingers simultaneously. 3. The touch function may need about 5 seconds to recover. (OS: Windows 7, Windows 8, Windows 8.1 and Windows 10 Calibration) 1. Open Control Panel, open Hardware and Sound, and then open Tablet PC Settings 2. Control of the Touch Function Before using the touch function, make sure the USB cable is connected and the Windows operating system is re-
... below to resume if the USB cable is started. NOTE: 1. Select Calibration 3. Cursor does not accurately follow your screen Tilt angle adjustment Tilt angle adjustment (-5˚ to 10 fingers simultaneously. 3. The touch function may need about 5 seconds to recover. (OS: Windows 7, Windows 8, Windows 8.1 and Windows 10 Calibration) 1. Open Control Panel, open Hardware and Sound, and then open Tablet PC Settings 2. Control of the Touch Function Before using the touch function, make sure the USB cable is connected and the Windows operating system is re-

User Guide
Page 14
For more information on a table for your reference. 8 Below is located on the back side of setting up the lock on installation and usage. Using the Security Lock The security connector is an example of the monitor.
For more information on a table for your reference. 8 Below is located on the back side of setting up the lock on installation and usage. Using the Security Lock The security connector is an example of the monitor.
User Guide
Page 15
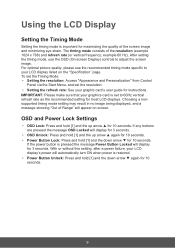
... image being displayed, and a message showing "Out of the resolution (example 1024 x 768) and refresh rate (or vertical frequency; For optimal picture quality, please use the OSD (On-screen Display) controls to your graphics card is pressed the message Power Button Locked will automatically turn ON when power is important for maximizing the quality of the screen image and minimizing eye strain. After setting the timing mode, use the recommended timing mode specific to adjust the screen image. OSD and Power Lock Settings • OSD Lock...
... image being displayed, and a message showing "Out of the resolution (example 1024 x 768) and refresh rate (or vertical frequency; For optimal picture quality, please use the OSD (On-screen Display) controls to your graphics card is pressed the message Power Button Locked will automatically turn ON when power is important for maximizing the quality of the screen image and minimizing eye strain. After setting the timing mode, use the recommended timing mode specific to adjust the screen image. OSD and Power Lock Settings • OSD Lock...
User Guide
Page 16
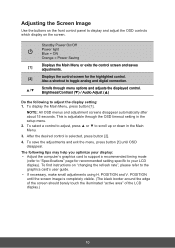
... the setup menu. 2. Also a shortcut to adjust the display setting: 1. This is adjustable through menu options and adjusts the displayed control. POSITION and V. Brightness/Contrast (▼) / Audio Adjust (▲) Do the following tips may help you optimize your LCD display). Scrolls through the OSD timeout setting in the Main Menu. 3. The following to toggle analog and digital connection. Adjusting the Screen Image Use the buttons on the front control panel to your display: • Adjust the computer's graphics card to support a recommended timing mode (refer...
... the setup menu. 2. Also a shortcut to adjust the display setting: 1. This is adjustable through menu options and adjusts the displayed control. POSITION and V. Brightness/Contrast (▼) / Audio Adjust (▲) Do the following tips may help you optimize your LCD display). Scrolls through the OSD timeout setting in the Main Menu. 3. The following to toggle analog and digital connection. Adjusting the Screen Image Use the buttons on the front control panel to your display: • Adjust the computer's graphics card to support a recommended timing mode (refer...
User Guide
Page 17
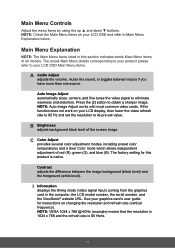
... video cards. The factory setting for instructions on changing the resolution and refresh rate (vertical frequency). The actual Main Menu details corresponding to your product please refer to your graphics card's user guide for this function does not work on your LCD display, then lower the video refresh rate to 60 Hz and set value. C Color Adjust provides several color adjustment modes, including preset color temperatures and a User Color mode which allows independent adjustment of the screen image. See your LCD OSD Main Menu items. A Audio Adjust adjusts the volume...
... video cards. The factory setting for instructions on changing the resolution and refresh rate (vertical frequency). The actual Main Menu details corresponding to your product please refer to your graphics card's user guide for this function does not work on your LCD display, then lower the video refresh rate to 60 Hz and set value. C Color Adjust provides several color adjustment modes, including preset color temperatures and a User Color mode which allows independent adjustment of the screen image. See your LCD OSD Main Menu items. A Audio Adjust adjusts the volume...
User Guide
Page 18
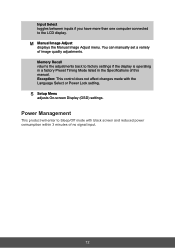
... the adjustments back to the LCD display. Exception: This control does not affect changes made with black screen and reduced power consumption within 3 minutes of no signal input. 12 Input Select toggles between inputs if you have more than one computer connected to factory settings if the display is operating in a factory Preset Timing Mode listed in the Specifications of this manual. S Setup Menu adjusts On-screen Display (OSD) settings. M Manual Image Adjust displays the Manual Image Adjust menu. You can manually set a variety of image quality adjustments. Power Management...
... the adjustments back to the LCD display. Exception: This control does not affect changes made with black screen and reduced power consumption within 3 minutes of no signal input. 12 Input Select toggles between inputs if you have more than one computer connected to factory settings if the display is operating in a factory Preset Timing Mode listed in the Specifications of this manual. S Setup Menu adjusts On-screen Display (OSD) settings. M Manual Image Adjust displays the Manual Image Adjust menu. You can manually set a variety of image quality adjustments. Power Management...
User Guide
Page 19
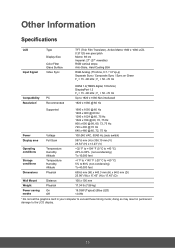
....45" (D) Wall Mount Distance 100 x 100 mm Weight Physical 17.34 lb (7.88 kg) Power saving On modes Off 19.03W (Typical) (Blue LED) Other Information Specifications LCD Input Signal Type Display Size Color Filter Glass Surface Video Sync Compatibility Resolution1 PC Recommended TFT (Thin Film Transistor), Active Matrix 1920 x 1080 LCD, 0.31125 mm pixel pitch Metric: 69 cm Imperial: 27" (27" viewable) RGB vertical stripe Anti-Glare, Hard Coating ≧6H RGB Analog (75 ohms...
....45" (D) Wall Mount Distance 100 x 100 mm Weight Physical 17.34 lb (7.88 kg) Power saving On modes Off 19.03W (Typical) (Blue LED) Other Information Specifications LCD Input Signal Type Display Size Color Filter Glass Surface Video Sync Compatibility Resolution1 PC Recommended TFT (Thin Film Transistor), Active Matrix 1920 x 1080 LCD, 0.31125 mm pixel pitch Metric: 69 cm Imperial: 27" (27" viewable) RGB vertical stripe Anti-Glare, Hard Coating ≧6H RGB Analog (75 ohms...

User Guide
Page 20
... screen with a clean, soft, lint-free cloth. To clean the case: 1. Some chemical cleaners have been reported to damage the screen and/or case of the LCD display. • ViewSonic will not be liable for damage resulting from use of any ammonia or alcohol-based cleaners on the LCD display screen or case. This removes dust and other particles. 2. Cleaning the LCD Display • MAKE SURE THE LCD DISPLAY IS TURNED...
... screen with a clean, soft, lint-free cloth. To clean the case: 1. Some chemical cleaners have been reported to damage the screen and/or case of the LCD display. • ViewSonic will not be liable for damage resulting from use of any ammonia or alcohol-based cleaners on the LCD display screen or case. This removes dust and other particles. 2. Cleaning the LCD Display • MAKE SURE THE LCD DISPLAY IS TURNED...

User Guide
Page 21
... connected. Control buttons do not work • Press only one button at a time. 15 Power is ON but no screen image • Make sure the video cable supplied with the LCD display is supplying proper voltage. Wrong or abnormal colors • If any colors (red, green, or blue) are missing, check the video cable to make sure it to the LCD display. • Adjust brightness and contrast. Troubleshooting No power • Make sure power button (or switch) is ON. • Make sure A/C power cord is securely connected to the LCD display...
... connected. Control buttons do not work • Press only one button at a time. 15 Power is ON but no screen image • Make sure the video cable supplied with the LCD display is supplying proper voltage. Wrong or abnormal colors • If any colors (red, green, or blue) are missing, check the video cable to make sure it to the LCD display. • Adjust brightness and contrast. Troubleshooting No power • Make sure power button (or switch) is ON. • Make sure A/C power cord is securely connected to the LCD display...
User Guide
Page 23
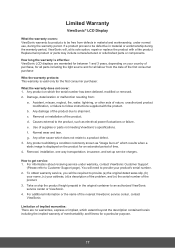
... of supplies or parts not meeting ViewSonic's specifications. c. g. How to an authorized ViewSonic service center or ViewSonic. 4. Take or ship the product freight prepaid in " which the serial number has been defaced, modified or removed. 2. How long the warranty is effective: ViewSonic LCD displays are no warranties, express or implied, which does not relate to a product defect. 3. What the warranty does not cover: 1. Accident...
... of supplies or parts not meeting ViewSonic's specifications. c. g. How to an authorized ViewSonic service center or ViewSonic. 4. Take or ship the product freight prepaid in " which the serial number has been defaced, modified or removed. 2. How long the warranty is effective: ViewSonic LCD displays are no warranties, express or implied, which does not relate to a product defect. 3. What the warranty does not cover: 1. Accident...
User Guide
Page 24
... cost of repair or replacement of goodwill, interference with business relationships, or other damages, whether incidental, consequential or otherwise. 3. Effect of state law: This warranty gives you specific legal rights, and you . viewsoniceurope.com under Support/Warranty Information. Exclusion of damages: ViewSonic's liability is subject to the terms and conditions of the Maintenance Guarantee Card. Some...
... cost of repair or replacement of goodwill, interference with business relationships, or other damages, whether incidental, consequential or otherwise. 3. Effect of state law: This warranty gives you specific legal rights, and you . viewsoniceurope.com under Support/Warranty Information. Exclusion of damages: ViewSonic's liability is subject to the terms and conditions of the Maintenance Guarantee Card. Some...
User Guide
Page 25
... parts may include remanufactured or refurbished parts or components & accessories. c. Any other acts of nature, unauthorized product modification, unauthorized attempted repair, or failure to follow instructions supplied with the product. Removal, installation, insurance, and set-up service charges. To obtain warranty service, you will be paid by ViewSonic. 19 Mexico Limited Warranty ViewSonic® LCD Display What the warranty covers: ViewSonic warrants its sole option, repair or replace...
... parts may include remanufactured or refurbished parts or components & accessories. c. Any other acts of nature, unauthorized product modification, unauthorized attempted repair, or failure to follow instructions supplied with the product. Removal, installation, insurance, and set-up service charges. To obtain warranty service, you will be paid by ViewSonic. 19 Mexico Limited Warranty ViewSonic® LCD Display What the warranty covers: ViewSonic warrants its sole option, repair or replace...


