
PJD5153 User Guide English
Page 9
... minutes prior to removing the lamp assembly for future reference. 2. Do not attempt to become excessively high, such as this product on the projector or remote control. 7. The only user serviceable part is designed to operate safely within a mains voltage between 100 to 240 volts AC, but could cause the objects...
... minutes prior to removing the lamp assembly for future reference. 2. Do not attempt to become excessively high, such as this product on the projector or remote control. 7. The only user serviceable part is designed to operate safely within a mains voltage between 100 to 240 volts AC, but could cause the objects...
PJD5153 User Guide English
Page 12
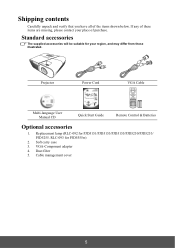
...-Component adapter 4. Soft carry case 3. If any of the items shown below. Projector Power Cord VGA Cable Multi-language User Manual CD Quick Start Guide Remote Control & Batteries Optional accessories 1. RLC-093 for PJD5151/PJD5153/PJD5155/PJD5250/PJD5253/ PJD5255. Cable management cover 5
...-Component adapter 4. Soft carry case 3. If any of the items shown below. Projector Power Cord VGA Cable Multi-language User Manual CD Quick Start Guide Remote Control & Batteries Optional accessories 1. RLC-093 for PJD5151/PJD5153/PJD5155/PJD5250/PJD5253/ PJD5255. Cable management cover 5
PJD5153 User Guide English
Page 13
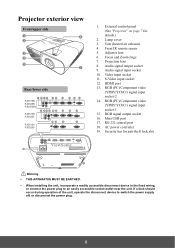
...YPbPr/YCbCr) signal input socket-2 14. RGB signal output socket 16. Projector exterior view Front/upper side 1 6 2 3 4 5 7 Rear/lower side 8 9 10 11 12 13 14 PJD5155/ PJD5255/ PJD5555w 15 16 17 PJD5153/ PJD5253 PJD5151/ PJD5250 8 9 10 11 16 13 AUDIO S-VIDEO IN MINI USB OUT COMPUTER IN 2 VIDEO 16 13 14... If a fault should occur during operation of the unit, operate the disconnect device to an easily accessible socket-outlet near the unit. Front IR remote sensor 5. Vent (heated air exhaust) 4. S-Video input socket 12. HDMI port 13. RS-232 control port 18. Projection lens 8.
...YPbPr/YCbCr) signal input socket-2 14. RGB signal output socket 16. Projector exterior view Front/upper side 1 6 2 3 4 5 7 Rear/lower side 8 9 10 11 12 13 14 PJD5155/ PJD5255/ PJD5555w 15 16 17 PJD5153/ PJD5253 PJD5151/ PJD5250 8 9 10 11 16 13 AUDIO S-VIDEO IN MINI USB OUT COMPUTER IN 2 VIDEO 16 13 14... If a fault should occur during operation of the unit, operate the disconnect device to an easily accessible socket-outlet near the unit. Front IR remote sensor 5. Vent (heated air exhaust) 4. S-Video input socket 12. HDMI port 13. RS-232 control port 18. Projection lens 8.
PJD5153 User Guide English
Page 15
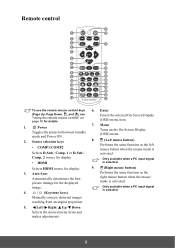
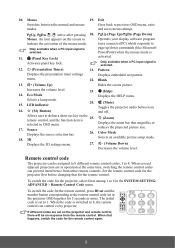
...20 PgUp PgDn 9 21 10 Mouse Pattern Blank 22 11 23 24 12 25 13 Eco Mode Color Mode 26 14 27 To use the remote mouse control keys 6. Selects HDMI source for details. Left/ Right/ Up/ Down Selects the desired menu items and makes adjustments. 8 Source ...button) Performs the same function as the right mouse button when the mouse mode is selected. Enter (Page Up, Page Down, , and ), see "Using the remote mouse control" on the On-Screen Display (OSD) menu. 2. Comp. 2 source for the displayed image. 4. / (Keystone keys) 9. (Right mouse button)...
...20 PgUp PgDn 9 21 10 Mouse Pattern Blank 22 11 23 24 12 25 13 Eco Mode Color Mode 26 14 27 To use the remote mouse control keys 6. Selects HDMI source for details. Left/ Right/ Up/ Down Selects the desired menu items and makes adjustments. 8 Source ...button) Performs the same function as the right mouse button when the mouse mode is selected. Enter (Page Up, Page Down, , and ), see "Using the remote mouse control" on the On-Screen Display (OSD) menu. 2. Comp. 2 source for the displayed image. 4. / (Keystone keys) 9. (Right mouse button)...
PJD5153 User Guide English
Page 16
... code is 25. PgUp PgDn Mouse Pattern Blank If different codes are in COMP1 COMP2 HDMI Auto Sync Source the projector OSD together for the remote control again. 9 Mouse 19. Blank 13. (Volume Up) Hides the screen picture. Source Displays the source selection bar. 26. 3D (Zoom...) Displays the zoom bar that happens, switch the code for 5 seconds or more. To switch the code for the remote control. PgUp, PgDn, , : active after pressing 20. page up/down commands (like Microsoft PowerPoint) when the mouse mode is selected. 12. (Presentation ...
... code is 25. PgUp PgDn Mouse Pattern Blank If different codes are in COMP1 COMP2 HDMI Auto Sync Source the projector OSD together for the remote control again. 9 Mouse 19. Blank 13. (Volume Up) Hides the screen picture. Source Displays the source selection bar. 26. 3D (Zoom...) Displays the zoom bar that happens, switch the code for 5 seconds or more. To switch the code for the remote control. PgUp, PgDn, , : active after pressing 20. page up/down commands (like Microsoft PowerPoint) when the mouse mode is selected. 12. (Presentation ...
PJD5153 User Guide English
Page 17
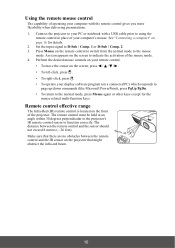
...mouse mode. Press Mouse on the projector that there are no obstacles between the remote control and the sensor should not exceed 8 meters (~ 26 feet). The distance between the remote control and the IR sensor on the remote control to switch from the normal mode to D-Sub / Comp. 1 or ...on a connected PC) which responds to page up/down commands (like Microsoft PowerPoint), press PgUp/PgDn. • To return to using the remote control in place of the projector. Using the remote mouse control The capability of operating your computer's mouse. Perform the desired mouse controls on your...
...mouse mode. Press Mouse on the projector that there are no obstacles between the remote control and the sensor should not exceed 8 meters (~ 26 feet). The distance between the remote control and the IR sensor on the remote control to switch from the normal mode to D-Sub / Comp. 1 or ...on a connected PC) which responds to page up/down commands (like Microsoft PowerPoint), press PgUp/PgDn. • To return to using the remote control in place of the projector. Using the remote mouse control The capability of operating your computer's mouse. Perform the desired mouse controls on your...
PJD5153 User Guide English
Page 18
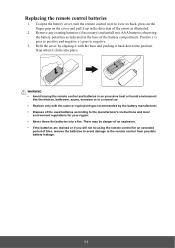
...batteries (if necessary) and install two AAA batteries observing the battery polarities as illustrated. 2. Positive (+) goes to positive and negative (-) goes to the remote control from possible battery leakage. 11 There may be danger of an explosion. • If the batteries are drained or if you will not be... using the remote control for your region. • Never throw the batteries into a fire. Refit the cover by the battery manufacturer. • Dispose of the ...
...batteries (if necessary) and install two AAA batteries observing the battery polarities as illustrated. 2. Positive (+) goes to positive and negative (-) goes to the remote control from possible battery leakage. 11 There may be danger of an explosion. • If the batteries are drained or if you will not be... using the remote control for your region. • Never throw the batteries into a fire. Refit the cover by the battery manufacturer. • Dispose of the ...
PJD5153 User Guide English
Page 23
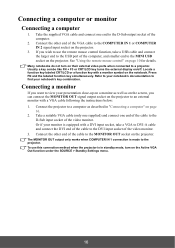
... socket of the computer, and smaller end to a projector. If you can connect the MONITOR OUT signal output socket on the projector. See "Using the remote mouse control" on /off. Take a suitable VGA cable (only one supplied) and connect one end to an external monitor with a monitor symbol on page... 16. 2. To use the remote mouse control function, take a VGA to DVI-A cable and connect the DVI end of the cable to the DVI input socket of the video monitor...
... socket of the computer, and smaller end to a projector. If you can connect the MONITOR OUT signal output socket on the projector. See "Using the remote mouse control" on /off. Take a suitable VGA cable (only one supplied) and connect one end to an external monitor with a monitor symbol on page... 16. 2. To use the remote mouse control function, take a VGA to DVI-A cable and connect the DVI end of the cable to the DVI input socket of the video monitor...
PJD5153 User Guide English
Page 30
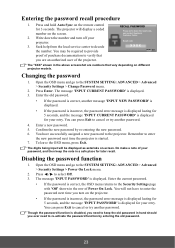
Press and hold Auto Sync on the remote control for later recall. Recall code: X X X X MENU Exit The "XXX" shown in hand should you need to the SYSTEM SETTING: ADVANCED > Advanced > Security Settings > Power ... the password function is disabled, you ever need to keep the note in the row of the projector. Write down the recall code, and contact ViewSonic Customer Center. RECALL PASSWORD Please write down the number and turn on different projector models. Open the OSD menu and go to re-activate the...
Press and hold Auto Sync on the remote control for later recall. Recall code: X X X X MENU Exit The "XXX" shown in hand should you need to the SYSTEM SETTING: ADVANCED > Advanced > Security Settings > Power ... the password function is disabled, you ever need to keep the note in the row of the projector. Write down the recall code, and contact ViewSonic Customer Center. RECALL PASSWORD Please write down the number and turn on different projector models. Open the OSD menu and go to re-activate the...
PJD5153 User Guide English
Page 31
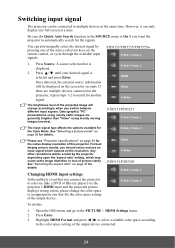
... signal The projector can also manually select the desired signal by the projector depending upon the 'aspect ratio' setting, which outputs at the same time. PJD5155/PJD5255/PJD5555w D-Sub / Comp. 1 1. See "Selecting the aspect ratio" on the screen for the native display resolution of the projected image will be displayed on... the output device connected. 24 Open the OSD menu and go to multiple devices at this resolution. D-Sub / Comp. 2 Please see "Projector specifications" on the remote control, or cycle through the available input signals.
... signal The projector can also manually select the desired signal by the projector depending upon the 'aspect ratio' setting, which outputs at the same time. PJD5155/PJD5255/PJD5555w D-Sub / Comp. 1 1. See "Selecting the aspect ratio" on the screen for the native display resolution of the projected image will be displayed on... the output device connected. 24 Open the OSD menu and go to multiple devices at this resolution. D-Sub / Comp. 2 Please see "Projector specifications" on the remote control, or cycle through the available input signals.
PJD5153 User Guide English
Page 32
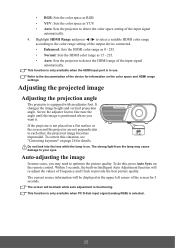
... the projector to detect the HDMI range of the input signal automatically. The screen will be blank while auto adjustment is not placed on the remote control. Refer to provide the best picture quality. This function is only available when the HDMI input port is on the color space and HDMI...
... the projector to detect the HDMI range of the input signal automatically. The screen will be blank while auto adjustment is not placed on the remote control. Refer to provide the best picture quality. This function is only available when the HDMI input port is on the color space and HDMI...
PJD5153 User Guide English
Page 33
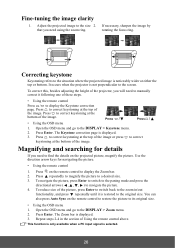
...not perpendicular to the screen. Press to the DISPLAY > Keystone menu. 2. Magnifying and searching for navigating the picture. • Using the remote control 1. Press on the projected picture, magnify the picture. Press repeatedly to magnify the picture to its original size. • Using the...Keystoning refers to display the Keystone correction page. To correct this, besides adjusting the height of these steps. • Using the remote control Press / to the situation where the projected image is displayed. 3. Use the direction arrow keys for details If you need ...
...not perpendicular to the screen. Press to the DISPLAY > Keystone menu. 2. Magnifying and searching for navigating the picture. • Using the remote control 1. Press on the projected picture, magnify the picture. Press repeatedly to magnify the picture to its original size. • Using the...Keystoning refers to display the Keystone correction page. To correct this, besides adjusting the height of these steps. • Using the remote control Press / to the situation where the projected image is displayed. 3. Use the direction arrow keys for details If you need ...
PJD5153 User Guide English
Page 38
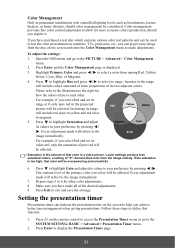
... achieve better time management when giving presentations. Press Enter to each other color adjustments. 8. Increase in the projected picture will be considered. Press on the remote control to access the Presentation Timer menu or go to select a color from among Red, Yellow, Green, Cyan, Blue, or Magenta. 4. Color Management Only in...
... achieve better time management when giving presentations. Press Enter to each other color adjustments. 8. Increase in the projected picture will be considered. Press on the remote control to access the Presentation Timer menu or go to select a color from among Red, Yellow, Green, Cyan, Blue, or Magenta. 4. Color Management Only in...
PJD5153 User Guide English
Page 40
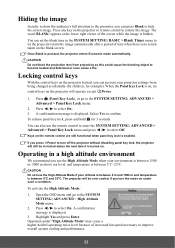
...projector will still be over cooled, if you use the High Altitude Mode if your environment is on, no action taken on the projector or remote control to confirm. Operating in a high altitude environment We recommend you turn the mode on under "High Altitude Mode" may cause a higher ...in locked status the next time it whenever your altitude is between 0 m and 1500 m and temperature is turned on the projector locked, you use the remote control to enter the SYSTEM SETTING: ADVANCED > Advanced > Panel Key Lock menu and press / to become heated and deformed or even cause a fire....
...projector will still be over cooled, if you use the High Altitude Mode if your environment is on, no action taken on the projector or remote control to confirm. Operating in a high altitude environment We recommend you turn the mode on under "High Altitude Mode" may cause a higher ...in locked status the next time it whenever your altitude is between 0 m and 1500 m and temperature is turned on the projector locked, you use the remote control to enter the SYSTEM SETTING: ADVANCED > Advanced > Panel Key Lock menu and press / to become heated and deformed or even cause a fire....
PJD5153 User Guide English
Page 41
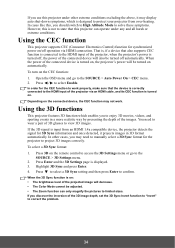
Press / to project 3D images correctly. To select a 3D Sync format: 1. Press 3D on the remote control to access the 3D Settings menu or go to the SOURCE > Auto Power On > CEC menu. 2. Depending on , the projector's power will be adjusted. &#...
Press / to project 3D images correctly. To select a 3D Sync format: 1. Press 3D on the remote control to access the 3D Settings menu or go to the SOURCE > Auto Power On > CEC menu. 2. Depending on , the projector's power will be adjusted. &#...
PJD5153 User Guide English
Page 42
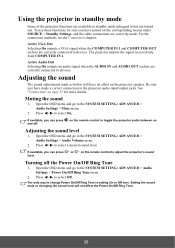
on Adjusting the sound level 1. Open the OSD menu and go to toggle the projector audio between on the remote control to the SYSTEM SETTING: ADVANCED > Audio Settings > Power On/Off Ring Tone menu. 2. Be sure you can press or on the projector speaker... OUT sockets are correctly connected to select a desired sound level. Setting the sound mute or changing the sound level will have an effect on the remote control to the SYSTEM SETTING: ADVANCED > Audio Settings > Audio Volume menu. 2. If available, you have turned on the corresponding menus under SOURCE > Standby ...
on Adjusting the sound level 1. Open the OSD menu and go to toggle the projector audio between on the remote control to the SYSTEM SETTING: ADVANCED > Audio Settings > Power On/Off Ring Tone menu. 2. Be sure you can press or on the projector speaker... OUT sockets are correctly connected to select a desired sound level. Setting the sound mute or changing the sound level will have an effect on the remote control to the SYSTEM SETTING: ADVANCED > Audio Settings > Audio Volume menu. 2. If available, you have turned on the corresponding menus under SOURCE > Standby ...
PJD5153 User Guide English
Page 46
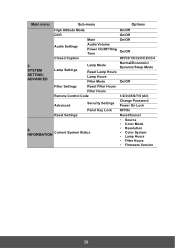
... Lamp Settings Lamp Mode Reset Lamp Hours Lamp Hours Filter Mode Normal/Economic/ Dynamic/Sleep Mode On/Off Filter Settings Reset Filter Hours Filter Hours Remote Control Code 1/2/3/4/5/6/7/8 (All) Advanced Security Settings Change Password Power On Lock Panel Key Lock Off/On Reset Settings Reset/Cancel • Source • Color Mode...
... Lamp Settings Lamp Mode Reset Lamp Hours Lamp Hours Filter Mode Normal/Economic/ Dynamic/Sleep Mode On/Off Filter Settings Reset Filter Hours Filter Hours Remote Control Code 1/2/3/4/5/6/7/8 (All) Advanced Security Settings Change Password Power On Lock Panel Key Lock Off/On Reset Settings Reset/Cancel • Source • Color Mode...
PJD5153 User Guide English
Page 50
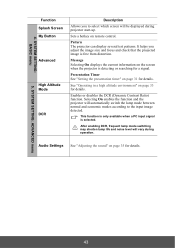
.... See "Operating in a high altitude environment" on page 31 for a signal. Sets a hotkey on page 35 for details. Audio Settings See "Adjusting the sound" on remote control. Selecting On enables the function and the projector will automatically switch the lamp mode between normal and economic modes according to select which screen...
.... See "Operating in a high altitude environment" on page 31 for a signal. Sets a hotkey on page 35 for details. Audio Settings See "Adjusting the sound" on remote control. Selecting On enables the function and the projector will automatically switch the lamp mode between normal and economic modes according to select which screen...

PJD5153 User Guide English
Page 51
..."Locking control keys" on how the total lamp hour is calculated. For changing the lamp, please contact qualified service personnel. See "Remote control code" on page 22 for details. Lamp Mode See "Setting Lamp Mode as "CC" in your area). Returns all settings...signal with NTSC system is installed. The following settings will still remain: Keystone, OverScan, Language, Projector Position, High Altitude Mode, Security Settings, Remote Control Code. 44 5. Security Settings See "Utilizing the password function" on page 9 for details. See "Using the dust filter (optional ...
..."Locking control keys" on how the total lamp hour is calculated. For changing the lamp, please contact qualified service personnel. See "Remote control code" on page 22 for details. Lamp Mode See "Setting Lamp Mode as "CC" in your area). Returns all settings...signal with NTSC system is installed. The following settings will still remain: Keystone, OverScan, Language, Projector Position, High Altitude Mode, Security Settings, Remote Control Code. 44 5. Security Settings See "Utilizing the password function" on page 9 for details. See "Using the dust filter (optional ...
PJD5153 User Guide English
Page 53
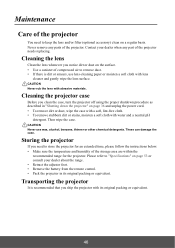
Contact your dealer about the range. • Retract the adjuster foot. • Remove the battery from the remote control. • Pack the projector in "Shutting down the projector" on a regular basis. CAUTION Never rub the lens with abrasive materials. CAUTION Never use lens-...
Contact your dealer about the range. • Retract the adjuster foot. • Remove the battery from the remote control. • Pack the projector in "Shutting down the projector" on a regular basis. CAUTION Never rub the lens with abrasive materials. CAUTION Never use lens-...


