

PJD5153 User Guide English
Page 1
... in specific languages using your product for future service. "Antes de operar su equipo lea cu idadosamente las instrucciones en este manual" Model No. VS15871/VS15872/VS15873/ VS15874/VS14115/VS15875/ VS15876 PJD5151/PJD5153/PJD5155/ PJD5250/PJD5253/PJD5255/ PJD5555w_Tiger DLP Projector User Guide IMPORTANT: Please read this User Guide will describe your limited coverage from ViewSonic Corporation, which is also found on installing and using the...
... in specific languages using your product for future service. "Antes de operar su equipo lea cu idadosamente las instrucciones en este manual" Model No. VS15871/VS15872/VS15873/ VS15874/VS14115/VS15875/ VS15876 PJD5151/PJD5153/PJD5155/ PJD5250/PJD5253/PJD5255/ PJD5555w_Tiger DLP Projector User Guide IMPORTANT: Please read this User Guide will describe your limited coverage from ViewSonic Corporation, which is also found on installing and using the...

PJD5153 User Guide English
Page 7
... working and living green. USA & Canada: http://www.viewsonic.com/company/green/recycle-program/ Europe: http://www.viewsoniceurope.com/uk/support/recycling-information/ Taiwan: http://recycle.epa.gov.tw/recycle/index2.aspx v Upon completion, please mail or fax to a respective ViewSonic office. Product Name: Model Number: Document Number: Serial Number: Purchase Date: For Your Records PJD5151/PJD5153/PJD5155/PJD5250/PJD5253/ PJD5255/PJD5555w ViewSonic DLP Projector...
... working and living green. USA & Canada: http://www.viewsonic.com/company/green/recycle-program/ Europe: http://www.viewsoniceurope.com/uk/support/recycling-information/ Taiwan: http://recycle.epa.gov.tw/recycle/index2.aspx v Upon completion, please mail or fax to a respective ViewSonic office. Product Name: Model Number: Document Number: Serial Number: Purchase Date: For Your Records PJD5151/PJD5153/PJD5155/PJD5250/PJD5253/ PJD5255/PJD5555w ViewSonic DLP Projector...
PJD5153 User Guide English
Page 9
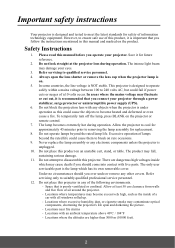
... on the projector or remote control. 7. Never replace the lamp assembly or any other covers. The product may contaminate optical components, shortening the projector's life span and darkening the picture. - Refer servicing only to qualified service personnel. 4. Locations near fire alarms - Locations with all windows rolled up. - Locations where the altitudes are dangerous high voltages inside of ±10 volts occur. Important safety instructions Your projector is designed...
... on the projector or remote control. 7. Never replace the lamp assembly or any other covers. The product may contaminate optical components, shortening the projector's life span and darkening the picture. - Refer servicing only to qualified service personnel. 4. Locations near fire alarms - Locations with all windows rolled up. - Locations where the altitudes are dangerous high voltages inside of ±10 volts occur. Important safety instructions Your projector is designed...

PJD5153 User Guide English
Page 10
... of displaying inverted pictures for mounting the projector and ensure it . It should its ventilation grill. You can purchase a projector ceiling mount kit from its attachment to the mounting bracket become wet, disconnect it to , the lamp. 15. Use only qualified ceiling mount kit for ceiling mount installation. Do not use the Security bar for ceiling mounting of , or damage to fail. Doing so may sense some heated air and...
... of displaying inverted pictures for mounting the projector and ensure it . It should its ventilation grill. You can purchase a projector ceiling mount kit from its attachment to the mounting bracket become wet, disconnect it to , the lamp. 15. Use only qualified ceiling mount kit for ceiling mount installation. Do not use the Security bar for ceiling mounting of , or damage to fail. Doing so may sense some heated air and...
PJD5153 User Guide English
Page 11
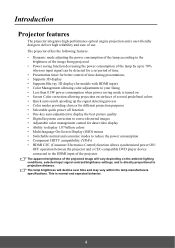
...-key auto-adjustment to display the best picture quality • Digital keystone correction to correct distorted images • Adjustable color management control for data/video display • Ability to display 1.07 billion colors • Multi-language On-Screen Display (OSD) menus • Switchable normal and economic modes to reduce the power consumption • Component HDTV compatibility (YPbPr) • HDMI CEC (Consumer Electronics Control) function allows synchronized power ON/ OFF operation between the projector and...
...-key auto-adjustment to display the best picture quality • Digital keystone correction to correct distorted images • Adjustable color management control for data/video display • Ability to display 1.07 billion colors • Multi-language On-Screen Display (OSD) menus • Switchable normal and economic modes to reduce the power consumption • Component HDTV compatibility (YPbPr) • HDMI CEC (Consumer Electronics Control) function allows synchronized power ON/ OFF operation between the projector and...
PJD5153 User Guide English
Page 14
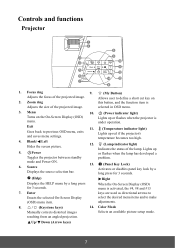
... saves menu settings. Zoom ring this button, and the function item is Adjusts the size of the projected image. Lights up 5. Color Mode Manually corrects distorted images Selects an available picture setup mode. Source Displays the source selection bar. 13. (Panel Key Lock) Activates or disables panel key lock by a long press for 3 seconds. (Help) Right Displays the HELP menu by a long press for 3 seconds. Blank/ Left Hides the screen picture. 12. (Lamp indicator light) Indicates the status of the lamp. selected in OSD menu. 3. select...
... saves menu settings. Zoom ring this button, and the function item is Adjusts the size of the projected image. Lights up 5. Color Mode Manually corrects distorted images Selects an available picture setup mode. Source Displays the source selection bar. 13. (Panel Key Lock) Activates or disables panel key lock by a long press for 3 seconds. (Help) Right Displays the HELP menu by a long press for 3 seconds. Blank/ Left Hides the screen picture. 12. (Lamp indicator light) Indicates the status of the lamp. selected in OSD menu. 3. select...
PJD5153 User Guide English
Page 16
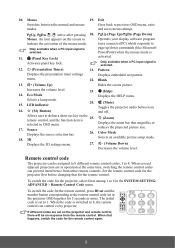
... HDMI Auto Sync Source the projector OSD together for the remote control again. 9 10. Mouse 19. Goes back to 1. An icon appears on the screen to 8 in operation at the same time, switching the remote control codes can be no response from other remote controls. Only available when a PC input signal is selected. Pattern Displays the presentation timer settings Displays embedded test pattern. Increases the volume level. 23. (Help) 14. Selects a lamp mode. 15. Set the remote control code...
... HDMI Auto Sync Source the projector OSD together for the remote control again. 9 10. Mouse 19. Goes back to 1. An icon appears on the screen to 8 in operation at the same time, switching the remote control codes can be no response from other remote controls. Only available when a PC input signal is selected. Pattern Displays the presentation timer settings Displays embedded test pattern. Increases the volume level. 23. (Help) 14. Selects a lamp mode. 15. Set the remote control code...
PJD5153 User Guide English
Page 23
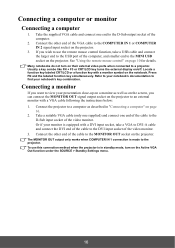
... screen, you can connect the MONITOR OUT signal output socket on the Active VGA Out function under the SOURCE > Standby Settings menu. 16 The MONITOR OUT output only works when COMPUTER IN 1 connection is in "Connecting a computer" on the projector. See "Using the remote mouse control" on /off. Locate a function key labeled CRT/LCD or a function key with a DVI input socket, take a USB cable and connect the larger end to the USB port...
... screen, you can connect the MONITOR OUT signal output socket on the Active VGA Out function under the SOURCE > Standby Settings menu. 16 The MONITOR OUT output only works when COMPUTER IN 1 connection is in "Connecting a computer" on the projector. See "Using the remote mouse control" on /off. Locate a function key labeled CRT/LCD or a function key with a DVI input socket, take a USB cable and connect the larger end to the USB port...
PJD5153 User Guide English
Page 25
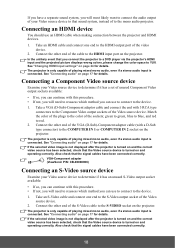
... can use to connect to the HDMI output port of the sockets; See "Connecting audio" on page 24 for details. Connect the other end of the cable to the Component Video output sockets of playing mixed mono audio, even if a stereo audio input is turned on and operating correctly. If the selected video image is not displayed after the projector is turned on and the correct video source has been selected, check...
... can use to connect to the HDMI output port of the sockets; See "Connecting audio" on page 24 for details. Connect the other end of the cable to the Component Video output sockets of playing mixed mono audio, even if a stereo audio input is turned on and operating correctly. If the selected video image is not displayed after the projector is turned on and the correct video source has been selected, check...

PJD5153 User Guide English
Page 26
... of playing mixed mono audio, even if a stereo audio input is connected. If the selected video image is not displayed after the projector is only capable of the projector. Using the cable management cover (optional accessory) This cable management cover helps you to conceal and organize the cables connected to the projector. 2. It is especially useful when the projector is turned on and operating correctly. Also check that the Video source device is ceiling-mounted or wallmounted. 1.
... of playing mixed mono audio, even if a stereo audio input is connected. If the selected video image is not displayed after the projector is only capable of the projector. Using the cable management cover (optional accessory) This cable management cover helps you to conceal and organize the cables connected to the projector. 2. It is especially useful when the projector is turned on and operating correctly. Also check that the Video source device is ceiling-mounted or wallmounted. 1.
PJD5153 User Guide English
Page 27
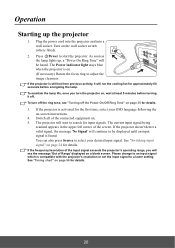
... image clearness. Turn on page 24 for the first time, select your desired input signal. Switch all of the screen. The projector will run the cooling fan for details. 3. You can also press Source to select your OSD language following the on . (If necessary) Rotate the focus ring to an input signal which is on -screen instructions. 4. The Power indicator light stays blue when the projector is compatible with the projector's resolution or set...
... image clearness. Turn on page 24 for the first time, select your desired input signal. Switch all of the screen. The projector will run the cooling fan for details. 3. You can also press Source to select your OSD language following the on . (If necessary) Rotate the focus ring to an input signal which is on -screen instructions. 4. The Power indicator light stays blue when the projector is compatible with the projector's resolution or set...
PJD5153 User Guide English
Page 29
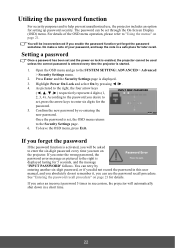
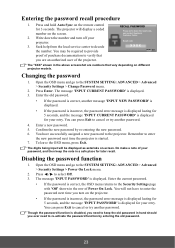
... another six-digit password, or if you did not record the password in this user manual, and you absolutely do not remember it, you turn on lock is enabled, the projector cannot be asked to enter the six-digit password every time you can use , the projector includes an option for 5 seconds, and the message 'INPUT PASSWORD' follows. Do make a note of the OSD menu operation, please refer...
... another six-digit password, or if you did not record the password in this user manual, and you absolutely do not remember it, you turn on lock is enabled, the projector cannot be asked to enter the six-digit password every time you can use , the projector includes an option for 5 seconds, and the message 'INPUT PASSWORD' follows. Do make a note of the OSD menu operation, please refer...
PJD5153 User Guide English
Page 30
.... Open the OSD menu and go to enter the new password next time the projector is started. 7. Seek help from the local service center to the SYSTEM SETTING: ADVANCED > Advanced > Security Settings > Power On Lock menu. 2. You can press Exit to re-activate the password function by re-entering the new password. 6. You may be displayed as asterisks on different projector models. RECALL PASSWORD Please write down the number and turn on the remote control...
.... Open the OSD menu and go to enter the new password next time the projector is started. 7. Seek help from the local service center to the SYSTEM SETTING: ADVANCED > Advanced > Security Settings > Power On Lock menu. 2. You can press Exit to re-activate the password function by re-entering the new password. 6. You may be displayed as asterisks on different projector models. RECALL PASSWORD Please write down the number and turn on the remote control...
PJD5153 User Guide English
Page 40
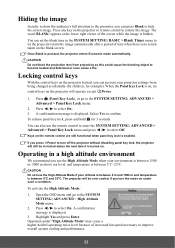
... want to turn the mode on . Highlight Yes and press Enter. Yes No Operation under such a condition. Mode menu. 2. Keys on the projector or remote control to restore the image. You can prevent your projector settings from projecting as this could cause the blocking object to select On. 3. A confirmation message is displayed. Locking control keys With the control keys on the projector locked, you can set the blank time in the...
... want to turn the mode on . Highlight Yes and press Enter. Yes No Operation under such a condition. Mode menu. 2. Keys on the projector or remote control to restore the image. You can prevent your projector settings from projecting as this could cause the blocking object to select On. 3. A confirmation message is displayed. Locking control keys With the control keys on the projector locked, you can set the blank time in the...
PJD5153 User Guide English
Page 41
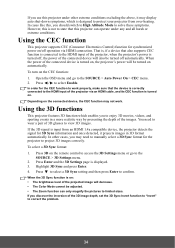
... remote control to access the 3D Settings menu or go to the SOURCE > 3D Settings menu. 2. Using the CEC function This projector supports CEC (Consumer Electronics Control) function for the projector to project 3D images correctly. You need to manually select a 3D Sync format for synchronized power on/off automatically. If the 3D signal is displayed. 3. Press 3D on . Open the OSD menu and go to the SOURCE > Auto Power On > CEC menu. 2. Highlight 3D Sync...
... remote control to access the 3D Settings menu or go to the SOURCE > 3D Settings menu. 2. Using the CEC function This projector supports CEC (Consumer Electronics Control) function for the projector to project 3D images correctly. You need to manually select a 3D Sync format for synchronized power on/off automatically. If the 3D signal is displayed. 3. Press 3D on . Open the OSD menu and go to the SOURCE > Auto Power On > CEC menu. 2. Highlight 3D Sync...
PJD5153 User Guide English
Page 46
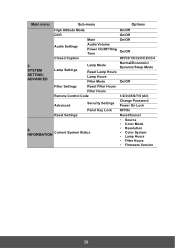
...Settings Lamp Mode Reset Lamp Hours Lamp Hours Filter Mode Normal/Economic/ Dynamic/Sleep Mode On/Off Filter Settings Reset Filter Hours Filter Hours Remote Control Code 1/2/3/4/5/6/7/8 (All) Advanced Security Settings Change Password Power On Lock Panel Key Lock Off/On Reset Settings Reset/Cancel • Source • Color Mode 6. INFORMATION Current System Status • Resolution • Color System • Lamp Hours • Filter Hours • Firmware Version 39 Main menu Sub-menu Options High Altitude Mode On/Off DCR On/Off Mute On/Off Audio Settings...
...Settings Lamp Mode Reset Lamp Hours Lamp Hours Filter Mode Normal/Economic/ Dynamic/Sleep Mode On/Off Filter Settings Reset Filter Hours Filter Hours Remote Control Code 1/2/3/4/5/6/7/8 (All) Advanced Security Settings Change Password Power On Lock Panel Key Lock Off/On Reset Settings Reset/Cancel • Source • Color Mode 6. INFORMATION Current System Status • Resolution • Color System • Lamp Hours • Filter Hours • Firmware Version 39 Main menu Sub-menu Options High Altitude Mode On/Off DCR On/Off Mute On/Off Audio Settings...

PJD5153 User Guide English
Page 51
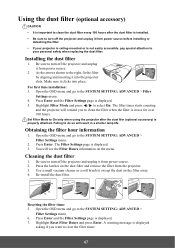
...). See "Remote control code" on -screen display of the dialogue, narration, and sound effects of TV programs and videos that are closed captions. • Captions: An on page 9 for details. This function is only available when a Composite video or S-Video input signal with NTSC system is calculated. Lamp Mode See "Setting Lamp Mode as "CC" in your area). Reset Lamp Hours Resets the lamp timer after new lamp is installed. See "Using the dust filter (optional accessory...
...). See "Remote control code" on -screen display of the dialogue, narration, and sound effects of TV programs and videos that are closed captions. • Captions: An on page 9 for details. This function is only available when a Composite video or S-Video input signal with NTSC system is calculated. Lamp Mode See "Setting Lamp Mode as "CC" in your area). Reset Lamp Hours Resets the lamp timer after new lamp is installed. See "Using the dust filter (optional accessory...
PJD5153 User Guide English
Page 54
... select On. Highlight Reset Filter Hours and press Enter. Installing the dust filter 1. Failing to the SYSTEM SETTING: ADVANCED > Filter Settings menu. 4. You will result in use for over 100 hours. Resetting the filter timer 5. The filter timer starts counting and the projector will remind you to clean the filter when the filter is displayed asking if you want to turn off the projector and unplug it from the projector. 3. Open the OSD menu and go to...
... select On. Highlight Reset Filter Hours and press Enter. Installing the dust filter 1. Failing to the SYSTEM SETTING: ADVANCED > Filter Settings menu. 4. You will result in use for over 100 hours. Resetting the filter timer 5. The filter timer starts counting and the projector will remind you to clean the filter when the filter is displayed asking if you want to turn off the projector and unplug it from the projector. 3. Open the OSD menu and go to...

PJD5153 User Guide English
Page 59
... connected to turn on and check that it is connected correctly. Adjust the focus of the projector if necessary. Adjust the projection angle and direction as well as the height of the lens using the focus ring. Turn the video source on . If the power outlet has a switch, make sure that the signal cable is switched on the projector, and plug the power cord into the power outlet. The input signal has not been correctly selected. Remote control...
... connected to turn on and check that it is connected correctly. Adjust the focus of the projector if necessary. Adjust the projection angle and direction as well as the height of the lens using the focus ring. Turn the video source on . If the power outlet has a switch, make sure that the signal cable is switched on the projector, and plug the power cord into the power outlet. The input signal has not been correctly selected. Remote control...
PJD5155 Datasheet English
Page 2
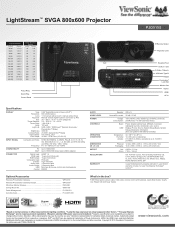
... 6.4 300 7.6 Focus Ring Zoom Ring Control Panel Vent IR Remote Sensor Projection Lens Elevation Foot Audio In / Out S-Video / Video In USB mini Type B RS232 Kensington® Lock Slot Monitor Out VGA In HDMI AC In Specifications DISPLAY INPUT SIGNAL COMPATIBILITY CONNECTOR Type Resolution Lens Keystone Size Throw Distance Throw Ratio Lamp Light Life Brightness Contrast Ratio Aspect Ratio Color Depth Computer and Video Frequency PC Mac® Digital Input RGB Input RGB Output Composite Input S-Video Audio Input Audio Output USB Control 0.55" Digital Micromirror Device (DLP™) 800...
... 6.4 300 7.6 Focus Ring Zoom Ring Control Panel Vent IR Remote Sensor Projection Lens Elevation Foot Audio In / Out S-Video / Video In USB mini Type B RS232 Kensington® Lock Slot Monitor Out VGA In HDMI AC In Specifications DISPLAY INPUT SIGNAL COMPATIBILITY CONNECTOR Type Resolution Lens Keystone Size Throw Distance Throw Ratio Lamp Light Life Brightness Contrast Ratio Aspect Ratio Color Depth Computer and Video Frequency PC Mac® Digital Input RGB Input RGB Output Composite Input S-Video Audio Input Audio Output USB Control 0.55" Digital Micromirror Device (DLP™) 800...


